继承关系:
inherits from: UIControl : UIView : UIResponder : NSObject
UIButton 其实包含 UIImageView 和 UILabel 两个控件,UIButton继承于UIControl,所以有addtarget监听事件
1、类型:
//初始化一个按钮对象
////////通过类方法来创建 buttonWithType : 类名+方法名
//内存自己管理 不能通过alloca init 来创建
//   创建   圆角矩形   的按钮    (现已扁平化)
        UIButton *button1 = [UIButton buttonWithType:UIButtonTypeRoundedRect];

    //     button  类型   有以下 6 种,
    //    typedef enum {
    //        UIButtonTypeCustom = 0,          自定义风格
    //        UIButtonTypeRoundedRect,         圆角矩形
    //        UIButtonTypeDetailDisclosure,    蓝色小箭头按钮,主要做详细说明用
    //        UIButtonTypeInfoLight,           亮色感叹号
    //        UIButtonTypeInfoDark,            暗色感叹号
    //        UIButtonTypeContactAdd,          十字加号按钮
    //    } UIButtonType;
2、位置
//设置 button在 view 上的  位置、尺寸
 button1.frame = CGRectMake(20, 20, 280, 20);
3、颜色、边框效果、边框颜色
//背景颜色
button1.backgroundColor = [UIColor clearColor];
//前景颜色
button1.tintColor = [UIColor redColor];
//圆角 外边框效果
    [Button1.layer setMasksToBounds:YES];
    [Button1.layer setCornerRadius:10.0]; //设置矩形四个圆角半径
    [Button1.layer setBorderWidth:1.0]; //边框宽度
    (若设置button为圆形,则setCornerRadius的值为button的半径)
//第一种  边框颜色
    CGColorSpaceRef colorSpace = CGColorSpaceCreateDeviceRGB();
    CGColorRef colorref = CGColorCreate(colorSpace,(CGFloat[]){ 1, 0, 0, 1 });
    [Button1.layer setBorderColor:colorref];//边框颜色
//第二种
    Button1.layer.backgroundColor = (__bridge CGColorRef)([self colorFromHexRGB:TopSliderColor]);
//第三种
    Button1.layer.borderColor=[UIColor grayColor].CGColor;
//导入(QuartzCore.framework)
4、图片
//设置button填充
    UIImage* image = [UIImage imageNamed:@"btng.png"];
    [button setImage:image forState:UIControlStateNormal];
    //背景图片
    [button setBackgroundImage:image forState:UIControlStateNormal];
    //拿到当前图片
    image = button.currentImage;
    image = button.currentBackgroundImage;
    //若image的宽高小于button的宽高,则setImage:会显示image实际宽高,而setBackgroundImage:会填充button。
//按钮图片大小
    //1、图片命名@2x.png
    //2、[UIImage imageNamed:@"aa.png"] 图片会根据按钮的大小改变,而[UIImage imageWithContentsOfFile:imagePath] 真实显示图片大小
    NSString *imagePath = [[NSBundle mainBundle] pathForResource:@"search-B@2x" ofType:@"png"];
5、标题文字 大小、字体、状态、对齐、颜色
//设置button 标签文字
    [button1 setTitle:@"点击" forState:UIControlStateNormal];
//取得title
    NSString* title = button.titleLabel.text;
    title = button.currentTitle;
//设置title颜色
    [button setTitleColor:[UIColor blueColor] forState:UIControlStateNormal];
    [button setTitleColor:[UIColor redColor] forState:UIControlStateHighlighted];
//取得title的颜色
    UIColor* color = button.currentTitleColor;
//字体、大小
button1.titleLabel.font = [UIFont fontWithName:@"Arial" size:18.0];
//文字阴影
[button1 setTitleShadowColor:[UIColor greenColor] forState:UIControlStateNormal];
[[button1 titleLabel] setShadowOffset:CGSizeMake(1, 1)];
/* forState: 这个参数的作用是定义按钮的文字或图片在何种状态下才会显现*/
//以下是几种状态
//    enum {
//        UIControlStateNormal       = 0,         常规状态显现
//        UIControlStateHighlighted  = 1 << 0,    高亮状态显现
//        UIControlStateDisabled     = 1 << 1,    禁用的状态才会显现
//        UIControlStateSelected     = 1 << 2,    选中状态
//        UIControlStateApplication  = 0x00FF0000, 当应用程序标志时
//        UIControlStateReserved     = 0xFF000000  为内部框架预留,可以不管他
//    };

/*
* 默认情况下,当按钮高亮的情况下,图像的颜色会被画深一点,如果这下面的这个属性设置为no,
* 那么可以去掉这个功能
*/
    button1.adjustsImageWhenHighlighted = NO;
/*跟上面的情况一样,默认情况下,当按钮禁用的时候,图像会被画得深一点,设置NO可以取消设置*/
    button1.adjustsImageWhenDisabled = NO;
/* 下面的这个属性设置为yes的状态下,按钮按下会发光*/
    button1.showsTouchWhenHighlighted = YES;
//水平文字对齐- 居左居右
[button setContentHorizontalAlignment:UIControlContentHorizontalAlignmentLeft];
//垂直对齐方式
[button1 setContentVerticalAlignment:UIControlContentVerticalAlignmentBottom];
//内部内容边距
[button1 setContentEdgeInsets:UIEdgeInsetsMake(0, 10, 0, 0)];
//文字内在距离
button.titleEdgeInsets = UIEdgeInsetsMake(0, 10, 0, 0);
//文字自适应
//计算UIlabel宽度,然后在设置UIButton宽度
6、事件相应
/*
给button添加点击事件,事件有很多种,下面这个事件的意思是
按下按钮,并且手指离开屏幕的时候触发这个事件,跟web中的click事件一样。
触发了这个事件以后,执行butClick:这个方法,addTarget:self 的意思是说,这个方法在本类中,也可以传入其他类的指针
*/
[button1 addTarget:self action:@selector(butClick:) forControlEvents:UIControlEventTouchUpInside];
//添加一个方法 来相应按钮的点击时间
- (void)buttonClick:(UIButton*)button{
    //父视图通过tag值获取子视图的指针对象
    /*
     子视图可以设置一个tag值,然后添加到父视图上,父视图就可以通过这个tag值拿到子视图的指针。
     tag值也可以保存一些用户的信息。
     */
    UILabel* label = (UILabel*)[self.window viewWithTag:100];
    label.text = @"我被修改了";
}
7、显示控件
//添加button到当前窗口的根视图
[self.view addSubview:button1];
问题解答
我设置的图片为什么变成蓝色 ?
**
//改button的type为: UIButtonTypeCustom
**实例一:仿 iPhone通话界面按钮 **
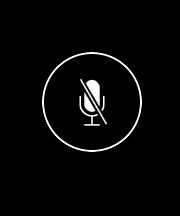
150145_lTAp_1451688.png.jpeg
 UIButton *button = [UIButton buttonWithType:UIButtonTypeCustom];
    button.frame = CGRectMake(50, 100, 50, 50);
    [button setImage:[UIImage imageNamed:@"dial_mute"] forState:UIControlStateNormal];
    button.layer.borderColor = [UIColor whiteColor].CGColor;
    button.layer.borderWidth = 1.0;
    [button.layer setMasksToBounds:YES];
    [button.layer setCornerRadius:25.0];//为button的半径,就是宽或高的一半
实例二: 选择框 checkbox
说明:根据UIControlState 、 selected 来切换图片,记住是否选中状态
UIButton *button = [UIButton buttonWithType:UIButtonTypeCustom];
button.frame = CGRectMake(150, 150, 20, 20);
[button addTarget:self action:@selector(buttonClick:) forControlEvents:UIControlEventTouchDown];
[button setImage:[UIImage imageNamed:@"checkbox_checkedunable"] forState:UIControlStateNormal];
[button setImage:[UIImage imageNamed:@"checkbox_checked"] forState:UIControlStateSelected];
[self.view addSubview:button];

- (void)buttonClick:(UIButton *)button{
if (button.selected) {
     button.selected = NO;
}else{
     button.selected = YES;
}
}

- (BOOL)isRemember{
return _button.selected;
}
实例三:UIButton 图片的大小
- (UIImage*)transformWidth:(CGFloat)width
                    height:(CGFloat)height image:(NSString *)imageName {

    CGFloat destW = width;
    CGFloat destH = height;
    CGFloat sourceW = width;
    CGFloat sourceH = height;

    UIImage *image = [UIImage imageNamed:imageName];
    CGImageRef imageRef = image.CGImage;
    CGContextRef bitmap = CGBitmapContextCreate(NULL,
                                                destW,
                                                destH,
                                                CGImageGetBitsPerComponent(imageRef),
                                                4*destW,
                                                CGImageGetColorSpace(imageRef),
                                                (kCGBitmapByteOrder32Little | kCGImageAlphaPremultipliedFirst));

    CGContextDrawImage(bitmap, CGRectMake(0, 0, sourceW, sourceH), imageRef);

    CGImageRef ref = CGBitmapContextCreateImage(bitmap);
    UIImage *resultImage = [UIImage imageWithCGImage:ref];
    CGContextRelease(bitmap);
    CGImageRelease(ref);

    return resultImage;
}
https://github.com/antoniocasero/ACPButton
很好的开源封装