和白昼一起歌唱,和黑夜一起做梦。——纪伯伦
- 微信公众号 《JavaScript全栈》
- 掘金 《合一大师》
- Bilibili 《合一大师》
做前端,不是在折腾就是在折腾的路上。
不同的场景我们有不同的应对方案,业务和通用组件的开发也有所差异,这篇文章借助Ant Design,一起体悟大厂在开发类似通用组件或类库时,如何定义规范,如何实施协同开发方案,怎么把控开发过程等。到正文前,先来看看我们封装这样一个库前需要做那些约定和准备。
规范实施
既然是通用组件或者库,就离不开一下几点:
- 开发环境构建
- 代码规范与测试
- 代码git提交
- 打包
- 发布
以上五个步骤是我们开发并发布组件或库的核心流程,以下,我们深入到每一个步骤,深究实现原理。
开发环境构建
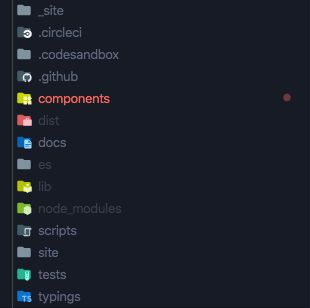
我们先看一下项目的架构
- _site 生成的组件预览项目
- components 组件源码
- dist 打包生成的文件
- docs 文档
- es 类型文件
- lib npm包源码
- site 定义组件预览项目相关文件
- tests 测试
- typeing 类型定义
开发UI组件库的项目构建有如下两个痛点:
- 生成UI组件库预览资源,实现组件库开发过程的预览
- 编译打包组件库代码,生成线上代码
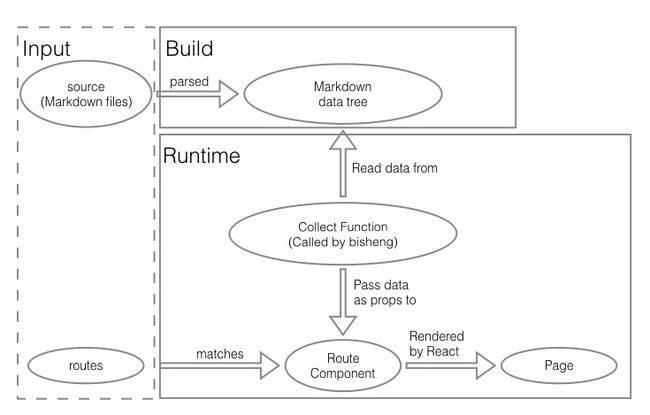
看到以上两个问题,结合我们开发,可以推测出预览项目和打包需要两套不同打包编译机制,但是在项目中一般只能使用一种打包方式,即:webpack配置只有一个或一套区分编译环境的文件。所以我们考虑这两种场景下使用两种不同方式进行打包处理,最终我们选用的方案是:__bisheng__、__antd-tools__,这里做一个解释,bisheng 是一个使用React轻松将符合约定的Markdown文件通过转换生成SPA网页的框架;antd-tools 定义了ant-design组件库打包相关的处理方案。
bisheng
bisheng的处理流程如下图(搜索微信公众号:__JavaScript全栈__ ,观看视频讲解)
基本配置
const path = require('path');
const CSSSplitWebpackPlugin = require('css-split-webpack-plugin').default;
const replaceLib = require('@ant-design/tools/lib/replaceLib');

const isDev = process.env.NODE_ENV === 'development';
const usePreact = process.env.REACT_ENV === 'preact';

function alertBabelConfig(rules) {
  rules.forEach(rule => {
    if (rule.loader && rule.loader === 'babel-loader') {
      if (rule.options.plugins.indexOf(replaceLib) === -1) {
        rule.options.plugins.push(replaceLib);
      }
      // eslint-disable-next-line
      rule.options.plugins = rule.options.plugins.filter(
        plugin => !plugin.indexOf || plugin.indexOf('babel-plugin-add-module-exports') === -1,
      );
      // Add babel-plugin-add-react-displayname
      rule.options.plugins.push(require.resolve('babel-plugin-add-react-displayname'));
    } else if (rule.use) {
      alertBabelConfig(rule.use);
    }
  });
}

module.exports = {
  port: 8001,
  hash: true,
  source: {
    components: './components',
    docs: './docs',
    changelog: ['CHANGELOG.zh-CN.md', 'CHANGELOG.en-US.md'],
  },
  theme: './site/theme',
  htmlTemplate: './site/theme/static/template.html',
  themeConfig: {
    categoryOrder: {
      'Ant Design': 0,
      原则: 7,
      Principles: 7,
      视觉: 2,
      Visual: 2,
      模式: 3,
      Patterns: 3,
      其他: 6,
      Other: 6,
      Components: 1,
      组件: 1,
    },
    typeOrder: {
      Custom: -1,
      General: 0,
      Layout: 1,
      Navigation: 2,
      'Data Entry': 3,
      'Data Display': 4,
      Feedback: 5,
      Other: 6,
      Deprecated: 7,
      自定义: -1,
      通用: 0,
      布局: 1,
      导航: 2,
      数据录入: 3,
      数据展示: 4,
      反馈: 5,
      其他: 6,
      废弃: 7,
    },
    docVersions: {
      '0.9.x': 'http://09x.ant.design',
      '0.10.x': 'http://010x.ant.design',
      '0.11.x': 'http://011x.ant.design',
      '0.12.x': 'http://012x.ant.design',
      '1.x': 'http://1x.ant.design',
      '2.x': 'http://2x.ant.design',
    },
  },
  filePathMapper(filePath) {
    if (filePath === '/index.html') {
      return ['/index.html', '/index-cn.html'];
    }
    if (filePath.endsWith('/index.html')) {
      return [filePath, filePath.replace(/\/index\.html$/, '-cn/index.html')];
    }
    if (filePath !== '/404.html' && filePath !== '/index-cn.html') {
      return [filePath, filePath.replace(/\.html$/, '-cn.html')];
    }
    return filePath;
  },
  doraConfig: {
    verbose: true,
  },
  lessConfig: {
    javascriptEnabled: true,
  },
  webpackConfig(config) {
    // eslint-disable-next-line
    config.resolve.alias = {
      'antd/lib': path.join(process.cwd(), 'components'),
      'antd/es': path.join(process.cwd(), 'components'),
      antd: path.join(process.cwd(), 'index'),
      site: path.join(process.cwd(), 'site'),
      'react-router': 'react-router/umd/ReactRouter',
      'react-intl': 'react-intl/dist',
    };

    // eslint-disable-next-line
    config.externals = {
      'react-router-dom': 'ReactRouterDOM',
    };

    if (usePreact) {
      // eslint-disable-next-line
      config.resolve.alias = Object.assign({}, config.resolve.alias, {
        react: 'preact-compat',
        'react-dom': 'preact-compat',
        'create-react-class': 'preact-compat/lib/create-react-class',
        'react-router': 'react-router',
      });
    }

    if (isDev) {
      // eslint-disable-next-line
      config.devtool = 'source-map';
    }

    alertBabelConfig(config.module.rules);

    config.module.rules.push({
      test: /\.mjs$/,
      include: /node_modules/,
      type: 'javascript/auto',
    });

    config.plugins.push(new CSSSplitWebpackPlugin({ size: 4000 }));

    return config;
  },

  devServerConfig: {
    public: process.env.DEV_HOST || 'localhost',
    disableHostCheck: !!process.env.DEV_HOST,
  },

  htmlTemplateExtraData: {
    isDev,
    usePreact,
  },
};
该文件定义了,如何将指定Markdown文件按何种规则转换为预览网页。
定义完文件,我们只需要执行 npm start 即可运行预览项目,执行 npm start 其实就是执行了如下的命令
rimraf _site && mkdir _site && node ./scripts/generateColorLess.js && cross-env NODE_ENV=development bisheng start -c ./site/bisheng.config.jsantd-tools
antd-tools负责组件的打包、发布、提交守卫、校验等工作
antd-tools run dist
antd-tools run compile
antd-tools run clean
antd-tools run pub
antd-tools run guard
每个命令的功能在我们讲解到对应流程时详细介绍。
代码规范与测试
本项目使用 Typescript ,组件单元测试使用 jest 结合 enzyme 。具体用例我们以Button为例来讲解。(搜索微信公众号:__JavaScript全栈__ ,观看视频讲解)
it('should change loading state instantly by default', () => {
class DefaultButton extends Component {
state = {
loading: false,
};
enterLoading = () => {
this.setState({ loading: true });
};
render() {
const { loading } = this.state;
return (
);
}
}
const wrapper = mount(代码Git提交管理
记得我刚入门编程那会儿,大环境生态还没有现在友好,类似eslint的工具也没有眼下这么易用,说不定同事就上传一些他自己都不能读懂的代码,怎么办?
我们为了把控质量,代码在本地git commit前,需要检查一下代码是否按约定的代码风格书写,如果不能通过检查,则不允许commit。
我们借助 husky 在我们commit时进行指定操作,只需下载husky,并在package.json中配置
"husky": {
  "hooks": {
    "pre-commit": "pretty-quick --staged"
  }
}
hooks定义了我们要处理时间的钩子,意图很明显,我们想在commit前,执行指定操作。代码的检查我们借助 pretty-quick 。
如此一来,当我们更改了文件,并通过git管理文件版本,执行 git commit 时,该钩子就会进行处理,pretty-quick检查通过则提交成功,否则失败。
打包组件
关于组件打包,单独封装了一个工具库来处理——antd-tools,我们顺着package.json给我透露的信息,去分析整个流程,相关启动命令如下
"build": "npm run compile && npm run dist",
"compile": "antd-tools run compile",
"dist": "antd-tools run dist",
compile 和 dist 命令配置见项目根路径下 .antd-tools.config.js
function finalizeCompile() {
  if (fs.existsSync(path.join(__dirname, './lib'))) {
    // Build package.json version to lib/version/index.js
    // prevent json-loader needing in user-side
    const versionFilePath = path.join(process.cwd(), 'lib', 'version', 'index.js');
    const versionFileContent = fs.readFileSync(versionFilePath).toString();
    fs.writeFileSync(
      versionFilePath,
      versionFileContent.replace(
        /require\(('|")\.\.\/\.\.\/package\.json('|")\)/,
        `{ version: '${packageInfo.version}' }`,
      ),
    );
    // eslint-disable-next-line
    console.log('Wrote version into lib/version/index.js');

    // Build package.json version to lib/version/index.d.ts
    // prevent https://github.com/ant-design/ant-design/issues/4935
    const versionDefPath = path.join(process.cwd(), 'lib', 'version', 'index.d.ts');
    fs.writeFileSync(
      versionDefPath,
      `declare var _default: "${packageInfo.version}";\nexport default _default;\n`,
    );
    // eslint-disable-next-line
    console.log('Wrote version into lib/version/index.d.ts');

    // Build a entry less file to dist/antd.less
    const componentsPath = path.join(process.cwd(), 'components');
    let componentsLessContent = '';
    // Build components in one file: lib/style/components.less
    fs.readdir(componentsPath, (err, files) => {
      files.forEach(file => {
        if (fs.existsSync(path.join(componentsPath, file, 'style', 'index.less'))) {
          componentsLessContent += `@import "../${path.join(file, 'style', 'index.less')}";\n`;
        }
      });
      fs.writeFileSync(
        path.join(process.cwd(), 'lib', 'style', 'components.less'),
        componentsLessContent,
      );
    });
  }
}

function finalizeDist() {
  if (fs.existsSync(path.join(__dirname, './dist'))) {
    // Build less entry file: dist/antd.less
    fs.writeFileSync(
      path.join(process.cwd(), 'dist', 'antd.less'),
      '@import "../lib/style/index.less";\n@import "../lib/style/components.less";',
    );

    // eslint-disable-next-line
    console.log('Built a entry less file to dist/antd.less');
  }
}
我们深入到 antd-tools ,改包在node_modules/@ant-design/tools,处理过程是交由 gulp 的,见gulpfile.js
// 编译处理
function compile(modules) {
  rimraf.sync(modules !== false ? libDir : esDir);
  const less = gulp
    .src(['components/**/*.less'])
    .pipe(
      through2.obj(function(file, encoding, next) {
        this.push(file.clone());
        if (
          file.path.match(/(\/|\\)style(\/|\\)index\.less$/) ||
          file.path.match(/(\/|\\)style(\/|\\)v2-compatible-reset\.less$/)
        ) {
          transformLess(file.path)
            .then(css => {
              file.contents = Buffer.from(css);
              file.path = file.path.replace(/\.less$/, '.css');
              this.push(file);
              next();
            })
            .catch(e => {
              console.error(e);
            });
        } else {
          next();
        }
      })
    )
    .pipe(gulp.dest(modules === false ? esDir : libDir));
  const assets = gulp
    .src(['components/**/*.@(png|svg)'])
    .pipe(gulp.dest(modules === false ? esDir : libDir));
  let error = 0;
  const source = ['components/**/*.tsx', 'components/**/*.ts', 'typings/**/*.d.ts'];
  // allow jsx file in components/xxx/
  if (tsConfig.allowJs) {
    source.unshift('components/**/*.jsx');
  }
  const tsResult = gulp.src(source).pipe(
    ts(tsConfig, {
      error(e) {
        tsDefaultReporter.error(e);
        error = 1;
      },
      finish: tsDefaultReporter.finish,
    })
  );

  function check() {
    if (error && !argv['ignore-error']) {
      process.exit(1);
    }
  }

  tsResult.on('finish', check);
  tsResult.on('end', check);
  const tsFilesStream = babelify(tsResult.js, modules);
  const tsd = tsResult.dts.pipe(gulp.dest(modules === false ? esDir : libDir));
  return merge2([less, tsFilesStream, tsd, assets]);
}

// 生成打包文件处理
function dist(done) {
  rimraf.sync(getProjectPath('dist'));
  process.env.RUN_ENV = 'PRODUCTION';
  const webpackConfig = require(getProjectPath('webpack.config.js'));
  webpack(webpackConfig, (err, stats) => {
    if (err) {
      console.error(err.stack || err);
      if (err.details) {
        console.error(err.details);
      }
      return;
    }

    const info = stats.toJson();

    if (stats.hasErrors()) {
      console.error(info.errors);
    }

    if (stats.hasWarnings()) {
      console.warn(info.warnings);
    }

    const buildInfo = stats.toString({
      colors: true,
      children: true,
      chunks: false,
      modules: false,
      chunkModules: false,
      hash: false,
      version: false,
    });
    console.log(buildInfo);

    // Additional process of dist finalize
    const { dist: { finalize } = {} } = getConfig();
    if (finalize) {
      console.log('[Dist] Finalization...');
      finalize();
    }

    done(0);
  });
}
如此完成组件打包操作,具体细节讲解见微信公众号:__JavaScript全栈__ 。
包发布
我们都有一个感受,每次发包都胆战心惊,准备工作充分了吗?该build的build了吗?该修改的确认过了吗?不管我们多么小心,还是会出现一些差错,所以我们可以在发布包之前定义一些约定规则,只有这些规则通过,才能够进行发布。这是我们需要借助 npm 提供的钩子 prepublish 来处理发布前的操作,处理的操作便是定义于 antd-tools 中指定的逻辑。我们同样看到上面看到的 gulpfile.js 。
gulp.task(
  'guard',
  gulp.series(done => {
    function reportError() {
      console.log(chalk.bgRed('!!!!!!!!!!!!!!!!!!!!!!!!!!!!!!!!!!!!!!!!!!!!!!!!!!'));
      console.log(chalk.bgRed('!! `npm publish` is forbidden for this package. !!'));
      console.log(chalk.bgRed('!! Use `npm run pub` instead.        !!'));
      console.log(chalk.bgRed('!!!!!!!!!!!!!!!!!!!!!!!!!!!!!!!!!!!!!!!!!!!!!!!!!!'));
    }
    const npmArgs = getNpmArgs();
    if (npmArgs) {
      for (let arg = npmArgs.shift(); arg; arg = npmArgs.shift()) {
        if (/^pu(b(l(i(sh?)?)?)?)?$/.test(arg) && npmArgs.indexOf('--with-antd-tools') < 0) {
          reportError();
          done(1);
          return;
        }
      }
    }
    done();
  })
);
package.json中的scripts定义
"prepublish": "antd-tools run guard",
"pub": "antd-tools run pub",
当我们执行 npm publish 时 antd-tools run guard 执行,阻止我们直接使用发布命令,应该使用 npm run pub 来发布应用,达到发布前的相关逻辑检测。
好了,到这里给大家介绍完一个库是如何从零开发出来的,我相信大家明白了 Ant-Design 组件的构建以及打包的整个流程,应对开发中其他一些自定义的库封装发布将会胸有成竹。
谢谢大家的阅读和鼓励,我是合一,英雄再会!


