Grafana 数据库监控平台
简介
Grafana
官网地址:https://www.percona.com/software/database-tools/percona-monitoring-and-management
文档地址:https://www.percona.com/doc/percona-monitoring-and-management/index.html
demo 地址:官方demo
文档可以下载pdf离线阅读
Percona监控和管理(PMM)是一个用于管理和监控MySQL和MongoDB性能的开源平台。它由Percona与托管数据库服务,支持和咨询领域的专家合作开发。
PMM是一种免费的开源解决方案,您可以在自己的环境中运行,以获得最大的安全性和可靠性。它为MySQL和MongoDB服务器提供全面的基于时间的分析,以确保您的数据尽可能高效地工作。
系统架构
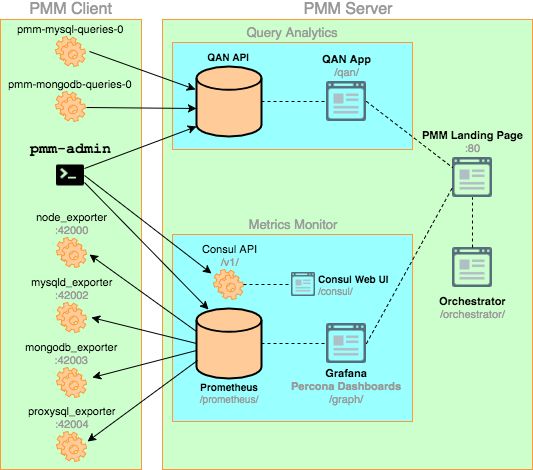
PMM平台基于客户端 - 服务器模型,实现可伸缩性。它包括以下模块:
- PMM客户端安装在要监视的每个数据库主机上。它收集服务器指标,常规系统指标和查询分析数据,以获得完整的性能概述。
- PMM Server是PMM的核心部分,它聚合收集的数据并以Web界面中的表格,仪表板和图形的形式呈现。
这些模块的封装便于安装和使用。假设用户不需要了解构成每个模块的确切工具以及它们如何交互。但是,如果您想充分发挥PMM的潜力,内部结构非常重要。
PMM客户端
PMM服务器
-
Orchestrator
PMM是一系列旨在无缝协同工作的工具。有些是由Percona开发的,有些是第三方开源工具。
注意
整体客户端 - 服务器模型不太可能改变,但组成每个组件的工具集可能随产品而变化。下图说明了PMM当前的结构:
PMM服务端安装
pmm服务器安装有多种方式。官方安装介绍
本文主要介绍docker的安装方式
docker 镜像下载
$ docker pull percona/pmm-server:latest
创建pmm-data 容器
创建一个持久化的 pmm 数据容器
docker create \
   -v /opt/prometheus/data \
   -v /opt/consul-data \
   -v /var/lib/mysql \
   -v /var/lib/grafana \
   --name pmm-data \
   percona/pmm-server:latest /bin/true
docker create 参数说明:
- The docker create command instructs the Docker daemon to create a container from an image.
- The -v options initialize data volumes for the container.
- The --name option assigns a custom name for the container that you can use to reference the container within a Docker network. In this case: pmm-data.
- percona/pmm-server:latest is the name and version tag of the image to derive the container from.
- /bin/true is the command that the container runs.
Note
这个容器不会运行,他的存在仅仅是保留PMM的数据,当你升级到一个新的PMM版本的时候。不要删除、重新创建这个容器,除非你想要删除所有的PMM数据。
创建PMM服务容器并启动
官网提供的创建方式
$ docker run -d \
 -p 80:80 \
 --volumes-from pmm-data \
 --name pmm-server \
 --restart always \
 percona/pmm-server:latest
docker run参数说明:
- The -d option starts the container in the background (detached mode).
- The -p option maps the port for accessing the PMM Server web UI. For example, if port 80 is not available, you can map the landing page to port 8080 using -p 8080:80.
- The -v option mounts volumes from the pmm-data container (see Creating the pmm-data Container).
- The --name option assigns a custom name to the container that you can use to reference the container within the Docker network. In this case: pmm-server.
- The --restart option defines the container’s restart policy. Setting it to always ensures that the Docker daemon will start the container on startup and restart it if the container exits.
- percona/pmm-server:latest is the name and version tag of the image to derive the container from.
我们在基础配置上,添加用户名密码的配置信息:
 $ docker run -d \
 -p 80:80 \
 --volumes-from pmm-data \
 --name pmm-server \
 --restart always \
 -e SERVER_USER=test \
 -e SERVER_PASSWORD=test \
 -e ORCHESTRATOR_ENABLED=true \
 percona/pmm-server:latest
新建PMM的客户端
安装Percona的软件仓库
sudo yum install http://www.percona.com/downloads/percona-release/redhat/0.1-6/percona-release-0.1-6.noarch.rpm
验证安装结果
sudo yum list | grep percona
结果如下:
percona-release.noarch                     0.1-6                       @/percona-release-0.1-6.noarch
Percona-Server-55-debuginfo.x86_64         5.5.54-rel38.7.el7          percona-release-x86_64
Percona-Server-56-debuginfo.x86_64         5.6.35-rel81.0.el7          percona-release-x86_64
Percona-Server-57-debuginfo.x86_64         5.7.17-13.1.el7             percona-release-x86_64
...
安装客户端
sudo yum install pmm-client
PMM的客户端配置
pmm客户端的 配置命令是pmm-admin
一般步骤为
配置客户端到服务器的连接信息
将需要监控的内容加入到监控列表
客户端与服务端连接配置
pmm-admin config --server 192.168.0.157:80 --server-user test --server-password test
配置服务端的网络信息,用户名,密码。
Note
执行后会生成配置文件,配置文件的默认路径为 /usr/local/percona/pmm-client/pmm.yml
配置好后可以使用以下命令查看连接信息
- 配置信息
# pmm-admin info
   pmm-admin 1.13.0

   PMM Server      | 192.168.0.157:80 (password-protected)
   Client Name     | 192.168.0.156
   Client Address  | 192.168.0.156
   Service Manager | linux-systemd

   Go Version      | 1.10.1
   Runtime Info    | linux/amd64
2.网络连接信息
# pmm-admin check-network
PMM Network Status

Server Address | 192.168.0.157:80
Client Address | 192.168.0.156

* System Time
NTP Server (0.pool.ntp.org)         | 2018-08-16 09:17:22 +0000 UTC
PMM Server                          | 2018-08-16 09:17:20 +0000 GMT
PMM Client                          | 2018-08-16 17:17:22 +0800 CST
PMM Server Time Drift               | OK
PMM Client Time Drift               | OK
PMM Client to PMM Server Time Drift | OK

* Connection: Client --> Server
-------------------- -------
SERVER SERVICE       STATUS
-------------------- -------
Consul API           OK
Prometheus API       OK
Query Analytics API  OK

Connection duration | 617.745µs
Request duration    | -207.451µs
Full round trip     | 410.294µs


* Connection: Client <-- Server
-------------- -------------- -------------------- ------- ---------- ---------
SERVICE TYPE   NAME           REMOTE ENDPOINT      STATUS  HTTPS/TLS  PASSWORD
-------------- -------------- -------------------- ------- ---------- ---------
linux:metrics  192.168.0.156  192.168.0.156:42000  OK      YES        YES
mysql:metrics  192.168.0.156  192.168.0.156:42002  OK      YES        YES
mysql数据配置
grafana收集mysql的信息方式的配置需要针对mysql的版本
mysql5.5 之后增加 performance_schema。mysql开启performance_schema后grafana可以直接获取信息。MySQL 5.6.9之后的版本默认开启,之前的版本需要手动开启。
mysql5.5之前的mysql版本可以通过slow-log获取慢查询的信息。
performance_schema 全方位介绍
Note
本节主要介绍使用performance_schema的方式,即 mysql5.5之后版本的数据库监控。
mysql5.5之前版本的数据库监控,见下一节。
创建pmm数据库账号
GRANT SELECT, PROCESS, SUPER, REPLICATION CLIENT, RELOAD  ON *.* TO pmm@'%' IDENTIFIED BY 'pmm' WITH MAX_USER_CONNECTIONS 10;
GRANT SELECT, UPDATE, DELETE, DROP ON performance_schema.* TO 'pmm'@'%';
flush privileges;
查看数据的关键参数
mysql> SHOW VARIABLES LIKE 'performance_schema';
+--------------------+-------+
| Variable_name      | Value |
+--------------------+-------+
| performance_schema | ON    |
+--------------------+-------+
mysql> select * from setup_consumers;
+----------------------------------+---------+
| NAME                             | ENABLED |
+----------------------------------+---------+
| events_stages_current            | NO      |
| events_stages_history            | NO      |
| events_stages_history_long       | NO      |
| events_statements_current        | YES     |
| events_statements_history        | YES     |
| events_statements_history_long   | NO      |
| events_transactions_current      | NO      |
| events_transactions_history      | NO      |
| events_transactions_history_long | NO      |
| events_waits_current             | NO      |
| events_waits_history             | NO      |
| events_waits_history_long        | NO      |
| global_instrumentation           | YES     |
| thread_instrumentation           | YES     |
| statements_digest                | YES     |
+----------------------------------+---------+
15 rows in set (0.00 sec)
确保 statements_digest是 开启的
如果以上关键参数没有开启就需要修改配置文件
mysql配置文件修改
官方文档Configuring MySQL for Best Results
-
Percona Server(or XtraDB Cluster)
log_output=file slow_query_log=ON long_query_time=0 log_slow_rate_limit=100 log_slow_rate_type=query log_slow_verbosity=full log_slow_admin_statements=ON log_slow_slave_statements=ON slow_query_log_always_write_time=1 slow_query_log_use_global_control=all innodb_monitor_enable=all userstat=1 -
MySQL 5.6+ or MariaDB 10.0+
innodb_monitor_enable=all performance_schema=ON -
MySQL 5.5 or MariaDB 5.5
log_output=file
slow_query_log=ON
long_query_time=0
log_slow_admin_statements=ON
log_slow_slave_statements=ON
mysql5.5之前版本的配置
mysql 5.5之前的版本是通过慢查询文件进行查询语句的查看,所以需要配置慢查询
slow_query_log
long_query_time = 3
PMM客户端添加数据库
performance_schema方式
pmm-admin add mysql --user pmm --password pmm --socket /application/mysql3307/logs/mysql.sock --query-source perfschema
慢查询的方式
pmm-admin add mysql --user pmm --password pmm --socket /application/mysql3307/logs/mysql.sock
参考文档
grafna官方文档地址
performance_schema 全方位介绍
