实训目的
- 掌握OSPF路由重发布中实现路径过滤。
实训背景
重发布基本知识
一般来说一个组织或者一个跨国公司很少只使用一个路由协议,而如果一个公司同时运行了多个路由协议,或者一个公司和另外一个公司合并的时候两个公司用的路由协议并不一样,这个时候该怎么办呢?所以必须采取一种方式来将一个路由协议的信息发布到另外的一个路由协议里面去,这样,重发布的技术就诞生了;重发布的概念:将一种路由选择协议获悉的网络告知另一种路由选择协议,以便网络中每台工作站能到达其他的任何一台工作站,这一过程被称为重发布。
重发布只能在针对同一种第三层协议的路由选择进程之间进行,也就是说OSPF、RIP、IGRP等之间可以重发布,因为他们都属于TCP/IP协议栈的协议,而AppleTalk或者IPX协议栈的协议与TCP/IP协议栈的路由选择协议就不能相互重发布路由了。
ASBR(Autonomous System Boundary Router, 自治系统边界路由器)。ASBR位于OSPF自主系统和非OSPF网络之间,可以运行OSPF和另一路由选择协议(如RIP),把OSPF上的路由发布到其他路由协议上。
实训拓扑
实验所需设备:
| 设备类型 | 设备型号 | 数量 |
|---|---|---|
| 路由器 | RSR20 | 2 |
| 三层交换机 | S3760 | 1 |
| 主机 | Windows 10 | 1 |
实训步骤
步骤1:基本配置。
R1:
Ruijie>enable
Ruijie#configure terminal
Ruijie(config)#hostname R1
R1(config)#
R2:
Ruijie>enable
Ruijie#configure terminal
Ruijie(config)#hostname R2
R2(config)#
SW1:
Ruijie>enable
Ruijie#configure terminal
Ruijie(config)#hostname SW1
SW1(config)#
步骤2:全网基本IP地址配置。
R1(config)#interface fastEthernet 0/0
R1(config-if-FastEthernet 0/0)#ip address 192.168.1.1 255.255.255.0
R1(config-if-FastEthernet 0/0)#exit
R1(config)#interface fastEthernet 0/1
R1(config-if-FastEthernet 0/1)#ip address 192.168.2.1 255.255.255.0
R1(config-if-FastEthernet 0/1)#exit
R1(config)#
R2(config)#interface FastEthernet 0/0
R2(config-if-FastEthernet 0/0)#ip address 192.168.1.2 255.255.255.0
R2(config-if-FastEthernet 0/0)#exit
R2(config)#interface fastEthernet 0/1
R2(config-if-FastEthernet 0/1)#ip address 192.168.3.1 255.255.255.0
R2(config-if-FastEthernet 0/1)#exit
R2(config)#
SW1(config)#interface fastEthernet 0/1
SW1(config-if-FastEthernet 0/1)#no switchport
SW1(config-if-FastEthernet 0/1)#ip address 192.168.2.2 255.255.255.0
SW1(config-if-FastEthernet 0/1)#exit
SW-1(config)#interface loopback 0
SW1(config-if-Loopback 0)#ip address 192.168.10.1 255.255.255.0
SW1(config-if-Loopback 0)#exit
SW1(config)#interface loopback 1
SW1(config-if-Loopback 1)#ip address 192.168.20.1 255.255.255.0
SW1(config-if-Loopback 1)#exit
SW1(config)#
步骤3:全网路由配置。
R1、R2配置OSPF。
R1(config)#router ospf 1
R1(config-router)#network 192.168.1.0 0.0.0.255 area 0
R1(config-router)#network 192.168.2.0 0.0.0.255 area 0
R1(config-router)#exit
R1(config)#
R2(config)#route ospf 1
R2(config-router)#network 192.168.1.0 0.0.0.255 area 0
R2(config-router)#network 192.168.3.0 0.0.0.255 area 0
R2(config-router)#exit
R2(config)#
步骤4:配置完OSPF后,在R2上查看路由表。如下图所示,说明已经通过OSPF学习到路由。
R2#show ip route
步骤5:SW1、R1通过静态路由互联。
R1(config)#ip route 192.168.10.0 255.255.255.0 192.168.2.2
R1(config)#ip route 192.168.20.0 255.255.255.0 192.168.2.2
SW1(config)#ip route 192.168.3.0 255.255.255.0 192.168.2.1
步骤6:路由重发布。
1.在ASBR路由器上将静态路由重分发进OSPF。
R1(config)#route ospf 1
R1(config-router)#redistribute static subnets
R1(config-router)#exit
R1(config)#
2.配置完成后在路由器R2上查看是否学习到了重分布的静态路由,如下图所示。
R2#show ip route
步骤7:通过ACL匹配出需要的路由。
1.在R1上创建访问控制列表,只允许IP地址为192.168.10.0的路由条目存在,其余的过滤掉。
R1(config)#ip access-list standard 1
R1(config-std-nacl)#10 permit 192.168.10.0 0.0.0.255
R1(config-std-nacl)#20 deny any
R1(config-std-nacl)#exit
R1(config)#
步骤8:过滤路由。
1.在R1静态路由重分发进ospf时,使用distribute-list调用acl过滤路由。
R1(config)#router ospf 1
R1(config-router)#distribute-list 1 out static
R1(config-router)#exit
R1(config)#
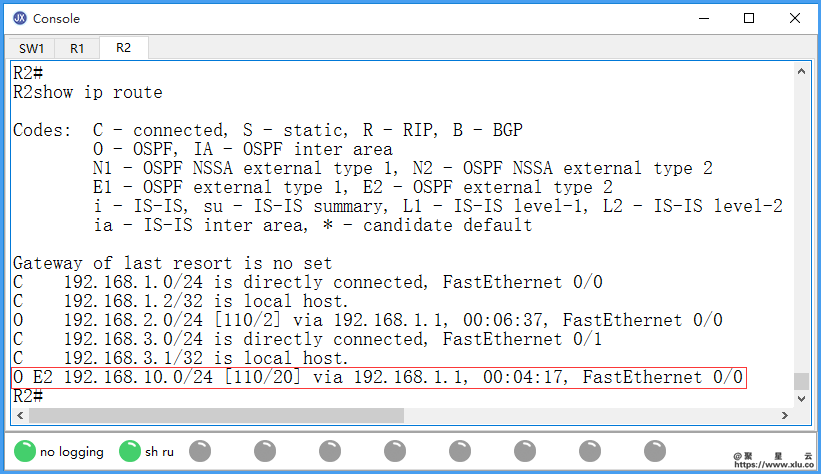
2.查看R2的路由条目,若R2学习到的路由条目为192.168.10.0/24,则distribute-list。
R2#show ip route


