Flex4.6事件监听机制的测试和总结
在Flex和Actionscript3中,事件的类型有很多,比如单击的click、鼠标移动的mouseEvent、改变大小等。开发人员需要注意的是,某个组件如何设置监听、发出事件,以及事件的响应操作。这种方式被称之为“事件驱动”方式。事件驱动涉及到的有关概念包括:
1、事件对象,即event object。所有的事件对象都是flash.events.Event或者其子类。每个事件对象都包含事件类型(type)和事件源(target),便于event listener知道事件的类型以及事件发出者。事件对象是Event类或者某个子类的实例,不但存储了有关特定事件的信息,还包括便于操作事件对象的方法。
2、事件源,即event dispatchers。是事件发起的主体,所有的dispatcher都是eventdispatcher或其子类。
3、事件监听器,即event listeners。它表现为一个函数,当事件发生时,事件源dispatcher通知该监听器去处理特定的事件。为对象添加监听器的方法是:
addEventListener(type, function)。
当指定类型的事件发生时,事件监听器以事件对象eventObject为参数传递给事件响应函数。同一时刻同一组件可能有多个事件发生,因此这里指定事件类型是非常有必要的。
4、事件流,当一个组件触发事件时,这个事件会沿着一定的顺序流动,每经过一个组件,就会检测这个组件是否注册了该事件类型的监听器,如果注册了,就会响应,并调用事件处理函数。事件流分为三个阶段:
(1)捕获阶段,Flex应用程序从根显示元素(如Application)逐层向下寻找,直到找到事件产生的源头。
(2)目标匹配阶段,在该阶段,Flex应用程序会调用目标对象自身注册的监听程序。
(3)冒泡阶段,在该阶段,从目标节点到根节点,逐层向上检测每个节点是否注册了监听器,相当于捕获阶段的逆过程。Flex应用程序可以在addEventListener()函数中的第三个参数设置事件获取的阶段,如果为true,则关闭捕获阶段,开启目标匹配和冒泡阶段。
如果要阻断事件流继续流动,可以在监听器的响应函数中添加:
event.stopPropagation();
由于Flex设置的监听事件类型比较少,如果需要设置组件的特殊响应事件,或者为自定义组件添加自定义的响应事件,我们需要设计自定义类型的Event对象。
下面我们以一个由button和textInput控件组成的自定义组件InputButtonComp为例,为该组件设置按钮单击时的响应事件。
第一步:设计自定义组件。
(1)新建InputButtonComp.as类文件,继承自BorderContainer容器,并定义自定义组件中需要包含的控件。
publicclass InputButtonComp extendsBorderContainer {
privatevar textInput:TextInput;
privatevar button:Button;
privatevar group:HGroup;
(2)在InputButtonComp组件中添加子控件,重写createChildren方法。
//添加子组件,并指定初始状态
overrideprotectedfunctioncreateChildren():void{
super.createChildren();
if(!group){
group = new HGroup();
group.percentWidth = 100;
group.percentHeight = 100;
}
if(!textInput){
textInput = new TextInput();
textInput.percentWidth=75;
textInput.percentHeight=100;
textInput.editable = true;
}
if(!button){
button = new Button();
button.label = _btnLabel;
button.percentWidth = 25;
button.percentHeight = 100;
//注册监听器,响应单击事件和键盘进入事件
button.addEventListener("click",buttonClickHandle);
button.addEventListener(KeyboardEvent.KEY_DOWN,buttonEnterHandle);//回车键响应
}
addElement(group);
group.addElement(textInput);
group.addElement(button);
}
(3)自定义组件样式设置
//提交组件的变化
overrideprotectedfunction commitProperties():void{
super.commitProperties();
invalidateDisplayList();
}
//默认宽度和长度
overrideprotectedfunction measure():void{
super.measure();
}
overrideprotectedfunction updateDisplayList(unscaledWidth:Number, unscaledHeight:Number):void{
super.updateDisplayList(unscaledWidth,unscaledHeight);
//button.move(textInput.width,0);
}
(4)设置按钮的监听器,我们设置在监听器中能分发出一个自定义的事件InputButtonCompEvent到事件流中,自定义事件的类型是“buttonClick”,传递的参数是我们的输入内容textInput.text。
//分发按钮单击响应事件
privatefunctionbuttonClickHandle(event:Event):void{
this.dispatchEvent(new InputButtonCompEvent("buttonClick",textInput.text));
}
//分发按钮回车键提交响应事件
privatefunction buttonEnterHandle(event:KeyboardEvent):void{
if(event.charCode == 13){
this.dispatchEvent(new InputButtonCompEvent("buttonClick",textInput.text));
}
}
这一步涉及到自定义组件设计的相关内容,这一方面我们不在此做过多叙述。
在这一步当中,我们做的工作主要是把自定义的组件搭建好,并为其中的子组件设置并注册了监听器。其中的监听器能分发出我们自定义的事件InputButtonCompEvent到事件流中。那么接下来,我们就要设计这个自定义事件的内部细节了。
二、自定义事件的设计
我们需要在InputButtonCompEvent.as文件中创建一个自定义的事件类。
所有事件对象都是flash.events.Event或其子类,因此自定义事件类需要继承自Event类:
publicclass InputButtonCompEvent extends Event{
然后我们的构造函数决定了自定义事件具有的参数列表形式,比如:
publicfunction InputButtonCompEvent(type:String,eventInfo:Object=null,bubbles:Boolean=false,cancelable:Boolean=false)
{
super(type,bubbles,cancelable);
this.eventInfo = eventInfo;
}
Event类具有三个参数:type,事件类型、
bubbles ,Event 对象是否参与事件流的冒泡阶段。默认值为false、
cancelable,确定是否可以取消 Event 对象。默认值为false。
我们在此基础上添加了一个参数eventInfo:Object,用于事件之间的参数传递,并定义该参数的获取和赋值方法:
publicfunctionget eventInfo():Object
{
return _eventInfo;
}
publicfunctionset eventInfo(value:Object):void
{
_eventInfo = value;
}
三、初步测试
到这里,我们的自定义组件和它的自定义响应事件已经建立起来了,也许此时你兴致勃勃的打算欣赏自己的杰作,于是你把自定义组件项目生成的库文件InputButtonComponent.swc拷贝到你的项目中的libs目录下,在设计模式下从自定义组件中找到我们的组件InputButtonComp,拖入我们的工作界面,大概是这么个样子:
一切正常吧,你很满意。然后设置组件的buttonClick事件响应函数:
这是开始出现问题了,在Flex-Builder编辑器底端提示错误:
这里为什么出错了呢?回想一下在设置自定义事件的buttonClick类型时,我们只是在分发自定义事件到事件流时,定义了事件类型为buttonClick:
//分发按钮单击响应事件
privatefunction buttonClickHandle(event:Event):void{
this.dispatchEvent(new InputButtonCompEvent("buttonClick",textInput.text));
}
但是系统怎么识别这个类型呢?换句话说,自定义组件是怎么知道这个是它要去响应的事件呢?
四、修改测试
Flex中专门为事件定义了一个[Event]元标签,用来申明被自定义组件分派的事件。
这就需要我们在自定义组件的时候,要对这个事件类型及其对应的事件进行申明:
[Event(name="buttonClick",type="events.InputButtonCompEvent")]
publicclass InputButtonComp extendsBorderContainer {
.....
}
事件类型申明放在package申明的后面,类的前面:
package components
{
[Event(name="buttonClick",type="events.InputButtonCompEvent")]
publicclass InputButtonComp extendsBorderContainer {
.....
}
}
上述的标签[Event]属于元数据标签,在代码中的作用是向编译器提供如何编译程序的信息,而不会被编译到生成的swf/swc文件中。为元数据标签定义的name属于自定义组件的事件属性名,在自定义组件中使用name可获取类型为type的自定义事件,并在应用程序中设置其处理函数。
这个时候错误消失了,整个环节都已经搭建好。我们在Flex应用程序中使用这个自定义的组件,并为其添加buttonClick事件的响应函数:
import events.InputButtonCompEvent;
import mx.controls.Alert;
protectedfunction inputbuttoncomp1_buttonClickHandler
(event:InputButtonCompEvent):void{
Alert.show(event.eventInfo as String);
}
]]>
buttonClick="inputbuttoncomp1_buttonClickHandler(event)">
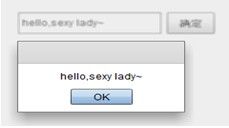
我们尝试着打印出从自定义事件中获得的对象信息eventInfo。结果显示如下:
下面我们来分析下整个事件分发和响应的过程:
(1)首先,编译器将代码编译好之后,在主程序界面中生成自定义组件,并给按钮组件注册了click类型的事件监听器。
(2)当我们点击按钮后,便触发了click事件监听器函数。在这个函数里面我们定义了一个用于事件派发的dispatcher方法,用于派发我们的自定义事件InputButtonCompEvent。
(3)接下来,为了派发这个事件,便需要获得该事件的实例化对象,执行其构造函数并赋值。
(4)然后这个实例化对象被派发到事件流中。
(5)事件被分发后,被自定义组件的事件属性buttonClick获取到,于是我们在使用自定义组件时为它定义的buttonclick处理函数buttonClickHandler(event)被调用。这个处理函数将获取到的自定义事件对象event中的eventInfo参数打印出来。
(6)到这里,整个自定义事件派发的过程才完全结束。
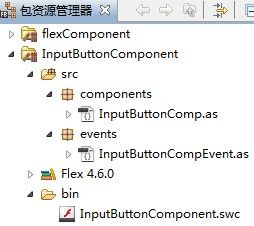
五、自定义组件和自定义事件项目结构。
六、源代码。
InputButtonComp.as
package components
{
import events.InputButtonCompEvent;
import flash.events.Event;
import flash.events.KeyboardEvent;
import flash.text.TextLineMetrics;
import mx.core.UIComponent;
import spark.components.BorderContainer;
import spark.components.Button;
import spark.components.HGroup;
import spark.components.TextInput;
/**
* @功能说明:将TextInput与Button的功能进行组合,定义成一个新的组件,命名为InputButtonComp
* @作者:andrew li
* @日期:2013-08-28 15:10
* @参数:
* @异常:
* @返回:
* */
[Event(name="buttonClick",type="events.InputButtonCompEvent")]
publicclass InputButtonComp extendsBorderContainer {
privatevar textInput:TextInput;
privatevar button:Button;
privatevar group:HGroup;
privatevar _btnLabel:String="确定";
privatevar _text:String;
publicfunction InputButtonComp()
{
super();
setStyle("borderVisible", false);
}
//添加子组件,并指定初始状态
overrideprotectedfunction createChildren():void{
super.createChildren();
if(!group){
group = new HGroup();
group.percentWidth = 100;
group.percentHeight = 100;
}
if(!textInput){
textInput = new TextInput();
textInput.percentWidth=75;
textInput.percentHeight=100;
textInput.editable = true;
}
if(!button){
button = new Button();
button.label = _btnLabel;
button.percentWidth = 25;
button.percentHeight = 100;
button.addEventListener("click",buttonClickHandle);//单击响应
button.addEventListener(KeyboardEvent.KEY_DOWN,buttonEnterHandle);//回车键响应
}
addElement(group);
group.addElement(textInput);
group.addElement(button);
}
//提交组件的变化
overrideprotectedfunction commitProperties():void{
super.commitProperties();
textInput.text = text;
invalidateDisplayList();
}
//默认宽度和长度
overrideprotectedfunction measure():void{
super.measure();
}
overrideprotectedfunction updateDisplayList(unscaledWidth:Number, unscaledHeight:Number):void{
super.updateDisplayList(unscaledWidth,unscaledHeight);
//button.move(textInput.width,0);
}
//分发按钮单击响应事件
privatefunction buttonClickHandle(event:Event):void{
this.dispatchEvent(new InputButtonCompEvent("buttonClick",textInput.text));
}
//分发按钮回车键提交响应事件
privatefunction buttonEnterHandle(event:KeyboardEvent):void{
if(event.charCode == 13){
this.dispatchEvent(new InputButtonCompEvent("buttonClick",textInput.text));
}
}
publicfunctionget text():String
{
return _text;
}
publicfunctionset text(value:String):void
{
_text = value;
}
}
}
=============================================================
InputButtonCompEvent.as
package events{
import flash.events.Event;
publicclassInputButtonCompEventextends Event{
privatevar _eventInfo:Object;
//public static const INPUTBUTTON_CLICK:String ="BUTTONCLICK";
publicfunctionInputButtonCompEvent(type:String,eventInfo:Object=null,bubbles:Boolean=false,cancelable:Boolean=false)
{
super(type,bubbles,cancelable);
this.eventInfo = eventInfo;
}
publicfunctionget eventInfo():Object
{
return _eventInfo;
}
publicfunctionset eventInfo(value:Object):void
{
_eventInfo = value;
}
overridepublicfunction clone():Event{
returnnewInputButtonCompEvent(type, eventInfo, false, false);
}
}
}


