HA(High Availability)指的是通过尽量缩短因日常维护操作(计划)和突发的系统崩溃(非计划)所导致的停机时间,以提高系统和应用的可用性。
HA集群架构:
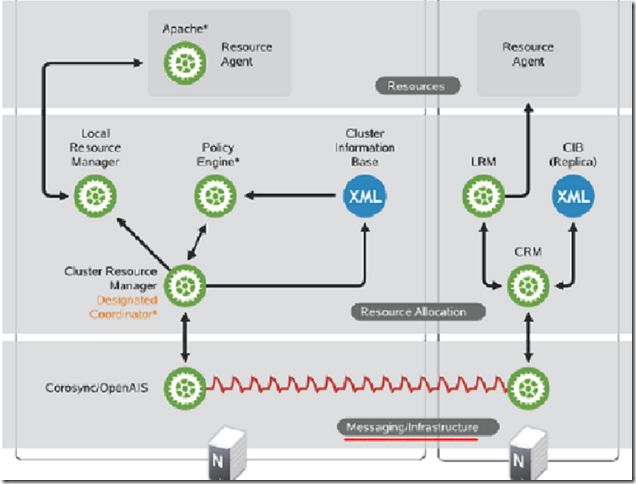
整体的HA结构分为三层:
1,Messaging Layer: 基础事务层
在基础架构上实现心跳信息探测。双方节点可以随时探测到对方的心跳信息,以实现对对方主机工作状态的探测。三类控制信息:心跳(Heartbeats ),集群事务信息(Cluster Transition Messages),重传信息(Retransmission Request)。 配置文件:/etc/ha.d/ha.cf。各节点间域共享密钥,实现节点间互相通信的认证。加密方式:MD5,HMAC-SHA1 。常用实现软件:HeartBeat、keepalived、ultramonkey、openais/corosync。红帽官方提供的集群套件RHCS底层使用的通信机制就是openais/corosync。
2,Cluster Resource Manager:集群资源管理层
在资源分配上定义资源种类,界定资源归属,每个服务需要哪些资源及这些资源之间的前后次序。
集群资源管理器(CRM,常用软件pacemaker),管理双方向外提供服务所需用到的资源,包括IP地址、Web服务、共享存储等等。而这些资源需要依靠集群信息库CIB(XML文件)来定义,同时还必须保证一旦某个节点上的XML文件更新,即刻通知其他节点上的XML也要及时更新。
heartbeat v1: 自带资源管理器haresources(配置接口:配置文件,文件名也叫haresources)
heartbeat v2: 自带资源管理器crm (各节点运行crmd进程,配置接口:命令行客户端crmsh,GUI客户端hb-gui)
heartbeat v3 = heartbeat + pacemaker + cluster-glue
策略引擎(PE Policy Engine):定义法定人数以及根据法定人数所做出的动作等等。
3,Local Resource Manager:本地资源管理层,监控本地某个资源的工作状况
RA本地资源代理(Resource Agent),脚本文件,一旦集群资源管理器发现某个资源工作异常,立即通知本地资源代理重启服务。常用方法:
(1)Heartbeat v1;
(2)使用脚本LSB scripts (Linux Standards Base );
(3)OCF Open Cluster Format 开放集群格式(最佳方式)。
高可用集群常用架构模型
(1)一主一从架构;
(2)互为主从架构:两台主机分别提供两种不同的服务;
(3)多主机架构:N台主机组成一个集群,分别提供不同的服务,一台服务器空闲做备节点。或者全部处于工作状态,一台服务器出故障,立刻将服务转移到其他主机上。各节点之间需要以多播的形式将自己的健康情况发送给其他主机。
实验内容:
基于heartbeat v1实现http、mysql高可用,mysql数据放在nfs文件系统上。
两台单独的服务器为node1 ,node2 做http的高可用。两台单独的服务器做MySQL的主备服务器。两台http服务器上的数据需要完全一样。两台MySQL上数据也要同步。
应为实验需要的主机太多,设备有限,所以下边实验将MySQL的主和http的主节点放在同一主机上 ,NFS文件系统也放在node1上。当然这样node1挂掉会使整个MySQL的文件系统挂掉。所以实际应用中mysql,http,nfs都要分开来放,以保证各节点的无不干扰。
实验环境:
node1:172.16.18.1
配置程序:http,mysql,NFS
node2:172.16.249.138
配置程序:http,mysql
实验过程:
首先在node1,node2 两台主机上都装上heartbeat v1,因为在CentOS6以后不提供rpm包的安装,所以安装方法可以编译安装,也可以去网上下载制作好的rpm包,我们实验采用制作好的rpm包
在node1 和node2上都安装
[root@www ~]# yum install perl-TimeDate PyXML libnet net-snmp-libs -y
[root@www ~]# rpm -ivh heartbeat-2.1.4-12.el6.x86_64.rpm heartbeat-pils-2.1.4-12.el6.x86_64.rpm heartbeat-stonith-2.1.4-12.el6.x86_64.rpm
Preparing... ########################################### [100%]
1:heartbeat-pils ########################################### [ 33%]
2:heartbeat-stonith ########################################### [ 67%]
3:heartbeat ########################################### [100%]
时间同步:在node1主机和node2主机上执行时间同步命令。172.16.0.1为时间服务器。
[root@www ~]# ntpdate 172.16.0.1
node2
[root@www ~]# ssh-keygen -t rsa -P '' 生成ssh密钥文件
[root@www .ssh]# scp id_rsa.pub [email protected]:/tmp
[root@www tmp]# cat /tmp/id_rsa.pub > /root/.ssh/authorized_keys
node1
[root@www ~]# ssh-keygen -t rsa -P '' 生成ssh密钥文件
[root@www .ssh]# scp id_rsa.pub [email protected]:/tmp
[root@www tmp]# cat /tmp/id_rsa.pub > /root/.ssh/authorized_keys
验证是否可无需密钥访问:
node2主机执行
[root@www .ssh]# ssh node1.aolens.com 'date';date
Thu Sep 4 22:07:45 CST 2014
Thu Sep 4 22:07:45 CST 2014
node1主机执行
[root@www .ssh]# ssh node2.aolens.com 'date';date
Thu Sep 4 22:09:09 CST 2014
Thu Sep 4 22:09:09 CST 2014
heartbeat 监听在694/tcp,udp上。
heartbeat的配置由三组组成:
主配置文件:ha.cf
认证密钥:authkeys, 其权限必须为组和其它无权访问; 是600 或400
用于资源的文件:haresources
主备节点的配置参数必须一样。主节点名称为进程平时启用的节点名称,只有主节点出现故障才会切到备用节点。
网卡别名,只需要制定在那块网卡上配置别名,而不用指定别名。
将node1配置为主服务节点。
第一配置ha.cf
[root@www ~]# cd /etc/ha.d/ #进入到/etc/ha.d/
[root@www ha.d]# ls /usr/share/doc/heartbeat-2.1.4/ #查看heartbeat下的文件
apphbd.cf GettingStarted.html heartbeat_api.txt authkeys GettingStarted.txt logd.cf AUTHORS ha.cf README ChangeLog HardwareGuide.html Requirements.html COPYING HardwareGuide.txt Requirements.txt COPYING.LGPL haresources rsync.html DirectoryMap.txt hb_report.html rsync.txt faqntips.html hb_report.txt startstop faqntips.txt heartbeat_api.html
[root@www ha.d]# cp /usr/share/doc/heartbeat-2.1.4/{ha.cf,haresources,authkeys} ./ #copy主配置文件,认证密钥,资源文件到/etc/ha.d/
[root@www ha.d]# ll #查看authkeys的权限
total 48
-rw-r--r-- 1 root root 645 Sep 4 22:41 authkeys
-rw-r--r-- 1 root root 10539 Sep 4 22:41 ha.cf
-rwxr-xr-x 1 root root 745 Sep 10 2013 harc
-rw-r--r-- 1 root root 5905 Sep 4 22:41 haresources
drwxr-xr-x 2 root root 4096 Sep 4 22:26 rc.d
-rw-r--r-- 1 root root 692 Sep 10 2013 README.config
drwxr-xr-x 2 root root 4096 Sep 4 22:26 resource.d
-rw-r--r-- 1 root root 7864 Sep 10 2013 shellfuncs
[root@www ha.d]# chmod 600 authkeys #修改权限。
[root@www ha.d]# vim ha.cf
logfile /var/log/ha-log #启用日志
#logfacility local0 #注释local 0的日志保存位置。
mcast eth0 225.18.18.100 694 1 0 #定义组播地址。并启用
auto_failback on #确定启用
#node kathy
node node1.aolens.com #添加node节点
node node2.aolens.com
ping 172.16.0.1 #ping节点指向网关
配置ok
[root@www tmp]# openssl rand -hex 8 #生成随机密钥
d83e19f1c779c57c
[root@www ha.d]# vim authkeys #在最后添加加密数据
auth 1
1 sha1 d83e19f1c779c57c
[root@node1 ha.d]# vim haresources
node1.aolens.com 172.16.18.1/16/eth0/172.16.255.255 httpd mysqld
配置完成文件配置.
[root@node1 ha.d]# scp /etc/ha.d/{ha.cf,haresources,authkeys} node2:/etc/ha.d/ 复制配置文件去node2节点。
启动node1,node2上的heartbeat文件
[root@node1 ha.d]# service heartbeat start #启动node1
Starting High-Availability services:
2014/09/05_22:50:49 INFO: Resource is stopped
Done.
[root@node1 ha.d]# ss -unl
State Recv-Q Send-Q Local Address:Port Peer Address:Port
UNCONN 0 0 225.18.18.100:694 *:* #查看被监听的资源,在UDP/694端口
[root@node1 ha.d]# ifconfig #查看网卡IP配置是否OK
eth0 Link encap:Ethernet HWaddr 00:0C:29:64:42:F1
inet addr:172.16.249.138 Bcast:172.16.255.255 Mask:255.255.0.0
inet6 addr: fe80::20c:29ff:fe64:42f1/64 Scope:Link
UP BROADCAST RUNNING MULTICAST MTU:1500 Metric:1
RX packets:870175 errors:0 dropped:0 overruns:0 frame:0
TX packets:119166 errors:0 dropped:0 overruns:0 carrier:0
collisions:0 txqueuelen:1000
RX bytes:119105660 (113.5 MiB) TX bytes:18401479 (17.5 MiB)
eth0:0 Link encap:Ethernet HWaddr 00:0C:29:64:42:F1
inet addr:172.16.18.18 Bcast:172.16.255.255 Mask:255.255.0.0
UP BROADCAST RUNNING MULTICAST MTU:1500 Metric:1
lo Link encap:Local Loopback
inet addr:127.0.0.1 Mask:255.0.0.0
inet6 addr: ::1/128 Scope:Host
UP LOOPBACK RUNNING MTU:16436 Metric:1
RX packets:3357 errors:0 dropped:0 overruns:0 frame:0
TX packets:3357 errors:0 dropped:0 overruns:0 carrier:0
collisions:0 txqueuelen:0
RX bytes:261024 (254.9 KiB) TX bytes:261024 (254.9 KiB)
[root@node1 ha.d]# ss -tnl
State Recv-Q Send-Q Local Address:Port Peer Address:Port #查看监听的服务OK
LISTEN 0 128 :::80 :::*
LISTEN 0 128 *:3306 *:*
[root@node1 ha.d]# ssh node2.aolens.com 'service heartbeat start' #在node1上启动node2.
logd is already running
Starting High-Availability services:
2014/09/05_20:34:12 INFO: Resource is stopped
Done.
[root@node1 ha.d]# ssh node2.aolens.com 'ss -unl'
State Recv-Q Send-Q Local Address:Port Peer Address:Port
UNCONN 0 0 225.18.18.100:694 *:*
[root@node1 ha.d]# ssh node2.aolens.com 'ifconfig'
eth0 Link encap:Ethernet HWaddr 00:0C:29:83:02:FD
inet addr:172.16.18.1 Bcast:172.16.255.255 Mask:255.255.0.0
inet6 addr: fe80::20c:29ff:fe83:2fd/64 Scope:Link
UP BROADCAST RUNNING MULTICAST MTU:1500 Metric:1
RX packets:133603 errors:0 dropped:0 overruns:0 frame:0
TX packets:47903 errors:0 dropped:0 overruns:0 carrier:0
collisions:0 txqueuelen:1000
RX bytes:20224936 (19.2 MiB) TX bytes:9346583 (8.9 MiB)
lo Link encap:Local Loopback
inet addr:127.0.0.1 Mask:255.0.0.0
inet6 addr: ::1/128 Scope:Host
UP LOOPBACK RUNNING MTU:16436 Metric:1
RX packets:4198 errors:0 dropped:0 overruns:0 frame:0
TX packets:4198 errors:0 dropped:0 overruns:0 carrier:0
collisions:0 txqueuelen:0
RX bytes:700967 (684.5 KiB) TX bytes:700967 (684.5 KiB)
[root@node1 ha.d]# service heartbeat stop #关闭主服务器,看被服务能否启动
[root@node1 ha.d]# ssh node2.aolens.com 'ss -tnl' #备服务启动
State Recv-Q Send-Q Local Address:Port Peer Address:Port
LISTEN 0 128 :::80 :::*
LISTEN 0 128 *:3306 *:*
[root@node1 ha.d]# service heartbeat start #启动主服务器,夺回资源。
[root@node1 ha.d]# ss -tnl
State Recv-Q Send-Q Local Address:Port Peer Address:Port #查看监听的服务OK
LISTEN 0 128 :::80 :::*
LISTEN 0 128 *:3306 *:*
基于httpd,mysql的高可用配置成功。
下来我们来配置mysql的数据存放位置,nfs文件系统。
在node1 上配置。
没有安装nfs-utils的自行安装;
[root@node1 ~]# vim /etc/exports #创建nfs共享目录
/nfsserver 172.16.0.0/16(rw,async,no_root_squash)
给共享目录apache用户的rwx权限:
setfacl -m u:apache:rwx /nfsserver/data/
重启服务:service nfs restart
[root@node2 ~]# showmount -a 172.16.249.138 #在node2查看NFS
All mount points on 172.16.249.138:
[root@node2 ~]# mount -t nfs 172.16.249.138:/nfsserver/data/ /mydata/data/ #挂载nfs
[root@node2 mysql]# cd /usr/local/ #切换到mysql的安装目录下
[root@node2 local]# mysql_install_db --user=mysql --datadir=/mydata/data/ #初始化mysql
然后在node1上启动mysql时,mysql会自己初始化,
[root@node1 data]# service mysqld start
Initializing MySQL database: Installing MySQL system tables...OK
Filling help tables...OK
To start mysqld at boot time you have to copy
support-files/mysql.server to the right place for your system
PLEASE REMEMBER TO SET A PASSWORD FOR THE MySQL root USER !
To do so, start the server, then issue the following commands:
/usr/bin/mysqladmin -u root password 'new-password'
/usr/bin/mysqladmin -u root -h node1.aolens.com password 'new-password'
Alternatively you can run:
/usr/bin/mysql_secure_installation
which will also give you the option of removing the test
databases and anonymous user created by default. This is
strongly recommended for production servers.
See the manual for more instructions.
You can start the MySQL daemon with:
cd /usr ; /usr/bin/mysqld_safe &
You can test the MySQL daemon with mysql-test-run.pl
cd /usr/mysql-test ; perl mysql-test-run.pl
Please report any problems with the /usr/bin/mysqlbug script![ OK ]
Starting mysqld: [ OK ]
此时两个不同主机所使用的mysql数据目录是一个。当然要注意的是两个节点的mysql版本要完全一样。
此时启动node1 和node2的heartbeat
访问172.16.18.18
如果将node1 上的heartbeat stop 访问到的结果将是。
实验到此结束!

![clipboard[2] http、mysql高可用 heartbeat v1_第2张图片](http://img.e-com-net.com/image/info3/125ce94f3de34faaa2f43742b7fbdbbc.jpg)
![clipboard[3] http、mysql高可用 heartbeat v1_第3张图片](http://img.e-com-net.com/image/info3/19de82d1b7a2417bbfd9e69085a1d2bb.jpg)
![clipboard[4] http、mysql高可用 heartbeat v1_第4张图片](http://img.e-com-net.com/image/info3/11b5b22b529e4e44bbe17aea65c170f5.jpg)