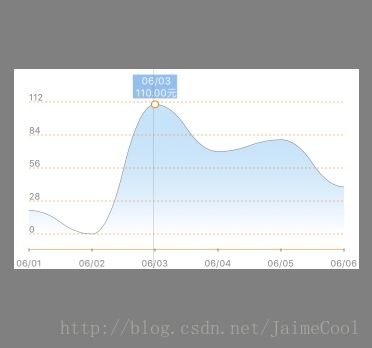
一个简单易用的折线图控件,最近项目工程中需要用到一个折现图,看了网上的一些例子,但都不能满足UED的特殊要求,所以只能自己写了一个。
先来看下效果图:
基本实现以下功能:
- 支持自定义Y轴坐标数
- 支持自定义X轴显示索引
- 添加参考线、点击标线
- 支持自定义弹出说明视图
·····
Demo见github YASimpleGraph,喜欢的话请star下_
使用说明
YASimpleGraph 目前已经支持CocoaPods,可以在很短的时间内被添加到任何工程中。
安装
YASimpleGraph 的安装,最简单的方法是使用CocoaPods,在PodFile里添加如下:
pod 'YASimpleGraph', '~> 0.0.1'
或者直接将YASimpleGraphView.h和YASimpleGraphView.m两个源文件直接拖进自己的项目工程中。
集成
- 首先导入头文件
#import "YASimpleGraphView.h"
- 遵循相应协议
@interface ViewController ()
- 初始化
//初始化数据源
allValues = @[@"20.00",@"0",@"110.00",@"70",@"80",@"40"];
allDates = @[@"06/01",@"06/02",@"06/03",@"06/04",@"06/05",@"06/06"];

//初始化折线图并设置相应属性
YASimpleGraphView *graphView = [[YASimpleGraphView alloc]init];
graphView.frame = CGRectMake(15, 200, 375-30, 200);
graphView.backgroundColor = [UIColor whiteColor];
graphView.allValues = allValues;
graphView.allDates = allDates;
graphView.defaultShowIndex = allDates.count-1;
graphView.delegate = self;
graphView.lineColor = [UIColor grayColor];
graphView.lineWidth = 1.0/[UIScreen mainScreen].scale;
graphView.lineAlpha = 1.0;
graphView.enableTouchLine = YES;
[self.view addSubview:graphView];
- 开始绘制
[graphView startDraw];
- 实现相应协议
//自定义X轴 显示标签索引
- (NSArray *)incrementPositionsForXAxisOnLineGraph:(YASimpleGraphView *)graph {
    return @[@0,@1,@2,@3,@4,@5];
}

//Y轴坐标点数
- (NSInteger)numberOfYAxisLabelsOnLineGraph:(YASimpleGraphView *)graph {
    return 5;
}

//自定义popUpView
- (UIView *)popUpViewForLineGraph:(YASimpleGraphView *)graph {

    UILabel *label = [[UILabel alloc]initWithFrame:CGRectMake(0, 0, 0, 0)];
    label.backgroundColor = [UIColor colorWithRed:146/255.0 green:191/255.0 blue:239/255.0 alpha:1];
    label.numberOfLines = 0;
    label.font = [UIFont systemFontOfSize:10];
    label.textAlignment = NSTextAlignmentCenter;
    return label;
}

//修改相应点位弹出视图
- (void)lineGraph:(YASimpleGraphView *)graph modifyPopupView:(UIView *)popupView forIndex:(NSUInteger)index {
    UILabel *label = (UILabel*)popupView;
    NSString *date = [NSString stringWithFormat:@"%@",allDates[index]];
    NSString *str = [NSString stringWithFormat:@" %@ \n %@元 ",date,allValues[index]];

    CGRect rect = [str boundingRectWithSize:CGSizeMake(MAXFLOAT, 40) options:NSStringDrawingUsesLineFragmentOrigin|NSStringDrawingUsesFontLeading attributes:@{NSFontAttributeName:[UIFont systemFontOfSize:10]} context:nil];

    [label setFrame:CGRectMake(0, 0, rect.size.width, rect.size.height)];
    label.textColor = [UIColor whiteColor];
    label.text = str;
}
完成上述步骤,折线图控件已经集成到我们的项目中了,当然YASimpleGraph还提供了一系列的对外属性变量,使我们可以高度自定义折线图控件,如下:
/// The line color
@property (nonatomic, strong) UIColor *lineColor;

/// The line width
@property (nonatomic, assign) CGFloat lineWidth;

/// The line alpha
@property (assign, nonatomic) float lineAlpha;


/// The Dot color
@property (nonatomic, strong) UIColor *dotColor;

/// The Dot borderColor
@property (nonatomic, strong) UIColor *dotBorderColor;

/// The Dot width
@property (nonatomic, assign) CGFloat dotWidth;

/// The Dot borderWidth
@property (nonatomic, assign) CGFloat dotBorderWidth;


/// The dashLine color
@property (nonatomic, strong) UIColor *dashLineColor;

/// The dashLine width
@property (nonatomic, assign) CGFloat dashLineWidth;

/// The bottomLine color
@property (nonatomic, strong) UIColor *bottomLineColor;

/// The bottomLine width
@property (nonatomic, assign) CGFloat bottomLineHeight;

····
等等一系列,具体可参考YASimpleGraphView.h
实现过程
实现过程大致分为以下几步:
- draw 坐标轴&点、参考线
- draw 数据点、折线
- 处理手势点击
简要列出上述3步中需要注意的一些地方:
a. 横坐标轴根据点的个数直接等分就好,纵坐标轴有点难度,这里参考了同事的纵坐标取整算法和最小值优化,实现主要如下:
- (NSInteger) calcIntegerDeltaValue:(double) maxValue minValue:(double) minValue{
    NSInteger integerDetla = ceil((maxValue - minValue) / (numberOfYAxis-1));
    //对得到的整数进一步取整 如: 101 -> 110, 1001 -> 1100
    if (integerDetla == 0) { //值为0的水平直线则返回100一个值的间距
        return 100;
    }else{
        return [self ajustIntegerValue:integerDetla];
    }

}

- (NSInteger)ajustIntegerValue:(NSInteger) origalValue{
    if (origalValue < 100) {
        return origalValue;
    }else{
        NSInteger base = origalValue;
        NSInteger round = 1;
        while (origalValue > 100) {
            origalValue = origalValue / 10;
            round *= 10;
        }
        return base - base % round + round;
    }
}
b. 折线直接连接坐标点即可,当画曲线时,为使曲线更加曲滑,采取两点之间两次二次贝塞尔,即先取中点,然后分别对起始点进行二次贝塞尔,具体实现如下:
+ (UIBezierPath *)quadCurvedPathWithPoints:(NSArray *)points {
    UIBezierPath *path = [UIBezierPath bezierPath];

    NSValue *value = points[0];
    CGPoint p1 = [value CGPointValue];
    [path moveToPoint:p1];

    if (points.count == 2) {
        value = points[1];
        CGPoint p2 = [value CGPointValue];
        [path addLineToPoint:p2];
        return path;
    }

    for (NSUInteger i = 1; i < points.count; i++) {
        value = points[i];
        CGPoint p2 = [value CGPointValue];

        CGPoint midPoint = midPointForPoints(p1, p2);
        [path addQuadCurveToPoint:midPoint controlPoint:controlPointForPoints(midPoint, p1)];
        [path addQuadCurveToPoint:p2 controlPoint:controlPointForPoints(midPoint, p2)];

        p1 = p2;
    }
    return path;
}

static CGPoint midPointForPoints(CGPoint p1, CGPoint p2) {
    return CGPointMake((p1.x + p2.x) / 2, (p1.y + p2.y) / 2);
}

static CGPoint controlPointForPoints(CGPoint p1, CGPoint p2) {
    CGPoint controlPoint = midPointForPoints(p1, p2);
    CGFloat diffY = fabs(p2.y - controlPoint.y);

    if (p1.y < p2.y)
        controlPoint.y += diffY;
    else if (p1.y > p2.y)
        controlPoint.y -= diffY;

    return controlPoint;
}
