温馨提示
关于主从复制的原理及其实现请参阅mysql主从复制
大纲
关于复制的相关问题
半同步的实现过程
半同步的总结
主从复制的注意细节
一、关于复制的相关问题
1、异步复制解决了那些问题
复制解决的基本问题是让一台服务器的数据和另外的服务器保持同步,可以位于不同的网络拓扑中,对整台服务器的特定的数据库,甚至特定的表进行复制。
mariadb或mysql复制大部分都是向后兼容的。这意味着版本较新的服务器可以是版本老的服务器的从服务器。复制通常不会大幅增加服务器的开销,它需要主服务器启用二进制日志。复制对扩展读取有好处,可以将读指向到到从服务器上.
2、有了异步为什么还要用半同步复制
MySQL5.5之前版本的MySQL Replication都是异步(asynchronous)的,主库在执行完一些事务后,是不会管备库的进度的。如果备库不幸落后,而更不幸的是主库此时又出现Crash(例如宕机),这时备库中的数据就是不完整的。简而言之,在主库发生故障的时候,我们无法使用备库来继续提供数据一致的服务了。Semisynchronous Replication则一定程度上保证提交的事务已经传给了至少一个备库。
3. 为什么不是完全同步
Semi_synchronous中,仅仅保证事务的已经传递到备库上,但是并不确保已经在备库上执行完成了。
此外,还有一种情况会导致主备数据不一致。在某个session中,主库上提交一个事务后,会等待事务传递给至少一个备库,如果在这个等待过程中主库Crash,那么也可能备库和主库不一致,这是很致命的。(在主库恢复后,可以通过参数Rpl_semi_sync_master_no_tx观察)
4. 如果主备之间连接出现故障,主库是否会一直等待?
如果主备网络故障或者备库挂了,主库在事务提交后等待10秒(rpl_semi_sync_master_timeout的默认值)后,就会继续。这时,主库就会变回原来的异步状态
二、半同步的实现过程
注:
1、之前的博文己经说过如何安装mariadb(与msyql编译或二进制通用格式安装方法一样),这里就直接上配置了。
2、如果要想实现半同步复制,先得配置主从复制。
================正式开始===========================
系统版本:centos6.5
数据库:mariadb-10(通用二进制格式安装)
系统资源分配
master 端:
ip地址: 192.168.1.114
slave 端:
ip地址:192.168.1.109
半同步插件是由谷歌提供,具体位置/usr/local/mysql/lib/plugin/下,一个是master用的semisync_master.so,一个是slave用的semisync_slave.so
在master端上执行如下命令:
MariaDB [(none)]> install plugin rpl_semi_sync_master soname 'semisync_master.so';
还要在/etc/my.cnf中打开semi_sync,将以下两条语句写入[mysqld]段中
或在数据库中直接执行如下命令
MariaDB [(none)]> set global rpl_semi_sync_master_enabled=1
重新启动服务
[root@bogon ~]# service mysqld restart
MySQL server PID file could not be found!              [FAILED]
Starting MySQL                                         [  OK  ]
在slave端执行如下命令:
MariaDB [(none)]> install plugin rpl_semi_sync_slave soname 'semisync_slave.so';
在/etc/my.cnf配置文件[mysqld]段中添加如下一条语句
rpl_semi_sync_slave_enabled=1
或在数据库中直接执行下面的语句
MariaDB [(none)]>set global rpl_semi_sync_slave_enabled=1
重新启动服务器
[root@bogon data]# service mysqld restart
Shutting down MySQL..                                      [  OK  ]
Starting MySQL...                                          [  OK  ]
在master查看一下状态
MariaDB [(none)]> SHOW GLOBAL STATUS LIKE 'rpl_semi%';
+--------------------------------------------+-------+
| Variable_name                              | Value |
+--------------------------------------------+-------+
| Rpl_semi_sync_master_clients               | 1     |
| Rpl_semi_sync_master_net_avg_wait_time     | 0     |
| Rpl_semi_sync_master_net_wait_time         | 0     |
| Rpl_semi_sync_master_net_waits             | 0     |
| Rpl_semi_sync_master_no_times              | 0     |
| Rpl_semi_sync_master_no_tx                 | 0     |
| Rpl_semi_sync_master_status                | ON    |
| Rpl_semi_sync_master_timefunc_failures     | 0     |
| Rpl_semi_sync_master_tx_avg_wait_time      | 0     |
| Rpl_semi_sync_master_tx_wait_time          | 0     |
| Rpl_semi_sync_master_tx_waits              | 0     |
| Rpl_semi_sync_master_wait_pos_backtraverse | 0     |
| Rpl_semi_sync_master_wait_sessions         | 0     |
| Rpl_semi_sync_master_yes_tx                | 0     |
+--------------------------------------------+-------+
14 rows in set (0.00 sec)
注解:
Rpl_semi_sync_master_clients
记录支持半同步的slave的个数。
Rpl_semi_sync_master_net_avg_wait_time
master 等待slave 回复的平均等待时间。 单位毫秒.
Rpl_semi_sync_master_net_wait_time
master 总的等待时间。
Rpl_semi_sync_master_net_waits
master 等待slave 回复的的总的等待次数。
Rpl_semi_sync_master_no_times
master 关闭半同步复制的次数。
Rpl_semi_sync_master_no_tx
master 没有收到slave的回复而提交的次数,(应该可以理解为master 等待超时的次
数)
Rpl_semi_sync_master_status
标记master现在是否是半同步复制状态。
Rpl_semi_sync_master_tx_avg_wait_time
master 花在每个事务上的平均等待时间。
Rpl_semi_sync_master_tx_wait_time
master 总的等待次数。
Rpl_semi_sync_master_wait_sessions
当前有多少个session 因为slave 的回复而造成等待。
Rpl_semi_sync_master_yes_tx
master 成功接收到slave的回复的次数。
Rpl_semi_sync_slave_status
标记slave 是否在半同步状态。
slave
MariaDB [(none)]> SHOW GLOBAL STATUS LIKE 'rpl_semi%';
+----------------------------+-------+
| Variable_name              | Value |
+----------------------------+-------+
| Rpl_semi_sync_slave_status | ON    |
+----------------------------+-------+
1 row in set (0.00 sec)
下面我们来测试一下
在maser中新创建一个库与一个表,向表中插入数据
MariaDB [(none)]> create database yy
    -> ;
Query OK, 1 row affected (0.02 sec)
MariaDB [(none)]> use yy
Database changed
MariaDB [yy]> create table t1 (name char(20));
Query OK, 0 rows affected (0.55 sec)
MariaDB [yy]> insert into t1 value('tom');
Query OK, 1 row affected (0.08 sec)
现在模拟一下故障,看看会发生什么。
在slave中将slave停止
MariaDB [(none)]> stop slave io_thread;
Query OK, 0 rows affected (0.00 sec)
#在master中新建立一张表看看效果。
MariaDB [(none)]> create table yy.user1 (id int(10));
Query OK, 0 rows affected (10.19 sec)
这时我们再看一下master的状态
MariaDB [(none)]> SHOW GLOBAL STATUS LIKE 'rpl_semi%';
+--------------------------------------------+-------+
| Variable_name                              | Value |
+--------------------------------------------+-------+
| Rpl_semi_sync_master_clients               | 1     |
| Rpl_semi_sync_master_net_avg_wait_time     | 1807  |
| Rpl_semi_sync_master_net_wait_time         | 1807  |
| Rpl_semi_sync_master_net_waits             | 1     |
| Rpl_semi_sync_master_no_times              | 1     |
| Rpl_semi_sync_master_no_tx                 | 1     |
| Rpl_semi_sync_master_status                | OFF   |
| Rpl_semi_sync_master_timefunc_failures     | 0     |
| Rpl_semi_sync_master_tx_avg_wait_time      | 0     |
| Rpl_semi_sync_master_tx_wait_time          | 0     |
| Rpl_semi_sync_master_tx_waits              | 0     |
| Rpl_semi_sync_master_wait_pos_backtraverse | 0     |
| Rpl_semi_sync_master_wait_sessions         | 0     |
| Rpl_semi_sync_master_yes_tx                | 0     |
+--------------------------------------------+-------+
14 rows in set (0.00 sec)
再看一下slave的状态
MariaDB [(none)]> SHOW GLOBAL STATUS LIKE 'rpl_semi%';
+----------------------------+-------+
| Variable_name              | Value |
+----------------------------+-------+
| Rpl_semi_sync_slave_status | OFF   |
+----------------------------+-------+
1 row in set (0.00 sec)
三、半同步的总结
当事务返回客户端成功后,则日志一定在至少两台主机上存在。
mariadb/mysql在加载并开启Semi-sync插件后,每一个事务需等待备库接收日志后才返回给客户端。如果做的是小事务,两台主机的延迟又较小,则Semi-sync可以实现在性能很小损失的情况下的零数据丢失。
完成单条事务增加了额外的等待延迟,延迟的大小取决于网络的好坏。
Semi-sync不是分布式事务,主库会在自己完成事务后,等待备库接收事务日志。
备库意外宕机时,主库会在某次等待超时后,关闭Semi-sync的特性,降级为普通的异步复制,这种情况比较简单。
主库意外宕机后,那么可能存在一些事务已经在主库Commit,但是还没有传给任何备库,这类"无根事务"都是没有返回给客户端的,所以发起事务的客户端并不知道这个事务是否已经完成。
这时,如果客户端不做切换,只是等意外宕机的主库恢复后,继续在主库进行操作,客户端会发现前面的"无根事务"都已经完成,可以继续进行后续的业务处理;
四、主从复制的注意细节
1、主从服务器时间要同步(ntp)
在生产环境中,当主从架构刚上线,此问题还是特别明显,但上线几个月后,发现,从服务器同步日志的速度明显慢于主服务器,即时在从服务器上使用binlog日志手动追赶,但可能一天之内的同步(同机房)还会有较大延迟,这时也许是时间同步上出了问题。
解决办法:
在主服务器或同局域网中建立一个NTP服务器,而在主从服务器上设置一个计划任务,设置适当的时间 去NTP服务器上进行同步。
2、如何限制从服务器只读
在从服务器上[msyqld]段中添加上
只读
read_only=1
设置开机不同步
skip_slave_start=0
3、如何主从复制时的事务安全
为了提高复制时的数据安全性,在主服务器上的设定:
立即同步biblog日志
sync_binlog =1
innodb_flush_log_at_trx_commit = 1
此参数的值设定为1,性能下降会较严重;因此,一般设定为2等,此时,主服务器崩溃依然有可能导致从服务器无法获取到全部的二进制日志事件;
如果master意外崩溃导致二进制日志中的某事件损坏,可以在从服务器使用如下参数忽略
sql_slave_skip_counter = 0
4、复制过滤器
有两种方式
第一种在master上过滤,会用到好下参数
binlog_do_db={database_name}
表示只将指定数据库的query操作记录到binlog日志中。
binlog_ignore_db={database_name}
对指定的数据库不做binlog记录的对象。
这样做虽然可以减轻IO压力,但也相当有风险,一但master挂了,那么在master上的binlog日志又不完整,进行数据的恢复相当的有压力啊~~
注:
binlog-ignore-db=db_name与binlog-do-db=db_name两个参数有一个共同的概念要清楚,参数中的db_name不是指query语句更新的数据所在的数据库,而是执行query的时候当前所处的数据库,不论更新那一个数据库的数据,mysql仅仅比较当前的连接所处的数据库(通过use db_name切换后所在的数据库)与参数设置的数据库名,而不会分析query语句所更新数据库所在的数据库。换句话说, 过滤不是基于 查询的字符串的, 而实际于你used的数据库
也就是在跨库操作后,将不会记录到binlog日志中。所以安全做法是使用第二种方式
第二种方式,在slave上过滤
对指定的某个库做过滤复制
replicate_do_db={database_name}
对指定的某个库不对其进行过滤复制
replicate_ignore_db={database_name}
复制指定库中的某张表
replicate_do_table={db_name.table_name}
不复制指定库中的某张表
replicate_ignore_table={db_name.table_name}
使用通配符来过滤,这样就能够解决在master跨库更新时无法同步到slave上了
replicate_wild_do_table
使用通配符来过滤,这样就能够对那个表做跨库更新时不同步到slave上了
replicate_wild_ignore_table
实例:
在从库的配置文件中添加如下语句
#vim /etc/my.cnf
[mysqld]
replicate_do_db=yydb
replicate_ignore_db=xxdb
重新启动服务即可生效
在mater中为yydb与xxdb添加两张表看看效果
MariaDB [(none)]> create database yydb;
Query OK, 1 row affected (0.04 sec)
MariaDB [(none)]> create database xxdb;
Query OK, 1 row affected (0.01 sec)
MariaDB [(none)]> create table yydb.t1 (id int not null,name char(20));
Query OK, 0 rows affected (0.03 sec)
MariaDB [(none)]> create table xxdb.t2 (id int not null,name char(20));
Query OK, 0 rows affected (0.03 sec)
MariaDB [(none)]> insert yydb.t1 value (1,'tom'),(2,'jerry');
Query OK, 2 rows affected (0.03 sec)
Records: 2  Duplicates: 0  Warnings: 0
MariaDB [(none)]> insert xxdb.t2 value (10,'root'),(20,'bin');
Query OK, 2 rows affected (0.01 sec)
Records: 2  Duplicates: 0  Warnings: 0
在从服务器上看看效果。
MariaDB [(none)]> show databases;
+---------------------+
| Database            |
+---------------------+
| #mysql50#lost+found |
| information_schema  |
| mysql               |
| performance_schema  |
| test                |
| yy                  |
| yydb                |
+---------------------+
7 rows in set (0.00 sec)
只能看到yydb了,却没有xxdb.
查看一下yydb里面的数据
MariaDB [(none)]> select * from yydb.t1;
ERROR 1146 (42S02): Table 'yydb.t1' doesn't exist
看到效果了吧,之前我们是在MariaDB [(none)]>建立的yydb.t1表,结果在从上无法看到,很惊愕吧,这回我们回到master上切换到yydb上重新建立一个表,再向里面插入数据,看看这回是否能正常同步。
在master上
MariaDB [(none)]> select * from yydb.t1;
+----+-------+
| id | name  |
+----+-------+
|  1 | tom   |
|  2 | jerry |
+----+-------+
2 rows in set (0.00 sec)
MariaDB [yydb]> create table t8 (id int not null,name char(20));
Query OK, 0 rows affected (0.02 sec)
MariaDB [yydb]> insert yydb.t8 value (99,'essun'),(2,'scott');
Query OK, 2 rows affected (0.01 sec)
Records: 2  Duplicates: 0  Warnings: 0
MariaDB [yydb]> select * from t8;
+----+-------+
| id | name  |
+----+-------+
| 99 | essun |
|  2 | scott |
+----+-------+
2 rows in set (0.00 sec)
再回到slave看一下。
MariaDB [(none)]> select * from yydb.t8;
+----+-------+
| id | name  |
+----+-------+
| 99 | essun |
|  2 | scott |
+----+-------+
2 rows in set (0.00 sec)
MariaDB [(none)]> select * from yydb.t1;
ERROR 1146 (42S02): Table 'yydb.t1' doesn't exist
你看明白了吗?但在slave加上通配语句就会解决此问题了,因为通配是基于binlog中查询的字符来过滤的,所以你懂得!这里就不再演示了
五、基于安全(SSL)复制
注:
1、安全模式的复制数据库的版本是mariadb-10.0.10源码安装,并不是之前使用的通用二进制格式的,因为二进制格式不支持SSL,所以只能源码编译安装了
2、源码安装完成后,此处复制是基于主从复制的异步模式。
为什么要用到ssl,因为在主从复制过程或远程连接到mariadb所有的链接通信中的数据都是明文的,也就变得不安全了,所以要用到SSL,虽然SSL在前几天曝出高危漏洞,如果没有采取安全措施,一定会出损失,如果增加了安全措施一定会减小损失。所以说还是尽可能的增加安全意识,来保证我们的信息数据的安全。
1、配置大纲
生成CA证书
master需要证书与私钥,指向CA文件所在位置
slave需要证书与私钥
远程连接的用户同样需要证书与私钥
2、实现步骤
⑴、在master做自签CA为所用的连接验证。
[root@bogon CA]# (umask 077; openssl genrsa 1024 > private/cakey.pem)
Generating RSA private key, 1024 bit long modulus
...................................................++++++
.......++++++
e is 65537 (0x10001)
[root@bogon CA]# openssl req -new -x509 -key private/cakey.pem -out cacert.pem -days 3655
You are about to be asked to enter information that will be incorporated
into your certificate request.
What you are about to enter is what is called a Distinguished Name or a DN.
There are quite a few fields but you can leave some blank
For some fields there will be a default value,
If you enter '.', the field will be left blank.
-----
Country Name (2 letter code) [XX]:cn
State or Province Name (full name) []:henan
Locality Name (eg, city) [Default City]:zz
Organization Name (eg, company) [Default Company Ltd]:it
Organizational Unit Name (eg, section) []:mysql
Common Name (eg, your name or your server's hostname) []:ca.it.com
Email Address []:[email protected]
[root@bogon CA]# mkdir newcerts/ crl/ certs/
[root@bogon CA]# ls
cacert.pem  certs  crl  newcerts  private
[root@bogon CA]# touch index.txt serial
[root@bogon CA]# echo 01 >serial
CA的自签证书到此建立完毕
⑵、建立master的证书
[root@bogon CA]# mkdir /etc/master/
[root@bogon CA]# cd /etc/master/
[root@bogon master]# (umask 077;openssl genrsa 1024 >master.key)
Generating RSA private key, 1024 bit long modulus
............................................................................++++++
.......................................................++++++
e is 65537 (0x10001)
[root@bogon master]# openssl req -new -key master.key -out master.csr
You are about to be asked to enter information that will be incorporated
into your certificate request.
What you are about to enter is what is called a Distinguished Name or a DN.
There are quite a few fields but you can leave some blank
For some fields there will be a default value,
If you enter '.', the field will be left blank.
-----
Country Name (2 letter code) [XX]:cn
State or Province Name (full name) []:henan
Locality Name (eg, city) [Default City]:zz
Organization Name (eg, company) [Default Company Ltd]:it
Organizational Unit Name (eg, section) []:mysql
Common Name (eg, your name or your server's hostname) []:master.mysql.com
Email Address []:
Please enter the following 'extra' attributes
to be sent with your certificate request
A challenge password []:
An optional company name []:
[root@bogon master]# ls
master.csr  master.key
[root@bogon master]# openssl ca -in master.csr -out master.crt -days 3655
Using configuration from /etc/pki/tls/openssl.cnf
Check that the request matches the signature
Signature ok
Certificate Details:
        Serial Number: 1 (0x1)
        Validity
            Not Before: Apr 12 12:19:15 2014 GMT
            Not After : Apr 14 12:19:15 2024 GMT
        Subject:
            countryName               = cn
            stateOrProvinceName       = henan
            organizationName          = it
            organizationalUnitName    = mysql
            commonName                = master.mysql.com
        X509v3 extensions:
            X509v3 Basic Constraints:
                CA:FALSE
            Netscape Comment:
                OpenSSL Generated Certificate
            X509v3 Subject Key Identifier:
                6D:EB:72:B3:2B:43:54:29:9B:53:C7:FD:65:B4:ED:A9:C1:6E:F8:67
            X509v3 Authority Key Identifier:
                keyid:24:2A:8E:6E:64:AC:23:15:E3:B4:E6:78:2C:DF:B6:B5:18:B7:A6:A7
Certificate is to be certified until Apr 14 12:19:15 2024 GMT (3655 days)
Sign the certificate? [y/n]:y
1 out of 1 certificate requests certified, commit? [y/n]y
Write out database with 1 new entries
Data Base Updated
[root@bogon master]# ll
total 12
-rw-r--r-- 1 root root 3107 Apr 12 20:19 master.crt
-rw-r--r-- 1 root root  643 Apr 12 20:16 master.csr
-rw------- 1 root root  887 Apr 12 20:13 master.key
[root@bogon master]# cp /etc/pki/CA/c
cacert.pem  certs/      crl/
[root@bogon master]# cp /etc/pki/CA/cacert.pem .
[root@bogon master]# chown mysql.mysql master.crt master.key cacert.pem
[root@bogon master]# ll
total 16
-rw-r--r-- 1 mysql mysql 1017 Apr 12 20:22 cacert.pem
-rw-r--r-- 1 mysql mysql 3107 Apr 12 20:19 master.crt
-rw-r--r-- 1 root  root   643 Apr 12 20:16 master.csr
-rw------- 1 mysql mysql  887 Apr 12 20:13 master.key
到此master的证书与私钥己经建立完毕。
修改/etc/my.cnf开启支持SSL
[mysqld]
ssl
ssl_ca= /etc/master/cacert.pem
ssl_cert = /etc/master/master.crt
ssl_key = /etc/master/master.key
还要在client段添加上如下一行,注明使用的算法
ssl_cipher = DHE-RSA-AES256-SHA
登录到master看一下变量
MariaDB [(none)]> show variables like "%ssl%";
+---------------+------------------------+
| Variable_name | Value                  |
+---------------+------------------------+
| have_openssl  | YES                    |
| have_ssl      | YES                    |
| ssl_ca        |                        |
| ssl_capath    | /etc/master/cacert.pem |
| ssl_cert      | /etc/master/master.crt |
| ssl_cipher    |                        |
| ssl_crl       |                        |
| ssl_crlpath   |                        |
| ssl_key       | /etc/master/master.key |
+---------------+------------------------+
9 rows in set (0.00 sec)
到此ssl安装完成
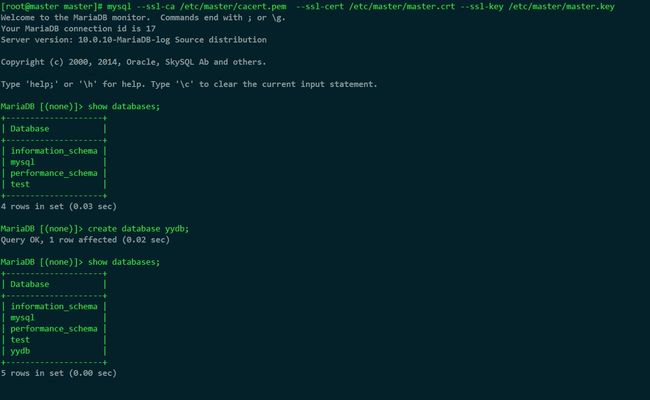
重启服务,登录看一下状态
生效了吧
以后就要指CA的证书,自己的公钥,自己的私钥才可登录 。
⑶、建立slave的证书
[root@slave slave]# (umask 077;openssl genrsa 1024 > mysql.key)
Generating RSA private key, 1024 bit long modulus
..........................++++++
.....++++++
e is 65537 (0x10001)
[root@slave slave]# openssl req -new -key mysql.key -out mysql.csr
You are about to be asked to enter information that will be incorporated
into your certificate request.
What you are about to enter is what is called a Distinguished Name or a DN.
There are quite a few fields but you can leave some blank
For some fields there will be a default value,
If you enter '.', the field will be left blank.
-----
Country Name (2 letter code) [XX]:cn
State or Province Name (full name) []:henan
Locality Name (eg, city) [Default City]:zz
Organization Name (eg, company) [Default Company Ltd]:it
Organizational Unit Name (eg, section) []:tach
Common Name (eg, your name or your server's hostname) []:slave.mysql.com
Email Address []:
Please enter the following 'extra' attributes
to be sent with your certificate request
A challenge password []:
An optional company name []:
[root@slave slave]# scp mysql.csr 192.168.1.116:/tmp
[email protected]'s password:
mysql.csr             100%  639     0.6KB/s   00:00
[root@slave slave]# ll
total 16
-rw-r--r-- 1 root root 1017 Apr 13 22:39 cacert.pem
-rw-r--r-- 1 root root 3105 Apr 13 22:39 mysql.crt
-rw-r--r-- 1 root root  639 Apr 13 22:37 mysql.csr
-rw------- 1 root root  887 Apr 13 22:37 mysql.key
[root@slave slave]# chown -R mysql.mysql 8
chown: cannot access `8': No such file or directory
[root@slave slave]# chown -R mysql.mysql *
[root@slave slave]# ll
total 16
-rw-r--r-- 1 mysql mysql 1017 Apr 13 22:39 cacert.pem
-rw-r--r-- 1 mysql mysql 3105 Apr 13 22:39 mysql.crt
-rw-r--r-- 1 mysql mysql  639 Apr 13 22:37 mysql.csr
-rw------- 1 mysql mysql  887 Apr 13 22:37 mysql.key
登录slave服务器连接
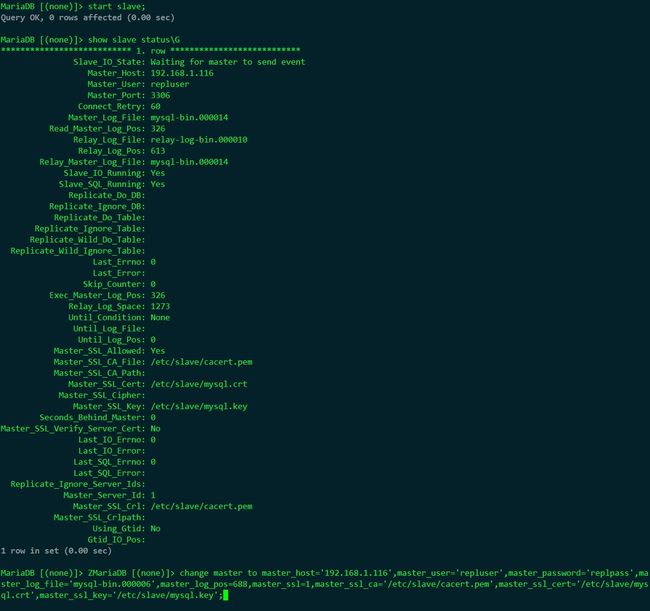
MariaDB [(none)]> change master to master_host='192.168.1.116',master_user='repluser',master_password='replpass',master_log_file='mysql-bin.000006',master_log_pos=688,master_ssl=1,master_ssl_ca='/etc/slave/cacert.pem',master_ssl_cert='/etc/slave/mysql.crt',master_ssl_key='/etc/slave/mysql.key';
启动slave
注:这张截图有点失算啊~~~~~
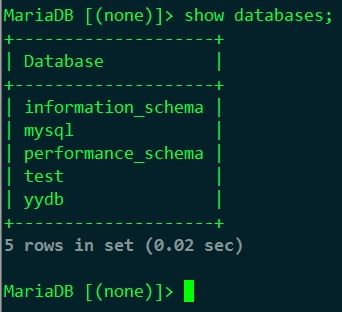
在slave上看看有没有之前同步到master上的yydb库。
好了,演示完毕,希望对各们有所帮助。
===========================================完===========================================


