要说python优雅在何处,与其他语言相比最为明显的,那一定是网络操作了。python可以让我们用最少的语句写出功能强大的程序,网络操作有相当多的开源库可以使用,而不用像其他语言一样,步骤繁琐。接下来从低到高介绍python网络编程
- socket网络编程接口
- 基本概念
可以这样来理解socket,完成一段网络通信需要五个元素,协议族,协议类型,协议,目标ip地址,目标端口号,这是由TCP/IP网络结构决定的。socket作为一种数据结构,将以上五个信息组合起来,称为套接字。根据面向连接与非连接,套接字类型分为Datagram与Stream两种类型。Datagram套接字使用UDP协议,向目标地址发送数据包,不保证可靠送达,Stream使用TCP协议,是可靠的、具有差错与流量控制的传输协议,也就是说,stream类型的套接字传输信息,具有较好的可靠性,而Datagram类型的套接字具有更高的实时性。 - 初始化流式套接字的步骤
- 服务端
- 使用socket函数创建套接字
- 绑定到指定的ip地址
- 监听客户端连接
- 获取客户端连接后,使用返回的套接字收发数据
- 通信结束,关闭套接字
- 客户端
- 创建套接字
- 连接指定ip地址
- 连接成功后收发数据
- 关闭套接字
-
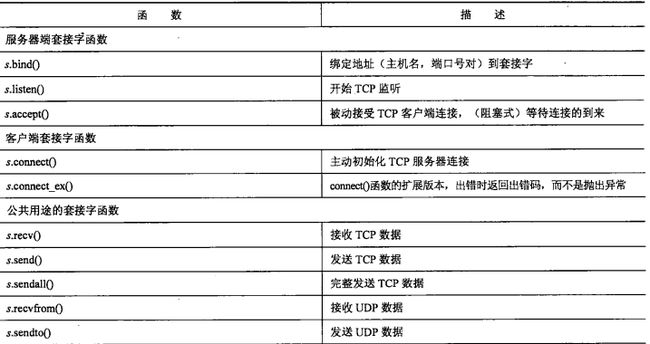
常用套接字函数

- 例程
- 时间戳服务器
#!/usr/bin/env python import socket from time import ctime host='127.0.0.1' port=8000 bufsize=1024 addr=(host, port) sock = socket.socket(socket.AF_INET, socket.SOCK_STREAM) sock.bind(addr) sock.listen(5) while True: print 'waiting for connection...' clisock, cliaddr = sock.accept() print 'connected from', cliaddr print 'peername:', clisock.getpeername() data = clisock.recv(bufsize) if not data: break clisock.send('[%s] %s' % (ctime(), data)) clisock.close() sock.close() - 客户端
 #!/usr/bin/env python
 from time import ctime
 import socket

 host='127.0.0.1'
 port=8000
 addr=(host, port)
 bufsize=1024


 while True:
     sock = socket.socket(socket.AF_INET, socket.SOCK_STREAM)
     sock.connect(addr)
     data = raw_input(u'>')
     if not data:
         break
     sock.send(data)
     data = sock.recv(bufsize)
     print data
            #!/usr/bin/env python
 from time import ctime
 import socket

 host='127.0.0.1'
 port=8000
 addr=(host, port)
 bufsize=1024


 while True:
     sock = socket.socket(socket.AF_INET, socket.SOCK_STREAM)
     sock.connect(addr)
     data = raw_input(u'>')
     if not data:
         break
     sock.send(data)
     data = sock.recv(bufsize)
     print data

     sock.close()
     sock.close()
- 时间戳服务器
- 服务端
- 基本概念
- 网络http操作,使用urllib、urllib2、requests
- 一般来说,进行网络操作时可以使用以上三个模块任意一种,但是就功能上来说,requests较为强大,对底层模块进行了封装,使用更为简便,我们重点来讨论一下requests
- http请求有几种类型,最常用的是get与post,get请求向指定的资源请求数据,GET 请求可被缓存,GET 请求保留在浏览器历史记录中,GET 请求可被收藏为书签,GET 请求不应在处理敏感数据时使用,GET 请求有长度限制,GET 请求只应当用于取回数据。post请求向指定的资源提交数据,POST 请求不会被缓存,POST 请求不会保留在浏览器历史记录中,POST 不能被收藏为书签,POST 请求对数据长度没有要求。还有一个区别是,使用get请求时,参数直接显示在url中,安全性不高,而post请求将参数包含在请求体中。
- 使用requests
- 发出get与post请求
In [8]: res = requests.get('http://www.baidu.com') In [9]: res2 = requests.post('http://www.baidu.com') - 设置请求参数,通过params参数设置请求参数,需要传进一个字典,且值为none的键不会出现在url中
In [10]: para = {'username':'xiaozhi','password':'testpass'} In [11]: res3 = requests.get('http://www.baidu.com',params=para) In [12]: res3.url Out[12]: u'http://www.baidu.com/?username=xiaozhi&password=testpass' - 为post请求传递数据使用data参数
In [3]: data = {'key':'value'}
In [4]: res = requests.post('http://httpbin.org/post', data=data)
In [38]: payload = (('key1', 'value1'), ('key1', 'value2')) In [39]: r = requests.post('http://httpbin.org/post', data=payload) - 获取响应内容
字符串内容
查看与设置内容编码In [5]: res.text Out[5]: u'{"args":{},"data":"","files":{},"form":{"key":"value"},"headers":{"Accept":"*/*","Accept-Encoding":"gzip, deflate","Connection":"close","Content-Length":"9","Content-Type":"application/x-www-form-urlencoded","Host":"httpbin.org","User-Agent":"python-requests/2.18.4"},"json":null,"origin":"113.140.11.6","url":"http://httpbin.org/post"}\n'
使用content属性可以查看返回内容的字节内容,python会自动为我们解码gzip压缩的数据In [8]: res.encoding In [9]: res.encoding='utf-8'
json对象In [15]: res.content Out[15]: '{"args":{},"data":"","files":{},"form":{"key":"value"},"headers":{"Accept":"*/*","Accept-Encoding":"gzip, deflate","Connection":"close","Content-Length":"9","Content-Type":"application/x-www-form-urlencoded","Host":"httpbin.org","User-Agent":"python-requests/2.18.4"},"json":null,"origin":"113.140.11.6","url":"http://httpbin.org/post"}\n'
查看返回状态码In [16]: res.json() Out[16]: {u'args': {}, u'data': u'', u'files': {}, u'form': {u'key': u'value'}, u'headers': {u'Accept': u'*/*', u'Accept-Encoding': u'gzip, deflate', u'Connection': u'close', u'Content-Length': u'9', u'Content-Type': u'application/x-www-form-urlencoded', u'Host': u'httpbin.org', u'User-Agent': u'python-requests/2.18.4'}, u'json': None, u'origin': u'113.140.11.6', u'url': u'http://httpbin.org/post'}
原始数据res.status_code
查看返回的http头部In [31]: res = requests.get('https://api.github.com/events', stream=True) In [32]: with open('temp.txt', 'wb') as fd: ...: for chunk in res.iter_content(512): ...: fd.write(chunk)
使用headers参数定制请求头In [44]: r.headers Out[44]: {'Content-Length': '351', 'Via': '1.1 vegur', 'Server': 'gunicorn/19.8.1', 'Connection': 'keep-alive', 'Access-Control-Allow-Credentials': 'true', 'Date': 'Thu, 24 May 2018 12:13:11 GMT', 'Access-Control-Allow-Origin': '*', 'Content-Type': 'application/json'}
返回对象的cookies属性保存了会话cookie,当需要重用cookies时,将cookie对象作为参数传递给请求的cookies参数In [33]: headers = {'user-agent':'myapp'} In [34]: res = requests.get('http://www.baidu.com', headers=headers)
使用cookie模拟登陆豆瓣网站res = requests.get(url,cookies=res.cookies)
使用proxies参数设置代理,访问googlecookies = {} In [57]: raw_cookies='bid=-aa9Pl9eMB0; _pk_ref.100001.8cb4=%5B%22%22%2C%22%22%2C1527208498%2C%22http ...: s%3A%2F%2Fwww.baidu.com%2Flink%3Furl%3DFpVInsn4IT_ak-F56yaoXBUJPtBtueoUd3nVtc4NWZV4QBO8sdnc ...: vDJTEYLuefv5%26ck%3D1583.5.192.64.190.324.478.646%26shh%3Dwww.baidu.com%26wd%3D%26eqid%3D89 ...: b868ea00032e0c000000035b06b157%22%5D; _pk_id.100001.8cb4=83b586dcea10d0e5.1519446169.2.1527 ...: 209320.1519446169.; __utma=30149280.2141300691.1527208503.1527208503.1527208503.1; __utmz=3 ...: 0149280.1527208503.1.1.utmcsr=baidu|utmccn=(organic)|utmcmd=organic; ll="118371"; _pk_ses.1 ...: 00001.8cb4=*; __utmb=30149280.9.10.1527208503; __utmc=30149280; ps=y; push_noty_num=0; push ...: _doumail_num=0; __utmv=30149280.13784; ap=1; dbcl2="137847261:LmaeCQEh7Eo"; ck=x-vi; __utmt ...: =1' In [58]: for line in raw_cookies.split(';'): ...: key,value = line.split('=', 1) ...: cookies[key] = value In [64]: url = 'https://www.douban.com/people/xiaozhiAXX/' In [65]: res = requests.get(url,cookies=cookies) In [66]: res.status_code Out[66]: 200In [1]: import requests In [2]: proxy = {'http':'http://127.0.0.1:8118','https':'https://127.0.0.1:8118'} In [3]: res = requests.get('https://www.google.com', proxies=proxy) In [4]: res.status_code Out[4]: 200
- 发出get与post请求
- 网络客户端
- 电子邮件
python发送电子邮件时,使用标准库中的smtplib和email,smptlib中有一个SMTP类,需要发送邮件时,初始化该类返回smtpserver对象,使用login登陆MUA,使用sendmail方法发送邮件,邮件的正文用email.mime.text.MIMEText对象进行描述
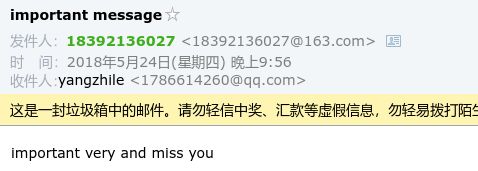
简单电子邮件发送程序from email.mime.text import MIMEText msg = MIMEText('hello message','plain', 'utf-8') from_addr = '[email protected]' to_addr = '[email protected]' sub_msg = 'hello' smtp_server = 'smtp.163.com' import smtplib # 初始化smtp对象,传入服务器地址与端口号 server = smtplib.SMTP(smtp_server,25) # 设置调试模式可以让我们看到发送邮件过程中的信息 server.set_debuglevel(1) # 登陆MUA,使用账户与授权码登陆 server.login(from_addr, 'yourpassword') msg['From'] = from_addr msg['To'] = to_addr msg['Subject'] = 'important message' server.sendmail(from_addr, [to_addr], msg.as_string())邮件被放入垃圾邮件中,如下
发送带附件的电子邮件
 from email.mime.text import MIMEText
 from smtplib import SMTP
 from email.mime.multipart import MIMEMultipart


 from_addr = '[email protected]'
 to_addr = '[email protected]'
 smtp_server = 'smtp.163.com'
 smtp_port = 25
 subject_msg = 'subject'

 mul_msg = MIMEMultipart()
 mul_msg['From'] = from_addr
 mul_msg['To'] = to_addr
 mul_msg['Subject'] = subject_msg

 msg = MIMEText('\n\rimportant message\n\r', 'plain', 'utf-8')
 mul_msg.attach(msg)

 att1 = MIMEText(open('program.txt','rb').read(), 'base64', 'utf-8')
 att1['Content-Type'] = 'application/octet-stream'
 att1["Content-Disposition"] = 'attachment;filename="program.txt"'
 mul_msg.attach(att1)

 smtp = SMTP(smtp_server, smtp_port)
 smtp.login(from_addr, 'youpass')
 smtp.set_debuglevel(1)
 smtp.sendmail(from_addr, to_addr, mul_msg.as_string())
 smtp.close()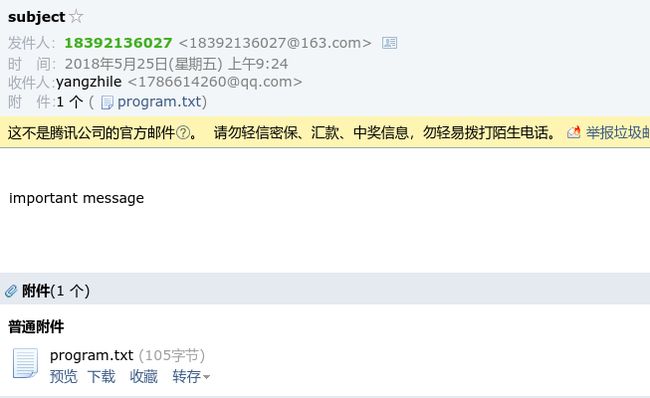
使用第三方开源库yagmail发送电子邮件
使用pop3协议用网易邮箱发送邮件时,容易被网易识别为垃圾邮件,可以使用qq邮箱import yagmail yag = yagmail.SMTP(user='[email protected]', password='you pass', host='smtp.qq.com', port=25) contents = ['import message','program.txt'] yag.send(to='dest', subject='subject', contents=contents)
- 电子邮件