官方手册:
https://mariadb.com/resources/blog/binlog-server
参考文章:
http://www.linuxidc.com/Linux/2016-12/137892.htm
http://www.sohu.com/a/120438391_487514
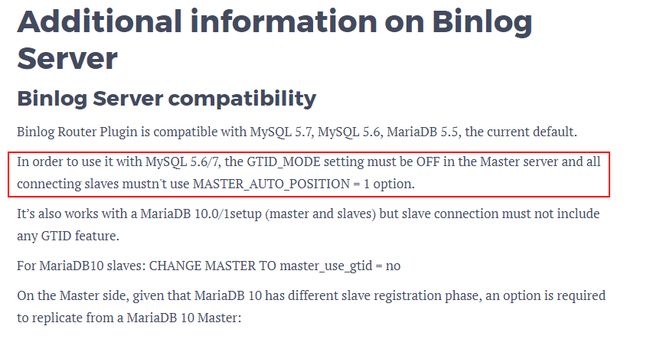
缺点:目前binlog server还不支持GTID的复制。
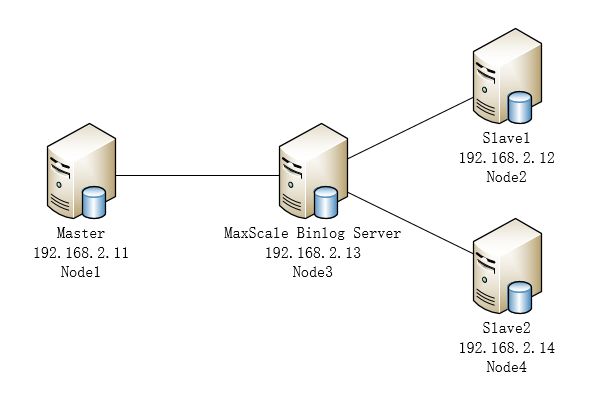
实验拓扑图:
步骤1:
Node1上创建复制权限的账户:
> grant replication client,replication slave,select on *.* to 'rpl'@"192.168.2.%" identified by 'rpl';
# 这是给从库复制用的账号,同时也是maxscale拉取binlog的账户,它比常规的slave 账户多了一个select权限。
先把Node2挂到node1下,模拟没有binlog server之前的架构:
过程无非就是导出node1的全量数据,在node2上恢复并change master 到node1,具体步骤略过。
Node3 上安装maxscale:
rpm -ivh maxscale-2.1.4-1.rhel.6.x86_64.rpm
mkdir /data/binlog/ -p
chown maxscale.maxscale /data/binlog/ -R
vim/etc/maxscale.conf 内容如下:
[maxscale]
threads=4 # 根据CPU核心数量来设置
## 连接到Master的信息
[Replication]
type=service
router=binlogrouter
version_string=5.6.36-log
# version_string 参数用于将主库的版本信息传递到从库,MaxScale sends server handshakepacket to clients
router_options=server-id=13,heartbeat=30,transaction_safety=1,rcompatibility=1,send_slave_heartbeat=1
binlogdir=/data/binlog # 这个目录属主属组必须是maxscale
user=rpl
passwd=rpl
#说明:
#server-id 设置的是maxscale的id,不能与主库或者从库重名。
#heartbeat=30表示当maxscale在30秒内没有接收到主库推送的binlog日志,发送心跳检查
#transaction_safety=1 用于启用binlog日志中的不完整事务检测。当MariaDBMaxScale启动时,如果当前binlog文件已损坏或找到不完整的事务,则可能会出现错误消息。在正常工作期间,binlog事件不会分配到从库,直到事务已经提交。默认值为off,设置transaction_safety= on以启用不完全事务检测。【类似relay_log_recovery = ON的作用】
#send_slave_heartbeat=1开启心跳检查
## 提供给slave连接的信息
[ReplicationListener]
type=listener
service=Replication
protocol=MySQLClient
port=5308
## maxscale后端管理端口
[MaxAdmin Service]
type=service
router=cli
[MaxAdmin Listener]
type=listener
service=MaxAdmin Service
protocol=maxscaled
socket=default
vim /data/binlog/master.ini 加上如下的内容:
[binlog_configuration]
master_host=192.168.2.11 # 主库地址
master_port=3306 #主库端口号
master_user=rpl #master的复制账号
master_password=rpl # master的复制密码
filestem=mysql # 表示拉过来的binlog文件以mysql.***这种命名方式。我的主库也是mysql.*这种命名方式
添加这个master.ini文件,以便启动maxscale后自动去拉取主库的目前的全部binlog文件(即便后来主库的binlog过期后被自动purge掉了,maxscale服务器上的binlog还会保存着的)
然后,在node3上开启maxscale服务:
/etc/init.d/maxscale start
稍等片刻,node3会把主库的全部binlog都拉过来。
日志记录在/var/log/maxscale/maxscale.log 里面。
ss -lnt|grep 5308 端口起来的话。
mysql -urpl -prpl -h 127.0.0.1 -P 5308 即可登陆到maxscale控制台,和mysql使用起来一样。
现在我们把node4这个新的从库加到node3的binlog server 下面:
首先,将node1的全备份数据导入到node4,
然后head -35 all.sql 全备份里面找到类似:
CHANGE MASTER TOMASTER_LOG_FILE='mysql.000004', MASTER_LOG_POS=2254 这样的记录。
在node4上执行change master操作:
> CHANGE MASTER TO MASTER_HOST='192.168.2.13' ,
MASTER_PORT=5308,
MASTER_USER='rpl',
MASTER_PASSWORD='rpl',
MASTER_LOG_FILE='mysql.000004',
MASTER_LOG_POS=2254 ;
注意上面的change master操作中,我们只改了下master的地址和端口、复制用的用户名、密码。
因为binlog server实际上和master的数据是一样的,它只直接把master的binlog拖过来的。
同样的操作,我们可以把node2也挂到binlog server下面。
在node2上:
show slave status\G 记录下Exec_Master_Log_Pos和Master_Log_File。
stop slave;
reset slave all;
然后使用change master将上级指向binlog server即可。
其他maxscale的命令:
在node3上,执行show slave hosts; 可以看到
还可以登陆maxscale控制台:
maxadmin -S /tmp/maxadmin.sock
MaxScale> show services 等其他很多查看状态的命令,可使用help提示。这里不是重点。


