aop
关于aop
AOP(Aspect Oriented Programming),即面向切面编程,可以说是OOP(Object Oriented Programming,面向对象编程)的补充和完善。OOP引入封装、继承、多态等概念来建立一种对象层次结构,用于模拟公共行为的一个集合。不过OOP允许开发者定义纵向的关系,但并不适合定义横向的关系,例如日志功能。日志代码往往横向地散布在所有对象层次中,而与它对应的对象的核心功能毫无关系对于其他类型的代码,如安全性、异常处理和透明的持续性也都是如此,这种散布在各处的无关的代码被称为横切(cross cutting),在OOP设计中,它导致了大量代码的重复,而不利于各个模块的重用。
AOP技术恰恰相反,它利用一种称为"横切"的技术,剖解开封装的对象内部,并将那些影响了多个类的公共行为封装到一个可重用模块,并将其命名为"Aspect",即切面。所谓"切面",简单说就是那些与业务无关,却为业务模块所共同调用的逻辑或责任封装起来,便于减少系统的重复代码,降低模块之间的耦合度,并有利于未来的可操作性和可维护性。
使用"横切"技术,AOP把软件系统分为两个部分:核心关注点和横切关注点。业务处理的主要流程是核心关注点,与之关系不大的部分是横切关注点。横切关注点的一个特点是,他们经常发生在核心关注点的多处,而各处基本相似,比如权限认证、日志、事物。AOP的作用在于分离系统中的各种关注点,将核心关注点和横切关注点分离开来。
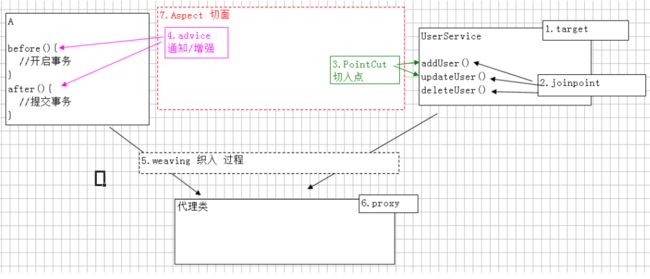
AOP核心概念
- 横切关注点:对哪些方法进行拦截,拦截后怎么处理,这些关注点称之为横切关注点。如日志 , 安全 , 缓存 , 事务等等 ...
- 切面(ASPECT):类是对物体特征的抽象,切面就是对横切关注点的抽象。可以说横切关注点是被模块化的特殊对象。即,它是一个类。
- 连接点(JointPoint):被拦截到的点,因为Spring只支持方法类型的连接点,所以在Spring中连接点指的就是被拦截到的方法,实际上连接点还可以是字段或者构造器
- 切入点(PointCut):对连接点进行拦截的定义。表示一组 joint point,这些 joint point 或是通过逻辑关系组合起来,或是通过通配、正则表达式等方式集中起来,它定义了相应的 Advice 将要发生的地方。
- 通知(Advice):所谓通知指的就是指拦截到连接点之后要执行的代码,通知分为前置、后置、异常、最终、环绕通知五类。切面必须要完成的工作。即,它是类中的一个方法。
- 目标对象(Target):代理的目标对象
- 织入(Weaving):将 Aspect 和其他对象连接起来, 并创建 Advice的过程
- 代理对象(Proxy):向目标对象应用通知之后创建的对象。
- 引入(introduction):在不修改代码的前提下,引入可以在运行期为类动态地添加一些方法或字段
举一个容易理解的例子:

通知(Advice)的类型
- 前置通知:before
在切入点方法执行之前实施增强 - 后置通知:after-returning
切入点方法正常执行之后实施增强,它和异常通知只能执行一个 - 异常通知:after-throwing
在切入点方法执行过程中出现异常之后实施增强 - 最终通知:after
无论切入点方法执行时是否出现异常,它都会在其后面执行 - 环绕通知:around
它是spring框架为我们提供的一种可以在代码中手动控制增强代码什么时候执行的方式,通常情况下,环绕通知都是独立使用的
spring对AOP的支持
Spring中AOP代理由Spring的IOC容器负责生成、管理,其依赖关系也由IOC容器负责管理。
因此,AOP代理可以直接使用容器中的其它bean实例作为目标,这种关系可由IOC容器的依赖注入提供。Spring创建代理的规则为:
1、默认使用Java动态代理来创建AOP代理,这样就可以为任何接口实例创建代理了
2、当需要代理的类不是代理接口的时候,Spring会切换为使用CGLIB代理,也可强制使用CGLIB
AOP编程其实是很简单的事情,纵观AOP编程,程序员只需要参与三个部分:
1、定义普通业务组件
2、定义切入点,一个切入点可能横切多个业务组件
3、定义增强处理,增强处理就是在AOP框架为普通业务组件织入的处理动作
所以进行AOP编程的关键就是定义切入点和定义增强处理,一旦定义了合适的切入点和增强处理,AOP框架将自动生成AOP代理,即:代理对象的方法=增强处理+被代理对象的方法。
使用Spring实现AOP
首先编写我们的业务接口和实现类
//抽象角色:增删改查业务
public interface UserService {
    int add();
    int delete();
    int update();
    void query();
}
//真实对象,完成增删改查操作的人
public
class UserServiceImpl implements UserService {
@Override
public int add() {
System.out.println("增加一个用户");
return 1;
}
@Override
public int delete() {
System.out.println("删除一个用户");
return 1;
}
@Override
public int update() {
System.out.println("更新一个用户");
return 1;
}
@Override
public void query() {
System.out.println("查找一个用户");
}
}
实现aop的三种方式
1.通过spring API实现
增强类
写两个增强类,一个前置通知,一个后置通知,实现spring提供的接口
//前置通知
public class BeforLog implements MethodBeforeAdvice {
    //method : 要执行的目标对象的方法
    //args : 被调用的方法的参数
    //target : 目标对象
    @Override
    public void before(Method method, Object[] args, Object target) throws Throwable {
//        System.out.println( target.getClass().getName() + "的" + method.getName() + "方法被执行了");
        if(!method.getName().equals("query")){
            System.out.println("开启事务...");
        }
    }
}
//后置通知
public class AfterLog implements AfterReturningAdvice {
    //returnValue 返回值
    //method被调用的方法
    //args 被调用的方法的对象的参数
    //target 被调用的目标对象
    @Override
    public void afterReturning(Object returnValue, Method method, Object[] args, Object target) throws Throwable {
//        System.out.println("执行了" + target.getClass().getName()
//                +"的"+method.getName()+"方法,"
//                +"返回值:"+returnValue);
        if(!method.getName().equals("query")){
            System.out.println("关闭事务...");
        }
    }
}
配置文件
命名为beans1.xml
测试
//spring的API
@Test
public void test1(){
    ApplicationContext context = new ClassPathXmlApplicationContext("beans1.xml");
    UserService userService = (UserService) context.getBean("userService");
    userService.query();
    userService.add();
    userService.update();
    userService.delete();
}
结果
查找一个用户
开启事务...
增加一个用户
关闭事务...
开启事务...
更新一个用户
关闭事务...
开启事务...
删除一个用户
关闭事务...
2.自定义增强类
模拟事务类
public class MyTransaction {
    public void before(){
        System.out.println("开启事务...");
    }
    public void afterReturning(){
        System.out.println("关闭事务...");
    }
    public void afterThrowing(){
        System.out.println("出现异常...");
    }
    public void after(){
        System.out.println("最终通知...");
    }
}
手动对update()方法添加异常
@Override
public int update() {
    int i  = 1/0;
    System.out.println("更新一个用户");
    return 1;
}
配置文件
命名为beans2.xml
测试
//自定义
@Test
public void test2(){
    ApplicationContext context = new ClassPathXmlApplicationContext("beans2.xml");
    UserService userService = (UserService) context.getBean("userService");
    userService.query();
    userService.add();
    userService.delete();
    userService.update();//会出现异常
}
结果
可以发现,执行顺便分别是前置通知,切入点方法执行,后置通知or异常通知,最终通知
查找一个用户
开启事务...
增加一个用户
关闭事务...
最终通知...
开启事务...
删除一个用户
关闭事务...
最终通知...
开启事务...
出现异常...
最终通知...
3.注解实现
切面类
@Aspect//标记为切面类
public class AnnotationPointcut {
    //前置通知
    @Before("execution(int com.cong.pojo.UserServiceImpl.*(..))")
    public void before(){
        System.out.println("开启事务...");
    }

    //后置通知
    @AfterReturning("execution(int com.cong.pojo.UserServiceImpl.*(..))")
    public void afterReturning(){
        System.out.println("关闭事务...");
    }
    //异常通知
    @AfterThrowing("execution(int com.cong.pojo.UserServiceImpl.*(..))")
    public void afterThrowing(){
        System.out.println("出现异常...");
    }
    //最终通知
    @After("execution(int com.cong.pojo.UserServiceImpl.*(..))")
    public void after(){
        System.out.println("最终通知...");
    }
    //环绕通知
    //@Around
}
配置文件
命名为beans3.xml
测试
//注解的
@Test
public void test3(){
    ApplicationContext context = new ClassPathXmlApplicationContext("beans3.xml");
    UserService userService = (UserService) context.getBean("userService");
    userService.query();
    userService.add();
    userService.delete();
    userService.update();//会出现异常
}
结果
有点意思的是,注解实现的,顺序有误,最终通知比后置通知更前
所以如果要使用注解实现aop的话,最好还是使用环绕通知的方法
查找一个用户
开启事务...
增加一个用户
最终通知...
关闭事务...
开启事务...
删除一个用户
最终通知...
关闭事务...
开启事务...
最终通知...
出现异常...
扩展关于
通过aop命名空间的
当然,spring在内部依旧采用AnnotationAwareAspectJAutoProxyCreator进行自动代理的创建工作,但具体实现的细节已经被
proxy-target-class属性,默认为false,表示使用jdk动态代理织入增强。当配为
4.关于环绕通知
环绕通知是spring框架为我们提供的一种可以在代码中手动控制增强方法何时执行的方式。
比如这里采用自定义增强类的方法实现aop
业务类
只有一个执行方法
public class AroundAdviceService {
    public void doSomething(){
        System.out.println("do something...");
    }
}
模拟通知类
public class AroundLog {
    public void before(){
        System.out.println("前置通知...");
    }
    public void afterReturning(){
        System.out.println("后置通知...");
    }
    public void afterThrowing(){
        System.out.println("异常通知...");
    }
    public void after(){
        System.out.println("最终通知...");
    }
    public void around(){
        System.out.println("环绕通知...");
    }
}
配置文件
命名为beans4.xml
测试
//环绕通知
@Test
public void test4(){
    ApplicationContext context = new ClassPathXmlApplicationContext("beans4.xml");
    AroundAdvice aroundAdvice = (AroundAdvice) context.getBean("aroundAdviceService");
    aroundAdvice.doSomething();
}
结果异常
结果很奇怪
前置通知...
环绕通知...
最终通知...
后置通知...
当注释掉aop里面环绕通知的时候,结果才是正常的
前置通知...
do something...
后置通知...
最终通知...
探究
问题:
当我们配置了环绕通知之后,切入点方法没有执行,而通知方法执行了。
原因:
通过对比动态代理中的环绕通知代码,发现动态代理的环绕通知有明确的切入点方法调用,而我们的代码中没有。
解决:
Spring框架为我们提供了一个接口:ProceedingJoinPoint。该接口有一个方法proceed(),此方法就相当于明确调用切入点方法。
该接口可以作为环绕通知的方法参数,在程序执行时,spring框架会为我们提供该接口的实现类供我们使用。
实现环绕通知
改写环绕通知
    public Object aroundAdvice(ProceedingJoinPoint proceedingJoinPoint){
        Object res;
        try {
            Object [] args = proceedingJoinPoint.getArgs();//得到方法执行所需的参数
            before();//前置通知
            res = proceedingJoinPoint.proceed(args);//明确调用业务层方法(通过切入点表达式配置)
            afterReturning();//后置通知
            return res;
        } catch (Throwable throwable) {
            afterThrowing();//异常通知
            throw new RuntimeException(throwable);
        }finally {
            after();//最终通知
        }
    }
配置文件,注释掉其它所有的通知
再次运行,结果正常了
前置通知...
do something...
后置通知...
最终通知...
模拟aspect与advice的执行过程
搬运自:https://blog.csdn.net/qq_32331073/article/details/80596084
public class AspectAdviceInvokeProcess {
    public static void main(String[] args){
        try {
            //正常执行
            AspectInvokeProcess(false);
            System.out.println("=====分割线=====");
            //异常执行
            AspectInvokeProcess(true);
        } catch (Exception e) {
            // TODO Auto-generated catch block
            e.printStackTrace();
        }
    }

    /**
     * 切面执行过程
     * @param isException
     * @throws Exception
     */
    public static void AspectInvokeProcess(boolean isException) throws Exception{
        try {
            try {
                aroundAdvice(isException);
            } finally {
                afterAdvice();
            }
            afterReturningAdvice();
            return;
        } catch (Exception e) {
            afterThrowingAdvice(e);
            throw e;
            return;
        }
    }

    /**
     * 环绕增强
     * @param isException
     * @throws Exception
     */
    private static void aroundAdvice(boolean isException) throws Exception {
        System.out.println("around before advice");
        try {
            JoinPoint_Proceed(isException);
        } finally {
            System.out.println("around after advice");
        }
    }

    /**
     * 编织后的接入点执行过程
     * @param isException
     */
    public static void JoinPoint_Proceed(boolean isException){
        beforeAdvice();
        targetMethod(isException);
    }

    /**
     * 前置增强
     */
    private static void beforeAdvice() {
        System.out.println("before advice");
    }

    /**
     * 目标方法
     * @param isException
     */
    private static void targetMethod(boolean isException) {
        System.out.println("target method 执行");
        if(isException)
            throw new RuntimeException("异常发生");
    }

    /**
     * 后置增强
     */
    private static void afterAdvice() {
        System.out.println("after advice");
    }

    /**
     * 正常返回增强
     */
    private static void afterReturningAdvice() {
        System.out.println("afterReturning");
    }

    /**
     * 异常返回增强
     * @param e
     * @throws Exception
     */
    private static void afterThrowingAdvice(Exception e) throws Exception {
        System.out.println("afterThrowing:"+e.getMessage());
    }
}
结果
around before advice
before advice
target method 执行
around after advice
after advice
afterReturning
=====分割线=====
around before advice
before advice
target method 执行
around after advice
after advice
afterThrowing:异常发生
java.lang.RuntimeException: 异常发生
