前言
最近自己在整理一些东西,总归吧学到的记录下来这样才能更好的理解,方便以后查阅。如果文章哪里理解的有些偏差,还望大家指正。
什么是Binder
- Binder是一种Android中实现跨进城通信的方式,是Android为了跨进程提出来的,是Android特有的。
- 从组成上来说,Binder是一种虚拟的物理设备驱动。
- 从Android 代码来说,Binder是一个类,实现IBinder接口,是将Binder机制模型以代码的形式实现在整个Android系统中。
为什么用Binder
我们都知道android是基于Linux开发的,那么为什么不用Linux的,而是要自己定义一套呢。那么Google没用那肯定说明Linux下的消息通信机制是不适合android的,那Linux下有哪几种?为什么不能用?一般都是基于性能、稳定性、安全性
Linux下的消息通信
主要有 socket、管道、消息队列、共享内存
性能:首先socket是基于文件和端口通信,传输效率低,开销大,一般用于跨网络之间的进程间通信,所以这个肯定pass掉了。而管道和消息队列采用了存储-转发的方式:即先从发送方缓存区拷贝到内核开辟的缓存区,再从内核开辟的缓存区发送到接收方的缓存区,整个过程至少有两次拷贝,那肯定pass。而共享内存虽然无需拷贝,但是控制复杂,难以使用。那Binder只需要一次拷贝,性能仅次于共享内存。
稳定性:Binder是基于C/S架构,客户端又什么需求直接丢给服务端服务端区完成,架构清晰,职责明确,那么肯定性能,虽然共享内存无需拷贝,但是控制负责,肯定没有Binder稳定。
安全性:那么Android作为一个开放性的平台,有大量的应用给用户让用户使用,因此安全性对于Android平台来说很重要的,作为用户来说肯定不希望你这些应用把我手机上个人隐私信息全部偷走,在后台各种乱来,而传统的IPC是没有任何安全措施的,完全依赖于上层。而Binder是由系统给每个应用在内核空间添加一个UIP/PID来添加身份标示的。所以Binder的安全性很高。
而Binder可以建立私有管道,是Linux的通信机制所无法实现的。
Binder实现原理
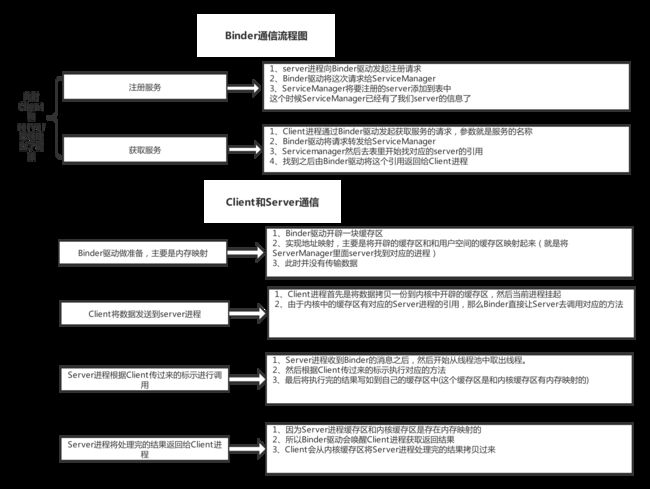
内存映射:Binder的跨进程通信和传统的Linux跨进程通信不一样,它是利用了Linux下的一个内存映射这个概念来实现的,也就是mmap()。内存映射就是将用户空间中的一块内存区域映射到内核空间,映射关系建立后,用户对这块内存的修改直接可以反应到内核空间,反之内核空间对这段区域的修改也能直接反应到用户空间。而且内存映射相对管道和消息队列来说少了一次拷贝,实现了用户空间和内核空间两个及时感知。
一次通信过程:
1、首先Binder驱动在内核空间创建一个数据接收缓存区。
2、接着在内核空间开辟一块内核缓存区,建立内核缓存区和内核中数据接收缓存区之间的映射关系,以及内核中数据接收缓存区和接收进程用户空间地址的映射关系。
3、发送方通过系统调用将数据copy到内核中的内核缓存区,由于内核缓存区和接收进城的用户空间有映射关系, 因此 相当于吧数据发送到了接收进城的用户空间,这样就完成了一次通信。
从代码角度看通信过程:
- 首先,一个进程使用BINDER_SEZT_CONTEXT_MGR命令通过Binder驱动将自己注册成为了ServiceManager
- Server通过驱动向ServiceManager中注册Binder(Server中Binder实体),驱动为这个Binder创建位于内核中实体节点以及ServerManager对实体的引用,将名字以及新建的引用包打包传给ServiceManager,ServiceManager将起填入查找表
- Client通过名字,在Binder驱动的帮助下葱ServiceManager中获取对Binder实体的引用,通过这个引用就能完成和Server的通信
Binde机制在Android中的具体实现原理
在我们Android中,首先要定义一个IMyService的AIDL文件,然后会帮我生成一个java文件,内部会有Stub和Proxy类,他们分别是Binder和BinderProxy的子类,Stub和Proxy都是实现了这个接口。
所以这个IInterface到底是什么,它呢就是一个用于表达Service提供的功能的一个契约,也就是说IInterface里有的方法,Service都能提供,调用者不用管BinderProxy是什么,只要拿到Interface,就可以直接调用里面的方法。
Proxy实现了IMyService,并且实现了里面的方法。为什么IMyservice要分Stub和Proxy,这是为了适用于本地调用和远程调用两种情况,如果Service运行在同一个进程,那直接就用Stub,因为它是直接实现了Serice提供的功能,不需要任何IPC过程,如果Service运行在其他进程,哪么客户端就使用的Proxy,就是吧参数封装后发送给Binder,然后Binder转发给ServiceManager从而让对应的Server段执行 在将结果返回。
bindService源码解析
那么如果我们客户端要去连接Server,那么一般都是要bindService去绑定的我们的服务,我们会去传一个ServiceConnection,下面分析下源码看看bindService 这一步是如何通过Binder去完成跨进程绑定我们的服务的,并且返回的Binder对象的
先肯定是bindService了,这里调用的ContextWrapper,那么它的实现类是ContextImpl,而且仅有这一个实现类
ContextImpl类

@Override
public boolean bindService(Intent service, ServiceConnection conn,int flags) {
    // 如果是系统进程会打印一个log
    warnIfCallingFromSystemProcess();
    // 又去调用bindServiceCommon 这个方法
    return bindServiceCommon(service, conn, flags, mMainThread.getHandler(),
                Process.myUserHandle());
}

/**
** 这里的conn 就是我们传过来要接受IBinder的接口
*/
private boolean bindServiceCommon(Intent service, ServiceConnection conn, int flags, Handler
            handler, UserHandle user) {
            IServiceConnection sd;
      if (conn == null) {
            throw new IllegalArgumentException("connection is null");
        }
        // mPackageInfo是loadApk的实例
        // handler是ActivityThread的mH实例,将它保存到ServiceDispatcher里面,得到了一个IServiceConnect接口
      if (mPackageInfo != null) {
            sd = mPackageInfo.getServiceDispatcher(conn, getOuterContext(), handler, flags);
      } else {
            throw new RuntimeException("Not supported in system context");
       }
       ...

       int res = ActivityManager.getService().bindService(
                mMainThread.getApplicationThread(), getActivityToken(), service,
                service.resolveTypeIfNeeded(getContentResolver()),
                sd, flags, getOpPackageName(), user.getIdentifier());
            if (res < 0) {
                throw new SecurityException(
                        "Not allowed to bind to service " + service);
            }


}
从上面得出,要执行ActivityManager.getService() 得到的这个对象的bindService方法,那么我们就看看ActivityManager的getService方法。
ActivityManager类
public static IActivityManager getService() {
    return IActivityManagerSingleton.get();
}

private static final Singleton IActivityManagerSingleton =
            new Singleton() {
                @Override
                protected IActivityManager create() {
                    final IBinder b = ServiceManager.getService(Context.ACTIVITY_SERVICE);
                    final IActivityManager am = IActivityManager.Stub.asInterface(b);
                    return am;
                }
            };
从上面看出,得到的一个IActivityManager而且是通过通过IBinder进行转换的
public interface IActivityManager extends IInterface {
}
那么这里是基于Android8.0 (26)26的源码,26以下是和这里不一样的,26用AIDL通信,(26以下其实是中间多了一层代理对象)。 那么就是得到了远程ActivityManagerService这个对象,那么我们直接看它是怎么实现的
ActivityManagerService类
public int bindService(IApplicationThread caller, IBinder token, Intent service,
            String resolvedType, IServiceConnection connection, int flags, String    callingPackage,int userId) throws TransactionTooLargeException {
        enforceNotIsolatedCaller("bindService");
...

        synchronized(this) {
          //这里调用的ActivitySerivces这个的bindServiceLocked
            return mServices.bindServiceLocked(caller, token, service,
                    resolvedType, connection, flags, callingPackage, userId);
        }
    }
ActivityServices类

int bindServiceLocked(IApplicationThread caller, IBinder token, Intent service,
            String resolvedType, final IServiceConnection connection, int flags,
            String callingPackage, final int userId) throws TransactionTooLargeException {

  ...
    //从ServiceMap中查找ServiceRecord对象
    ServiceLookupResult res =
            retrieveServiceLocked(service, resolvedType, callingPackage, Binder.getCallingPid(),
                    Binder.getCallingUid(), userId, true, callerFg, isBindExternal);
   ServiceRecord s = res.record;
  ...
    // 创建链接信息
    AppBindRecord b = s.retrieveAppBindingLocked(service, callerApp);
            ConnectionRecord c = new ConnectionRecord(b, activity,
                    connection, flags, clientLabel, clientIntent);

  //将创建好的连接信息存到集合中
  ArrayList clist = s.connections.get(binder);
            if (clist == null) {
                clist = new ArrayList();
                s.connections.put(binder, clist);
            }
            clist.add(c);
            b.connections.add(c);
            if (activity != null) {
                if (activity.connections == null) {
                    activity.connections = new HashSet();
                }
                activity.connections.add(c);
            }
            b.client.connections.add(c);
            if ((c.flags&Context.BIND_ABOVE_CLIENT) != 0) {
                b.client.hasAboveClient = true;
            }
            if ((c.flags&Context.BIND_ALLOW_WHITELIST_MANAGEMENT) != 0) {
                s.whitelistManager = true;
            }
            if (s.app != null) {
                updateServiceClientActivitiesLocked(s.app, c, true);
            }
            clist = mServiceConnections.get(binder);
            if (clist == null) {
                clist = new ArrayList();
                mServiceConnections.put(binder, clist);
            }
            clist.add(c);


  //如果Flag中包含BIND_AUTO_CREATE就启动Service
  if ((flags&Context.BIND_AUTO_CREATE) != 0) {
                s.lastActivity = SystemClock.uptimeMillis();
                if (bringUpServiceLocked(s, service.getFlags(), callerFg, false,
                        permissionsReviewRequired) != null) {
                    return 0;
                }
            }


  if (s.app != null && b.intent.received) {
//如果Service已经启动或者这个intent没有被连接过,立即连接,在会掉onServiceConnected
     c.conn.connected(s.name, b.intent.binder, false);

   } else if (!b.intent.requested) {
    //Service启动了 但是没有bind过,先调用onBind,在会掉onServiceConnected
     requestServiceBindingLocked(s, b.intent, callerFg, false);
  }
}
源码就分析到这里吧,下面总结下
- 当我们bindService的时候,会调用ContextImpl的bindService的方法,然后获取一个ServiceDispath.InnerConnect的对象,可以跨进程通信
- 然后通过Binder回去调用ActivityManagerService的bindService 的方法,然乎会判断当前服务有没有启动和绑定。
- 如果没有启动,那就执行realStartServiceLocked的方法,在去调用ActivityThread中的ApplicationThread中的scheduleCreateService方法,通过反射加载一个class,去执行onCreate方法。
- 如果启动但是没有bind,执行requestServiceBiningsLocked方法,在里面调用ActivityThread中的ApplicationThread中的scheduleBindService方法来执行service的bind过程。
- 然后调用AMS的publishService,再去调用我们的ServiceDispatch.InnerConnection的connect方法
大概就写完了,算是自己的学习笔记吧。
