SpringBoot源码学习系列之异常处理自动配置
1、源码学习
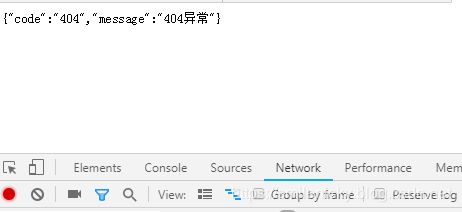
先给个SpringBoot中的异常例子,假如访问一个错误链接,让其返回404页面
在浏览器访问:

而在其它的客户端软件,比如postman软件:

很显然,在浏览器里访问才会返回页面,而在Postman直接返回json数据了,所以基于此现象,可以跟一下Springboot异常自动配置的原理,本博客基于学习了尚硅谷课程之后,自己动手实践再做的笔录
SpringBoot的异常自动配置类是ErrorMvcAutoConfiguration.java,可以简单跟一下源码:
package org.springframework.boot.autoconfigure.web.servlet.error;

....

@Configuration(proxyBeanMethods = false)//定义注解类
@ConditionalOnWebApplication(type = Type.SERVLET)//作用于web环境
@ConditionalOnClass({ Servlet.class, DispatcherServlet.class })//系统中有Servlet、DispatcherServlet(Spring重要的分发器类)类才起效
// Load before the main WebMvcAutoConfiguration so that the error View is available(作者也有注释,意思是WebMvcAutoConfiguration加载之后,才加载此自动配置类,目的是保证错误视图可以被加载到)
@AutoConfigureBefore(WebMvcAutoConfiguration.class)
@EnableConfigurationProperties({ ServerProperties.class, ResourceProperties.class, WebMvcProperties.class })//使这些配置类起作用
public class ErrorMvcAutoConfiguration {

    private final ServerProperties serverProperties;

    public ErrorMvcAutoConfiguration(ServerProperties serverProperties) {
        this.serverProperties = serverProperties;
    }

    //系统没有自定义的DefaultErrorAttributes的时候,使这个默认的model属性配置起效
    @Bean
    @ConditionalOnMissingBean(value = ErrorAttributes.class, search = SearchStrategy.CURRENT)
    public DefaultErrorAttributes errorAttributes() {
        return new DefaultErrorAttributes(this.serverProperties.getError().isIncludeException());
    }
    //默认的异常控制类
    @Bean
    @ConditionalOnMissingBean(value = ErrorController.class, search = SearchStrategy.CURRENT)
    public BasicErrorController basicErrorController(ErrorAttributes errorAttributes,
            ObjectProvider errorViewResolvers) {
        return new BasicErrorController(errorAttributes, this.serverProperties.getError(),
                errorViewResolvers.orderedStream().collect(Collectors.toList()));
    }
    //定义异常错误页面规则
    @Bean
    public ErrorPageCustomizer errorPageCustomizer(DispatcherServletPath dispatcherServletPath) {
        return new ErrorPageCustomizer(this.serverProperties, dispatcherServletPath);
    }

    ....
    //默认的error视图解析器配置类
    @Configuration(proxyBeanMethods = false)
    static class DefaultErrorViewResolverConfiguration {
        //ioc容器
        private final ApplicationContext applicationContext;

        private final ResourceProperties resourceProperties;

        DefaultErrorViewResolverConfiguration(ApplicationContext applicationContext,
                ResourceProperties resourceProperties) {
            this.applicationContext = applicationContext;
            this.resourceProperties = resourceProperties;
        }

        //从容器里加载对应的properties配置
        @Bean
        @ConditionalOnBean(DispatcherServlet.class)
        @ConditionalOnMissingBean(ErrorViewResolver.class)
        DefaultErrorViewResolver conventionErrorViewResolver() {
            return new DefaultErrorViewResolver(this.applicationContext, this.resourceProperties);
        }

    }

    ....


}
ok,基于此类,可以拿出比较重要的类
- BasicErrorController
BasicErrorController是页面的默认异常处理控制类
//默认异常控制类
@Bean
    @ConditionalOnMissingBean(value = ErrorController.class, search = SearchStrategy.CURRENT)
    public BasicErrorController basicErrorController(ErrorAttributes errorAttributes,
            ObjectProvider errorViewResolvers) {
        return new BasicErrorController(errorAttributes, this.serverProperties.getError(),
                errorViewResolvers.orderedStream().collect(Collectors.toList()));
    }
控制类的映射路径,如果application没配server.error.path就使用默认的/error
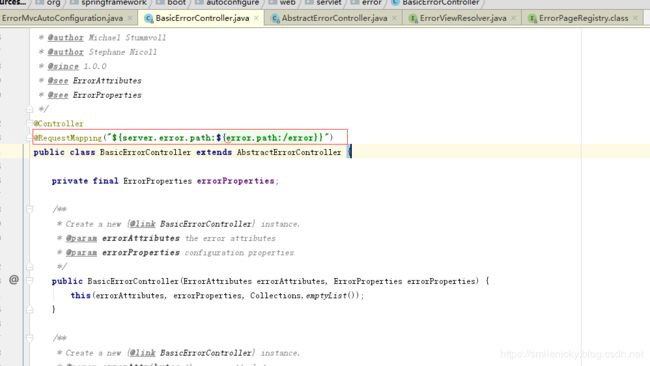
翻下控制类的源码,在里面找到如下的关键代码:
// 这里获取MediaType为text/html的调用这个接口
@RequestMapping(produces = MediaType.TEXT_HTML_VALUE)
    public ModelAndView errorHtml(HttpServletRequest request, HttpServletResponse response) {
    //获取http的请求状态对象
        HttpStatus status = getStatus(request);
        //model属性map,这个map是不可以编辑的unmodifiableMap
        Map model = Collections
                .unmodifiableMap(getErrorAttributes(request, isIncludeStackTrace(request, MediaType.TEXT_HTML)));
        //设置状态码,目的是页面转跳到对应的状态码页面,eg:/error/404.html
        response.setStatus(status.value());
        // 构建modelAndView,通过resolveErrorView方法
        ModelAndView modelAndView = resolveErrorView(request, response, status, model);
        //resolveErrorView是否能获取到?没获取到就跳转到命名为error的视图
        return (modelAndView != null) ? modelAndView : new ModelAndView("error", model);
    }

    //error json数据返回的接口
    @RequestMapping
    public ResponseEntity> error(HttpServletRequest request) {
        //同样获取http状态对象
        HttpStatus status = getStatus(request);
        if (status == HttpStatus.NO_CONTENT) {
            return new ResponseEntity<>(status);
        }
        //通过getErrorAttributes获取默认属性配置封装到model
        Map body = getErrorAttributes(request, isIncludeStackTrace(request, MediaType.ALL));
        return new ResponseEntity<>(body, status);
} /**
* Simple {@link View} implementation that writes a default HTML error page.
*/
private static class StaticView implements View {
private static final MediaType TEXT_HTML_UTF8 = new MediaType("text", "html", StandardCharsets.UTF_8);
private static final Log logger = LogFactory.getLog(StaticView.class);
@Override
public void render(Map model, HttpServletRequest request, HttpServletResponse response)
throws Exception {
if (response.isCommitted()) {
String message = getMessage(model);
logger.error(message);
return;
}
response.setContentType(TEXT_HTML_UTF8.toString());
StringBuilder builder = new StringBuilder();
Date timestamp = (Date) model.get("timestamp");
Object message = model.get("message");
Object trace = model.get("trace");
if (response.getContentType() == null) {
response.setContentType(getContentType());
}
builder.append("Whitelabel Error Page
").append(
"This application has no explicit mapping for /error, so you are seeing this as a fallback.
")
.append("").append(timestamp).append("")
.append("There was an unexpected error (type=").append(htmlEscape(model.get("error")))
.append(", status=").append(htmlEscape(model.get("status"))).append(").");
if (message != null) {
builder.append("").append(htmlEscape(message)).append("");
}
if (trace != null) {
builder.append("").append(htmlEscape(trace)).append("");
}
builder.append("");
response.getWriter().append(builder.toString());
}
private String htmlEscape(Object input) {
return (input != null) ? HtmlUtils.htmlEscape(input.toString()) : null;
}
private String getMessage(Map model) {
Object path = model.get("path");
String message = "Cannot render error page for request [" + path + "]";
if (model.get("message") != null) {
message += " and exception [" + model.get("message") + "]";
}
message += " as the response has already been committed.";
message += " As a result, the response may have the wrong status code.";
return message;
}
@Override
public String getContentType() {
return "text/html";
}
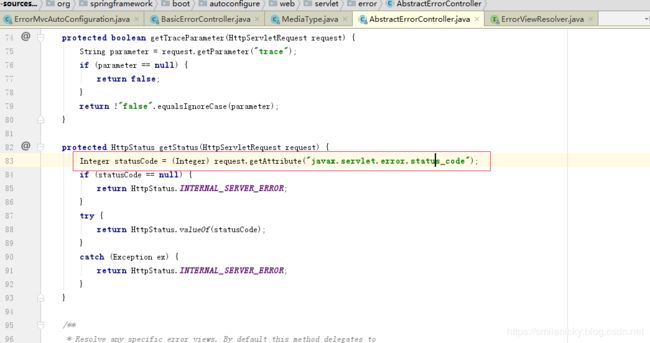
} 然后status又是从哪里获取的?点下源码,如图,是从javax.servlet.error.status_code属性获取的, 这也就是为什么在配置类开头要加上@ConditionalOnClass({ Servlet.class, DispatcherServlet.class })的原因了
ok,跟了这个默认控制类,或许我们就能明白为什么浏览器访问就会访问默认错误页面,Postman访问就返回json数据了
在浏览器的页面按F12调试:这里可以找到请求头里有accept这个关键属性,Springboot就是根据这个属性进行判断的,通过设置@RequestMapping(produces = MediaType.TEXT_HTML_VALUE),从而让浏览器访问的都跳转页面转跳的接口
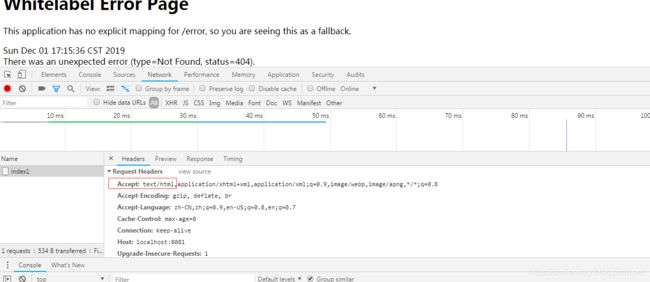
而Postman调的默认就调json数据的接口,因为Postman调的接口默认没指定accept属性为text/html:
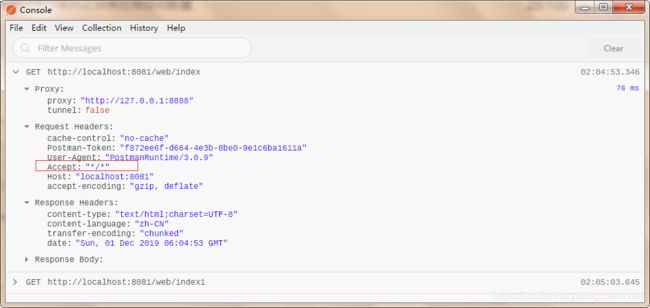
ok,弄清楚这个原理之后,继续跟一下默认Error控制类的源码

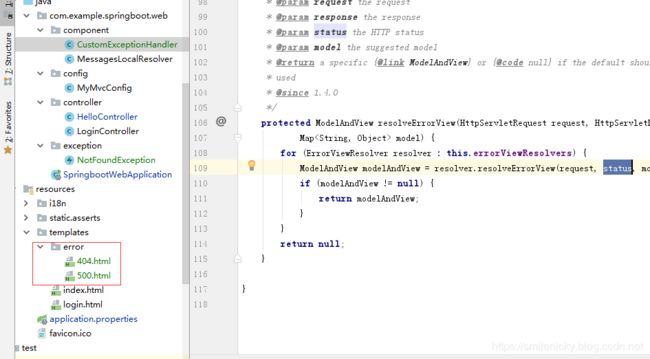
resolveErrorView方法是什么作用?点下源码,这个方法代码如图所示,里面是进行error视图解析器的遍历,既然有视图解析器,那么是否有默认的视图解析器?IDEA软件Ctrl+alt+B打开接口的实现类是DefaultErrorViewResolver.java
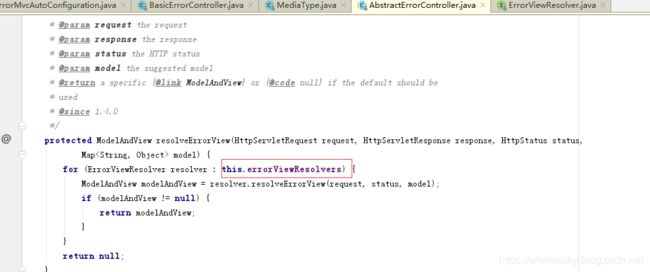
- DefaultErrorAttributes
在前面BasicErrorController的源码学习里,可以看到如图代码:

可以看出model的属性配置都是从getErrorAttributes方法获取的

ctrl+alt+B打开其实现:可以看出默认是通过DefaultErrorAttributes实现的

通过Postman测试,看看属性返回参数
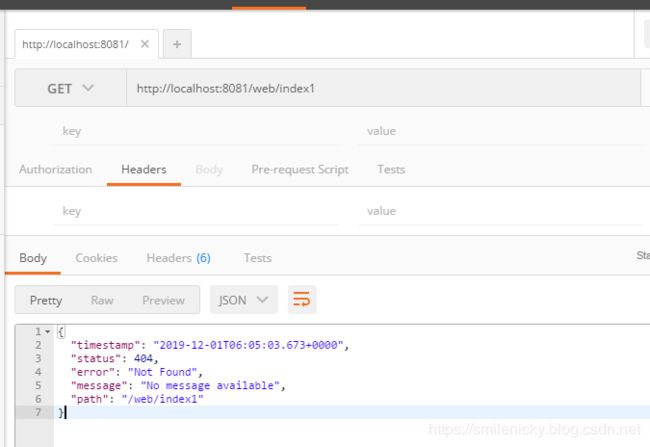
当然也可以翻其源码,通过Postman简单测试和翻其源码的方式,可以确定,默认的属性配置基本有:- timestamp:时间戳
- status:状态码
- error:错误提示
- exception:异常对象
- message:异常消息
- errors:JSR303数据校验的错误都在这里
- ErrorPageCustomizer
作用:定义错误页面的规则,是一个内部类,源码如图,有进行了/error默认的相对路径设置,注意是相对路径,并非绝对路径,因为error文件夹可以放在模板引擎对应文件夹下面,也可以放在statis文件夹下面,详细请看下文分析

- DefaultErrorViewResolver
前面的源码分析可以看出,BasicErrorController会遍历Error视图解析器,通过ctrl+alt+b的方式,我们可以看到只有DefaultErrorViewResolver这个实现类,当然我们虽然从命名上看觉得,这个类应该就是默认的视图解析器类,显然还不是特别确定

ok,翻一下前面的ErrorMvcAutoConfiguration自动配置类,如图代码,可以找到这个内部配置类,这里进行了默认视图的配置,而且将ioc的实例传到DefaultErrorViewResolver构造方法,所以现在可以确定默认的视图解析器类就是DefaultErrorViewResolver.java
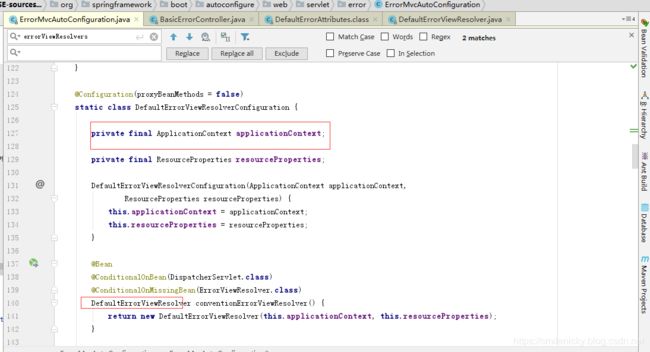
点一下DefaultErrorVireResolver源码:故意让页面报错,然后调试一下源码
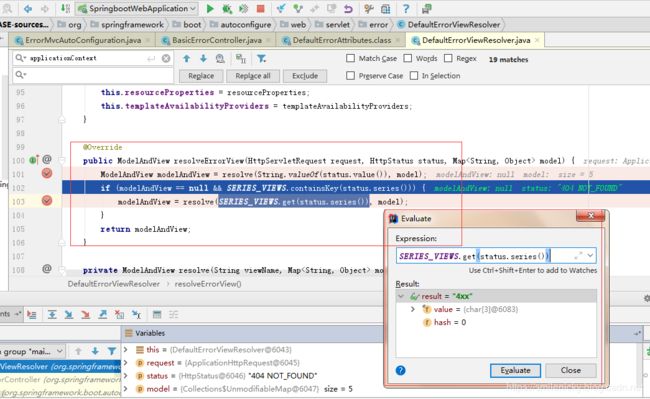
这里是进行默认状态码获取

ok,分析一下这个关键的方法:
//modelAndView的model数据和Viewname设置
@Override
    public ModelAndView resolveErrorView(HttpServletRequest request, HttpStatus status, Map model) {
        //resolve方法是关键方法,待会分析
        ModelAndView modelAndView = resolve(String.valueOf(status.value()), model);
        //ModelAndView对象获取不到的情况,采用默认的,比如客户端报错返回4xx的Viewname,服务端报错返回5xx的viewname
        if (modelAndView == null && SERIES_VIEWS.containsKey(status.series())) {
            modelAndView = resolve(SERIES_VIEWS.get(status.series()), model);
        }
        return modelAndView;
    }
关键的resolve方法
private ModelAndView resolve(String viewName, Map model) {
        String errorViewName = "error/" + viewName;//从这里可以看出跳转的页面就是在error文件夹下面的以viewname(状态码命名)的对应html文件
        //模板引擎起效的情况,也就是能加载到对应error/status.html文件的情况
        TemplateAvailabilityProvider provider = this.templateAvailabilityProviders.getProvider(errorViewName,
                this.applicationContext);
        //模板引擎能找得到对应文件的情况
        if (provider != null) {
            return new ModelAndView(errorViewName, model);
        }
        //没找到的情况,继续resolveResource方法
        return resolveResource(errorViewName, model);
    }
找下Thymeleaf模板引擎ThymeleafTemplateAvailabilityProvider类,这里是进行了资源加载,prefix也就是template文件夹,所以将view(error/status)这个参数传进来就能被加载到

ok,经过视图解析器的源码学习,其实可以这样尝试了,在templates的文件夹下面建一个error文件夹,丢几个状态码html文件

故意让页面报错,调试,确实进到这里,viewName也是error/404

放开断点,发现返回的是我们自定义的404页面,并非默认页面了,所以可以得出,我们的猜想是正确的,建个error命名的文件夹丢在templates里,模板引擎是能进行解析的

ok,在源码里还是这个方法,在模板引擎扫描不到对应html页面的时候,会进入这个方法,分析一下源码
private ModelAndView resolveResource(String viewName, Map model) {
    //这里是获取所有的静态资源,进行扫描,也就是说将error文件夹放在statis文件夹下面也是会被扫描到的
        for (String location : this.resourceProperties.getStaticLocations()) {
            try {
            //资源读取
                Resource resource = this.applicationContext.getResource(location);
                resource = resource.createRelative(viewName + ".html");
                //扫描都status.html这种html文件,返回一个modelAndView
                if (resource.exists()) {
                    return new ModelAndView(new HtmlResourceView(resource), model);
                }
            }
            catch (Exception ex) {
            }
        }
        return null;//扫描不到html,返回null值,不影响主程序
    }
2、自定义异常
经过前面源码的比较详细的学习,我们现在思路应该比较清晰了,首先SpringBoot的异常处理自动配置就是这样的,首先是有根据客户端的不同显示不同效果,比如浏览器在什么都没配置的情况就返回默认页面,这个页面也就是通过view命名的默认视图StaticView实现的,然后在Postman这些客户端抛异常的时候,是返回json数据的,不返回页面,然后我们通过默认视图解析器源码的学习,就可以知道了,我们是可以自定义异常解析页面的,比如404的时候,我们只要在templates文件夹下面放一个error/404.html文件,就可以实现异常页面的个性定制,而在templates文件夹下面没有对应html文件的时候,就会去statis文件夹下面扫描
ok,所以现在我们想自定义系统的异常实现,具体要怎么实现?本博客就以尚硅谷教程的例子来举例
按照以前SpringMVC的做法,加个自定义异常类:
package com.example.springboot.web.exception;

/**
 *
 *  自定义异常类
 *
 *
 * @author nicky
 *
 * 修改记录
 *    修改后版本:     修改人:  修改日期: 2019年12月01日  修改内容:
 *
 */
public class NotFoundException extends RuntimeException{

    private Integer code;//自定义异常码

    public Integer getCode() {
        return code;
    }

    public void setCode(Integer code) {
        this.code = code;
    }

    public NotFoundException(String message, Integer code) {
        super(message);// 父类的构造函数;调用底层的Throwable的构造函数,将参数message赋值到detailMessage (Throwable的属性)
        this.code = code;//赋值code码
    }
}
当然也需要一个ExceptionHandler类:
package com.example.springboot.web.controller;

import com.example.springboot.web.exception.NotFoundException;
import org.springframework.web.bind.annotation.ExceptionHandler;
import org.springframework.web.bind.annotation.RestControllerAdvice;

import java.util.HashMap;
import java.util.Map;

/**
 *
 *  自定义异常处理类
 *
 *
 * @author nicky
 *
 * 修改记录
 *    修改后版本:     修改人:  修改日期: 2019年12月01日  修改内容:
 *
 */
@RestControllerAdvice
public class CustomExceptionHandler {

    @ExceptionHandler(NotFoundException.class)
    //@ResponseBody
    //@ResponseStatus(value=HttpStatus.INTERNAL_SERVER_ERROR)
    public Map handleException(Exception e){
        Map map = new HashMap<>(16);
        map.put("code", "404");
        map.put("message", e.getMessage());
        return map;
    }

}
测试接口方法:
@RequestMapping(value = {"/testException"})
    @ResponseBody
    public String testException(String tFlag){
        if("1".equals(tFlag)) {
            throw new NotFoundException("404异常",404);
        }
        return "hello!";
    }
很显然,返回的都是json数据
通过前面源码的学习,如果我们想实现SpringBoot那种效果,浏览器返回错误页面,Postman的才返回json数据,具体要怎么实现?
通过前面的学习,BasicErrorController类就是默认的异常处理类,映射链接就是/error,所以这里可以通过BasicErrorController提供的接口来实现
@RestControllerAdvice注解就要换成@ControllerAdvice注解,因为Rest返回的都是json数据,现在要返回一个页面
package com.example.springboot.web.component;

import com.example.springboot.web.exception.NotFoundException;
import org.springframework.web.bind.annotation.ControllerAdvice;
import org.springframework.web.bind.annotation.ExceptionHandler;

import java.util.HashMap;
import java.util.Map;

/**
 *
 *  自定义异常处理类
 *
 *
 * @author nicky
 *
 * 修改记录
 *    修改后版本:     修改人:  修改日期: 2019年12月01日  修改内容:
 *
 */
//@RestControllerAdvice
@ControllerAdvice
public class CustomExceptionHandler {

    @ExceptionHandler(NotFoundException.class)
    public String handleException(Exception e){
        Map map = new HashMap<>(16);
        map.put("code", "404");
        map.put("message", e.getMessage());
        return "forward:/error";//BasicErrorController的接口
    }


}
ok,貌似是实现了,不过发现不是我们要的效果,又调回了默认页面,而且状态码是还是200
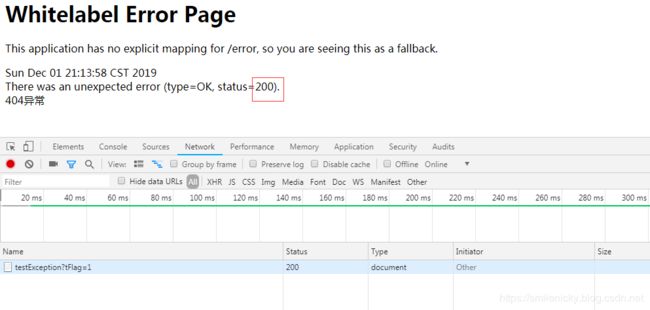
具体是为什么?又要跟一下BasicErrorController的源码了,如图,这里有setStatus的操作

前面源码学习,可以知道就是通过这个状态码去找对应页面,所以很显然,我们可以知道为什么不能跳转自定义页面了
因为status获取不到,所以不能找到对应页面
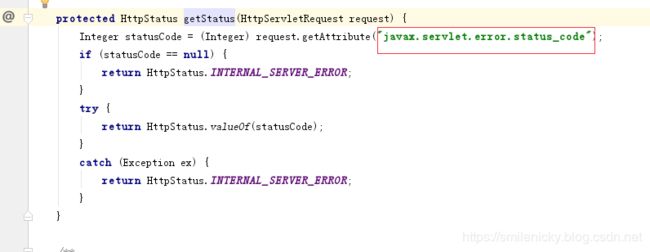
修改方法是,加上属性配置即可:
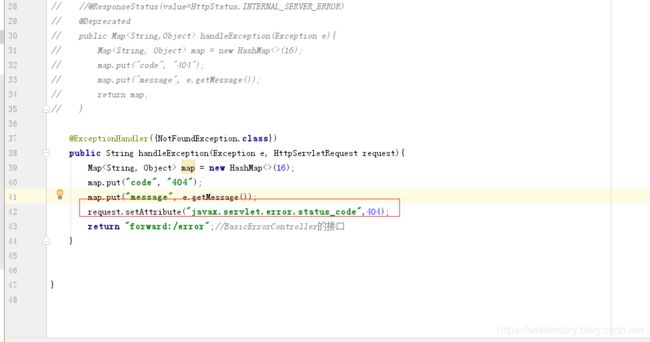
404.html进行信息修改,将SpringBoot默认的DefaultErrorAttributes信息获取到,当然要放在templates下面,因为这样才能被模板引擎解析到
this is a 404 page
    status:[[${status}]]

    timestamp:[[${timestamp}]]

    error:[[${error}]]

    exception:[[${exception}]]

    message:[[${message}]]

ok,自定义异常页面,已经实现,然后想自定义异常Attributes怎么实现?看一下Springboot ErrorAttributes的自动配置,注意了,这里指明了要系统没有自定义DefaultErrorAttributes的情况才使用默认的,所以我们只有写个自定义的类实现DefaultErrorAttributes即可

修改一下ExceptionHandler类:
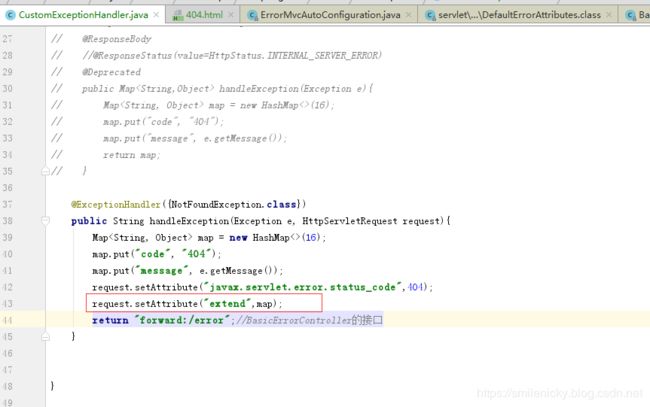
自定义一个ErrorAttributes类:
package com.example.springboot.web.component;


import org.springframework.boot.web.servlet.error.DefaultErrorAttributes;
import org.springframework.stereotype.Component;
import org.springframework.web.context.request.WebRequest;

import java.util.Map;

/**
 *
 *   自定义异常Attributes类
 *
 *
 * @author nicky
 *
 * 修改记录
 *    修改后版本:     修改人:  修改日期: 2019年12月01日  修改内容:
 *
 */
@Component
public class CustomErrorAttributes extends DefaultErrorAttributes {

    //返回值的map就是页面和json能获取的所有字段
    @Override
    public Map getErrorAttributes(WebRequest webRequest, boolean includeStackTrace) {
        //先将默认的Attributes封装到map
        Map map = super.getErrorAttributes(webRequest, includeStackTrace);
        map.put("company","company.com");
        //获取ExceptionHandler设置的Attributes,0表示从Request中拿
        Map ext = (Map) webRequest.getAttribute("extend",0);
        map.put("extend",ext);
        return map;
    }

}
404页面进行修改
this is a 404 page
    status:[[${status}]]

    timestamp:[[${timestamp}]]

    error:[[${error}]]

    exception:[[${exception}]]

    message:[[${message}]]


    company:[[${company}]]

    extend:[[${extend}]]
ok,自定义的attribute信息也拿到

Postman软件测试也是可以的:
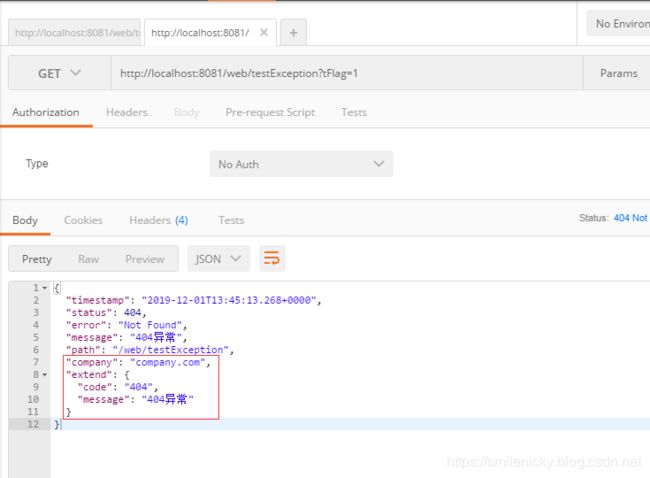
ok,本博客例子是学习尚硅谷教程后写的,例子都经过验证,基于Springboot2.2.1版本,代码例子下载


