SSM学习总结
SSM(Spring+SpringMVC+MyBatis)框架集由Spring、MyBatis两个开源框架整合而成(SpringMVC是Spring中的部分内容)。常作为数据源较简单的web项目的框架。
学习思路
-单独使用Mybatis
-有mapper实现类
-无mapper实现类
-mapper接口扫描
-JDBC整合事务
-业务层调用
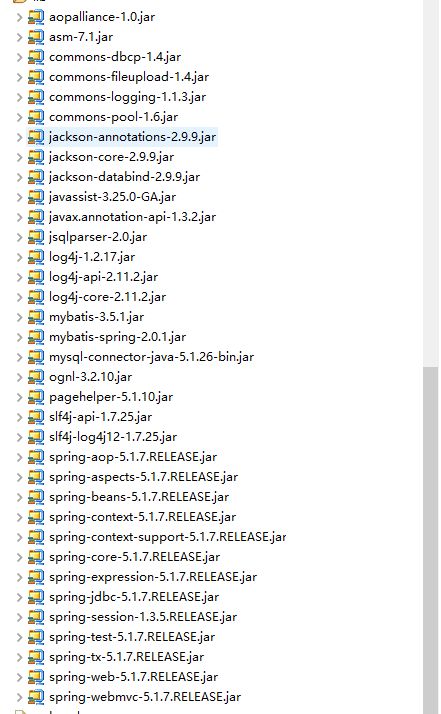
为方便记录,整个项目完成后所需要的所有Jar包
一、单独使用Mybatis

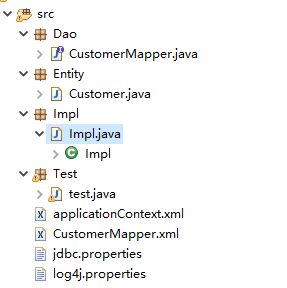
1、Dao下的CustomerMapper负责写接口实现方法。
2、Entity下的Customer作为对象类,所有属性与数据库保持一致
3、sqlMapConfig.xml文件,负责连接数据库
4、CustomerMapper.xml文件,负责编写sql语句
INSERT INTO ssm.customer
(name,gender,tel,address)
VALUES(
#{name},
#{gender},
#{tel},
#{address}
)
delete from ssm.customer where name=#{name}
update ssm.customer set name=#{name},gender=#{gender},tel=#{tel},address=#{address} where name=#{name}
5、log4j.properties日志输出(可不要)
log4j.rootLogger = debug,stdout

log4j.appender.stdout = org.apache.log4j.ConsoleAppender
log4j.appender.stdout.Target = System.err
log4j.appender.stdout.layout = org.apache.log4j.PatternLayout
log4j.appender.stdout.layout.ConversionPattern = [%-5p] %d{yyyy-MM-dd HH:mm:ss,SSS} method:%l%n%m%n

log4j.appender = org.apache.log4j.DailyRollingFileAppender
log4j.appender.file =G:Javajar//Mybaits//logs/lzog.log
log4j.appender.file.layout = org.apache.log4j.PatternLayout
log4j.appender.file.layout.ConversionPattern = %-d{yyyy-MM-dd HH:mm:ss}  [ %t:%r ] - [ %p ]  %m%n
6、Test作为主函数测试,以下为核心代码
               //1.创建SqlSessionFactoryBuilder
                SqlSessionFactoryBuilder builder=new SqlSessionFactoryBuilder();
                //加载sqlMapConfig.xml文件
                InputStream in =Resources.getResourceAsStream("sqlMapConfig.xml");

                //2.创建SqlSessionFactory
                SqlSessionFactory factory =builder.build(in);

                //3.打开Sqlsession
                SqlSession session=factory.openSession();

                //4.获取Mapper接口
                CustomerMapper mapper = session.getMapper(CustomerMapper.class);

                //5.实例化对象
                Customer customer=new Customer();
                customer.setName("黑马");
                customer.setAddress("天上星河");
                customer.setGender("男");
                customer.setTel("111111111");

                //6.调用方法
                //添加
                mapper.savaCustomer(customer);
                //删除
                //mapper.deleteCustomer("QQQ");
                //更新
                //mapper.updateCustomerForname(customer);

                //查找
                //List selectCustomerForId = mapper.selectCustomerForId();

                //7.提交事务
                session.commit();
                //System.out.println(selectCustomerForId.get(0).getName()+"\n");

                //8.关闭session
                session.close();
7、至此,MyBaties单独使用完毕
二、Spring-Mybatis有mapper实现类整合
1、在Mybatis单独使用基础上有如上改变
2、删除了sqlMapConfig.xml文件,jdbc.properties常规操作,以下为applicationContext.xml;
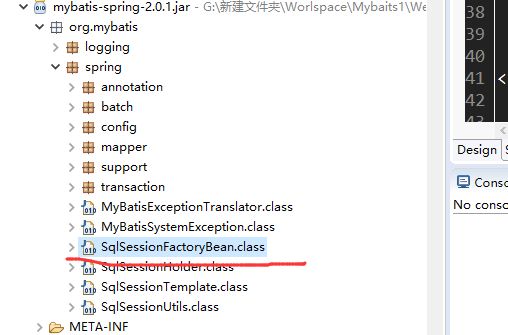
注意!!!!:这里为Jar包下的类文件路径

3、添加Dao接口的Impl实现类
package Impl;

import org.apache.ibatis.session.SqlSession;
import org.mybatis.spring.support.SqlSessionDaoSupport;
import Dao.CustomerMapper;
import Entity.Customer;
public class Impl extends SqlSessionDaoSupport implements CustomerMapper{
        //以下为一个保存用户的例子、当然还有删改查的操作
    @Override
    public void savaCustomer(Customer customer) {
        // TODO Auto-generated method stub
        SqlSession sqlSession = this.getSqlSession();
        //参数一:方法名称       //参数二:保存类型
        sqlSession.insert("savaCustomer", customer);
        //不需要事务提交sqlSession.commit()
    }
}
4、Test测试类核心代码如下:
因applicationContext.xml已经配置了SqlSessionFactory工厂,在Mybatis单独使用基础上有所改变
       //1.加载Spring配置
        ApplicationContext ac=new ClassPathXmlApplicationContext("applicationContext.xml");

        //2.获取对象
        CustomerMapper customerMapper = (CustomerMapper) ac.getBean("customerMapper");

        //3.实例化对象
        Customer customer=new Customer("黑马","天空之城","男","111-111-111");
        customerMapper.savaCustomer(customer);
5、至此,Spring-Mybatis有mapper实现类完毕。
三、Spring-Mybatis无mapper实现类整合

1、在Spring-Mybatis有mapper实现类基础上有如上改变,(删除了实现接口)
2、更改applicationContext.xml文件,更改如下,注意需要导入calss的类名的jar包
3、其他不变,运行测试,至此,Spring-Mybatis无mapper实现类整合完毕
四、Spring-Mybatis接口扫描

1、目录结构与Spring-Mybatis无mapper实现类整合一致
2、更改applicationContext.xml文件,更改如下,注意需要导入calss的类名的jar包
3、其他不变,运行测试,至此,Spring-Mybatis接口扫描整合完毕
五、Spring-Mybatis JDBC事务整合
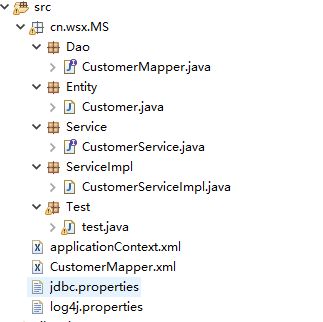
1、Spring-Mybatis接口扫描整合的基础上作如上更改,把之前的包放入了一个父包,请记得要更改applicationContext.xml的路径
2、添加了一个Service接口和ServiceImpl接口实现类
接口如下
import cn.wsx.MS.Entity.Customer;

public interface CustomerService {

    public void savaCustomer(Customer customer);

}
实现类:注意这里有一个int i=100/0;正常运行会抛出异常;两条插入语句;
import javax.annotation.Resource;
import org.springframework.stereotype.Service;
import org.springframework.transaction.annotation.Transactional;
import cn.wsx.MS.Dao.CustomerMapper;
import cn.wsx.MS.Entity.Customer;
import cn.wsx.MS.Service.CustomerService;
@Service
public class CustomerServiceImpl implements CustomerService{
    //注入Mapper对象
    @Resource
    private CustomerMapper customerMapper;
    @Override
    public void savaCustomer(Customer customer) {
        // TODO Auto-generated method stub
        customerMapper.savaCustomer(customer);
        //模拟异常
        int i=100/0;
        customerMapper.savaCustomer(customer);
    }
}
3、测试类代码如下、运行测试代码,会发现抛出算术异常,就是int i=100/0;抛出的,查看数据库,发现有一条插入了,因此第四步应该添加JDBC事务整合
//1.加载Spring配置
        ApplicationContext ac=new ClassPathXmlApplicationContext("applicationContext.xml");

        //2.实例化CustomerService    CustomerService->customerService  getBean(customerService  )
        CustomerService service = (CustomerService) ac.getBean("customerService");

        //3.插入
        Customer customer=new Customer("黑马","天空之城","男","111-111-111");

        service.savaCustomer(customer);
4、更改applicationContext.xml,添加代码如下:
5、更改ServiceImpl实现类如下,其实是添加了注解Service和Transactional
package cn.wsx.MS.ServiceImpl;
import javax.annotation.Resource;
import org.springframework.stereotype.Service;
import org.springframework.transaction.annotation.Transactional;
import cn.wsx.MS.Dao.CustomerMapper;
import cn.wsx.MS.Entity.Customer;
import cn.wsx.MS.Service.CustomerService;
@Service("customerService")
@Transactional
public class CustomerServiceImpl implements CustomerService{
    //注入Mapper对象
    @Resource
    private CustomerMapper customerMapper;
    @Override
    public void savaCustomer(Customer customer) {
        // TODO Auto-generated method stub
        customerMapper.savaCustomer(customer);
        //模拟异常
        int i=100/0;
        customerMapper.savaCustomer(customer);
    }
}
6、再次运行Test,发现数据库不会插入,在接口类取消模拟异常,运行发现插入两条数据。
六、SpringMVC基本整合

1、项目结构如上,网址访问,所以不需要Test类了
2、添加index.jsp作为首页,注意文件路径,Body中代码如下
再新建success.jsp和error.jsp作为成功失败后返回的界面。
3、新建Controller类代码如下
package cn.wsx.MS.Controller;

import javax.annotation.Resource;

import org.springframework.stereotype.Controller;
import org.springframework.web.bind.annotation.RequestMapping;
import cn.wsx.MS.Entity.Customer;
import cn.wsx.MS.Service.CustomerService;
@Controller
@RequestMapping("/customer")
public class CustomerController {

    //注入业务对象
    @Resource
    private CustomerService customerService;
    /**
     * 进入首页 注意 访问这个网址http://localhost:8080/MySpringMVC-Use/customer/index
     */
    @RequestMapping("/index")
    public String index() {
        return "index";
    }

    /**
     * 保存客户  注意 访问这个网址http://localhost:8080/MySpringMVC-Use/customer/save
     */
    @RequestMapping("/save")
    public String save(Customer customer) {
        customerService.savaCustomer(customer);
        return "success";
    }
}
4、编写Spring-mvc.xml文件
5、添加如下代码进Web.xml文件
    CharacterEncodingFilter
    org.springframework.web.filter.CharacterEncodingFilter

        encoding
        utf-8


    CharacterEncodingFilter
    /*


    DispatcherServlet
    org.springframework.web.servlet.DispatcherServlet

        contextConfigLocation
        classpath:spring-mvc.xml


    DispatcherServlet
    /


    org.springframework.web.context.ContextLoaderListener


    contextConfigLocation
    classpath:applicationContext.xml
6.访问测试:
这里注意几个问题
问题一:代码完全没错,报404错误,这时需要重新部署项目 > clean >重启服务 , 再不行可以新建html文件访问

