本文主要讲述如何通过源码来编译LAMP,并可以通过xcache能给为php加速,本文使用的是三台机器,本处不考虑单点故障的问题,关于负载均衡的问题,将在后续推出,敬请期待!!!
一、环境规划
| 用途 | ip地址 | 安装应用 | 下载地址 |
| 前段服务器 | 192.168.1.200 | httpd2.4.9 | http://apache.fayea.com/apache-mirror//httpd/httpd-2.4.9.tar.bz2 |
| 后端php与服务器 | 192.168.1.201 | php5.4.26 | http://cn2.php.net/get/php-5.4.26.tar.bz2/from/this/mirror |
xcache服务器 |
192.168.1.201 | xcache | http://xcache.lighttpd.net/pub/Releases/3.0.4/xcache-3.0.4.tar.bz2 |
| 数据库服务器 |
192.168.1.202 | mysqld5.5.36 | http://mirrors.sohu.com/mysql/MySQL-5.5/mysql-5.5.35-linux2.6-x86_64.tar.gz |
本文所做实验的机器的系统都为centos6.5,并都已经安装好开发包组“Server Platform Development”和“Development tools”
二、编译安装httpd
关于编译安装httpd2.4.9请移步至本人的博客http://wangfeng7399.blog.51cto.com/3518031/1379373,本处就不再做累赘。
三、编译安装mysqld
1)、获取源程序、解压、创建软连接,此处创建软连接的好处在于在以后为mysql升级做便利。
[root@localhost ~]# tar xf mysql-5.5.36-linux2.6-x86_64.tar.gz -C /usr/local/
[root@localhost ~]# cd /usr/local/
[root@localhost local]# ln -sv mysql-5.5.36-linux2.6-x86_64 mysql
2)、建议:在生产环境中应该将数据库建在lvm上,底层的lvm应该通过硬raid来搭建。本文建立了一个10G的lvm的逻辑卷,并实现开机自动挂载/data下
在/etc/fstab中添加
/dev/mydata/data        /data                   ext4    defaults        0 0
3)、挂载后再/data目录创建mydata目录来存放数据文件
[root@localhost local]# mkdir /data/mydata
4)、创建mysql系统用户和系统组,并使其不能登陆系统
[root@localhost local]# groupadd -r mysql
[root@localhost local]# useradd -r  -g mysql -s /sbin/nologin mysql
5)、为了安全起见,我们将mysql目录下的内容的属组改为mysql
[root@localhost local]# chown .mysql mysql -R
6)、安装数据库
[root@localhost mysql]# scripts/mysql_install_db --datadir=/data/mydata/ --user=mysql
查看/data/mydata下是否会生成默认数据库
7)、导出mysql的二进制文件、头文件、库文件、帮助文档
[root@localhost mysql]# echo "export PATH=/usr/local/mysql/bin:$PATH" > /etc/profile.d/mysql.sh
[root@localhost mysql]# echo "/usr/local/mysql/lib" > /etc/ld.so.conf.d/mysql.conf
[root@localhost mysql]# ln -sv include /usr/include/mysql
`/usr/include/mysql' -> `include'
[root@localhost mysql]# . /etc/profile.d/mysql.sh
帮助文档在/etc/man.config中添加MANPATH /usr/local/mysql/man
8)、为mysql提供配置文件
[root@localhost mysql]# cp support-files/my-large.cnf /etc/my.cnf
# Try number of CPU's*2 for thread_concurrency
thread_concurrency = 2  //改成cpu的两倍
datadir= /data/mydata  //数据库文件的存放位置
9)、为mysql提供启动脚本,并使其能够开机自动启动
[root@localhost mysql]# cp support-files/mysql.server /etc/init.d/mysqld
[root@localhost mysql]# chkconfig --add mysqld
[root@localhost mysql]# chkconfig --list mysqld
mysqld          0:off   1:off   2:on    3:on    4:on    5:on    6:off
10)、启动服务并尝试登陆
[root@localhost mysql]# service mysqld start
Starting MySQL....                                         [  OK  ]
[root@localhost mysql]# mysql
Welcome to the MySQL monitor.  Commands end with ; or \g.
Your MySQL connection id is 1
Server version: 5.5.36-log MySQL Community Server (GPL)
Copyright (c) 2000, 2014, Oracle and/or its affiliates. All rights reserved.
Oracle is a registered trademark of Oracle Corporation and/or its
affiliates. Other names may be trademarks of their respective
owners.
Type 'help;' or '\h' for help. Type '\c' to clear the current input statement.
mysql>
11)、删除不必要的用户,并为登陆用户设置密码
mysql> drop user ''@'localhost';
Query OK, 0 rows affected (0.00 sec)
mysql> drop user ''@'localhost.localdomain';
Query OK, 0 rows affected (0.00 sec)
mysql> drop user 'root'@'localhost.localdomain';
Query OK, 0 rows affected (0.00 sec)
mysql> drop user 'root'@'::1';
Query OK, 0 rows affected (0.00 sec)
mysql> set password for 'root'@'localhost'=password('wodehao123');
Query OK, 0 rows affected (0.00 sec)
mysql> set password for 'root'@'127.0.0.1'=password('wodehao123');
Query OK, 0 rows affected (0.00 sec)
四、编译php
1)、编译php
1、为了解决php的依赖关系,建议安装“Desktop Platform Development”,bzip2-devel
[root@localhost ~]# yum groupinstall "Desktop Platform Development" -y
[root@localhost ~]# yum install -y bzip2-devel
2.解压编译
[root@localhost ~]# tar -xf php-5.4.26.tar.bz2
[root@localhost ~]# cd php-5.4.26
[root@localhost php-5.4.26]# ./configure --prefix=/usr/local/php --with-mysql=mysqlnd --with-pdo-mysql=mysqlnd --with-mysqli=mysqlnd --with-openssl --enable-mbstring --with-freetype-dir --with-jpeg-dir --with-png-dir  --with-libxml-dir=/usr/ --enable-xml --enable-sockets --enable-fpm --with-config-file-path=/etc/ --with-config-file-scan-dir=/etc/php.d --with-bz2
如果使用PHP5.3以上版本,为了链接MySQL数据库,可以指定mysqlnd,这样在本机就不需要先安装MySQL或MySQL开发包了。mysqlnd从php 5.3开始可用,可以编译时绑定到它(而不用和具体的MySQL客户端库绑定形成依赖),但从PHP 5.4开始它就是默认设置了。
--with-mysql=mysqlnd --with-pdo-mysql=mysqlnd --with-mysqli=mysqlnd
--with-openssl --enable-mbstring --with-freetype-dir --with-jpeg-dir --with-png-dir --with-bz2 加载openssl mbstring zlib bz2模块,创建freetype jpeg png存放目录
--with-libxml-dir=/usr/ libxml的查找目录
-enable-xml --enable-sockets --enable-fpm 默认开启xml sockets fpm模块
--with-config-file-path=/etc/ --with-config-file-scan-dir=/etc/php.d 生成的配置文件路径以及辅助文件的路径
[root@localhost php-5.4.26]# make && make install
3、为php提供配置文件
[root@localhost php-5.4.26]# cp php.ini-production /etc/php.ini
4、为php-fpm提供服务启动脚本,并将其添加至服务列表中,并实现开机自启动,php通过php-gpm来管理
[root@localhost php-5.4.26]# cp sapi/fpm/init.d.php-fpm /etc/init.d/php-fpm
[root@localhost php-5.4.26]# chmod +x /etc/init.d/php-fpm
[root@localhost php-5.4.26]# chkconfig --add php-fpm
[root@localhost php-5.4.26]# chkconfig php-fpm on
5.为php-fpm提供配置文件
[root@localhost php-5.4.26]# cp /usr/local/php/etc/php-fpm.conf.default /usr/local/php/etc/php-fpm.conf
6.编辑php-fpm的配置文件
listen = 192.168.1.201:9000   //监听地址
pm.max_children = 50          //允许启动的最大进程数
pm.start_servers = 5          //默认启动的进程数
pm.min_spare_servers = 2      //最小的空闲进程数
pm.max_spare_servers = 8      //最大的空闲进程数
7.启动服务,并查看端口是否处于监听状态
[root@localhost php-5.4.26]# service php-fpm start
Starting php-fpm  done
[root@localhost php-5.4.26]# ss -tnlp |grep php
LISTEN     0      128           192.168.1.201:9000                     *:*      users:(("php-fpm",47352,7),("php-fpm",47353,0),("php-fpm",47354,0),("php-fpm",47355,0),("php-fpm",47356,0),("php-fpm",47357,0))
2)、配置在虚拟主机中指出fcgi
1.修改主配置文件使其能够支持php
启动fcgi模块
LoadModule proxy_module modules/mod_proxy.so
LoadModule proxy_fcgi_module modules/mod_proxy_fcgi.so
添加支持php的功能
AddType application/x-httpd-php .php
AddType application/x-httpd-php-source .phps
添加主页
DirectoryIndex index.php index.html
2.在虚拟主机中使其能够将客户端发来的php请求发送到192.168.1.201上
    DocumentRoot "/www/html/wangfeng7399"
    ServerName www.wangfeng7399.com
    ServerAlias wangfeng7399.com
    ErrorLog "/var/logs/wangfeng7399_error_log"
    CustomLog "/var/logs/wangfeng7399_access_log" combined
    ProxyRequests Off
    ProxyPassMatch ^/(.*\.php)$ fcgi://192.168.1.201:9000/www/html/wangfeng7399/$1
说明:
ProxyRequests Off:关闭正向代理
ProxyPassMatch:把以.php结尾的文件请求发送到php-fpm进程,php-fpm至少需要知道运行的目录和URI,所以这里直接在fcgi://192.168.1.201:9000后指明了这两个参数,其它的参数的传递已经被mod_proxy_fcgi.so进行了封装,不需要手动指定。
3.测试
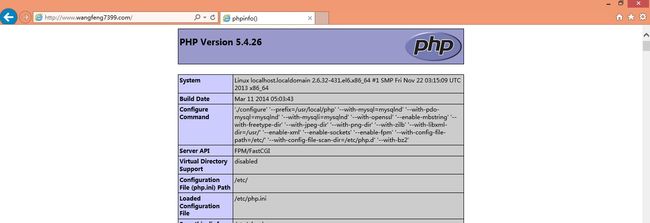
在1.201的/www/html/wangfeng7399的目录中创建index.php
~
~
测试成功
4.为php登陆远端数据的权限,需要在192.168.1.202上为其授权
mysql> grant all privileges on *.* to 'root'@'192.168.1.201' identified by 'wodehao123';
Query OK, 0 rows affected (0.00 sec)
mysql> flush privileges;
Query OK, 0 rows affected (0.00 sec)
5.修改inde.php查看数据库是否能够连接正常
~
测试成功
6.安装phpMyAdmin
详细安装步骤,请移步本人博客http://wangfeng7399.blog.51cto.com/3518031/1381359,为了确保我的图片能正常访问,建议在httpd的虚拟主机目录中也放一份
测试成功
切记:如果要登陆测试的话,请修改config.ini.config文件
$cfg['Servers'][$i]['host'] = '192.168.1.202';
7.做压力测试
[root@localhost wangfeng7399]# ab -c 100 -n 1000 www.wangfeng7399.com/phm
Concurrency Level:      100
Time taken for tests:   4.160 seconds
Complete requests:      1000
Failed requests:        0
Non-2xx responses:      1000
Total transferred:      469000 bytes
HTML transferred:       240000 bytes
Requests per second:    240.38 [#/sec] (mean)
Time per request:       416.012 [ms] (mean)
Time per request:       4.160 [ms] (mean, across all concurrent requests)
Transfer rate:          110.09 [Kbytes/sec] received
五、安装xcache
1.解压、编译、安装
[root@localhost ~]# tar xf xcache-3.1.0.tar.bz2
[root@localhost ~]# cd xcache-3.1.0
[root@localhost xcache-3.1.0]# /usr/local/php/bin/phpize
[root@localhost xcache-3.1.0]# ./configure --enable-xcache --with-php-config=/usr/local/php/bin/php-config
安装结束时,会出现类似如下行
Installing shared extensions:     /usr/local/php/lib/php/extensions/no-debug-non-zts-20100525/
2.编辑php.ini,整合php和xcache
[root@localhost xcache-3.1.0]# mkdir /etc/php.d
[root@localhost xcache-3.1.0]# cp xcache.ini /etc/php.d
3.编辑xcache的配置文件
extension = /usr/local/php/lib/php/extensions/no-debug-non-zts-20100525/xcache.so
注意:如果php.ini文件中有多条zend_extension指令行,要确保此新增的行排在第一位。
4.压力测试
Concurrency Level:      100
Time taken for tests:   1.059 seconds
Complete requests:      1000
Failed requests:        0
Non-2xx responses:      1000
Total transferred:      469000 bytes
HTML transferred:       240000 bytes
Requests per second:    944.57 [#/sec] (mean)
Time per request:       105.868 [ms] (mean)
Time per request:       1.059 [ms] (mean, across all concurrent requests)
Transfer rate:          432.62 [Kbytes/sec] received
可以看到比上次有明显提升
由于本人水平有限,请各位大牛多多指正!谢谢


