在上一篇中讲述了使用VS2010
开发Silverlight
的一些基础知识,并且讲述了Silverlight
的部署和代码安全知识,这一篇主要是讲述如何在Silverlight
中摆放界面元素。
记得早年前我还在学习Java
的时候,当时有两种开发Java SE
的方法,一种是使用JCreator
或者JBuilder
之类的IDE
开发(现在这二者都几乎没人用了,流行的是Eclipse
或者NetBeans
);一种是使用Visual J++
开发。使用前一种方法开发的Java
程序可以多种操作系统平台上运行,不过界面布局比较麻烦,什么CardLayout
、FlowLayout
、BorderLayout
、GridBagLayout
、GridLayout
等等,开发一个复杂的界面需要开发人员对各种布局类都有所了解;使用Visual J++
开发的话可以使用XY
坐标来定位元素,相对来说容易多了,不过这种开发的Java
软件并不是严格意义上的Java
软件,它只能在Windows
平台上运行。Java
从出现到现在,在Java EE
和Java ME
上都相对比较成功,而唯独在Java SE
上表现不佳,不知道跟它难以使用的界面布局有关系。
布局概述
在上一篇提到了XAML
语言,它适用于在WPF
和Silverlight
中进行界面布局的标记语言,它是一种有特定要求的XML
语言,从某种意义上来说,我觉得它和XHTML
走得更近一些:首先它们都是有特定格式的XML
语言,其次它们都是用于界面布局。除此之外,在XAML
语言中还有一个特点,那就是每一个元素都代表着一个Silverlight
中的类,并且在XAML
中只能有一个顶级元素。因此在进行WPF
和Silverlight
开发时不能绕开的一个问题就是界面布局,在Silverlight
中常见的界面布局类有Canvas
、Grid
和StackPanel
。
Canvas
、Grid
和StackPanel
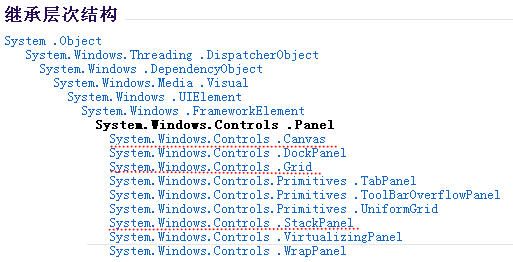
其实都是继承自System.Windows.Controls.Panel
的类,它们的继承层次关系如下图:
Panel
类有如下比较常见的属性:
Background
:用于填充 Panel
的边框之间的区域的 Brush
。
Children
:此 Panel
的子元素的 UIElementCollection
。
Height
:元素的建议高度。
HorizontalAlignment
:在父元素(如面板或项控件)中构成此元素时应用于此元素的水平对齐特征。
MaxHeight
:元素的最大高度约束,MaxHeight
的默认值是PositiveInfinity
(正无穷大)。
MaxWidth
:元素的最大宽度约束,MaxWidth
的默认值是PositiveInfinity
(正无穷大)。
MinHeight
:元素的最小高度约束,MinHeight
的默认值分别是Auto(
自动调整)。
MinWidth
:元素的最小宽度约束,MinWidth
的默认值分别是Auto(
自动调整)。
VerticalAlignment
:在父元素(如面板或项控件)中组合此元素时应用于此元素的垂直对齐特征。
Width
:元素的宽度。
可以看出在这里存在着Height
、MaxHeigh
、MinHeight
及Width
、MaxWidth
、MinWidth
这么两组与高度和宽度相关的属性,这的确让初学的人有些模糊。这些值之间存在着什么样的关系呢?拿Width
、MaxWidth
、MinWidth
来说,它们存在的关系如下:如果这三个值之间存在冲突,则应用程序确定宽度的实际顺序是:首先必须采用 MinWidth
;然后采用 MaxWidth
;最后,如果这些值中的每个值都在限制之内,则采用 Width
。为什么对于Width
或者Height
会出现这么三个属性呢?这是跟编程有一定的关系,假如我们在一个布局容器中水平放置了三个按钮,每个按钮的宽度是60
像素,即使不考虑这三个按钮之间的间隙显示这三个按钮的宽度至少需要180
像素,在默认情况下Width
、MaxWidth
、MinWidth
的默认值分别是Auto(
自动调整)、PositiveInfinity
(正无穷大)、0.0
,这样一来按照上面的规则会采取自动调整的方式。
StackPanel
布局用法
StackPane
是上面提到的几种布局中最简单的一种布局方式,它在一行或者一列中显示所有的子控件,默认情况下它是在一列中显示所有元素的,不过可以通过设置它的Orientation
属性为Horizontal
以指示在一行中显示所有元素。
下面是一个使用StackPanel
的简单例子:
<
navigation:Page
x:Class
="SilverlightDemo1.StackPanelDemo"
xmlns ="http://schemas.microsoft.com/winfx/2006/xaml/presentation"
xmlns:x ="http://schemas.microsoft.com/winfx/2006/xaml"
xmlns:d ="http://schemas.microsoft.com/expression/blend/2008"
xmlns:mc ="http://schemas.openxmlformats.org/markup-compatibility/2006"
mc:Ignorable ="d"
xmlns:navigation ="clr-namespace:System.Windows.Controls;assembly=System.Windows.Controls.Navigation"
d:DesignWidth ="640" d:DesignHeight ="480"
Title ="StackPanelDemo Page" >
< StackPanel Height ="100" Name ="stackPanel1" Width ="200" Background ="Yellow" >
< Button Content ="按钮一" Height ="23" Name ="button1" Width ="100" />
< Button Content ="按钮二" Height ="23" Name ="button2" Width ="200" />
< Button Content ="按钮三" Height ="23" Name ="button3" Width ="400" />
StackPanel >
navigation:Page >
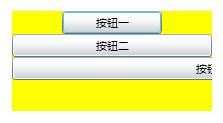
这个Page
的显示效果如下:
在上面的代码中我们设置StackPanel
的Width
为200
,没有设置MaxWidth
、MinWidth
的值,最终实际显示宽度为200
,因为此时MaxWidth
和MinWidth
都采用了默认值,因为这这三个值有冲突但是都在限制(没有找到具体对限制的定义,周公推测为MinWidth
≤Width
≤MaxWidth
,如果您觉得周公的推测不正确,请告知以免误导大家,谢谢)之内,所以最终实际宽度为200
。
如果设置StackPanel
的Width
、MaxWidth
、MinWidth
分别为200
、400
、100
,最终实际显示宽度仍为200
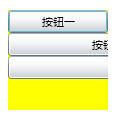
,原因同上,如下图所示:
如果设置StackPanel
的Width
、MaxWidth
、MinWidth
分别为200
、100
、100
,最终实际显示宽度为100
,这里MaxWidth
和MinWidth
都是100
,而Width
却是200
不在限制之内,所以最终显示宽度为MinWidth
设置的宽度,如下图所示:
如果设置StackPanel
的Width
、MaxWidth
、MinWidth
分别为200
、400
、500
,最终实际显示宽度为500
,这里MaxWidth
和MinWidth
分别是400
和500
,而Width
却是200
不在限制之内,所以最终显示宽度也为MinWidth
设置的宽度,如下图所示:
Grid
布局用法
Grid
布局是Silverlight
一种比较复杂的布局,它有点像我们HTML
中的Table
元素,将空间划分为行和列组成的单元格,在每个单元格中可以放置其它元素,下面是一个使用Grid
的例子:
<
navigation:Page
x:Class
="SilverlightDemo1.GridDemo1"
xmlns ="http://schemas.microsoft.com/winfx/2006/xaml/presentation"
xmlns:x ="http://schemas.microsoft.com/winfx/2006/xaml"
xmlns:d ="http://schemas.microsoft.com/expression/blend/2008"
xmlns:mc ="http://schemas.openxmlformats.org/markup-compatibility/2006"
mc:Ignorable ="d"
xmlns:navigation ="clr-namespace:System.Windows.Controls;assembly=System.Windows.Controls.Navigation"
d:DesignWidth ="400" d:DesignHeight ="300"
Title ="GridDemo1 Page" >
< Grid x:Name ="LayoutRoot" Background ="Pink" >
< Grid.RowDefinitions >
< RowDefinition />
< RowDefinition Height ="200" />
Grid.RowDefinitions >
< Grid.ColumnDefinitions >
< ColumnDefinition Width ="100" />
< ColumnDefinition Width ="100" />
< ColumnDefinition Width ="100" />
< ColumnDefinition />
Grid.ColumnDefinitions >
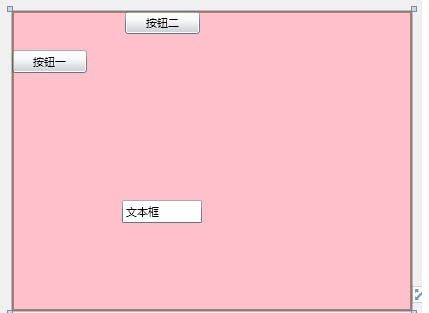
< Button Content ="按钮一" Height ="23" HorizontalAlignment ="Left" Name ="button1" VerticalAlignment ="Center" Width ="75" Grid.Column ="0" Grid.Row ="0" />
< Button Content ="按钮二" Grid.Column ="1" Grid.Row ="0" Height ="23" HorizontalAlignment ="Center" Name ="button2" VerticalAlignment ="Top" Width ="75" />
< TextBox Grid.Column ="1" Grid.Row ="1" Height ="23" HorizontalAlignment ="Center" Name ="textBox1" VerticalAlignment ="Center" Width ="80" Text ="文本框" />
Grid >
navigation:Page >
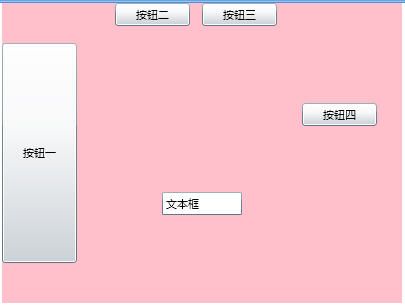
它的显示效果如下:
当然Grid
也可以像HTML
中的Table
一样跨行或者跨列,这需要通过设置控件的RowSpan
或者ColumnSpan
属性,下面就是一个例子:
<
navigation:Page
x:Class
="SilverlightDemo1.GridDemo1"
xmlns ="http://schemas.microsoft.com/winfx/2006/xaml/presentation"
xmlns:x ="http://schemas.microsoft.com/winfx/2006/xaml"
xmlns:d ="http://schemas.microsoft.com/expression/blend/2008"
xmlns:mc ="http://schemas.openxmlformats.org/markup-compatibility/2006"
mc:Ignorable ="d"
xmlns:navigation ="clr-namespace:System.Windows.Controls;assembly=System.Windows.Controls.Navigation"
d:DesignWidth ="400" d:DesignHeight ="300"
Title ="GridDemo1 Page" >
< Grid x:Name ="LayoutRoot" Background ="Pink" >
< Grid.RowDefinitions >
< RowDefinition />
< RowDefinition Height ="200" />
Grid.RowDefinitions >
< Grid.ColumnDefinitions >
< ColumnDefinition Width ="100" />
< ColumnDefinition Width ="100" />
< ColumnDefinition Width ="100" />
< ColumnDefinition />
Grid.ColumnDefinitions >
< Button Content ="按钮一" Height ="220" HorizontalAlignment ="Left" Name ="button1" Width ="75" Grid.Column ="0" Grid.Row ="0" Grid.RowSpan ="2" />
< Button Content ="按钮二" Grid.Column ="1" Grid.Row ="0" Height ="23" HorizontalAlignment ="Center" Name ="button2" VerticalAlignment ="Top" Width ="75" />
< TextBox Grid.Column ="1" Grid.Row ="1" Grid.ColumnSpan ="2" Height ="23" Name ="textBox1" VerticalAlignment ="Center" Width ="80" Text ="文本框" />
< Button Content ="按钮三" Grid.Column ="2" Height ="23" HorizontalAlignment ="Left" Name ="button3" VerticalAlignment ="Top" Width ="75" />
< Button Content ="按钮四" Grid.Column ="3" Grid.Row ="1" Height ="23" HorizontalAlignment ="Left" Name ="button4" VerticalAlignment ="Top" Width ="75" />
Grid >
navigation:Page >
它的显示效果如下:
Canvas
布局用法
相比Grid
和Grid
的布局方式来说,Canvas
提供了另外一种途径来布置我们的控件,它采用了我们比较熟悉的利用坐标的方式的,在使用Canvas
布局时可以设置每个控件Top
和Left
属性,也就是设置控件距离它所在的容器的距离,下面就是一个例子:
<
navigation:Page
x:Class
="SilverlightDemo1.CanvasDemo1"
xmlns ="http://schemas.microsoft.com/winfx/2006/xaml/presentation"
xmlns:x ="http://schemas.microsoft.com/winfx/2006/xaml"
xmlns:d ="http://schemas.microsoft.com/expression/blend/2008"
xmlns:mc ="http://schemas.openxmlformats.org/markup-compatibility/2006"
mc:Ignorable ="d"
xmlns:navigation ="clr-namespace:System.Windows.Controls;assembly=System.Windows.Controls.Navigation"
d:DesignWidth ="640" d:DesignHeight ="480"
Title ="CanvasDemo1 Page" >
< Canvas Height ="240" Name ="canvas1" Width ="300" Background ="Teal" >
< Button Canvas.Left ="40" Canvas.Top ="161" Content ="登录" Height ="23" Name ="button1" Width ="75" />
< TextBlock Canvas.Left ="40" Canvas.Top ="56" Height ="23" Name ="textBlock1" Text ="用户名" />
< TextBlock Canvas.Left ="40" Canvas.Top ="102" Height ="23" Name ="textBlock2" Text ="密码" />
< Button Canvas.Left ="183" Canvas.Top ="161" Content ="取消" Height ="23" Name ="button2" Width ="75" />
< TextBox Canvas.Left ="138" Canvas.Top ="56" Height ="23" Name ="textBox1" Width ="120" />
< PasswordBox Canvas.Left ="138" Canvas.Top ="102" Height ="23" Name ="passwordBox1" Width ="120" />
Canvas >
navigation:Page >
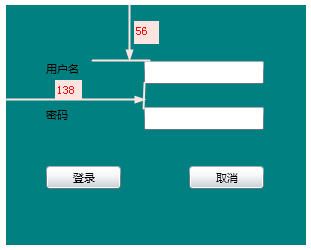
它的显示效果如下:
在代码中我们对用户名所对应的文本框的设置是:
<
TextBox
Canvas.Left
="138"
Canvas.Top
="56"
Height
="23"
Name
="textBox1"
Width
="120"
/>
于是就会在距离Canvas
顶部56
、左边138
处显示一个高度为23
、宽度为120
的文本框。
布局的综合使用
虽然在XAML
中只能有一个顶级元素,但是这并不意味着在一个界面中只使用一种界面布局,我们完全可以在外层布局中嵌套内层布局,就像我们在HTML
的Table
中再次嵌套Table
一样,下面是一个简单的例子:
<
navigation:Page
x:Class
="SilverlightDemo1.Graphics"
xmlns ="http://schemas.microsoft.com/winfx/2006/xaml/presentation"
xmlns:x ="http://schemas.microsoft.com/winfx/2006/xaml"
xmlns:d ="http://schemas.microsoft.com/expression/blend/2008"
xmlns:mc ="http://schemas.openxmlformats.org/markup-compatibility/2006"
mc:Ignorable ="d"
xmlns:navigation ="clr-namespace:System.Windows.Controls;assembly=System.Windows.Controls.Navigation"
d:DesignWidth ="800" d:DesignHeight ="600"
Title ="Chapter10 Page" >
< StackPanel Width ="800" Height ="600" Orientation ="Vertical" >
< Canvas Width ="800" Height ="200" Background ="White" >
< Canvas.Resources >
< Storyboard x:Name ="myStroryboard" >
< DoubleAnimation Storyboard.TargetName ="myTransform" Storyboard.TargetProperty ="Angle"
From ="0" To ="360" Duration ="0:0:5" RepeatBehavior ="Forever" />
Storyboard >
Canvas.Resources >
< Image Canvas.Left ="50" Canvas.Top ="50" Height ="100" Name ="p_w_picpath01" Stretch ="Fill" Width ="100" Source ="p_w_picpath/15.jpg" MouseEnter ="Image_MouseEnter" MouseLeave ="Image_MouseLeave" >
< Image.RenderTransform >
< RotateTransform x:Name ="myTransform" Angle ="15" CenterX ="50" CenterY ="50" > RotateTransform >
Image.RenderTransform >
Image >
< Image Canvas.Left ="350" Canvas.Top ="0" Height ="100" Name ="p_w_picpath02" Stretch ="Fill" Width ="100" Source ="p_w_picpath/15.jpg" >
Image >
< Image Canvas.Left ="350" Canvas.Top ="0" Height ="100" Name ="p_w_picpath03" Stretch ="Fill" Width ="100" Source ="p_w_picpath/15.jpg" Opacity ="0.8" >
< Image.RenderTransform >
< TransformGroup >
< ScaleTransform ScaleY ="-0.75" > ScaleTransform >
< TranslateTransform Y ="180" X ="30" > TranslateTransform >
< SkewTransform AngleX ="-15" > SkewTransform >
TransformGroup >
Image.RenderTransform >
< Image.OpacityMask >
< LinearGradientBrush StartPoint ="0.5,0.0" EndPoint ="0.5,1.0" >
< GradientStop Offset ="0.0" Color ="#00000000" > GradientStop >
< GradientStop Offset ="1.0" Color ="#FF000000" > GradientStop >
LinearGradientBrush >
Image.OpacityMask >
Image >
Canvas >
< Canvas Width ="800" Height ="200" >
< Image Canvas.Left ="100" Canvas.Top ="10" Height ="100" Name ="p_w_picpath31" Stretch ="Fill" Width ="200" Source ="p_w_picpath/14.jpg" />
< Image Canvas.Left ="100" Canvas.Top ="10" Height ="100" Name ="p_w_picpath32" Stretch ="Fill" Width ="200" Source ="p_w_picpath/14.jpg" >
< Image.RenderTransform >
< RotateTransform Angle ="15" CenterX ="0" CenterY ="0" > RotateTransform >
Image.RenderTransform >
Image >
< Image Canvas.Left ="100" Canvas.Top ="10" Height ="100" Name ="p_w_picpath33" Stretch ="Fill" Width ="200" Source ="p_w_picpath/14.jpg" >
< Image.RenderTransform >
< RotateTransform Angle ="30" CenterX ="50" CenterY ="300" > RotateTransform >
Image.RenderTransform >
Image >
< Image Canvas.Left ="100" Canvas.Top ="10" Height ="100" Name ="p_w_picpath34" Stretch ="Fill" Width ="200" Source ="p_w_picpath/14.jpg" >
< Image.RenderTransform >
< RotateTransform Angle ="45" CenterX ="0" CenterY ="50" > RotateTransform >
Image.RenderTransform >
Image >
Canvas >
< Canvas Width ="800" Height ="200" >
< Image Canvas.Left ="100" Canvas.Top ="10" Height ="100" Name ="p_w_picpath1" Stretch ="Fill" Width ="200" Source ="p_w_picpath/14.jpg" />
< Image Canvas.Left ="100" Canvas.Top ="10" Height ="100" Name ="p_w_picpath2" Stretch ="Fill" Width ="200" Source ="p_w_picpath/14.jpg" >
< Image.RenderTransform >
< RotateTransform Angle ="15" > RotateTransform >
Image.RenderTransform >
Image >
< Image Canvas.Left ="100" Canvas.Top ="10" Height ="100" Name ="p_w_picpath3" Stretch ="Fill" Width ="200" Source ="p_w_picpath/14.jpg" >
< Image.RenderTransform >
< RotateTransform Angle ="30" > RotateTransform >
Image.RenderTransform >
Image >
< Image Canvas.Left ="100" Canvas.Top ="10" Height ="100" Name ="p_w_picpath4" Stretch ="Fill" Width ="200" Source ="p_w_picpath/14.jpg" >
< Image.RenderTransform >
< RotateTransform Angle ="40" > RotateTransform >
Image.RenderTransform >
Image >
Canvas >
StackPanel >
navigation:Page >
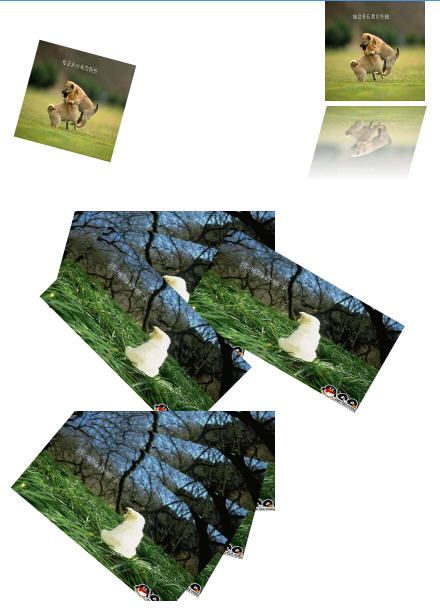
它的显示效果如下:
总结:本篇主要讲述了Silverlight
中几种常见的布局:StackPanel
可以将控件按行或者按列布局,这是一种比较简单的布局方式;Grid
可以采用类似于HTML
中Table
的方式布局,并且可以设置控件跨行或者跨列摆放;Canvas
控件采用类似于坐标定位的方式对控件进行布局。还有一些布局在本篇中没有讲述,读者朋友可以在学习时借鉴这些知识来学习,其实利用这些布局已经足够实现复杂的界面了。
下一篇将讲述常用控件的学习。
周公(zhoufoxcn)
2010-10-11
