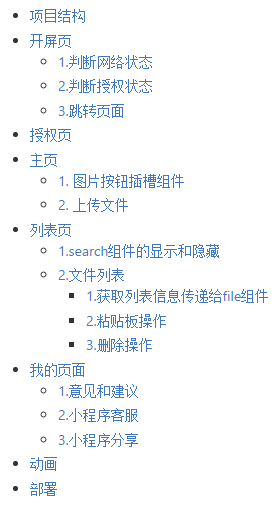
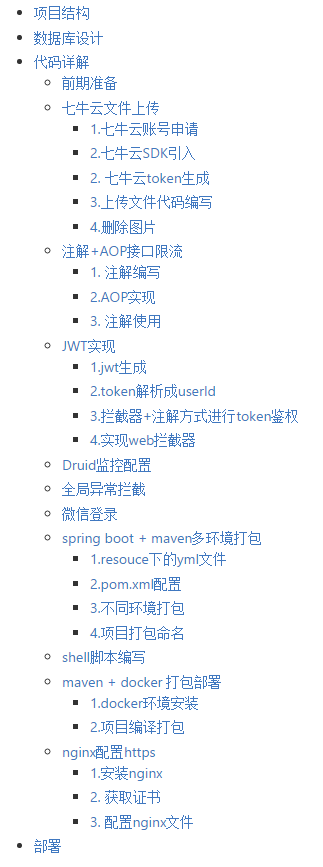
[TOC]
稻草人图床神器
源码地址:
小程序源码 https://github.com/w77996/mini-straw
后台源码 https://github.com/w77996/hi-straw
体验一下
之前乘着换工作的间隙撸的,一方面练习一下小程序,学过之后没怎么应用,一方面写点笔记啥的,项目断断续续做了两个月,只是一个简单的图片上传工具,觉得不错的话记得给个star
小程序
- 小程序授权,登录
- 父组件与子组件相互通信
- 小程序分享,意见与建议,客服功能,文件上传
- flex布局的使用
- Promise的使用,业务model封装
- 插槽的使用,动画效果
项目目录结构
mini-straw
    ├── component -- 组件
    |    ├── file -- 文件组件
    |    ├── image-button -- 图片按钮组件
    |    ├── search -- 查找页面组件
    |    ├── tag -- 标签组件
    ├── images -- 图片目录
    |    ├── icon -- icon图片
    |    ├── tab -- tab图片
    ├── model -- 封装的model
    ├── pages -- 页面
    |    ├── about -- 关于页
    |    ├── auth -- 授权页
    |    ├── file -- 文件页
    |    ├── index -- 首页
    |    ├── launch -- 启动页面
    |    ├── my -- 个人中心
    └── utils -- 工具
后台:
技术栈:spring boot + druid + mybatis + jwt
- 微信登录,jwt授权
- 注解及AOP的使用
- maven多环境打包,docker使用
- shell脚本自动化部署
- nginx反向代理及https配置
- 七牛云文件操作
项目目录结构
hi-straw
├── common -- 公共模块
├── config -- 配置模块
├── controller -- controller接口
├── core -- 核心业务模块
|    ├── annontaion -- 注解
|    ├── aop -- aop实现
|    ├── constant -- 常量
|    ├── filter -- 拦截器
|    ├── jwt -- jwt相关
|    └── result -- 结果返回
├── entity -- 实体类
|    ├── dto -- 数据传输
|    └── vo -- 页面传输
├── exception -- 全局异常
├── mapper -- dao层
├── service -- service层
└── util -- 工具类
小程序详解
[TOC]
mini-straw
项目结构
mini-straw
    ├── component -- 组件
    |    ├── file -- 文件组件
    |    ├── image-button -- 图片按钮组件
    |    ├── search -- 查找页面组件
    |    ├── tag -- 标签组件
    ├── images -- 图片目录
    |    ├── icon -- icon图片
    |    ├── tab -- tab图片
    ├── model -- 封装的model
    ├── pages -- 页面
    |    ├── about -- 关于页
    |    ├── auth -- 授权页
    |    ├── file -- 文件页
    |    ├── index -- 首页
    |    ├── launch -- 启动页面
    |    ├── my -- 个人中心
    └── utils -- 工具
开屏页
1.判断网络状态
使用wx.getNetworkType({})可获取当前网络状态,networkType值wifi/2g/3g/4g/unknown(Android下不常见的网络类型)/none(无网络)
 //判断网络状态
wx.getNetworkType({
    success: res => {
    if (res.networkType == "none") {
        wx.showToast({
            title: '嗷~~网络不可用',
            icon: 'none',
            duration: 2000
        })
        return;
    }
    },
})
2.判断授权状态
使用wx.getSetting({})获取授权状态,在获得data后取data.authSetting['scope.userInfo']判断授权状态
 // 获取授权的状态
wx.getSetting({
    success: data => {
    if (data.authSetting['scope.userInfo']) {
        //已授权,执行登陆
        wx.getUserInfo({
            success: data => {
                    console.log("userInfo {}", data)
                    let userInfo = data.userInfo;
                    wx.setStorageSync('userInfo', userInfo);
                    //执行登陆操作
                    this._userLoginGetCode(userInfo);
            }
        });
        wx.setStorageSync('authorized', true);
    } else {
        console.log("未授权")
        //跳转至授权页
        let timer = setTimeout(() => {
                wx.redirectTo({
                        url: '/pages/auth/auth'
                })
        }, 2000)

    }
    }
});
若授权,则调用wx.getUserInfo({})获取微信用户信息,信息获取完成后调用wx.login({})获取小程序的code,通过code向后台获取用户openId及token。
//后台获取code
_userLoginGetCode(userInfo) {
    console.log("发起_userLoginGetCode请求");
    wx.login({
        success(res) {
        console.log("wx.login {}", res);
        if (res.code) {
            // 发起网络请求
            const code = res.code;
            userInfo.code = code;
            userModel.getTokenByCode(userInfo).then((res) => {
                console.log("userModel getUserInfo {}", res);
                wx.setStorageSync("token", res.data.data.token);
                let timer = setTimeout(() =>
                    wx.switchTab({
                            url: '/pages/index/index',
                    }), 2000)
            });
        } else {
                console.log('登录失败!' + res.errMsg)
        }
        }
    })
},
3.跳转页面
- 跳转
/pages/auth/auth页面使用的是wx.redirectTo({}) - 跳转
/pages/index/index页面使用的是wx.switchTab({})
因为/pages/index/index是小程序tab页,使用wx.redirectTo({})无法跳转
授权页
授权需制定button按钮,加入open-type='getUserInfo'属性,bindgetuserinfo调用自定义方法onGetUserInfo。
onGetUserInfo接受授权状态及授权获取的用户信息,再进行code获取,通过code向后台获取用户openId及token。
onGetUserInfo: function(e) {
    console.log(e)
    const userInfo = e.detail.userInfo;
    if (userInfo) {
            //通过`code`向后台获取用户openId及token。
            this._userLoginGetCode(userInfo);
    }
},
主页
1. 图片按钮插槽组件
在component目录下的images-button组件,做了简单的图片插槽统一,在分享按钮,用户登录按钮,文件上传按钮均可以使用。plain="{{true}}"代表button背景透明
options需要开启插槽功能,添加multipleSlots: true
open-type="{{openType}}"父组件将参数传入子组件,子组件在properties属性中可以获取到父组件传来的openType数据,通过this.properties.openType可以获取属性值
options: {
    // 开启插槽
    multipleSlots: true
  },
/**
   * 组件的属性列表
   */
  properties: {
    openType: {
      type: String
    }
  },
index页面引入组件,需要在index.json中添加组件路径
{
  "usingComponents": {
    "btn-cmp": "/component/image-button/index"
  }
}
2. 上传文件
主要使用到wx.chooseImage({})进行图片的选择,选择后使用wx.uploadFile({})上传图片至服务器
//上传文件
onUpload(event) {
let _this = this;
wx.chooseImage({
  count: 1, // 默认9
  sizeType: ['original', 'compressed'], // 可以指定是原图还是压缩图,默认二者都有
  sourceType: ['album', 'camera'], // 可以指定来源是相册还是相机,默认二者都有
  success: function(res) {
    // 返回选定照片的本地文件路径列表,tempFilePath可以作为img标签的src属性显示图片
    let tempFilePaths = res.tempFilePaths;
    console.log(tempFilePaths)
    wx.uploadFile({
      header: {
        "Authorization": "Bearer " + wx.getStorageSync("token")
      },
      url: config.apiBaseUrl + '/file/upload',
      filePath: tempFilePaths[0],
      name: 'file',
      success: (res) => {
        wx.showToast({
          title: "上传成功~",
          icon: 'none',
          duration: 2000
        })
      },
      fail: (res) => {
        wx.showToast({
          title: res.data.msg,
          icon: 'none',
          duration: 2000
        })
      }
    })

  }
})
}
列表页
1.search组件的显示和隐藏
固定列表页搜索header位置,点击header显示search组件,在search组件点击取消则隐藏search组件,此处设计子组件向父组件传递消息
- 引入search组件
 "usingComponents": {
    ...
    "search-cmp": "/component/search/index"
  }
- 使用searchPage参数判断
search组件的,默认为false,在点击header时更新searchPage为true,显示search组件
...
-
search页面点击取消,向父组件发送一个this.triggerEvent('cancel', {}, {});事件,在xml中的search-cmp添加cancel事件的通知绑定
#file页面中的search-cmp组件
父组件file页面绑定子组件传来的cancel事件通知,就调用onCancel方法,
在onCancel方法中获取事件响应,将searchPage参数修改为false,search组件就隐藏起来了
//cancel searching page
onCancel(event) {
  console.info(event)
  this.triggerEvent('cancel', {}, {});

},
2.文件列表
1.获取列表信息传递给file组件
在page中的file页面,获取到后台传来的fileList数据,引入file组件,file="{{item}}"将数据传入子组件
在component中的file组件,在properties添加属性file来接收父组件传来的数据
  /**
   * 组件的属性列表
   */
  properties: {
    file: Object
  }
file组件在xml页面中使用{{file.fileName}}即可获取到对象信息,相应的数据也会呈现在页面上
3.粘贴板操作
图片点击响应方法onCopy,onCopy调用wx.setClipboardData({})可以将数据复制到粘贴板
    onCopy: function (event) {
      console.info(event)
      let _this = this;
      wx.setClipboardData({
        data: _this.properties.file.filePath,
        success: function(res) {
          wx.showToast({
            title: '图片地址复制成功',
          })
        }
      });
4.删除操作
子组件将数据传递给父组件,点击删除图片出发onDelete方法,通过this.triggerEvent('del', {fileId}, {});将文件ID发送到父组件
    onDelete: function (event) {
      console.info(event)
      let fileId = this.properties.file.id;
      this.triggerEvent('del', {fileId}, {});
    },
父组件file页面绑定子组件传来的del事件
调用onDelete出发网络请求去完成删除文件的逻辑,删除成功后重新刷新文件列表
 //删除图片
onDelete(event) {
    console.info("DEL")
    console.info(event)
    let fileId = event.detail.fileId;
    fileModel.delFileById(fileId).then((res) => {
        console.info(res);
        wx.showToast({
                title: '删除成功',
        })
        this.setData({
                pageNum: 1,
                fileList: []
        });
        this._getFileList();
    })
},
我的页面
1.意见和建议
小程序自带用户反馈功能,使用button跳转至网页,用户可以填写相关反馈,open-type设置为feedback
2.小程序客服
小程序的button中的open-type拥有开放能力,在微信公众平台中启用客服功能,添加客服人员,在代码中添加button即可弹出客服聊天界面,open-type设置为contact
3.小程序分享
此处使用插槽,button中的open-type设置为share
动画
小程序动画官方文档
开屏动画,设置文字透明度,从0到1,渐渐显示,主要使用到opacity去设置组件的透明度,先创建一个动画animationTip,持续800ms,然后在setTimeout(function () {})中设置动画出现时间
 var animationTip = wx.createAnimation({
      //持续时间800ms
      duration: 800,
      timingFunction: 'ease',
    });
    this.animationTip = animationTip;
    animationTip.opacity(0).step()
    this.setData({
      animationTip: animationTip.export()
    })
    setTimeout(function () {
      animationTip.opacity(1).step()
      this.setData({
        animationTip: animationTip.export()
      })
    }.bind(this), 500)
部署
- 修改
utils目录下的config.apiBaseUrl,改成自己的域名,上传到微信公众号平台,在版本管理中进行发布
const config ={
   apiBaseUrl: "你自己的域名或服务器地址"
}
后台功能详解
hi-straw
项目结构
hi-straw
├── common -- 公共模块
├── config -- 配置模块
├── controller -- controller接口
├── core -- 核心业务模块
|    ├── annontaion -- 注解
|    ├── aop -- aop实现
|    ├── constant -- 常量
|    ├── filter -- 拦截器
|    ├── jwt -- jwt相关
|    └── result -- 结果返回
├── entity -- 实体类
|    ├── dto -- 数据传输
|    └── vo -- 页面传输
├── exception -- 全局异常
├── mapper -- dao层
├── service -- service层
└── util -- 工具类
数据库设计
CREATE TABLE `t_straw_file` (
  `id` int(11) UNSIGNED NOT NULL AUTO_INCREMENT,
  `user_id` int(11) UNSIGNED DEFAULT NULL COMMENT '用户ID',
  `file_path` varchar(255) DEFAULT NULL COMMENT '文件路径',
  `file_name` varchar(100) DEFAULT NULL COMMENT '文件名',
  `file_size` varchar(10) DEFAULT NULL COMMENT '文件大小',
  `props` varchar(255) DEFAULT NULL,
  `status` tinyint(5) UNSIGNED DEFAULT '0' COMMENT '0.正常 -1.删除',
  `create_time` datetime DEFAULT CURRENT_TIMESTAMP COMMENT'创建时间',
  PRIMARY KEY (`id`),
    KEY `user_id` (`user_id`) USING BTREE
) ENGINE=InnoDB AUTO_INCREMENT=27 DEFAULT CHARSET=utf8mb4 COMMENT '用户文件列表';
CREATE TABLE `t_straw_user` (
  `id` int(11) UNSIGNED NOT NULL AUTO_INCREMENT,
  `user_name` varchar(20) DEFAULT NULL COMMENT '用户名',
  `nickname` varchar(20) DEFAULT NULL COMMENT '用户昵称',
  `user_logo` varchar(250) DEFAULT NULL COMMENT '用户logo',
  `phone_num` varchar(20) DEFAULT NULL COMMENT '手机号',
  `open_id` varchar(55) DEFAULT NULL COMMENT '微信openId',
  `union_id` varchar(20) DEFAULT NULL COMMENT '微信union_id',
  `password` varchar(50) DEFAULT NULL COMMENT '密码',
  `uuid` varchar(20) DEFAULT NULL COMMENT '自定义生成的uuid',
  `last_login` datetime DEFAULT CURRENT_TIMESTAMP COMMENT '最后登陆时间',
    `create_time` datetime DEFAULT CURRENT_TIMESTAMP COMMENT '创建时间',
  PRIMARY KEY (`id`),
    UNIQUE KEY `open_id` (`open_id`) USING HASH
) ENGINE=InnoDB AUTO_INCREMENT=12 DEFAULT CHARSET=utf8mb4 COMMENT '用户表';
CREATE TABLE `t_straw_user_file_info` (
  `id` int(11) NOT NULL AUTO_INCREMENT,
  `user_id` int(11) UNSIGNED NOT NULL COMMENT '用户ID',
  `file_size` int(11) UNSIGNED DEFAULT '0' COMMENT '用户文件大小',
  `left_size` int(11) UNSIGNED DEFAULT '5242880' COMMENT '剩余文件大小',
  `total_size` int(11)UNSIGNED DEFAULT '5242880' COMMENT '用户文件空间大小',
  `file_num` int(11) UNSIGNED DEFAULT '0' COMMENT '文件数量',
  `is_vip` tinyint(5) UNSIGNED DEFAULT '0' COMMENT '是否为vip,1.是 0.否',
  PRIMARY KEY (`id`),
  UNIQUE KEY `user_id` (`user_id`) USING HASH
) ENGINE=InnoDB AUTO_INCREMENT=43 DEFAULT CHARSET=utf8mb4 COMMENT'用户文件信息';
CREATE TABLE `t_straw_user_info` (
  `user_id` int(11)  UNSIGNED NOT NULL COMMENT '用户ID',
  `sex` tinyint(5) UNSIGNED DEFAULT NULL COMMENT '性别',
  `location` varchar(55) DEFAULT NULL COMMENT '位置',
  `platform` varchar(55) DEFAULT NULL COMMENT '平台',
  `birthday` datetime DEFAULT NULL COMMENT '生日',
  PRIMARY KEY (`user_id`)
) ENGINE=InnoDB DEFAULT CHARSET=utf8mb4 COMMENT '用户详细表';
代码详解
前期准备
- linux服务器及MySql数据库
- 七牛云账号,可以去七牛云官网申请账号
- HTTPS证书 阿里云获取免费证书
- 微信公众平台小程序开发者账号
七牛云文件上传
代码com.w77996.straw.util.QiNiuUtil
1.七牛云账号申请
七牛云官网申请账号,获得AccessKey,SecretKey,并设置七牛云图片bucket
    /**
     * 七牛accessKey
     */
    @Value("${QiNiu.accessKey}")
    private String accessKey;
    /**
     * 七牛密钥
     */
    @Value("${QiNiu.secretKey}")
    private String secretKey;
    /**
     * 七牛bucket
     */
    @Value("${QiNiu.bucket}")
    private String bucket;
2.七牛云SDK引入
pom.xml文件引入七牛云仓库
        com.qiniu
        qiniu-java-sdk
        [7.2.0, 7.2.99]
2. 七牛云token生成
    /**
     * 七牛云生成token
     *
     * @param fileName
     * @return
     */
    public QiNiuAuth generateToken(String userId, String fileName) {
        Auth auth = Auth.create(accessKey, secretKey);
        String key = "upload/file/000/" + userId + "/" + fileName;
        StringMap putPolicy = new StringMap();
        putPolicy.put("returnBody", "{\"key\":\"$(key)\",\"hash\":\"$(etag)\",\"bucket\":\"$(bucket)\",\"fsize\":$(fsize)}");
        long expireSeconds = 3600;
        String upToken = auth.uploadToken(bucket, key, expireSeconds, putPolicy);
        Map resultMap = Maps.newHashMapWithExpectedSize(3);
        resultMap.put("domain", "https://www.w77996.cn");
        resultMap.put("key", key);
        resultMap.put("upToken", upToken);
        return new QiNiuAuth("https://www.w77996.cn", key, upToken);
    }
3.上传文件代码编写
    /**
     * 上传图片
     *
     * @param file
     * @param key
     * @param token
     * @return
     */
    public String uploadImage(MultipartFile file, String key, String token) {
        Configuration cfg = new Configuration(Zone.zone2());
        UploadManager uploadManager = new UploadManager(cfg);
        String filePath = null;
        //生成上传凭证,不指定key的情况下,以文件内容的hash值作为文件名
        Response response = null;
        try {
            byte[] uploadBytes = file.getBytes();
            Auth auth = Auth.create(accessKey, secretKey);
            String upToken = auth.uploadToken(bucket);
            try {
                response = uploadManager.put(uploadBytes, key, upToken);
                //解析上传成功的结果
                DefaultPutRet putRet = new Gson().fromJson(response.bodyString(), DefaultPutRet.class);
                log.info("上传结果 {} {}", putRet.hash, putRet.key);
                filePath = putRet.key;
            } catch (QiniuException ex) {
                try {
                    response = ex.response;
                    log.error(response.bodyString());
                } catch (QiniuException ex2) {
                    //ignore
                    ex.printStackTrace();
                }
            }
        } catch (Exception ex) {
            //ignore
            ex.printStackTrace();
        }
        return filePath;
    }
4.删除图片
    /**
     * 删除图片
     *
     * @param key
     */
    public void delete(String key) {
        Configuration cfg = new Configuration(Zone.zone2());
        Auth auth = Auth.create(accessKey, secretKey);
        //实例化一个BucketManager对象
        BucketManager bucketManager = new BucketManager(auth, cfg);
        try {
            //调用delete方法移动文件
            bucketManager.delete(bucket, key);
        } catch (QiniuException e) {
            //捕获异常信息
            throw new GlobalException(ResultCode.ERROR);
        }
    }
注解+AOP接口限流
1. 注解编写
代码com.w77996.straw.core.annotation.Limiter
@Target(ElementType.METHOD)
@Retention(RetentionPolicy.RUNTIME)
@Documented
public @interface Limiter {

    /**
     *
     * @return
     */
    String value() default "";

    /**
     * 每秒向桶中放入令牌的数量   默认最大即不做限流
     * @return
     */
    double perSecond() default Double.MAX_VALUE;

    /**
     * 获取令牌的等待时间  默认0
     * @return
     */
    int timeOut() default 0;

    /**
     * 超时时间单位
     * @return
     */
    TimeUnit timeOutUnit() default TimeUnit.MILLISECONDS;
}
2.AOP实现
代码com.w77996.straw.core.aop.RateLimitAspect
@Aspect
@Component
@Slf4j
public class RateLimitAspect {

    private RateLimiter rateLimiter = RateLimiter.create(Double.MAX_VALUE);

    /**
     * 定义切点
     * 1、通过扫包切入
     * 2、带有指定注解切入
     */
    @Pointcut("@annotation(com.w77996.straw.core.annotation.Limiter)")
    public void checkPointcut() {
    }

    @ResponseBody
    @Around(value = "checkPointcut()")
    public Object aroundNotice(ProceedingJoinPoint pjp) throws Throwable {
        log.info("拦截到了{}方法...", pjp.getSignature().getName());
        Signature signature = pjp.getSignature();
        MethodSignature methodSignature = (MethodSignature) signature;
        //获取目标方法
        Method targetMethod = methodSignature.getMethod();
        if (targetMethod.isAnnotationPresent(Limiter.class)) {
            //获取目标方法的@Limiter注解
            Limiter limiter = targetMethod.getAnnotation(Limiter.class);
            rateLimiter.setRate(limiter.perSecond());
            if (!rateLimiter.tryAcquire(limiter.timeOut(), limiter.timeOutUnit())) {
                log.info("rateLimiter lock");
                return Result.error(ResultCode.BUSY);
            }
        }
        return pjp.proceed();
    }
}
3. 注解使用
限定每秒只能调用一次,如果超出,则返回Result.error(ResultCode.BUSY)
    @GetMapping("/limit")
    @Limiter(perSecond = 1.0, timeOut = 500)
    public String testLimiter() {
        return " success";
    }
JWT实现
1.jwt生成
使用JwtUtil生成jwt Token
     /**
     * 生成jwt
     *
     * @param userId
     * @return
     */
    public static String createJWT(String userId) {
        String token = JwtHelper.createJWT(userId, Constant.JWT_CLIENT_ID,
                Constant.JWT_NAME, Constant.JWT_EXPIRES_SECOND, Constant.JWT_BASE64_SECRET);
        return token;
    }
2.token解析成userId
将userId放入token中,在请求接口时可以通过请求Header获取Bearer {token}进行解码,从而获取userId。
    /**
     * 通过token获取用户信息
     *
     * @return
     */
    public String getUserIdByToken() {
        HttpServletRequest request = ((ServletRequestAttributes) RequestContextHolder.getRequestAttributes()).getRequest();
        String accessToken = request.getHeader("Authorization");
        if (StringUtils.isEmpty(accessToken) || accessToken.length() < 20) {
            throw new GlobalException(ResultCode.ERROR_TOKEN_NULL);
        }
        accessToken = accessToken.substring(7);
        if ("admin".equals(accessToken)) {
            return "1";
        }
        Claims claims = JwtHelper.parseJWT(accessToken, Constant.JWT_BASE64_SECRET);
        return claims.getSubject();
    }
3.拦截器+注解方式进行token鉴权
代码 com.w77996.straw.core.annotation.IgnoreToken
先设置忽略token的注解
/**
 * @description: 忽略token
 * @author: w77996
 **/
@Retention(RetentionPolicy.RUNTIME)
@Target(value={ElementType.METHOD,ElementType.TYPE})
public @interface IgnoreToken {
}
代码 com.w77996.straw.core.filter.TokenFilter
拦截器TokenFilter实现HandlerInterceptor,在每次请求进来时进行拦截,在调用controller之前都会调用perHandle,所以在perHandler内获取方法名的注解,判断是否有ignoreToken的注解,然后进行jwt的校验。
 @Override
    public boolean preHandle(HttpServletRequest request, HttpServletResponse response, Object handler) throws Exception {
        HandlerMethod handlerMethod = (HandlerMethod) handler;
        IgnoreToken ignoreToken = handlerMethod.getBeanType().getAnnotation(IgnoreToken.class);
        log.info("enter preHandle {}",request.getRequestURL());
        if (ignoreToken == null) {
            ignoreToken = handlerMethod.getMethodAnnotation(IgnoreToken.class);
        }
        if (ignoreToken != null) {
            log.info("ignoreToken not null");
            return true;
        }
        log.info("ignoreToken  null");
        String token = request.getHeader("Authorization");
        if(token != null){
            log.info("token is {}",token);
            if ("admin".equals(token.substring(7))) {
                return true;
            }
            Claims claims = JwtHelper.parseJWT(token.substring(7), Audience.BASE64SECRET);
            if(claims != null){
                log.info("claims is {} {}",claims.toString(),claims.getSubject());
                return true;
            }else{
                log.info("claims is null");
                throw new GlobalException(ResultCode.ERROR_AUTH);
            }
        }
        return false;
    }
4.实现web拦截器
代码com.w77996.straw.config.WebMvcAdapterConfig
不拦截/druid/*的接口
/**
 * @description: web拦截器
 * @author: w77996
 **/
@Component
public class WebMvcAdapterConfig extends WebMvcConfigurationSupport {
    @Override
    public void addInterceptors(InterceptorRegistry registry) {
        registry.addInterceptor(new TokenFilter()).excludePathPatterns("/druid/*");
    }
}
Druid监控配置
代码com.w77996.straw.config.DruidConfig
项目运行后访问http://ip:port/druid,输入账号admin密码amdin即可访问
@Configuration
public class DruidConfig {

    @Bean
    @ConfigurationProperties("spring.datasource")
    public DataSource druidDataSource() {
        DruidDataSource dataSource = new DruidDataSource();
        return dataSource;
    }

    @Bean
    public ServletRegistrationBean druidStatViewServlet() {
        ServletRegistrationBean registrationBean = new ServletRegistrationBean(new StatViewServlet(), "/druid/*");
        // IP白名单 (没有配置或者为空,则允许所有访问)e
        registrationBean.addInitParameter("allow", "");
        // IP黑名单 (存在共同时,deny优先于allow)
        registrationBean.addInitParameter("deny", "");
        registrationBean.addInitParameter("loginUsername", "admin");
        registrationBean.addInitParameter("loginPassword", "admin");
        registrationBean.addInitParameter("resetEnable", "false");
        return registrationBean;
    }

    @Bean
    public FilterRegistrationBean druidWebStatViewFilter() {
        FilterRegistrationBean registrationBean = new FilterRegistrationBean(new WebStatFilter());
        registrationBean.addInitParameter("urlPatterns", "/*");
        registrationBean.addInitParameter("exclusions", "*.js,*.gif,*.jpg,*.bmp,*.png,*.css,*.ico,/druid/*");
        return registrationBean;
    }
}
全局异常拦截
全局异常拦截主要是依靠@RestControllerAdvice注解,在方法上使用@ExceptionHandler(value = Exception.class)代表拦截所有Exception,然后进行对应的操作
@RestControllerAdvice
public class GlobalExceptionHandler {
/**
* 全局错误拦截
*
* @param e
* @return
*/
@ExceptionHandler(value = Exception.class)
private Result微信登录
需要在微信公共平台获取对应的appId,appSec,小程序获取到code之后发送给后台,后台获取code向微信发送http请求,使用的是restTemplate,但是需要注意编码,微信编码返回是ISO-8859-1;调用成功后可以拿到用户的openId,再去数据库中获取对应的用户信息,进行登陆更新及用户创建的逻辑处理
@RestController
@RequestMapping("/wx")
@Slf4j
public class WxController {

    @Autowired
    private IUserService iUserService;

    @Value("${wx.appId}")
    private String wxAppId;

    @Value("${wx.appSec}")
    private String wxAppSec;

    /**
     * 通过code获取openId
     *
     * @param wxLoginDto
     * @return
     */
    @IgnoreToken
    @PostMapping("/code")
    public Result getUserInfoByCode(@RequestBody WxLoginDto wxLoginDto) {
        log.info("enter getUserInfoByCode");
        //微信授权获取openId
        String reqUrl = "https://api.weixin.qq.com/sns/jscode2session?appid=" + wxAppId + "&secret=" + wxAppSec + "&js_code=" + wxLoginDto.getCode() + "&grant_type=authorization_code";
        JSONObject wxAuthObject = RestHttpClient.client(reqUrl, HttpMethod.GET, null);
        log.info("wxAuthObject {}", wxAuthObject.toJSONString());
        WxTokenDto wxTokenDto = JSONObject.parseObject(wxAuthObject.toJSONString(), WxTokenDto.class);
        log.info("wxTokenDto {}", wxTokenDto.toString());
        Map tokenMapper = Maps.newHashMapWithExpectedSize(2);
        //生成新用户
        UserEntity userEntity = iUserService.getUserByOpenId(wxTokenDto.getOpenid());
        if (!ObjectUtils.allNotNull(userEntity)) {
            WxUserInfoDto wxUserInfoDto = new WxUserInfoDto();
            wxUserInfoDto.setNickname(wxLoginDto.getNickName());
            wxUserInfoDto.setUserLogo(wxLoginDto.getUserLogo());
            wxUserInfoDto.setSex(wxLoginDto.getSex());
            wxUserInfoDto.setLastLogin(new Date());
            wxUserInfoDto.setOpenId(wxTokenDto.getOpenid());
            wxUserInfoDto.setLocation(StringUtils.join(new String[]{wxLoginDto.getCountry(), wxLoginDto.getProvince(), wxLoginDto.getCity()}, "-"));
            iUserService.createNewUser(wxUserInfoDto);
            log.info("create new user {}", wxUserInfoDto);
        }
        tokenMapper.put("token", JwtHelper.createJWT(userEntity.getId() + ""));
        return Result.success(tokenMapper);
    }
}
spring boot + maven多环境打包
1.resouce下的yml文件
项目环境分为dev和prod两种,resource文件下默认加载application.yml。
- dev环境:application-dev.yml
- prod环境:application-prod.yml
在application.yml中
spring:
    profiles:
      active: @spring.profiles.active@
@spring.profiles.active@对应的为pom.xml文件中profiles下的spring.profiles.active属性
2.pom.xml配置
默认情况下使用dev环境下的配置信息
            dev

                true


                dev


            prod


                prod
3.不同环境打包
- 打包
prod环境:执行mvn package -Pprod -DskipTests - 打包
dev环境:执行mvn package -Pdev -DskipTests
4.项目打包命名
在properties属性中添加时间格式,然后再build中添加fileName格式化文件名。
    hi-straw
    1.0.0

        ...
        yyyy-MM-ddHHmm


        ...

            ${project.artifactId}-${project.version}-${spring.profiles.active}_${maven.build.timestamp}
打包完成后生成的jar:hi-straw-1.0.0-prod_2019-04-091533.jar
shell脚本编写
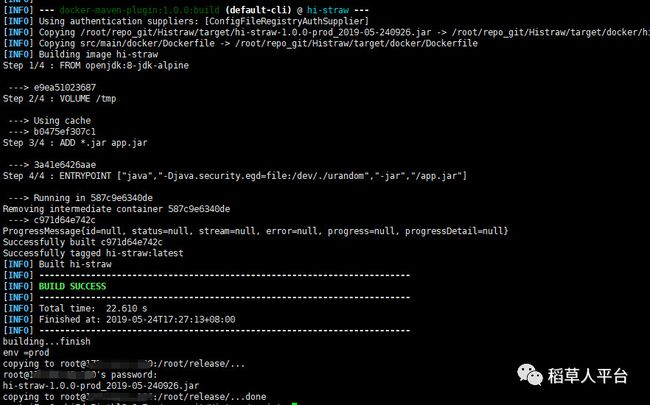
登陆服务器,clone项目至/root/repo_git/目录下,执行进入script目录下,执行./build.sh,需要将RELEASE_HOST换成你自己的服务器地址,方便做保存备份
#!/bin/sh
set -e
#打包的服务器地址
RELEASE_HOST="你自己的服务器地址"
#打包的环境
RELEASE_ENV=prod
#项目目录
BASE_DIR=/root/repo_git/Histraw
#进入项目目录
cd ${BASE_DIR}
#执行git拉去最新的代码
echo "pulling changes..."
git pull origin master
echo "pulling changes... finish"
echo "building..."
#执行mvn命令打包
mvn clean
mvn package -P${RELEASE_ENV} -DskipTests docker:build
echo "building...finish"
echo "env =${RELEASE_ENV}"
#for HOST in ${RELEASE_HOST}; do
#进行拷贝及备份
RELEASE_TARGET=root@${RELEASE_HOST}:~/release/
echo "copying to $RELEASE_TARGET..."
scp ${BASE_DIR}/target/*.jar ${RELEASE_TARGET}
echo "copying to $RELEASE_TARGET...done"
#done
执行
docker images查看刚刚打包好的docker镜像
maven + docker 打包部署
1.docker环境安装
卸载老旧的版本(若未安装过可省略此步):
sudo apt-get remove docker docker-engine docker.io
安装最新的docker:
curl -fsSL get.docker.com -o get-docker.sh
sudo sh get-docker.sh
确认Docker成功安装:
docker run hello-world
2.项目编译打包
在src/main/docker下建立dockerFile文件
FROM openjdk:8-jdk-alpine
VOLUME /tmp
ADD *.jar app.jar
ENTRYPOINT ["java","-Djava.security.egd=file:/dev/./urandom","-jar","/app.jar"]
pom.xml配置docker打包,配合shell脚本在linux实现maven自动打包docker
        com.spotify
        docker-maven-plugin
        1.0.0

            ${project.artifactId}
            src/main/docker


                    /
                    ${project.build.directory}
                    ${project.build.finalName}.jar
执行docker images查看刚刚打包的docker镜像
执行docker run --name hi-straw -p 8989:8989 -t hi-straw启动镜像
执行dockers ps查看已启动docker镜像
nginx配置https
1.安装nginx
登陆到服务器,执行
$ apt-get update // 更新软件
$ apt-get install nginx // 安装nginx
2. 获取证书
可以去阿里云获取免费证书
将生成的证书放入/etc/nginx/sites-enabled/cert/(具体看你将nginx安装在哪个目录下)
3. 配置nginx文件
新建一个https.conf
server {
    listen 443;
    server_name 你自己的域名;
    ssl on;
    ssl_certificate  cert/你自己的证书.pem;
    ssl_certificate_key cert/你自己的证书.key;
    ssl_session_timeout 5m;
    ssl_ciphers ECDHE-RSA-AES128-GCM-SHA256:ECDHE:ECDH:AES:HIGH:!NULL:!aNULL:!MD5:!ADH:!RC4;
    ssl_protocols SSLv3 TLSv1 TLSv1.1 TLSv1.2;
    ssl_prefer_server_ciphers on;
    location / {
        #项目部署的ip和端口
        proxy_pass http://localhost:port;

    }
}
配置完成后,检查一下nginx配置文件是否可用
nginx -t //检查nginx配置文件
配置正确后,重新加载配置文件使配置生效
nginx -s reload //使配置生效
如需重启nginx,用以下命令:
service nginx stop //停止
service nginx start //启动
service nginx restart //重启
部署
修改resource下的application-dev.yml和application-prod.yml中你自己申请的微信息及七牛云信息修改,修改数据库地址,用户名和密码
#七牛
qiNiu:
  accessKey: 你申请的七牛云key
  secretKey: 你申请的七牛云sec
  bucket: 你申请的七牛云bucket
  domain: 你申请的七牛云domain
#微信
wx:
  appId: 你申请的微信id
  appSec: 你申请的微信sec
spring:
  datasource:
    name: graduate
    driver-class-name: com.mysql.jdbc.Driver
    url: 数据库地址
    username: 数据库用户名
    password: 数据库密码
修改script目录下build.sh
RELEASE_HOST="你自己的服务器地址"
项目的服务器7月15号到期了……哪位大佬资助一下服务器,感激不尽
捐助


