详情:南峰子博客 http://southpeak.github.io/2014/11/10/quartz2d-1/
图形上下文
Graphics Context是一个数据类型(CGContextRef),用于封装Quartz绘制图像到输出设备的信息。换句话说,我们可以简单地给Quartz绘图序列指定不同的Graphics Context,就可将相同的图像绘制到不同的设备上。我们不需要处理任何设备相关的计算;这些都由Quartz替我们完成。
Quartz提供了以下几种类型的Graphics Context:
- Bitmap Graphics Context
- PDF Graphics Context
- Window Graphics Context
- Layer Context
- Post Graphics Context
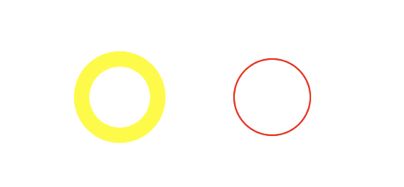
CGContextSaveGState和CGContextRestoreGState
-(void)drawRect:(CGRect)rect{

    CGContextRef ctx=UIGraphicsGetCurrentContext();
    [[UIColor redColor] setStroke];                                 //红色

    CGContextSaveGState(UIGraphicsGetCurrentContext());

    CGContextAddEllipseInRect(ctx, CGRectMake(100, 100, 50, 50));
    CGContextSetLineWidth(ctx, 10);
    [[UIColor yellowColor] setStroke];                               //黄色
    CGContextStrokePath(ctx);

    CGContextRestoreGState(UIGraphicsGetCurrentContext());

    CGContextAddEllipseInRect(ctx, CGRectMake(200, 100, 50, 50));    //红色
    CGContextStrokePath(ctx);
}
获取上下文的途径
- 创建一个UIView对象,在drawRect:方法中通过UIGraphicsGetCurrentContext函数来获取(注意在其他UI控件方法中无法取得这个对象)。在调用自定义的drawRect:之前,系统会自动创建上下文
- 通过
void UIGraphicsBeginImageContext(CGSize size);或void UIGraphicsBeginImageContextWithOptions(CGSize size, BOOL opaque, CGFloat scale)创建UIImage context。
对应的配套方法有UIImage* __nullable UIGraphicsGetImageFromCurrentImageContext(void);、void UIGraphicsEndImageContext(void); - 创建位图Graphics Context
CGContextRef __nullable CGBitmapContextCreate(void * __nullable data, size_t width, size_t height, size_t bitsPerComponent, size_t bytesPerRow, CGColorSpaceRef cg_nullable space, uint32_t bitmapInfo)
位图Graphics Context支持反锯齿,我们可以通过调用CGContextSetShouldAntialias来关闭位图Graphics Context的反锯齿效果。反锯齿设置是图形状态的一部分。
注:位图Graphics Context有时用于后台绘制。CGLayer对象优化了后台绘制,因为Quartz在显卡上缓存了层。官方文档建议使用UIGraphicsBeginImageContextWithOptions而不是CGBitmapContextCreate - PDF Graphics Context、打印的Graphics Context不做详述
Quartz 2D 坐标系统
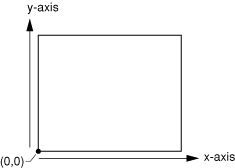
-
Quartz中默认的坐标系统
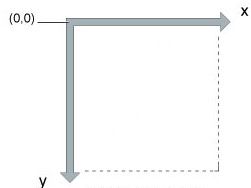
- iOS中,通过调用UIGraphicsBeginImageContextWithOptions函数返回的绘图上下文的坐标系统
-
由UIView返回的绘图上下文的坐标系统
在iOS 3.2及后续的版本中,当UIKit为你的应用程序创建一个绘图上下文时,也对上下文进行了额外的修改以匹配UIKit的约定。特别的,patterns和shadows(不被CTM影响)单独进行调整以匹配UIKit坐标系统。
内存管理:对象所有权
- 如果使用含有”Create”或“Copy”单词的函数获取一个对象,当使用完后必须释放,否则将导致内存泄露。
路径 Path
开始新的路径
CGContextBeginPath//开始新的路径,就的路径被放弃
点
CGContextMoveToPoint
直线
CGContextAddLineToPoint//添加一条直线到子路径中
CGContextAddLines//传递一个点数组给这个函数
弧
CGContextAddArc//从圆中来创建一个曲线段
CGContextAddArcToPoint//弧线与当前点到点(x1, y1)连线相切,且与点(x1, y1)到点(x2, y2)连线相切
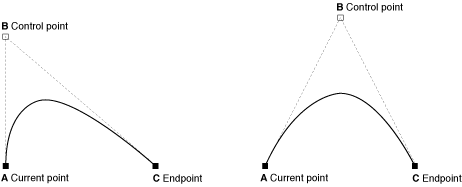
曲线(Bezier)
CGContextAddCurveToPoint
CGContextAddQuadCurveToPoint
闭合路径
CGContextClosePath//该函数用一条直接来连接当前点与起始点,以使路径闭合
椭圆
CGContextAddEllipseInRect
添加到路径中的椭圆开始于一个move-to操作,结束于一个close-subpath操作,所有的移动方向都是顺时针。
矩形
CGContextAddRect//添加一个矩形到当前路径中
CGContextAddRects//添加一系列的矩形到当前路径
通过可变路径对象创建路径
我们也许想保留路径,特别是在绘制复杂场景时,我们需要反复使用。基于此,Quartz提供了两个数据类型来创建可复用路径—CGPathRef和CGMutablePathRef。我们可以调用函数CGPathCreateMutable来创建可变的CGPath对象,并可向该对象添加直线、弧、曲线和矩形。Quartz提供了一个类似于操作图形上下文的CGPath的函数集合。这些路径函数操作CGPath对象,而不是图形上下文。这些函数包括:
CGPathCreateMutable,取代CGContextBeginPath
CGPathMoveToPoint,取代CGContextMoveToPoint
CGPathAddLineToPoint,取代CGContexAddLineToPoint
CGPathAddLines,取代CGContextAddLines
CGPathAddCurveToPoint,取代CGContexAddCurveToPoint
CGPathAddQuadCurveToPoint,取代CGContexAddQuadCurveToPoint
CGPathAddEllipseInRect,取代CGContexAddEllipseInRect
CGPathAddArc,取代CGContexAddArc
CGPathAddArcToPoint,取代CGContexAddArcToPoint
CGPathAddRect,取代CGContexAddRect
CGPathAddRects,取代CGContexAddRects
CGPathCloseSubpath,取代CGContexClosePath
如果想要添加一个路径到图形上下文,可以调用CGContextAddPath。路径将保留在图形上下文中,直到Quartz绘制它。我们可以调用CGContextAddPath再次添加路径。
路径描边和填充
详情看南峰子博客 http://southpeak.github.io/2014/11/10/quartz2d-1/
裁剪路径
CGContextClip
CGContextEOClip
CGContextClipToRect
CGContextClipToRects
CGContextClipToMask
颜色和颜色空间
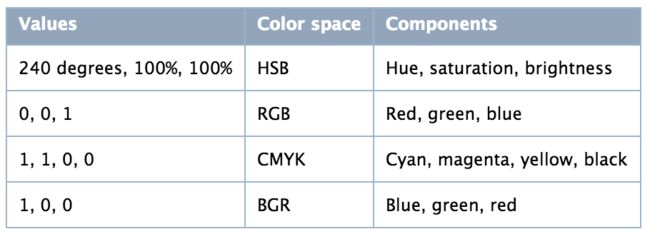
Quartz中的颜色是用一组值来表示。而颜色空间用于解析这些颜色信息。
alpha值
alpha值为1.0时表示新对象是完全不透明的,值0.0表示新对象是完全透明的。
Quartz使用下面的公式来混合源颜色和目标颜色的组件:
destination = (alpha source) + (1 - alpha) destination
创建设备颜色空间
设备颜色空间主要用于IOS应用程序,因为其它颜色空间无法在IOS上使用。
返回CGColorSpaceRef类型数据
- CGColorSpaceCreateDeviceGray:创建设备依赖灰度颜色空间
- CGColorSpaceCreateDeviceRGB:创建设备依赖RGB颜色空间
- CGColorSpaceCreateDeviceCMYK:创建设备依赖CMYK颜色空间
设置和创建颜色
我们可以使用CGContextSetFillColorSpace和CGContextSetStrokeColorSpace函数来设置填充和线框颜色空间,或者可以使用以下便利函数来设置设备颜色空间的颜色值。
我们可以调用CGColorCreate函数来创建CGColor对象,该函数需要两个参数:CGColorspace对象及颜色值数组。数组的最后一个值指定alpha值。
变换
修改CTM(Current Transformation Matrix)
我们可以通过操作CTM(current transformation matrix)来修改默认的用户空间。在创建图形上下文后,CTM是单位矩阵,我们可以使用 Quartz的变换函数来修改CTM,从而修改用户空间中的绘制操作。
CGContextTranslateCTM (myContext, w/4, 0);
CGContextScaleCTM (myContext, .25,  .5);
CGContextRotateCTM (myContext, radians ( 22.));
创建仿射变换
仿射变换操作在矩阵上,而不是在CTM上。我们可以使用这些函数来构造一个之后用于CTM(调用函数CGContextConcatCTM)的矩阵。仿射变换函数使用或者返回一个CGAffineTransform数据对象。
模式(Pattern)
模式(Pattern)是绘制操作的一个序列,这些绘制操作可以重复地绘制到一个图形上下文上。我们可以像使用颜色一样使用这些模式。当我们使用pattern来绘制时,Quartz将Page分割成模式单元格的集合,其中每个单元格的大小是模式图片的大小,并使用我们提供的回调函数来绘制这些单元格。
我们可以指定水平和竖直方向上两个单元格之间的间距,亦可以指定间距为负数,这样单元格便会重叠。
着色模式
绘制着色模式需要执行以下五步操作:
- 写一个绘制着色模式单元格的回调函数
- 设置着色模式的颜色空间
- 设置着色模式的骨架(Anatomy)
- 指定着色模式作为填充或描边模式
- 使用着色模式绘制
- 指定着色模式作为填充或描边模式
我们可以调用CGContextSetFillPattern或者CGContextSetStrokePattern函数来使用模式进行填充或描边。Quartz可以将模式用于任何填充或描边流程。
- (void)viewDidLoad {
    [super viewDidLoad];
    // Do any additional setup after loading the view.

    self.view.backgroundColor = [UIColor whiteColor];

    UIGraphicsBeginImageContext(self.view.bounds.size);
    CGContextRef context = UIGraphicsGetCurrentContext();

    MyColoredPatternPainting(context, CGRectMake(100, 100, 200, 200));

    UIImage *image = UIGraphicsGetImageFromCurrentImageContext();
    UIGraphicsEndImageContext();
    self.view.layer.contents = (id)image.CGImage;
}

void MyDrawColoredPattern(void *info, CGContextRef myContext)
{
    CGFloat subunit = 5;

    CGSize size = {subunit, subunit};
    CGPoint point1 = {0,0}, point2 = {subunit, subunit}, point3 = {0,subunit}, point4 = {subunit,0};
    CGRect myRect1 = {point1, size}, myRect2 = {point2, size}, myRect3 = {point3, size}, myRect4 = {point4, size};

    CGContextSetRGBFillColor (myContext, 0, 0, 1, 0.5);
    CGContextFillRect (myContext, myRect1);
    CGContextSetRGBFillColor (myContext, 1, 0, 0, 0.5);
    CGContextFillRect (myContext, myRect2);
    CGContextSetRGBFillColor (myContext, 0, 1, 0, 0.5);
    CGContextFillRect (myContext, myRect3);
    CGContextSetRGBFillColor (myContext, .5, 0, .5, 0.5);
    CGContextFillRect (myContext, myRect4);
}

#define PSIZE 16
void MyColoredPatternPainting(CGContextRef myContext,CGRect rect)
{
    CGPatternRef    pattern;
    CGColorSpaceRef patternSpace;
    CGFloat         alpha = 1;
    static const CGPatternCallbacks callbacks = {0, &MyDrawColoredPattern, NULL};

    CGContextSaveGState (myContext);
    patternSpace = CGColorSpaceCreatePattern (NULL);
    CGContextSetFillColorSpace (myContext, patternSpace);
    CGColorSpaceRelease (patternSpace);
    pattern = CGPatternCreate(NULL, CGRectMake(0, 0, PSIZE, PSIZE),
                              CGAffineTransformIdentity, PSIZE, PSIZE,
                              kCGPatternTilingConstantSpacing,
                              false, &callbacks);
    CGContextSetFillPattern (myContext, pattern, &alpha);
    CGPatternRelease (pattern);
    CGContextFillRect (myContext,rect);
    CGContextRestoreGState (myContext);
}
模版模式
与绘制着色模式类似,绘制模板模式也有5个步骤:
- 写一个绘制模板模式单元格的回调函数
- 设置模板模式的颜色空间
- 设置模板模式的骨架(Anatomy)
- 指定模板模式作为填充或描边模式
- 使用模板模式绘制
绘制模板模式与绘制着色模式的区别在于设置颜色信息。
- (void)viewDidLoad {
    [super viewDidLoad];
    // Do any additional setup after loading the view.

    self.view.backgroundColor = [UIColor whiteColor];

    UIGraphicsBeginImageContext(self.view.bounds.size);
    CGContextRef context = UIGraphicsGetCurrentContext();

    MyStencilPatternPainting(context, nil);
    UIImage *image = UIGraphicsGetImageFromCurrentImageContext();
    UIGraphicsEndImageContext();
    self.view.layer.contents = (id)image.CGImage;
}

#define PSIZE 16

#pragma mark - 模版模式

static void MyDrawStencilStar (void *info, CGContextRef myContext)
{
    int k;
    double r, theta;

    r = 0.8 * PSIZE / 2;
    theta = 2 * M_PI * (2.0 / 5.0); // 144 degrees

    CGContextTranslateCTM (myContext, PSIZE/2, PSIZE/2);

    CGContextMoveToPoint(myContext, 0, r);
    for (k = 1; k < 5; k++) {
        CGContextAddLineToPoint (myContext,
                                 r * sin(k * theta),
                                 r * cos(k * theta));
    }
    CGContextClosePath(myContext);
    CGContextFillPath(myContext);
}

void MyStencilPatternPainting (CGContextRef myContext,
                               const Rect *windowRect)
{
    CGPatternRef pattern;
    CGColorSpaceRef baseSpace;
    CGColorSpaceRef patternSpace;
    static const CGFloat color[4] = { 0, 1, 0, 1 };
    static const CGPatternCallbacks callbacks = {0, &MyDrawStencilStar, NULL};

    baseSpace = CGColorSpaceCreateDeviceRGB ();
    patternSpace = CGColorSpaceCreatePattern (baseSpace);
    CGContextSetFillColorSpace (myContext, patternSpace);
    CGColorSpaceRelease (patternSpace);
    CGColorSpaceRelease (baseSpace);
    pattern = CGPatternCreate(NULL, CGRectMake(0, 0, PSIZE, PSIZE),
                              CGAffineTransformIdentity, PSIZE, PSIZE,
                              kCGPatternTilingConstantSpacing,
                              false, &callbacks);
    CGContextSetFillPattern (myContext, pattern, color);
    CGPatternRelease (pattern);
    CGContextFillRect (myContext,CGRectMake (0,0,PSIZE*20,PSIZE*20));
}
阴影
- CGContextSetShadow
- CGContextSetShadowWithColor
阴影有三个属性:
- x偏移值,用于指定阴影相对于图片在水平方向上的偏移值。
- y偏移值,用于指定阴影相对于图片在竖直方向上的偏移值。
- 模糊(blur)值,用于指定图像是有一个硬边,还是一个漫射边
绘制阴影
- 按照如下步骤来绘制阴影
- 保存图形状态
- 调用函数CGContextSetShadow,传递相应的值
- 使用阴影绘制所有的对象
- 恢复图形状态
- 按照如下步骤来绘制彩色阴影
- 保存图形状态
- 创建一个CGColorSpace对象,确保Quartz能正确地解>* 析阴影颜色
- 创建一个CGColor对象来指定阴影的颜色
- 调用CGContextSetShadowWithColor,并传递相应的值
- 使用阴影绘制所有的对象
- 恢复图形状态
void MyDrawWithShadows (CGContextRef myContext, float wd, float ht)
{
    CGSize          myShadowOffset = CGSizeMake (-15,  20);
    CGFloat           myColorValues[] = {1, 0, 0, .6};
    CGColorRef      myColor;
    CGColorSpaceRef myColorSpace;

    CGContextSaveGState(myContext);

    CGContextSetShadow (myContext, myShadowOffset, 5);

    // Your drawing code here
    CGContextSetRGBFillColor (myContext, 0, 1, 0, 1);
    CGContextFillRect (myContext, CGRectMake (wd/3 + 75, ht/2 , wd/4, ht/4));

    myColorSpace = CGColorSpaceCreateDeviceRGB ();
    myColor = CGColorCreate (myColorSpace, myColorValues);
    CGContextSetShadowWithColor (myContext, myShadowOffset, 5, myColor);

    // Your drawing code here
    CGContextSetRGBFillColor (myContext, 0, 0, 1, 1);
    CGContextFillRect (myContext, CGRectMake (wd/3-75,ht/2-100,wd/4,ht/4));

    CGColorRelease (myColor);
    CGColorSpaceRelease (myColorSpace);

    CGContextRestoreGState(myContext);
}
渐变
透明层
透明层(TransparencyLayers)通过组合两个或多个对象来生成一个组合图形。
在开始透明层操作后,我们可以绘制任何想显示在层上的对象。指定上下文中的绘制操作将被当成一个组合对象绘制到一个透明背景上。这个背景被当作一个独立于图形上下文的目标缓存。
当绘制完成后,我们调用函数CGContextEndTransparencyLayer。Quartz将结合对象放入上下文,并使用上下文的全局alpha值、阴影状态及裁减区域作用于组合对象。
在透明层中绘制需要三步:
- 调用函数CGContextBeginTransparencyLayer
- 在透明层中绘制需要组合的对象
- 调用函数CGContextEndTransparencyLayer
void MyDrawTransparencyLayer (CGContextRef myContext, float wd,float ht)
{
    CGSize myShadowOffset = CGSizeMake (10, -20);
    CGContextSetShadow (myContext, myShadowOffset, 10);
    CGContextBeginTransparencyLayer (myContext, NULL);

    // Your drawing code here
    CGContextSetRGBFillColor (myContext, 0, 1, 0, 1);
    CGContextFillRect (myContext, CGRectMake (wd/3+ 50,ht/2 ,wd/4,ht/4));
    CGContextSetRGBFillColor (myContext, 0, 0, 1, 1);
    CGContextFillRect (myContext, CGRectMake (wd/3-50,ht/2-100,wd/4,ht/4));
    CGContextSetRGBFillColor (myContext, 1, 0, 0, 1);
    CGContextFillRect (myContext, CGRectMake (wd/3,ht/2-50,wd/4,ht/4));
    CGContextEndTransparencyLayer (myContext);
}
位图与图像遮罩
一个位图是一个像素数组。每一个像素表示图像中的一个点。
一个图像遮罩也是一个位图,它指定了一个绘制区域,而不是颜色。从效果上来说,一个图像遮罩更像一个模块,它指定在page中绘制颜色的位置。Quartz使用当前的填充颜色来绘制一个图像遮罩。一个颜色遮罩可以有1-8位的深度。
- 使用一个图像遮罩来遮罩图像
一个图像遮罩的采样如同一个反转的alpha值。一个图像遮罩采样值(S):
- 为1时,则不会绘制对应的图像样本。
- 为0时,则允许完全绘制对应的图像样本。
- 0和1之间的值,则让对应的图像样本的alpha的值为(1-S)。
- 使用一个图像来遮罩一个图像
用于遮罩的图像的采样也是操作alpha值。一个图像采样值(S):
- 为1时,则允许完全绘制对应的图像样本。
- 为0时,则不会绘制对应的图像样本。
- 0和1之间的值,则让对应的图像样本的alpha的值为S。
- 使用颜色来遮罩图像
函数CGImageCreateWithMaskingColors有两个参数:
- 一个图像,它不能是遮罩图像,也不能是使用过图像遮罩或颜色遮罩的图像。
一个颜色分量数组,指定了一个颜色或一组颜色值,以用于遮罩图像。
-
通过裁减上下文来遮罩一个图片
UIGraphicsBeginImageContext(self.view.bounds.size);
    CGContextRef context = UIGraphicsGetCurrentContext();
UIImage *oneImage = [UIImage imageNamed:@"one.png"];
    UIImage *twoImage = [UIImage imageNamed:@"two.png"];
CGImageRef maskRef = oneImage.CGImage;
    CGImageRef mask = CGImageMaskCreate(CGImageGetWidth(maskRef),
                                        CGImageGetHeight(maskRef),
                                        CGImageGetBitsPerComponent(maskRef),
                                        CGImageGetBitsPerPixel(maskRef),
                                        CGImageGetBytesPerRow(maskRef),
                                        CGImageGetDataProvider(maskRef), NULL, false);
    CGContextClipToMask(context, CGRectMake(50, 100, 200, 200), mask);
    [twoImage drawInRect:CGRectMake(50, 100, 200, 200)];


    UIImage *image = UIGraphicsGetImageFromCurrentImageContext();
    UIGraphicsEndImageContext();
    CGImageRelease(mask);
UIGraphicsBeginImageContext(self.view.bounds.size);
    CGContextRef context = UIGraphicsGetCurrentContext();

    UIImage *oneImage = [UIImage imageNamed:@"one.png"];
    UIImage *twoImage = [UIImage imageNamed:@"two.png"];
    CGContextClipToMask(context, CGRectMake(50, 100, 200, 200), oneImage.CGImage);
    [twoImage drawInRect:CGRectMake(50, 100, 200, 200)];


    UIImage *image = UIGraphicsGetImageFromCurrentImageContext();
    UIGraphicsEndImageContext();
层绘制
层适合于以下几种情况:
- 高质量离屏渲染,以绘制我们想重用的图形。例如,我们可能要建立一个场景并重用相同的背景。将背景场景绘制于一个层上,然后在需要的时候再绘制层。一个额外的好处是我们不需要知道颜色空间或其它设备依赖的信息来绘制层。
- 重复绘制。例如,我们可能想创建一个由相同元素反复绘制而组成的模式。将元素绘制到一个层中,然后重复绘制这个层。任何我们重复绘制的Quartz对象,包括CGPath, CGShading和CGPDFPage对象,都可以通过将其绘制到CGLayer来优化性能。注意一个层不仅仅是用于离屏绘制;我们也可以将其用于那些不是面向屏幕的图形上下文,如PDF图形上下文。
- 缓存。虽然我们可以将层用于此目的,但通常不需要这样做,因为Quartz Compositor已经做了此事。如果我们必须绘制一个缓存,则使用层来代替位图图形上下文。
