在分布式系统中,应用数量众多,应用调用链复杂,常常使用ELK作为日志收集、分析和展示的组件。本篇文章将讲讲解如何部署ELK,然后讲解如何 使用Filebeat采集Spring Boot的日志输出到Logstash上,logstash再将日志输出到Elasticsearch上,最后展示到kibana上面。整个日志采集流程如下图:
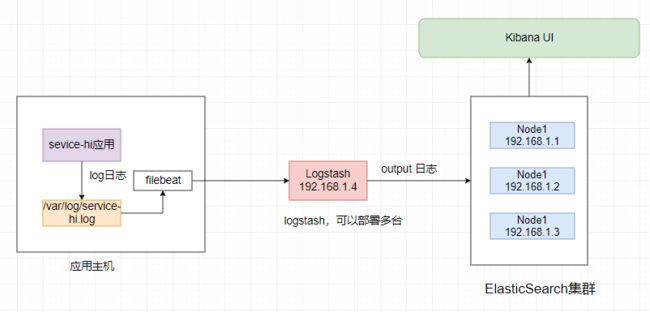
在传统的日志采集只会用ELK,那么为什么需要使用filebeat呢,因为 logstash是java应用,解析日志是非的消耗cpu和内存,logstash安装在应用部署的机器上显得非常的影响应用的性能。最常见的做法是用filebeat部署在应用的机器上,logstash单独部署,然后由 filebeat将日志输出给logstash解析,解析完由logstash再传给elasticsearch。
安装计划
本文主要讲解如何部署ElasticSearch 集群,部署的ElasticSearch的版本为7.2,计划用三台机器组成一个ElasticSearch集群,从而组成高可用,机器分配如下:
| 节点 | 规则 | 数量 | | -------- | -----: | :----: | | 192.168.1.1 | 2核4G | 1 | | 192.168.1.2 | 2核4G | 1 | | 192.168.1.3 | 2核4G | 1 |
安装
下载安装执行以下命令:
# 下载elasticsearch-7.2.0-x86_64的rpm包
wget https://artifacts.elastic.co/downloads/elasticsearch/elasticsearch-7.2.0-x86_64.rpm
wget https://artifacts.elastic.co/downloads/elasticsearch/elasticsearch-7.2.0-x86_64.rpm.sha512
# shasum 检查版本信息
shasum -a 512 -c elasticsearch-7.2.0-x86_64.rpm.sha512
# rpm本地安装
sudo rpm --install elasticsearch-7.2.0-x86_64.rpm
安装成功ElasticSearch成功后,执行一下命令启动elasticSearch,并设置为开启自启动:
sudo systemctl daemon-reload
sudo systemctl enable elasticsearch.service
sudo systemctl start elasticsearch.service
elasticSearch的默认端口为9200,启动成功后,执行以下命令:
curl -X GET "localhost:9200/"
如果返回以下的信息,则证明安装成功:
{
"name" : "VM_0_5_centos",
"cluster_name" : "elasticsearch",
"cluster_uuid" : "gst98AuET6a648YmAkXyMw",
"version" : {
"number" : "7.2.0",
"build_flavor" : "default",
"build_type" : "rpm",
"build_hash" : "508c38a",
"build_date" : "2019-06-20T15:54:18.811730Z",
"build_snapshot" : false,
"lucene_version" : "8.0.0",
"minimum_wire_compatibility_version" : "6.8.0",
"minimum_index_compatibility_version" : "6.0.0-beta1"
},
"tagline" : "You Know, for Search"
}
查看节点的健康状态,执行命令 curl localhost:9200/_cluster/health ,如果返回以下信息,则Elasticsearch则为监控状态。
{
"cluster_name" : "elasticsearch",
"status" : "green",
"timed_out" : false,
"number_of_nodes" : 1,
"number_of_data_nodes" : 1,
"active_primary_shards" : 0,
"active_shards" : 0,
"relocating_shards" : 0,
"initializing_shards" : 0,
"unassigned_shards" : 0,
"delayed_unassigned_shards" : 0,
"number_of_pending_tasks" : 0,
"number_of_in_flight_fetch" : 0,
"task_max_waiting_in_queue_millis" : 0,
"active_shards_percent_as_number" : 100.0
}
可以执行以下的命令,查看es的 journal:
sudo journalctl --unit elasticsearch
配置
以下的路径的配置文件可以配置es的javahome,esconfig_home :
/etc/sysconfig/elasticsearch
es本身的一些配置在以下的路径,在这里可以配置elasticsearch的堆内存,数据保留天数等信息:
/etc/elasticsearch
所有的配置文件描述和路径如下表所示:
配置类型描述路径
homeelasticsearch的home目录/usr/share/elasticsearch
binelasticsearch的bin目录/usr/share/elasticsearch/bin
confelasticsearch的配置文件/etc/elasticsearch
confelasticsearch的环境变量配置/etc/sysconfig/elasticsearch
dataelasticsearch的数据目录/var/lib/elasticsearch
logselasticsearch的日志目录/var/log/elasticsearch
pluginselasticsearch的插件目录/usr/share/elasticsearch/plugins
集群搭建
在三台机器上分别装完elasticsearch,在主节点vim /etc/elasticsearch/,配置一下的信息:
主节点的配置如下:
#三个集群需要同样的集群名
cluster.name: my-application
# 每个node的名字需要唯一
node.name: node-1
node.master: true
#允许该节点存储数据(默认开启)
node.data: true
#注意一定要是路径后面加上/var/lib/elasticsearch/nodes,要不然无法加入集群
path.data: /var/lib/elasticsearch/nodes
path.logs: /var/log/elasticsearch
network.host: 0.0.0.0
http.port: 9200
transport.tcp.port: 9300
http.cors.enabled: true
http.cors.allow-origin: "*"
xpack.security.enabled: false
discovery.seed_hosts: ["192.168.1.1", "192.168.1.2", "192.168.1.3"]
cluster.initial_master_nodes: ["192.168.1.1", "192.168.1.2", "192.168.1.3"]
同理从节点的配置:
cluster.name: my-application
# 每个node的名字需要唯一,两个从节点的名字不能相同
node.name: node-2
node.master: true
#允许该节点存储数据(默认开启)
node.data: true
path.data: /var/lib/elasticsearch/nodes
path.logs: /var/log/elasticsearch
network.host: 0.0.0.0
http.port: 9200
transport.tcp.port: 9300
xpack.security.enabled: false
http.cors.enabled: true
http.cors.allow-origin: "*"
discovery.seed_hosts: ["192.168.1.1", "192.168.1.2", "192.168.1.3"]
cluster.initial_master_nodes: ["192.168.1.1", "192.168.1.2", "192.168.1.3"]
配置完主从节点,需要重启三台elasticsearch,重启命令如下:
sudo systemctl restart elasticsearch.service
重启三台Elasticsearch后,执行curl http://localhost:9200/_cat/master,如果响应如下,则证明安装成功
SHBUDVUAQhi7FauSoI8bMg 192.168.1.1 192.168.1.1 node-1
也路执行命令curl -XGET 'http://127.0.0.1:9200/_cat/nodes?pretty',返回类型如下的数据则安装成功:
192.168.1.2 9 97 1 0.00 0.03 0.05 mdi - node-2
192.168.1.3 97 0 0.01 0.07 0.07 mdi - node-3
192.168.1.1 18 97 2 0.05 0.05 0.05 mdi * node-1
也可以通过命令curl localhost:9200/_cluster/health?pretty,查看集群的健康状态:
{
"cluster_name" : "my-application",
"status" : "green",
"timed_out" : false,
"number_of_nodes" : 3,
"number_of_data_nodes" : 3,
"active_primary_shards" : 5,
"active_shards" : 10,
"relocating_shards" : 0,
"initializing_shards" : 0,
"unassigned_shards" : 0,
"delayed_unassigned_shards" : 0,
"number_of_pending_tasks" : 0,
"number_of_in_flight_fetch" : 0,
"task_max_waiting_in_queue_millis" : 0,
"active_shards_percent_as_number" : 100.0
}
Elasticsearch中信息很多,同时ES也有很多信息查看命令,可以帮助开发者快速查询Elasticsearch的相关信息。
$ curl localhost:9200/_cat
=^.^=
/_cat/allocation
/_cat/shards
/_cat/shards/{index}
/_cat/master
/_cat/nodes
/_cat/indices
/_cat/indices/{index}
/_cat/segments
/_cat/segments/{index}
/_cat/count
/_cat/count/{index}
/_cat/recovery
/_cat/recovery/{index}
/_cat/health
/_cat/pending_tasks
/_cat/aliases
/_cat/aliases/{alias}
/_cat/thread_pool
/_cat/plugins
/_cat/fielddata
/_cat/fielddata/{fields}
head安装
在elasticsearch的高级版本之后,head不在是一个插件,而是一个独立的应用来部署,源码地址在https://github.com/mobz/elasticsearch-head。
需要提前安装node,安装命令如下:
git clone git://github.com/mobz/elasticsearch-head.git
cd elasticsearch-head
npm install
npm run start
安装成功后,打开 http://localhost:9100/,浏览器显示如下的界面,则安装成功:

如上图所示,在Head组件的界面上,可以很方便的查看集群的状态和数据。
参考资料
https://www.elastic.co/guide/en/elasticsearch/reference/7.2/rpm.html https://www.elastic.co/guide/index.html https://www.elastic.co/guide/en/elasticsearch/plugins/current/installation.html
源网络,版权归原创者所有。如有侵权烦请告知,我们会立即删除并表示歉意。谢谢。
更多技术,欢迎关注下方公众号
