开发过macOS应用的同学都知道,NSWindow拥有一个几乎相同的titlebar,最左边是交通灯按钮,中间是标题等,那如何不要这些元素呢?
交通灯是可以选择隐藏的: 甚至整个titlebar都可以隐藏:你会发现很完美,除了不能移动window。。。
这个问题很好解决,移动window不过就是改变其frame而已,只需要识别拖动然后获取坐标更新frame就好了。
我们知道无论是NSWindow还是NSView都继承了NSResponder的多种键鼠标准方法:
- (void)mouseDown:(NSEvent *)event;
- (void)rightMouseDown:(NSEvent *)event;
- (void)otherMouseDown:(NSEvent *)event;
- (void)mouseUp:(NSEvent *)event;
- (void)rightMouseUp:(NSEvent *)event;
- (void)otherMouseUp:(NSEvent *)event;
- (void)mouseMoved:(NSEvent *)event;
- (void)mouseDragged:(NSEvent *)event;
- (void)scrollWheel:(NSEvent *)event;
- (void)rightMouseDragged:(NSEvent *)event;
- (void)otherMouseDragged:(NSEvent *)event;
- (void)mouseEntered:(NSEvent *)event;
- (void)mouseExited:(NSEvent *)event;
- (void)keyDown:(NSEvent *)event;
- (void)keyUp:(NSEvent *)event;
- (void)flagsChanged:(NSEvent *)event;
- (void)tabletPoint:(NSEvent *)event;
- (void)tabletProximity:(NSEvent *)event;
- (void)cursorUpdate:(NSEvent *)event
因此我们重写这其中的mouseDragged:方法就好了,考虑到我们通常是通过拖动titlebar区域来移动window,因为直接重写NSWindow的方法需要多余的拖动区域计算,不够灵活。
而重写NSView的方法后可以将其随意添加到window的任何位置实现拖动。另外,为了防止鼠标按下时触发别的操作,也可以重写mouseDown:方法。
- (void)mouseDown:(NSEvent*)event {

    [self mouseDragged:event];
}

- (void)mouseDragged:(NSEvent*)theEvent {

    NSWindow *window =self.window;
    NSRect whereRect = [window convertRectToScreen:NSMakeRect(theEvent.locationInWindow.x, theEvent.locationInWindow.y, 1, 1)];
    NSPoint where = NSMakePoint(whereRect.origin.x, whereRect.origin.y);
    NSPoint origin = window.frame.origin;
    CGFloat deltaX =0.0;
    CGFloat deltaY =0.0;

    while ((theEvent = [NSApp nextEventMatchingMask:NSEventMaskLeftMouseDown | NSEventMaskLeftMouseDragged | NSEventMaskLeftMouseUp untilDate:[NSDate distantFuture] inMode:NSEventTrackingRunLoopMode dequeue:YES]) && (theEvent.type != NSEventTypeLeftMouseUp)) {

        @autoreleasepool {

            NSRect nowRect = [window convertRectToScreen:NSMakeRect(theEvent.locationInWindow.x, theEvent.locationInWindow.y, 1, 1)];
            NSPoint now = NSMakePoint(nowRect.origin.x, nowRect.origin.y);
            deltaX += now.x- where.x;
            deltaY += now.y- where.y;

            if (fabs(deltaX) >= _mouseDragDetectionThreshold || fabs(deltaY) >= _mouseDragDetectionThreshold) {

                origin.x+= deltaX;
                origin.y+= deltaY;
                window.frameOrigin= origin;
                deltaX =0.0;
                deltaY =0.0;
            }
            where = now;
        }
    }
}
将这个自定义view添加到window的视图层级上就可以移动window了。
到这,我们发现现在已经可以随意在window上添加我们自己的视图了。但是,有时候我们还是需要交通灯的。。。这个时候就算勾选了三个交通灯按钮,它们也不会出来了,毕竟titlebar没了,也没了它们的容身之所。
所幸发现NSWindow有这么两个方法:
+ (nullable NSButton *)standardWindowButton:(NSWindowButton)b forStyleMask:(NSWindowStyleMask)styleMask;
- (nullable NSButton *)standardWindowButton:(NSWindowButton)b;
这不就是获取那三个交通灯的方法么!于是通过这两个方法获取到button实例,以view的形式添加上去。
- (void)commonInitialize {

    self.closeButton = [NSWindow standardWindowButton:NSWindowCloseButton forStyleMask:3];
    self.closeButton.frame = NSMakeRect(10, 0, self.closeButton.bounds.size.width, self.closeButton.bounds.size.height);

    self.miniButton = [NSWindow standardWindowButton:NSWindowMiniaturizeButton forStyleMask:3];
    self.miniButton.frame = NSMakeRect(30, 0, self.miniButton.bounds.size.width, self.miniButton.bounds.size.height);

    self.maxButton = [NSWindow standardWindowButton:NSWindowZoomButton forStyleMask:3];
    self.maxButton.frame = NSMakeRect(50, 0, self.maxButton.bounds.size.width, self.maxButton.bounds.size.height);

    [self addSubview:self.closeButton];
    [self addSubview:self.miniButton];
    [self addSubview:self.maxButton];
}
熟悉的交通灯是回来了,可是从图中可以看到,在鼠标没有聚焦的情况下,就算窗口是在最前,交通灯居然不会亮,这与系统交通灯的表现不一样!
当我重新勾选titlebar选项,发现交通灯默认是可以点亮的,看来是由于隐藏了titlebar的原因。另外,隐藏titlebar后,交通灯的默认行为,如关闭、最小化、最大化都是不起作用的。看来要达到系统效果还得另辟蹊径。
试一下自定义NSWindow:
#import

@interface SWSTCustomWindow : NSWindow

@end
#import "SWSTCustomWindow.h"

@implementation SWSTCustomWindow

- (void)awakeFromNib {

    [super awakeFromNib];
    NSArray *subviews = self.contentView.superview.subviews;
    for (NSView *view in subviews) {
        if ([view isKindOfClass:NSClassFromString(@"NSTitlebarContainerView")]) {
            [view removeFromSuperview];
        }
    }
}

- (BOOL)canBecomeKeyWindow {

    return YES;
}

- (BOOL)canBecomeMainWindow {

    return YES;
}

@end
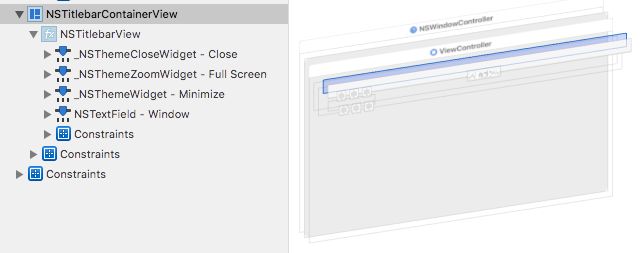
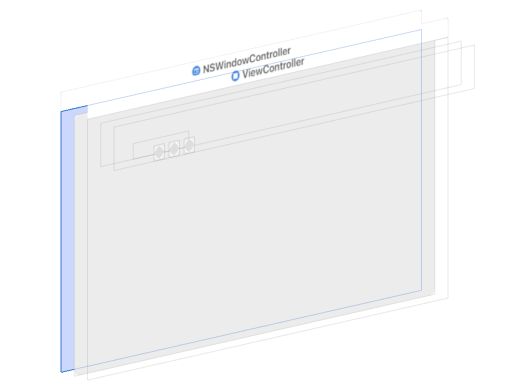
根据视图层级我发现NSTitlebarContainerView与NSWindow的contentView是同级的,因此获取contentView的superview,遍历它的subviews,找到NSTitlebarContainerView并remove。
运行效果:可以看到titlebar没了,我们添加的交通灯也亮了,暗自窃喜,离完美更近一步了!
最后需要调整一下window的frame,因为我们在storyboad中设置的view是270的高度,但是运行出来以后变成292,多出了22的高度,这个高度应该是titlebar的高度。现在移除了,我们可以在NSViewController的viewWillAppear方法中把整个window的高度调整到与view一致。
- (void)viewWillAppear {

    [super viewWillAppear];
    CGFloat windowWidth = self.view.bounds.size.width;
    CGFloat windowHeight = self.view.bounds.size.height;
    [self.view.window setRestorable:NO];
    [self.view.window setFrame:NSMakeRect(self.view.window.frame.origin.x, self.view.window.frame.origin.y, windowWidth, windowHeight) display:NO];
    self.view.window.contentView.frame = NSMakeRect(0, 0, windowWidth, windowHeight);
}
最后,在updateTrackingAreas方法中,添加了自己的NSTrackingArea,以保证窗口不在最前时移动鼠标到交通灯也可以点亮。
- (void)updateTrackingAreas {

    [super updateTrackingAreas];
    NSTrackingArea *const trackingArea = [[NSTrackingArea alloc] initWithRect:NSZeroRect options:(NSTrackingMouseEnteredAndExited | NSTrackingActiveAlways | NSTrackingInVisibleRect) owner:self userInfo:nil];
    [self addTrackingArea:trackingArea];
}
完整代码见gitlab:https://gitlab.com/Maulyn/CustomWindowDemo
欢迎随时交流~


