CoreText
CoreText是底层的API,它使用了许多C的函数(例如CTFramesetterCreateWithAttributedString,CTFramesetterCreateFrame)来代替OC的类和方法。
Core Text是和Core Graphics配合使用的,一般是在UIView的drawRect方法中的Graphics Context上进行绘制的。Core Text真正负责绘制的是文本部分,如果要绘制图片,可以使用CoreText给图片预留出位置,然后用Core Graphics绘制。demo地址
CoreText布局会用到attributed strings(CFAttributedStringRef)和graphics paths(CGPathRef)。attributed strings封装了文本的属性,例如字体和颜色;graphics paths定义了文本框的外形。
字形度量
字形度量就是字形的各个参数:
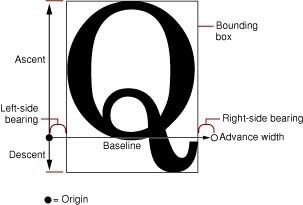
bounding box(边界框),这是一个假想的框子,它尽可能紧密的装入字形。
baseline(基线),一条假想的线,一行上的字形都以此线作为上下位置的参考,在这条线的左侧存在一个点叫做基线的原点。
ascent(上行高度),从原点到字体中最高(这里的高深都是以基线为参照线的)的字形的顶部的距离,ascent是一个正值。
descent(下行高度),从原点到字体中最深的字形底部的距离,descent是一个负值(比如一个字体原点到最深的字形的底部的距离为2,那么descent就为-2)。
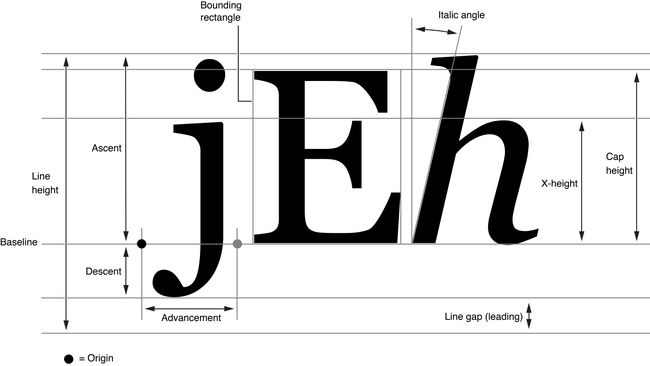
linegap(行距),linegap也可以称作leading(其实准确点讲应该叫做External leading)。
leading,文档说的很含糊,其实是上一行字符的descent到- 下一行的ascent之间的距离。
所以字体的高度是由三部分组成的:leading + ascent + descent。
字形和字符,一些Metrics专业知识还可以参考Free Type的文档 Glyph metrics,其实iOS就是使用Free Type库来进行字体渲染的。苹果文档 Querying Font Metrics ,Text Layout。
CoreText对象模型


运行时的Core Text对象形成一个层次结构,如图1所示。 这个层次结构的顶部是framesetter对象(CTFramesetterRef)。 使用attributed string和graphics path作为输入,框架设置器会生成一个或多个文本框(CTFrameRef)。 每个CTFrame对象都代表一个段落。
从图中可以看到,我们首先通过CFAttributeString来创建CTFramaeSetter,然后再通过CTFrameSetter来创建CTFrame。
在CTFrame内部,是由多个CTLine来组成的,每个CTLine代表一行,每个CTLine是由多个CTRun来组成,每个CTRun代表一组显示风格一致的文本。
- CTFrameSetter: CTFrameSetter是通过CFAttributeString进行初始化它负责根据path生产对应的CTFrame;
- CTFrame:CTFrame可以想象成画布, 画布的大小范围由CGPath决定。CTFrame由很多CTLine组成。 CTFrame可以通过CTFrameDraw函数直接绘制到context上,我们可以在绘制之前,操作CTFrame中的CTline,进行一些参数的微调;
- CTLine: CTLine可以看做Core Text绘制中的一行的对象,通过它可以获得当前行的line ascent, line descent, line heading,还可以获得CTLine下的所有CTRun;
- CTRun: CTRun是一组共享相同attributes的集合体;
要绘制图片,需要用CoreText的CTRun为图片在绘制过程中留出空间。这个设置要用到CTRunDelegate。我们可以在要显示图片的地方,用一个特殊的空白字符代替,用CTRunDelegate为其设置ascent,descent,width等参数,这样在绘制文本的时候就会把图片的位置留出来,用CGContextDrawImage方法直接绘制出来就行了。
创建CTRunDelegate:
CTRunDelegateRef __nullable CTRunDelegateCreate(
    const CTRunDelegateCallbacks* callbacks,
    void * __nullable refCon )
创建CTRunDelegate需要两个参数,一个是callbacks结构体,还有一个是callbacks里的函数调用时需要传入的参数。
typedef struct
{
    CFIndex                         version;
    CTRunDelegateDeallocateCallback dealloc;
    CTRunDelegateGetAscentCallback  getAscent;
    CTRunDelegateGetDescentCallback getDescent;
    CTRunDelegateGetWidthCallback   getWidth;
} CTRunDelegateCallbacks;
callbacks是一个结构体,主要包含了返回当前CTRun的ascent,descent和width函数。
代码
自定义一个继承自UIView的子类CoreTextView;在.m文件里引入头文件CoreText/CoreText.h重写drawRect方法:
void RunDelegateDeallocCallback( void* refCon ){

}

CGFloat RunDelegateGetAscentCallback( void *refCon ){
    NSString *imageName = (__bridge NSString *)refCon;
    CGFloat height = [UIImage imageNamed:imageName].size.height;
    return height;
}

CGFloat RunDelegateGetDescentCallback(void *refCon){
    return 0;
}

CGFloat RunDelegateGetWidthCallback(void *refCon){
    NSString *imageName = (__bridge NSString *)refCon;
    CGFloat width = [UIImage imageNamed:imageName].size.width;
    return width;
}


- (void)drawRect:(CGRect)rect{
    [super drawRect:rect];
    //得到当前绘制画布的上下文,用于将后续内容绘制在画布上
    CGContextRef context = UIGraphicsGetCurrentContext();

    //将坐标系上下翻转。对于底层的绘制引擎来说,屏幕的左下角是坐标原点(0,0),而对于上层的UIKit来说,屏幕的左上角是坐标原点,为了之后的坐标系按UIKit来做,在这里做了坐标系的上下翻转,这样底层和上层的(0,0)坐标就是重合的了
    CGContextSetTextMatrix(context, CGAffineTransformIdentity);
    CGContextTranslateCTM(context, 0, self.bounds.size.height);
    CGContextScaleCTM(context, 1.0,-1.0);

    //创建绘制的区域,这里将UIView的bounds作为绘制区域
    CGMutablePathRef path = CGPathCreateMutable();
    CGPathAddRect(path, NULL, self.bounds);

    NSMutableAttributedString * attString = [[NSMutableAttributedString alloc] initWithString:@"海洋生物学家在太平洋里发现了一条与众不同的鲸。一般蓝鲸的“歌唱”频率在十五到二十五赫兹,长须鲸子啊二十赫兹左右,而它的频率在五十二赫兹左右。"];
    //设置字体
    [attString addAttribute:NSFontAttributeName value:[UIFont systemFontOfSize:24] range:NSMakeRange(0, 5)];
    [attString addAttribute:NSFontAttributeName value:[UIFont systemFontOfSize:13] range:NSMakeRange(6, 2)];
    [attString addAttribute:NSFontAttributeName value:[UIFont systemFontOfSize:38] range:NSMakeRange(8, attString.length - 8)];


    //设置文字颜色
    [attString addAttribute:NSForegroundColorAttributeName value:[UIColor redColor] range:NSMakeRange(0, 11)];
    [attString addAttribute:NSForegroundColorAttributeName value:[UIColor blueColor] range:NSMakeRange(11, attString.length - 11)];


    NSString * imageName = @"jingyu";
    CTRunDelegateCallbacks callbacks;
    callbacks.version = kCTRunDelegateVersion1;
    callbacks.dealloc = RunDelegateDeallocCallback;
    callbacks.getAscent = RunDelegateGetAscentCallback;
    callbacks.getDescent = RunDelegateGetDescentCallback;
    callbacks.getWidth = RunDelegateGetWidthCallback;

    CTRunDelegateRef runDelegate = CTRunDelegateCreate(&callbacks, (__bridge void * _Nullable)(imageName));
    //空格用于给图片留位置
    NSMutableAttributedString *imageAttributedString = [[NSMutableAttributedString alloc] initWithString:@" "];
     CFAttributedStringSetAttribute((CFMutableAttributedStringRef)imageAttributedString, CFRangeMake(0, 1), kCTRunDelegateAttributeName, runDelegate);
    CFRelease(runDelegate);
    [imageAttributedString addAttribute:@"imageName" value:imageName range:NSMakeRange(0, 1)];
    [attString insertAttributedString:imageAttributedString atIndex:1];
    CTFramesetterRef framesetter = CTFramesetterCreateWithAttributedString((CFAttributedStringRef)attString);
    CTFrameRef frame = CTFramesetterCreateFrame(framesetter, CFRangeMake(0, attString.length), path, NULL);
    //把frame绘制到context里
    CTFrameDraw(frame, context);

    NSArray * lines = (NSArray *)CTFrameGetLines(frame);
    NSInteger lineCount = lines.count;
    CGPoint lineOrigins[lineCount];
    //拷贝frame的line的原点到数组lineOrigins里,如果第二个参数里的length是0,将会从开始的下标拷贝到最后一个line的原点
    CTFrameGetLineOrigins(frame, CFRangeMake(0, 0), lineOrigins);

    for (int i = 0; i < lineCount; i++) {
        CTLineRef line = (__bridge CTLineRef)lines[I];
        NSArray * runs = (__bridge NSArray *)CTLineGetGlyphRuns(line);
        for (int j = 0; j < runs.count; j++) {
            CTRunRef run =  (__bridge CTRunRef)runs[j];
            NSDictionary * dic = (NSDictionary *)CTRunGetAttributes(run);
            CTRunDelegateRef delegate = (__bridge CTRunDelegateRef)[dic objectForKey:(NSString *)kCTRunDelegateAttributeName];
            if (delegate == nil) {
                continue;
            }
            NSString * imageName = [dic objectForKey:@"imageName"];
            UIImage * image = [UIImage imageNamed:imageName];
            CGRect runBounds;
            CGFloat ascent;
            CGFloat descent;
            runBounds.size.width = CTRunGetTypographicBounds(run, CFRangeMake(0, 0), &ascent, &descent, NULL);
            runBounds.size.height = ascent + descent;
            CFIndex index = CTRunGetStringRange(run).location;
            CGFloat xOffset = CTLineGetOffsetForStringIndex(line, index, NULL);
            runBounds.origin.x = lineOrigins[i].x + xOffset;
            runBounds.origin.y = lineOrigins[i].y;
            runBounds.size =image.size;
            CGContextDrawImage(context, runBounds, image.CGImage);
        }
    }
    //底层的Core Foundation对象由于不在ARC的管理下,需要自己维护这些对象的引用计数,最后要释放掉。
    CFRelease(frame);
    CFRelease(path);
}
运行后效果如下:

异步绘制
上面的drawRect方法是在主线程里调用的,如果绘制的过程比较耗时,可能会阻塞主线程,这时候可以将会值得过程发到子线程里进行,绘制完成后将context转成位图,然后再把位图在主线程里设置到view的layer里。
- (void)drawRect:(CGRect)rect{
    [super drawRect:rect];
   //将绘制过程放入到后台线程中
    dispatch_async(dispatch_get_global_queue(QOS_CLASS_BACKGROUND, 0), ^{
        UIGraphicsBeginImageContext(rect.size);
        //得到当前绘制画布的上下文,用于将后续内容绘制在画布上
        CGContextRef context = UIGraphicsGetCurrentContext();

        //将坐标系上下翻转。对于底层的绘制引擎来说,屏幕的左下角是坐标原点(0,0),而对于上层的UIKit来说,屏幕的左上角是坐标原点,为了之后的坐标系按UIKit来做,在这里做了坐标系的上下翻转,这样底层和上层的(0,0)坐标就是重合的了
        CGContextSetTextMatrix(context, CGAffineTransformIdentity);
        CGContextTranslateCTM(context, 0, rect.size.height);
        CGContextScaleCTM(context, 1.0,-1.0);

        //创建绘制的区域,这里将UIView的bounds作为绘制区域
        CGMutablePathRef path = CGPathCreateMutable();
        CGPathAddRect(path, NULL, rect);

        NSMutableAttributedString * attString = [[NSMutableAttributedString alloc] initWithString:@"海洋生物学家在太平洋里发现了一条与众不同的鲸。一般蓝鲸的“歌唱”频率在十五到二十五赫兹,长须鲸子啊二十赫兹左右,而它的频率在五十二赫兹左右。"];
        //设置字体
        [attString addAttribute:NSFontAttributeName value:[UIFont systemFontOfSize:24] range:NSMakeRange(0, 5)];
        [attString addAttribute:NSFontAttributeName value:[UIFont systemFontOfSize:13] range:NSMakeRange(6, 2)];
        [attString addAttribute:NSFontAttributeName value:[UIFont systemFontOfSize:38] range:NSMakeRange(8, attString.length - 8)];


        //设置文字颜色
        [attString addAttribute:NSForegroundColorAttributeName value:[UIColor redColor] range:NSMakeRange(0, 11)];
        [attString addAttribute:NSForegroundColorAttributeName value:[UIColor blueColor] range:NSMakeRange(11, attString.length - 11)];


        NSString * imageName = @"jingyu";
        CTRunDelegateCallbacks callbacks;
        callbacks.version = kCTRunDelegateVersion1;
        callbacks.dealloc = RunDelegateDeallocCallback;
        callbacks.getAscent = RunDelegateGetAscentCallback;
        callbacks.getDescent = RunDelegateGetDescentCallback;
        callbacks.getWidth = RunDelegateGetWidthCallback;

        CTRunDelegateRef runDelegate = CTRunDelegateCreate(&callbacks, (__bridge void * _Nullable)(imageName));
        //空格用于给图片留位置
        NSMutableAttributedString *imageAttributedString = [[NSMutableAttributedString alloc] initWithString:@" "];
        CFAttributedStringSetAttribute((CFMutableAttributedStringRef)imageAttributedString, CFRangeMake(0, 1), kCTRunDelegateAttributeName, runDelegate);
        CFRelease(runDelegate);
        [imageAttributedString addAttribute:@"imageName" value:imageName range:NSMakeRange(0, 1)];
        [attString insertAttributedString:imageAttributedString atIndex:1];
        CTFramesetterRef framesetter = CTFramesetterCreateWithAttributedString((CFAttributedStringRef)attString);
        CTFrameRef frame = CTFramesetterCreateFrame(framesetter, CFRangeMake(0, attString.length), path, NULL);
        //把frame绘制到context里
        CTFrameDraw(frame, context);

        NSArray * lines = (NSArray *)CTFrameGetLines(frame);
        NSInteger lineCount = lines.count;
        CGPoint lineOrigins[lineCount];
        //拷贝frame的line的原点到数组lineOrigins里,如果第二个参数里的length是0,将会从开始的下标拷贝到最后一个line的原点
        CTFrameGetLineOrigins(frame, CFRangeMake(0, 0), lineOrigins);

        for (int i = 0; i < lineCount; i++) {
            CTLineRef line = (__bridge CTLineRef)lines[I];
            NSArray * runs = (__bridge NSArray *)CTLineGetGlyphRuns(line);
            for (int j = 0; j < runs.count; j++) {
                CTRunRef run =  (__bridge CTRunRef)runs[j];
                NSDictionary * dic = (NSDictionary *)CTRunGetAttributes(run);
                CTRunDelegateRef delegate = (__bridge CTRunDelegateRef)[dic objectForKey:(NSString *)kCTRunDelegateAttributeName];
                if (delegate == nil) {
                    continue;
                }
                NSString * imageName = [dic objectForKey:@"imageName"];
                UIImage * image = [UIImage imageNamed:imageName];
                CGRect runBounds;
                CGFloat ascent;
                CGFloat descent;
                runBounds.size.width = CTRunGetTypographicBounds(run, CFRangeMake(0, 0), &ascent, &descent, NULL);
                runBounds.size.height = ascent + descent;
                CFIndex index = CTRunGetStringRange(run).location;
                CGFloat xOffset = CTLineGetOffsetForStringIndex(line, index, NULL);
                runBounds.origin.x = lineOrigins[i].x + xOffset;
                runBounds.origin.y = lineOrigins[i].y;
                runBounds.size =image.size;
                CGContextDrawImage(context, runBounds, image.CGImage);
            }
        }

        CGImageRef imageRef = CGBitmapContextCreateImage(context);
        UIImage *image;
        if (imageRef) {
            image = [UIImage imageWithCGImage:imageRef];
            CGImageRelease(imageRef);
        }

        UIGraphicsEndImageContext();
       //在主线程中更新
        dispatch_async(dispatch_get_main_queue(), ^{
            self.layer.contents = (__bridge id _Nullable)(image.CGImage);
        });
    });
}
NSAttributedString
看yykit的demo里,微博的页面的富文本使用了NSAttributedString,这里记录下学习笔记。
这里要把"我家这个好忠犬啊~[喵喵] http://t.cn/Ry4UXdF //@我是呆毛芳子蜀黍w:这是什么鬼?[喵喵] //@清新可口喵酱圆脸星人是扭蛋狂魔:窝家这个超委婉的拒绝了窝"在手机上显示成;
![Uploading 屏幕快照 2017-08-17 上午11.11.20_514440.png . . .]
@用户名用到了正则匹配,可以得到一个nsrange的数组,是@用户名的nsrange;
表情也是用到了正则匹配,得到每个表情的nsrange,从本地寻找表情对应的图片,然后用到了NSTextAttachment来生成NSAttributedString,然后把表情进行了替换。
http://t.cn/Ry4UXdF这个链接被替换成了图片和文字,图片是从网络上下载的。可以先判断本地是否有图片的缓存,如果没有,先用占位图生成NSTextAttachment,先显示占位图,等图片下载完以后就重新替换掉图片。
demo