VIcacti
一、相关概念:
http://www.cacti.net/downloads/
cacti通过页面以图形化方式展示rrdtool复杂命令的绘图(有了cacti后再也不用复杂的rrdtool命令了,若不理解rrdtool命令的用法则无法知道填入cacti各选项的意义,理解了rrdtool命令的用法就可精确操作cacti了):
功能一:如用命令rrdtool create创建数据库文件,cacti通过页面填入数值例如DS名、数据从哪取得,点保存后会将rrdtool create语句自动生成;
功能二:周期性的执行能够取得数据的命令(在cacti用户下把取数据的命令做成任务计划),并将取回的数据保存至.rrd文件中(上一篇是通过脚本不断的往.rrd中存数据);
功能三:利用rrdtool绘图并展示
另cacti支持模板(用别人已定义好的数据源、各种rrd文件的定义方式、取得数据的方式、图形展示的方式);cacti支持插件机制,有插件框架允许用户开发插件,以扩展cacti功能,例如thold为cacti提供报警功能,默认cacti只绘图并展示并不报警,有了thold就可实现
cacti是php开发的网页程序,依赖LAMP或LNMP平台,若是编译安装php的话要启用--enable-sockets,否则LAMP平台或LNMP平台无法运行cacti,cacti平时不运行只有在用户打开网页时才展示
cacti监视各server状态,不能允许其它用户随意查看,所以cacti内置的机制有用户及权限管理机制,有管理员用户(能创建图形和查看图形)和普通用户(仅查看图形,只能监控不能设置)
cacti提供三种模板:
图形模板(定义图形是如何绘制的);
数据模板(定义如何获取数据,保存在哪个.rrd文件中);
主机模板(如要监视100台server,每个server上监视的指标不一样,将要监视的server上所有相同的指标定义为模板,如都要监控的指标有CPU、内存、磁盘的使用率,将模板往这些主机上一套即可监控定义的所有主机,所以主机模板是归好类的数据模板和图形模板,可直接应用到某个类别的主机上予以监视,省得一个个的定义)
cacti要指挥着rrdtool获取数据,cacti获取数据的方式:
script;
SNMP(获取远程server上数据);
ssh(获取远程server上数据,在远程server上放一脚本,运行脚本并将结果取回,要使自动运行,要设置基于密钥的认证)
cacti让获取数据的命令周期性的执行,并通过rrdtoolupdate保存在.rrd文件中(取得数据、保存数据),通过数据模板定义将取得的数据如何保存下来;对于不同的主机,如果要以某个数据绘图,把这个模板套在对应主机上让主机能够取得数据并保存在cacti主机上,所以数据模板定义cacti从其它主机上获得的数据保存下来的格式的方法,监视的指标不一样展示的内容就不一样;图形模板实现快速的套到某个主机上,让这个主机知道去哪些数据文件中获取什么样的聚合函数得来的数据,并通过什么样的方式展示
cacti功能强大,在开源监控方面最流行,很多商业软件是在cacti基础上二次开发的,cacti自身并不获取数据,也不保存数据,更不展示数据,靠的都是rrdtool,cacti只是提供了管理框架而已,cacti支持用户、插件方面额外的管理功能,因此cacti自己的信息要保存下来,要用到mysql,所以cacti是在LAMP平台或LNMP平台上运行的网页程序
二、安装使用:
[root@www ~]# uname -a
Linux www.magedu.com 2.6.32-358.el6.x86_64#1 SMP Tue Jan 29 11:47:41 EST 2013 x86_64 x86_64 x86_64 GNU/Linux
[root@www ~]# yum groupinstall "Desktop platform" "Development tools"
[root@www ~]# yum -y install httpd mysql mysql-server mysql-devel libxml2-devel mysql-connector-odbc perl-DBD-Mysql unixODBC php php-mysql php-pdo
[root@www ~]# yum -y install net-snmp net-snmp-utils net-snmp-libs lm_sensors
[root@www ~]# tar xf cgilib-0.5.tar.gz
[root@www ~]# cd cgilib-0.5
[root@www cgilib-0.5]# make
[root@www cgilib-0.5]# cp libcgi.a /usr/local/lib
[root@www cgilib-0.5]# cp cgi.h /usr/include
[root@www cgilib-0.5]# yum -y install libart_lgpl-devel
[root@www cgilib-0.5]# yum -y install pango-devel* cairo-devel*
[root@www cgilib-0.5]# cd
[root@www ~]# tar xf rrdtool-1.4.5.tar.gz
[root@www ~]# cd rrdtool-1.4.5
[root@www rrdtool-1.4.5]# ./configure --prefix=/usr/local
[root@www rrdtool-1.4.5]# make && make install
[root@www ~]# tar xf cacti-0.8.8a.tar.gz -C /var/www/html/
[root@www ~]# ln -sv /var/www/html/cacti-0.8.8a/ /var/www/html/cacti
"/var/www/html/cacti"-> "/var/www/html/cacti-0.8.8a/"
[root@www ~]# ls /var/www/html
cacti cacti-0.8.8a
cacti-0.8.8a.tar.gz(0.8.8有大量bug,0.8.8之前的所有版本默认都不带插件功能,得要额外安装插件框架;0.8.8a这个版本以后的插件已集成,不需额外安装插件框架)
cacti默认使用的网页位置:/var/www/html/cacti-->http://192.168.41.131/cacti
cacti上的大多数程序都是相对于/var/www/html/cacti/这个父路径而言
以下配置的cacti目录是/var/www/html/cacti-->http://cacti.magedu.com,不使用默认的http://cacti.magedu.com/cacti相对路径,所以要想使用根路径直接访问,要将cacti的默认路径改为$url_path = “/”,否则cacti网页程序无法使用
[root@www ~]# vim /etc/httpd/conf/httpd.conf
#DocumentRoot "/var/www/html"
DirectoryIndex index.php index.html index.html.var
DocumentRoot /var/www/html/cacti
ServerName cacti.magedu.com
Options none
AllowOverride none
Allow from all
ErrorLog logs/cacti-error_log
CustomLog logs/cacti-access_log common
[root@www ~]# service httpd start
正在启动 httpd: [确定]
[root@www cacti]# service mysqld start
正在启动 mysqld: [确定]
[root@www cacti]# ls(cacti.sql,cacti所用到的数据库,创建表的所有语句,但没有指定数据库的语句;rra/目录是保存.rrd文件的,rra/和log/都以cactiuser的身份访问;resource/模板资源目录)
[root@www cacti]# mysqladmin create cacti
[root@www cacti]# mysql cacti < cacti.sql
[root@www cacti]# mysql -e "GRANT ALL ON cacti.* TO 'cactiuser'@localhost IDENTIFIED BY 'cactiuser'"
[root@www cacti]# mysqladmin flush-privileges
[root@www cacti]# mysql -ucactiuser -p
Enter password:
mysql> SHOW DATABASES;
+--------------------+
| Database |
+--------------------+
| information_schema |
| cacti |
| test |
+--------------------+
3 rows in set (0.01 sec)
mysql> \q
Bye
[root@www cacti]# cd include/
[root@www include]# vim config.php
$url_path = "/";
[root@www include]# cd ..
[root@www cacti]# chown -R root:root ./
[root@www cacti]# chown -R cactiuser:cactiuser rra/ log/
更改win的hosts文件(C:\Windows\System32\drivers\etc\hosts)
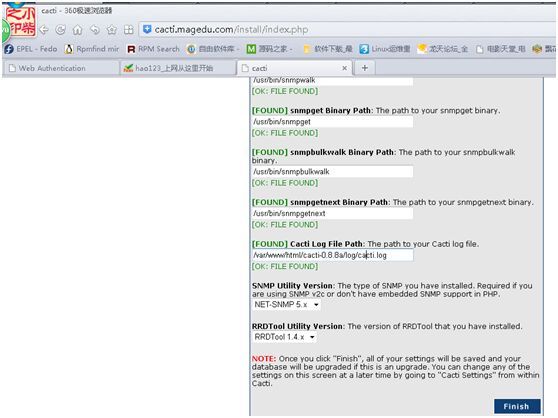
访问http://cacti.magedu.com
默认帐号密码均为admin,第一次登录要求更改
如图:
console(所有的编辑配置都在此选项卡下);
graph(监控的主机状态图形);
Collection Method(数据收集的定义,数据收集方法,cacti要能获取数据并让rrdtool保存,此项定义通过哪种方法到哪去获取数据,方法有两种:数据查询(Data Queries),数据输入方法(Data Input Methods,通过是命令或脚本)
注:Data Queries(一些事先定义好的xml格式,数据收集方法事先将命令或脚本组织成xml格式文档,对于某种特定的设备,需要收集数据的各类很多,如8口的router,每个口进出的数据,进出数据包的个数,进和出的流量大小,这要定义很多DS)
脚本只需指定如何获取数据,并且获取到的数据经过处理后要按规定的格式输出,如TAG:data TAG:data用空格隔开的多个输出,例网卡流量:input:30 output:40(脚本写完后要输出,输出要说明白是什么数据多少个),脚本每隔多长时间执行一次这由cacti定义
让cacti定义一个默认的周期性的任务计划,靠poller.php实现,会把定义好的所有的数据查询方法和数据输入方法,确定要收集数据的,每隔一段时间执行一次,poller.php指挥着定义好的脚本工作;poller.php用php编写功能不强,只支持单线程,为弥补这个缺陷,cacti官方又提供了一个工具spine,这是替换poller.php的程序,分布式,可从多个主机上收集数据,在大规模场景下一定要用spine
[root@www ~]# echo '*/5 * * * * /usr/bin/php /var/www/html/cacti/poller.php &> /dev/null' > /var/spool/cron/cactiuser(或#crontab –u cactiuser –e)
[root@www ~]# su cactiuser
[cactiuser@www root]$ crontab -l
*/5 * * * * /usr/bin/php/var/www/html/cacti/poller.php &> /dev/null
[cactiuser@www ~]$ /usr/bin/php /var/www/html/cacti/poller.php(若有时区报错,调整php.ini)
PHP Warning: date(): It is not safe to rely on thesystem's timezone settings. You are *required* to use the date.timezone settingor the date_default_timezone_set() function. In case you used any of thosemethods and you are still getting this warning, you most likely misspelled thetimezone identifier. We selected 'Asia/Chongqing' for 'CST/8.0/no DST' insteadin /var/www/html/cacti-0.8.8a/include/global_arrays.php on line 676
[root@www ~]# vim /etc/php.ini
date.timezone = Asia/Shanghai
[root@www ~]# su - cactiuser
[cactiuser@www ~]$ /usr/bin/php /var/www/html/cacti/poller.php
[root@www ~]# cd /var/www/html
[root@www html]# cd cacti
[root@www cacti]# cd log
[root@www log]# ls
cacti.log
[root@www log]# tail cacti.log
……
03/07/2016 12:17:43 PM - POLLER: Poller[0]WARNING: Cron is out of sync with the Poller Interval! The Poller Interval is '300' seconds, with amaximum of a '300' second Cron, but 4393662 seconds have passed since the lastpoll!
03/07/2016 12:17:43 PM - SYSTEM STATS:Time:0.1108 Method:cmd.php Processes:1 Threads:N/A Hosts:2 HostsPerProcess:2DataSources:0 RRDsProcessed:0
[root@www log]# ls ../rra
Management:
Graph Management
Graph Trees(将监控的对象分类)
Data Sources(把数据获取方法结合数据模板应用到某个主机上,必须有DS才能生成数据,此项中的定义就是为Devices中Associated Graph Templates提供数据,点Localhost –Processes关键是Data Source Fields,
Devices(所监控的主机;若要监控远程主机,一上来就添加此项;localhost默认status为unknown,SNMP Options中SNMP Version选Version2-->save,Associated Graph Templates和Associated DataQueries)
Collection Methods:
Data Queries
Data Input Methods(数据收集方法必须有对应的数据模板,表示数据收集下来如何保存)
Templates:
Graph Templates
Host Templates(将datatemplates和graph templates归类应用到一类主机上)
Data Templates(定义如何从脚本中接收数据,接收下来后如何对应的一个个保存在DS上)
Configuration:
Settings(General(SNMP Version:Version2,SNMPCommunity:public;poller:若用poller线程数只能有一个,若用spine则可调N个线程;save)
[root@www ~]# cd /var/www/html/cacti/rra
[root@www rra]# ls
localhost_load_1min_5.rrd localhost_mem_buffers_3.rrd localhost_mem_swap_4.rrd localhost_proc_7.rrd localhost_users_6.rrd
[root@www rra]# rrdtool fetch -r 300 localhost_mem_buffers_3.rrd AVERAGE
……
1457329200: -nan
1457329500: -nan
1457329800: 5.6497300633e+03
1457330100: 5.1016000000e+03
1457330400: 4.2497066667e+03
1457330700: 9.5143733333e+03
1457331000: -nan
[root@www rra]# date +%s(查看当前时间点,与最后一个时间点比较)
1457330739
collection methods-->data input methods
templates-->data templates
management-->data sources
templates-->graph templates
举例1:
自己创建数据收集方法-->并将做成数据模板-->将数据模板关联到主机-->提供图形模板-->最终应用到特定的主机上实现特定的监控功能
[root@www rra]# vim /etc/snmp/snmpd.conf
view systemview included .1.3.6.1.2.1.6
[root@www rra]# service snmpd restart
停止 snmpd: [确定]
正在启动 snmpd: [确定]
[root@www rra]# snmpnetstat -v 2c -c public -Can localhost
Active Internet (tcp) Connections(including servers)
Proto Local Address Remote Address (state)
tcp *.22 *.* LISTEN
tcp *.111 *.* LISTEN
tcp *.3306 *.* LISTEN
tcp *.51205 *.* LISTEN
tcp 127.0.0.1.25 *.* LISTEN
tcp 127.0.0.1.199 *.* LISTEN
tcp 127.0.0.1.631 *.* LISTEN
tcp 127.0.0.1.6010 *.* LISTEN
tcp 192.168.41.135.22 192.168.41.1.2374 ESTABLISHED
Active Internet (udp) Connections
Proto Local Address
udp *.*
[root@www rra]# vim tcpconn.sh
-------------------script start-------------
#/bin/bash
#
#$1:hostname or IP
#$2:snmp community
SNMPNETSTAT=/usr/bin/snmpnetstat
ESTABLISHED=`$SNMPNETSTAT -v 2c -c $2 -Can -Cp tcp $1 | grep -i 'established' | wc -l`
echo -n "established:$ESTABLISHED"
-------------------script end--------------------
[root@www rra]# chmod +x tcpconn.sh
[root@www rra]# cp tcpconn.sh ../scripts/
[root@www rra]# cd ../scripts
[root@www scripts]# ls
3com_cable_modem.pl loadavg_multi.pl query_host_partitions.php ss_host_cpu.php unix_processes.pl webhits.pl
diskfree.pl loadavg.pl query_unix_partitions.pl ss_host_disk.php unix_tcp_connections.pl
diskfree.sh ping.pl sql.php ss_sql.php unix_users.pl
linux_memory.pl query_host_cpu.php ss_fping.php tcpconn.sh weatherbug.pl
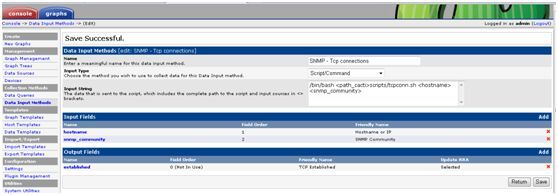
console-->data input methods-->add
name(SNMP – Tcp connections)
input type(选script/command)
input string(/bin/bash
-->create
input fields-->add
field(hostname)
friendly name(Hostname or IP)
special type code(hostname)
-->create
input fields-->add
field(snmp_community)
friendly name(SNMP Community)
special type code(snmp_community)
-->create
output fields-->add
field(established)
friendly name(TCP Established)
update rrd file(V)
-->create
-->save
collection methods-->data input methods-->点Tcp connections
templates-->data templates-->add
name(SNMP – Tcpconnections)
data source中:name(|host_description|- Tcp connections),data input method(选SNMP – Tcp connections),associated rra’s(取消选中的hourly),step(300),data source active(V)
data source item中:internaldata source name(tcpestablished),minimum value(0),maximum value(65535),data source type(gauge),heartbeat(600)
-->create
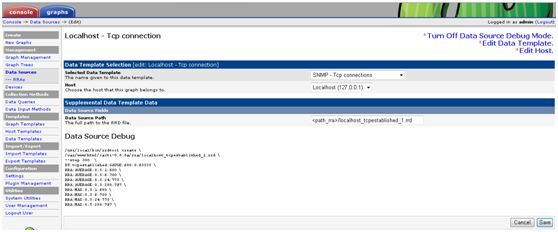
management-->data sources-->add
selected data template(选SNMP – Tcp connections)
host(选localhost)
-->create
data source path(
-->save
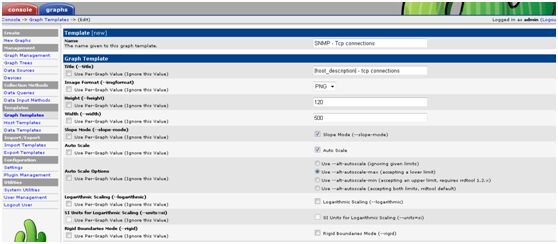
templates-->graph templates-->add
name(SNMP – tcp connections)
title(|host_description| -tcp connections)
p_w_picpath format(PNG)
vertical label(tcpconnections)
-->create
graph template items-->add
data source(选SNMP – Tcp connections – (tcpestablished))
color(任选一)
consolidation function(AVERAGE)
text format(Established)
-->create
graph item inputs
-->save
management-->graph management-->选localhost-->add
selected graph template(选SNMP – Tcpconnections)
host(localhost)
-->create
date source[tcpestablished](localhost –Tcp connections (tcpestablished))
--save
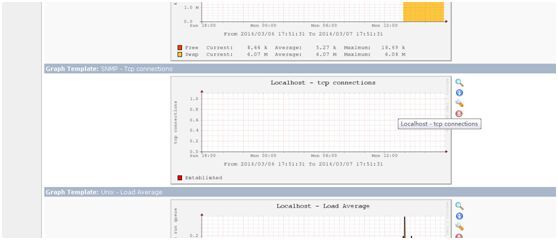
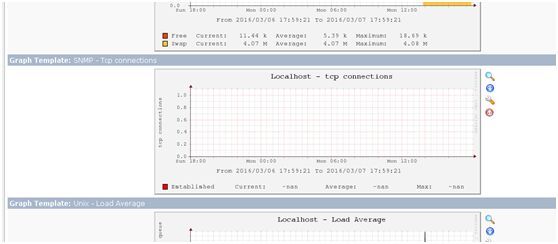
选项卡graphs
选项卡console
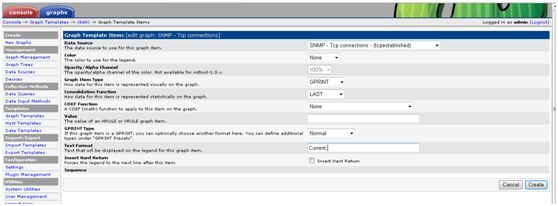
templates-->graph templates-->SNMP –Tcp connections-->graph template items-->add
color不管
graph item type(GPRINT)
consolidation function(LAST)
text format(current:)
-->create
graph template items-->add
graph item type(GPRINT)
consolidation function(AVERAGAE)
text format(Average:)
-->create
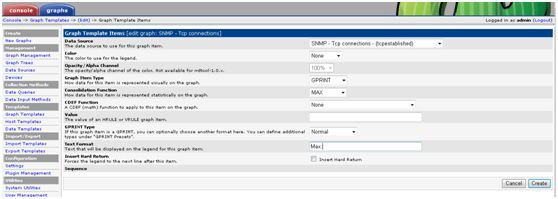
graph template items-->add
graph item type(GPRINT)
consolidation function(MAX)
text format(Max:)
-->create
[root@www rra]# ls
localhost_load_1min_5.rrd localhost_mem_swap_4.rrd localhost_tcpestablished_1.rrd tcpconn.sh
localhost_mem_buffers_3.rrd localhost_proc_7.rrd localhost_users_6.rrd
[root@www rra]# rrdtool fetch localhost_tcpestablished_1.rrd AVERAGE
[root@www rra]# date +%s
1457345360
[root@www rra]# ab -c 100 -n 10000 http://localhost/index.html
[root@cacti cacti]# service httpd status
httpd (pid 1790) 正在运行...
[root@cacti cacti]# service mysqld status
mysqld (pid 1910) 正在运行...
[root@cacti cacti]# service snmpd status(确保snmpd服务开启才能监控到本机数据)
snmpd (pid 2601) 正在运行...
对于server有三种状态常见:established,timewait,synreceived
举例2:
[root@cacti cacti]# vim scripts/tcpconn.sh
-------------script start---------------
#/bin/bash
#
#$1:hostname or IP
#$2:snmp community
SNMPNETSTAT=/usr/bin/snmpnetstat
TEMPFILE=`mktemp /tmp/$1_tcpconn.XXXXXXXX`
$SNMPNETSTAT -v 2c -c $2 -Can -Cp tcp $1> $TEMPFILE
ESTABLISHED=`grep -i"ESTABLISHED" $TEMPFILE | wc -l`
TIMEWAIT=`grep -i "TIMEWAIT"$TEMPFILE | wc -l`
SYNRECEIVED=`grep -i"SYNRECEIVED" $TEMPFILE | wc -l`
echo -n "established:$ESTABLISHEDtimewait:$TIMEWAIT synreceived:$SYNRECEIVED"
-----------------script end-------------------
collection methods-->data inputmethods-->add
name(SNMP – Tcp 3con)
input type(script/command)
input string(/bin/bash
-->create
input fields-->add
field(选hostname)
friendly name(Hostname)
special type code(hostname)
-->create
input fields-->add
field(选snmp_community)
friendly name(Snmpcommunity)
special type code(snmp_community)
-->create
output fields-->add
field(established)
friendly name(Tcp established)
update rrd file(V)
-->create
output fields-->add
field(timeout)
friendly name(Tcp timeout)
update rrd file(V)
-->create
output fileds-->add
field(synreceived)
friendly name(Tcp synreceived)
update rrd file(V)
-->create
-->save
templates-->data templates-->add
name(SNMP – Tcp 3con)
data source-->name(|host_description|- Tcp 3con)
data input method(选SNMP – Tcp3c)
associated rra’s(取消1hourly)
data source item-->internal data sourcename(tcpestablished)
maximum value(65535)
data source type(gauge)
output field(选established – Tcpestablished)
-->save
data source item-->new
internal data source name(tcptimeout)
maximum value(65535)
output field(选timeout – Tcptimeout)
-->save
internal data source name(tcpsynreceived)
maximum value(65535)
output field(选synreceived – Tcpsynreceived)
-->save
management-->data source-->选localhost-->add
selected data template(选SNMP - Tcp3c)
host(localhost)
-->create
data source path(
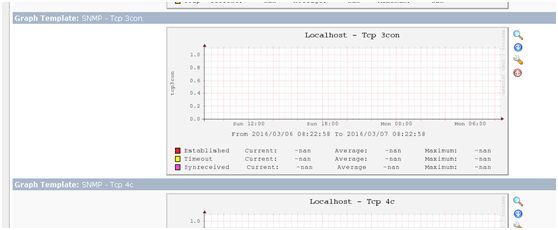
templates-->graph templates-->add
name(SNMP – Tcp 3con)
title(|host_description| -Tcp 3con)
vertical label(tcp3con)
-->create
graph template items-->add
data source(选SNMP – Tcp 3con –(tcpestablished))
color(任选一种)
graph item type(LINE2)
consolidation function(AVERAGE)
text format(Established)
-->create
graph template items—add
data source(选SNMP – Tcp 3con –(tcpestablished))
color不管
graph item type(GPRINT)
consolidation function(LAST)
test format(Current:)
-->create
graph template items—add
data source(选SNMP – Tcp 3con –(tcpestablished))
color不管
graph item type(GPRINT)
consolidation function(AVERAGE)
text format(Average:)
--create
graph template items—add
data source(选SNMP – Tcp 3con –(tcpestablished))
color不管
graph item type(GPRINT)
consolidation function(MAX)
text format(Maximum:)
--create
tcptimeout和tcpsynreceived重复以上步骤
management-->graph management-->add
selected graph template(选SNMP – Tcp3con)
host(localhost)
-->create
data source[tcpestablished](选Localhost –Tcp 3c (tcpestablished))
data source[tcpsynreceived](选Localhost –Tcp 3c (tcpsynreceived))
data source [tcptimeout](选Localhost –Tcp 3c (tcptimeout))
-->save
若出现错误,如turn on graph debug mode-->ERROR: opening '/var/www/html/cacti-0.8.8a/rra/localhost_tcp3con_1.rrd':No such file or directory,在management-->data sources-->turn on data source debugmode-->将显示出的生成的语句以cactiuser身份在命令行下执行即可
import/export-->export templates-->graph template to export选择要导出的图形模板-->export
configuration-->plugin management
[root@cacti ~]# tar xf thold-0.4.3.tar.gz-C /var/www/html/cacti/plugins/
[root@cacti ~]# tar xf settings-0.5.tar.gz-C /var/www/html/cacti/plugins/
[root@cacti ~]# cd !$
cd /var/www/html/cacti/plugins/
[root@cacti plugins]# ls
index.php settings thold
[root@cacti plugins]# cd ..
[root@cacti cacti]# vim include/config.php(告诉cacti要启用plugin功能)
$plugin
configuration-->plugin management
点安装-->再点启用会多出一个选项卡thold
forums.cacti.net-->scripts and templates,有众多的模板,如mysql-cacti-template,cacti-memcached-template,tcp-connections,cactiWMI-0.0.6(cacti的补丁包通过WMI接口监控win的各种指标),npc-2.0.1(将nagios和cacti整合在一起的工具)
book(cacti 0.8 beginner’s,cacti 0.8network monitoring,OReilly Essential SNMP 2nd Edition)

