曹朋辉
原创作品转载请注明出处
《Linux内核分析》MOOC课程
内核里操作系统的三大功能:
内存管理
进程管理
文件系统
其中最核心的是进程管理
进程描述符task_struct数据结构
进程控制块PCB——task_struct
为了管理进程,内核必须对每个进程进行清晰的描述,进程描述符提供了内核所需了解的进程信息。
struct task_struct数据结构很庞大
Linux进程的状态与操作系统原理中的描述的进程状态似乎有所不同,比如就绪状态和运行状态都是TASK_RUNNING,为什么呢?
进程的标示pid
所有进程链表struct list_head tasks;
内核的双向循环链表的实现方法 - 一个更简略的双向循环链表
程序创建的进程具有父子关系,在编程时往往需要引用这样的父子关系。进程描述符中有几个域用来表示这样的关系
Linux为每个进程分配一个8KB大小的内存区域,用于存放该进程两个不同的数据结构:Thread_info和进程的内核堆栈
进程处于内核态时使用,�不同于用户态堆栈,即PCB中指定了内核栈,那为什么PCB中没有用户态堆栈?用户态堆栈是怎么设定的?
内核控制路径所用的堆栈�很少,因此对栈和Thread_info�来说,8KB足够了
struct thread_struct thread; //CPU-specific state of this task
文件系统和文件描述符
内存管理——进程的地址空间
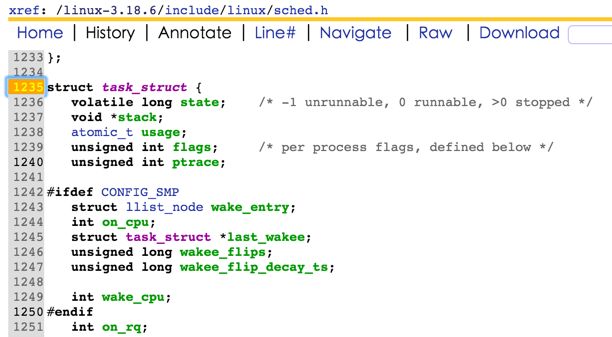
struct task_struct {
1236    volatile long state;    运行状态/* -1 unrunnable, 0 runnable, >0 stopped */
1237    void *stack;  进程的内核堆栈
1238    atomic_t usage;
1239    unsigned int flags; /* per process flags, defined below */
1240    unsigned int ptrace;
#ifdef CONFIG_SMP  多处理器时会用到
1243    struct llist_node wake_entry;
1244    int on_cpu;
1245    struct task_struct *last_wakee;
1246    unsigned long wakee_flips;
1247    unsigned long wakee_flip_decay_ts;
1248
1249    int wake_cpu;
1250#endif
//下面一段和优先级,调度相关
1251        int on_rq;
1252
1253    int prio, static_prio, normal_prio;
1254    unsigned int rt_priority;
1255    const struct sched_class *sched_class;
1256    struct sched_entity se;
1257    struct sched_rt_entity rt;
1258#ifdef CONFIG_CGROUP_SCHED
1259    struct task_group *sched_task_group;
1260#endif
1261    struct sched_dl_entity dl;


1295        struct list_head tasks;  进程链表
1296#ifdef CONFIG_SMP
1297    struct plist_node pushable_tasks;
1298    struct rb_node pushable_dl_tasks;
1299#endif
1300
1301    struct mm_struct *mm, *active_mm;  内存管理进程的地址空间相关
1302#ifdef CONFIG_COMPAT_BRK
1303    unsigned brk_randomized:1;
1304#endif
1305    /* per-thread vma caching */
1306    u32 vmacache_seqnum;
1307    struct vm_area_struct *vmacache[VMACACHE_SIZE];
1308#if defined(SPLIT_RSS_COUNTING)
1309    struct task_rss_stat    rss_stat;
1310#endif


/* Revert to default priority/policy when forking */
1325    unsigned sched_reset_on_fork:1;
1326    unsigned sched_contributes_to_load:1;
1327
1328    unsigned long atomic_flags; /* Flags needing atomic access. */
1329
1330    pid_t pid;  进程的pid
1331    pid_t tgid;
1332
1333#ifdef CONFIG_CC_STACKPROTECTOR
1334    /* Canary value for the -fstack-protector gcc feature */
1335    unsigned long stack_canary;
1336#endif


//下面一段为进程的父子关系
    struct task_struct __rcu *real_parent; /* real parent process */
1343    struct task_struct __rcu *parent; /* recipient of SIGCHLD, wait4() reports */
1344    /*
1345     * children/sibling forms the list of my natural children
1346     */
1347    struct list_head children;  /* list of my children */
1348    struct list_head sibling;   /* linkage in my parent's children list */
1349    struct task_struct *group_leader;   /* threadgroup leader */
1350
1351    /*
1352     * ptraced is the list of tasks this task is using ptrace on.
1353     * This includes both natural children and PTRACE_ATTACH targets.
1354     * p->ptrace_entry is p's link on the p->parent->ptraced list.
1355     */
1356    struct list_head ptraced;    调试用的
1357    struct list_head ptrace_entry;
1358
1359    /* PID/PID hash table linkage. */
1360    struct pid_link pids[PIDTYPE_MAX];  pid的哈希表   可以方便查找

1361    struct list_head thread_group;
1362    struct list_head thread_node;
1363


一下一段为时间相关的数据结构
    cputime_t utime, stime, utimescaled, stimescaled;
1369    cputime_t gtime;
1370#ifndef CONFIG_VIRT_CPU_ACCOUNTING_NATIVE
1371    struct cputime prev_cputime;
1372#endif
1373#ifdef CONFIG_VIRT_CPU_ACCOUNTING_GEN
1374    seqlock_t vtime_seqlock;
1375    unsigned long long vtime_snap;
1376    enum {
1377        VTIME_SLEEPING = 0,
1378        VTIME_USER,
1379        VTIME_SYS,
1380    } vtime_snap_whence;
1381#endif
1382    unsigned long nvcsw, nivcsw; /* context switch counts */
1383    u64 start_time;     /* monotonic time in nsec */
1384    u64 real_start_time;    /* boot based time in nsec */
1385/* mm fault and swap info: this can arguably be seen as either mm-specific or thread-specific */
1386    unsigned long min_flt, maj_flt;
1387
1388    struct task_cputime cputime_expires;
1389    struct list_head cpu_timers[3];
1390

/* process credentials */
1392    const struct cred __rcu *real_cred; /* objective and real subjective task
1393                     * credentials (COW) */
1394    const struct cred __rcu *cred;  /* effective (overridable) subjective task
1395                     * credentials (COW) */
1396    char comm[TASK_COMM_LEN]; /* executable name excluding path
1397                     - access with [gs]et_task_comm (which lock
1398                       it with task_lock())
1399                     - initialized normally by setup_new_exec */
1400/* file system info */
1401    int link_count, total_link_count;
1402#ifdef CONFIG_SYSVIPC
1403/* ipc stuff */
1404    struct sysv_sem sysvsem;
1405    struct sysv_shm sysvshm;
1406#endif
1407#ifdef CONFIG_DETECT_HUNG_TASK
1408/* hung task detection */
1409    unsigned long last_switch_count;
1410#endif
1411/* CPU-specific state of this task */
1412    struct thread_struct thread;    和当前任务cpu相关的一些状态,与之前my_kernelvs中自己定义的PCB相似,在进程切换时起着关键作用

1413/* filesystem information */
1414    struct fs_struct *fs;   文件系统
1415/* open file information */
1416    struct files_struct *files;  打开的文件描述符列表
1417/* namespaces */
1418    struct nsproxy *nsproxy;
1419/* signal handlers */
1420    struct signal_struct *signal;  信号处理相关
1421    struct sighand_struct *sighand;
1422
1423    sigset_t blocked, real_blocked;
1424    sigset_t saved_sigmask; /* restored if set_restore_sigmask() was used */
1425    struct sigpending pending;
fork一个子进程的代码
#include
#include
#include
int main(int argc, char * argv[])
{
    int pid;
    /* fork another process */
    pid = fork();
    if (pid < 0)
    {
        /* error occurred */
        fprintf(stderr,"Fork Failed!");
        exit(-1);
    }
    else if (pid == 0)
    {
        /* child process */
        printf("This is Child Process!\n");
    }
    else
    {
        /* parent process  */
        printf("This is Parent Process!\n");
        /* parent will wait for the child to complete*/
        wait(NULL);
        printf("Child Complete!\n");
    }
}
创****建一个新进程在内核中的执行过程
fork、vfork和clone三个系统调用都可以创建一个新进程,而且都是通过调用do_fork来实现进程的创建;
Linux通过复制父进程来创建一个新进程,那么这就给我们理解这一个过程提供一个想象的框架:
复制一个PCB——task_struct
err = arch_dup_task_struct(tsk, orig);
要给新进程分配一个新的内核堆栈
tsk->stack = ti;
setup_thread_stack(tsk, orig); //这里只是复制thread_info,而非复制内核堆栈
要修改复制过来的进程数据,比如pid、进程链表等等都要改改吧,见copy_process内部。
从用户态的代码看fork();函数返回了两次,即在父子进程中各返回一次,父进程从系统调用中返回比较容易理解,子进程从系统调用中返回,那它在系统调用处理过程中的哪里开始执行的呢?这就涉及子进程的内核堆栈数据状态和task_struct中thread记录的sp和ip的一致性问题,这是在哪里设定的?copy_thread in copy_process
*childregs = *current_pt_regs(); //复制内核堆栈
childregs->ax = 0; //为什么子进程的fork返回0,这里就是原因!
p->thread.sp = (unsigned long) childregs; //调度到子进程时的内核栈顶
p->thread.ip = (unsigned long) ret_from_fork; //调度到子进程时的第一条指令地址


创建进程的大致框架
复制父进程的PCB
修改复制的PCB
分配一个新的内核堆栈
copy原来的内核堆栈
创建进程调用do_fork

do_fork中用copy_process包含创建一个进程的主要代码


