每次iOS一更新,就是我们iOS开发的噩梦,它打一个喷嚏,我们就要地震.Xcode7就有访问不到网络的问题,现在小编讲一讲iOS 10 开发遇到的问题:
1.iOS 10 隐私权限设置
2.iOS 10 网络问题
3.iOS 10 推送通知问题
4.iOS 10 适配问题
5.iOS 10 上传APP审核问题
首先,说一说隐私权限设置问题.在升级Xcode8之后,iOS 10开始对隐私权限更加严格.如果你没有设置就会导致APP崩溃,小编开始更新系统的时候就出现了这个问题.解决办法是在info.plist文件添加对应的Key-Value就可以了.如图所示:
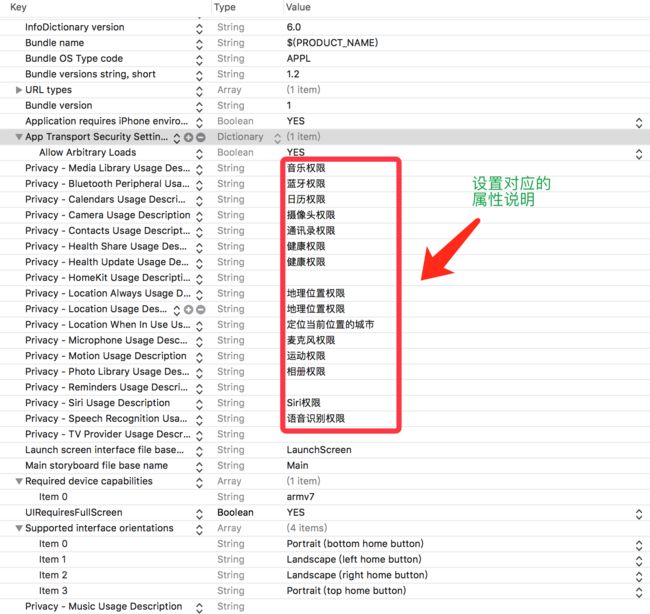
在这里小编总结了一些隐私设置Key-Value,具体步骤如图:
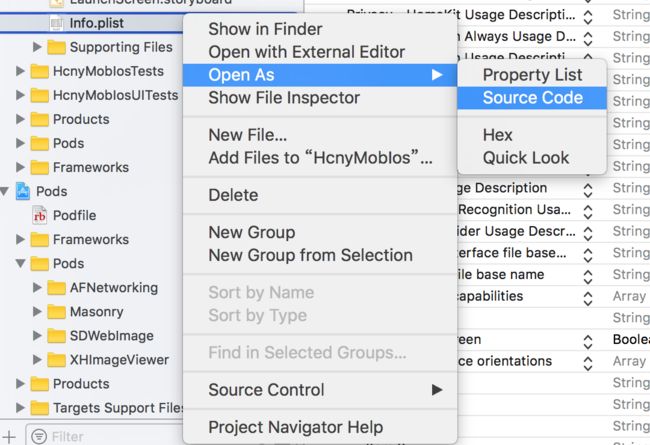
点击Source Code之后会跳到这个节面:

在这里添加的代码:
    NSAppleMusicUsageDescription
    音乐权限
    NSBluetoothPeripheralUsageDescription
    蓝牙权限
    NSCalendarsUsageDescription
    日历权限
    NSCameraUsageDescription
    摄像头权限
    NSContactsUsageDescription
    通讯录权限
    NSHealthShareUsageDescription
    健康权限
    NSHealthUpdateUsageDescription
    健康权限
    NSHomeKitUsageDescription

    NSLocationAlwaysUsageDescription
    地理位置权限
    NSLocationUsageDescription
    地理位置权限
    NSLocationWhenInUseUsageDescription
    定位当前位置的城市
    NSMicrophoneUsageDescription
    麦克风权限
    NSMotionUsageDescription
    运动权限
    NSPhotoLibraryUsageDescription
    相册权限
    NSRemindersUsageDescription

    NSSiriUsageDescription
    Siri权限
    NSSpeechRecognitionUsageDescription
    语音识别权限
    NSVideoSubscriberAccountUsageDescription
2.网络问题
说起这个问题,小编就觉得很坑.小编做完一个项目,发了一个测试版本给客户,我们这边的机型访问网络都没有问题,唯独客户的手机有问题.小编就测试怎么会出现这种情况.客户说:"我的手机一开始可以访问网络,但是关机之后就不行了".so,按照客户的操作先关机(苹果的关机门你懂的),然后在重启,结果可以访问网络.小编当时就整个人蒙了,心想苹果这也太坑了吧,难道又是机型问题?无力吐槽了,最后在百度找到了解决办法:
方案一: 重启手机再打开有相关联网问题的应用
对于此问题可能带来的问题有:如果你有多个应用具有网络访问问题,你可能需要多次重启设备后依次打开相关应用,因为在每次重启设备之后,系统貌似只能修正一个应用的联网访问请求,关于此问题还需要进一步求证。
方案二:更改 iOS 10 中的蜂窝网络访问权限设置
除了重启设别以外,你也可以尝试在「设置-通用-蜂窝移动网络-使用无线局域网与蜂窝移动的应用」选项中更改任意应用的联网权限设置后再恢复原先设置选项,完成操作后再次打开相关问题应用,也可以解决这一问题。
方案三:临时启动无线局域网助理
在「设置」-「蜂窝移动网络」打开「无线局域网助理」选项,之后再打开相关问题应用也可以解决这个问题。
修复问题后即可关闭「无线局域网助理」选项。
小编的代码解决方法是在访问不到网络时出现警告框,在警告框中选择设置跳转到手机的设置里的网络设置里.具体代码:
UIAlertView * alert = [[UIAlertView alloc]initWithTitle:@"网络错误" message:@"检测网络访问失败,您可以去设置中的设置.设置->蜂窝移动网络->若为iOS10以下选择开即可,iOS10以上使用无线局域网与蜂窝移动的应用->门店智能管理系统->选择您要使用的选项" delegate:self cancelButtonTitle:@"取消" otherButtonTitles:@"设置", nil];
    [alert show];
#pragma mark 警告框代理方法
- (void)alertView:(UIAlertView *)alertView clickedButtonAtIndex:(NSInteger)buttonIndex{
    if (buttonIndex == 1) {
        if ([[[UIDevice currentDevice] systemVersion] floatValue] < 10.0) {
            NSURL *url = [NSURL URLWithString:@"prefs:root=MOBILE_DATA_SETTINGS_ID"];
            if( [[UIApplication sharedApplication]canOpenURL:url] ) {
                [[UIApplication sharedApplication]openURL:url];
            }
        }else {

            [[UIApplication sharedApplication] openURL:[NSURL URLWithString:UIApplicationOpenSettingsURLString]];

        }
    }
}
3.推送通知问题
iOS 10的本地推送通知的方法也变了,首先判断是哪个系统.
if ([[[UIDevice currentDevice] systemVersion] floatValue] < 10.0) {

        [self LowIOSTenSystem];

    }else {

        [self IOSTenSystem];

    }
之后是本地推送代码:
/**
 * IOS10 以下版本消息本地推送
 */

- (void)LowIOSTenSystem {

    UILocalNotification *notification = [[UILocalNotification alloc] init];
    // 设置触发通知的时间
    NSDate *fireDate = [NSDate dateWithTimeIntervalSinceNow:1];
//    NSLog(@"fireDate=%@",fireDate);

    notification.fireDate = fireDate;
    // 时区
    notification.timeZone = [NSTimeZone defaultTimeZone];
    // 设置重复的间隔
//    notification.repeatInterval = kCFCalendarUnitSecond;

    // 通知内容
    notification.alertBody = self.stringLink;
    notification.applicationIconBadgeNumber = 1;
    // 通知被触发时播放的声音
    notification.soundName = UILocalNotificationDefaultSoundName;
    // 通知参数
    NSDictionary *userDict = [NSDictionary dictionaryWithObject:self.titleStr forKey:@"key"];
    notification.userInfo = userDict;

    // ios8后,需要添加这个注册,才能得到授权
    if ([[UIApplication sharedApplication] respondsToSelector:@selector(registerUserNotificationSettings:)]) {
        UIUserNotificationType type = UIUserNotificationTypeAlert | UIUserNotificationTypeBadge | UIUserNotificationTypeSound;
        UIUserNotificationSettings *settings = [UIUserNotificationSettings settingsForTypes:type
                                                                                 categories:nil];
        [[UIApplication sharedApplication] registerUserNotificationSettings:settings];
        // 通知重复提示的单位,可以是天、周、月
//        notification.repeatInterval = NSCalendarUnitDay;
    } else {
        // 通知重复提示的单位,可以是天、周、月
//        notification.repeatInterval = NSDayCalendarUnit;
    }

    // 执行通知注册
    [[UIApplication sharedApplication] scheduleLocalNotification:notification];
}
#pragma mark - 此方法是 用户点击了通知,应用在前台 或者开启后台并且应用在后台 时调起
- (void)application:(UIApplication *)application didReceiveLocalNotification:(UILocalNotification*)notification
{
    //这里,你就可以通过notification的useinfo,干一些你想做的事情了
    UIAlertView * alert = [[UIAlertView alloc]initWithTitle:self.titleStr message:self.stringLink delegate:self cancelButtonTitle:@"取消" otherButtonTitles:@"确定", nil];
    [alert show];
    application.applicationIconBadgeNumber -= 1;

}

/**
 * IOS10 消息本地推送
 */

- (void)IOSTenSystem {

    // 使用 UNUserNotificationCenter 来管理通知
    UNUserNotificationCenter* center = [UNUserNotificationCenter currentNotificationCenter];

    //需创建一个包含待通知内容的 UNMutableNotificationContent 对象,注意不是 UNNotificationContent ,此对象为不可变对象。
    UNMutableNotificationContent* content = [[UNMutableNotificationContent alloc] init];
    content.title = [NSString localizedUserNotificationStringForKey:self.titleStr arguments:nil];
    content.body = [NSString localizedUserNotificationStringForKey:self.stringLink
                                                         arguments:nil];
    content.sound = [UNNotificationSound defaultSound];

    // 在 alertTime 后推送本地推送
    UNTimeIntervalNotificationTrigger* trigger = [UNTimeIntervalNotificationTrigger
                                                  triggerWithTimeInterval:1 repeats:NO];

    UNNotificationRequest* request = [UNNotificationRequest requestWithIdentifier:@"FiveSecond"
                                                                          content:content trigger:trigger];

    //添加推送成功后的处理!
    [center addNotificationRequest:request withCompletionHandler:^(NSError * _Nullable error) {

    }];
}
4.iOS 10 适配有关的问题
APP程序内原来2个字的宽度是24,现在2个字需要27的宽度来显示了
希望有解决办法的朋友,评论告诉我一下耶,谢谢啦.
当我们手机系统字体改变了之后,那我们App的label也会跟着一起变化,这需要我们写很多代码来进一步处理才能实现,但是iOS 10 提供了这样的属性adjustsFontForContentSizeCategory来设置.(这个是百度的,如有问题请评论指正)代码如下:
UILabel *myLabel = [UILabel new];   /*
    UIFont 的preferredFontForTextStyle: 意思是指定一个样式,并让字体大小符合用户设定的字体大小。
   */
    myLabel.font =[UIFont preferredFontForTextStyle: UIFontTextStyleHeadline]; /*
 Indicates whether the corresponding element should automatically update its font when the device’s UIContentSizeCategory is changed.
 For this property to take effect, the element’s font must be a font vended using +preferredFontForTextStyle: or +preferredFontForTextStyle:compatibleWithTraitCollection: with a valid UIFontTextStyle.
 */
     //是否更新字体的变化
    myLabel.adjustsFontForContentSizeCategory = YES;
使用Xcode8打开xib文件后,会出现下图的提示.
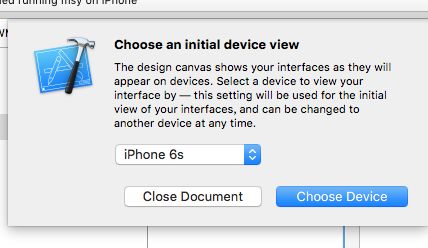
选择Choose Device即可.之后会发现布局的frame乱了,只需要更新一下frame即可.如下图:

注意:如果按上面的步骤操作后,在用Xcode7打开Xib会报错误:
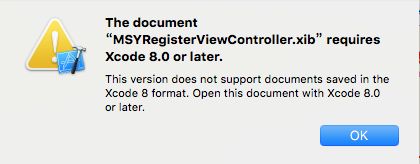
解决办法:需要删除Xib里面
这句话,以及把< document >中的toolsVersion和< plugIn >中的version改成你正常的xib文件中的值,不过不建议这么做.
5.iOS 10 上传APP审核问题
首先你要确定第一个问题就是隐私设置问题,工程中要访问的这些必须都要在info.plist添加,否则你上传到App Store的ipa包会报错.
然后是2017年1月1日起,苹果App Store中的所有App都必须启用 App Transport Security(ATS)安全功能.具体步骤小编会在另一篇文章里介绍.