- 原文链接: Callbacks, RemoteViews and Notifications
- 原文作者: Future Studio
- 译文出自: 小鄧子的
- 译者: 小鄧子
- 状态: 完成
Callback与Target
在了解callback之前,值得一提的是Picasso有多种图像加载方式。大体可分为同步和异步两种。
fetch(),get()与target之间的区别与联系
.fetch()会在后台线程中异步加载图片,但不会展示到ImageView上,也不会返回该图片对象。它只会把图像保存到磁盘或内存中。它在后台缓存那些稍后会用到的图片,从而降低加载时间。
.get()同步加载图片,并返回Bitmap对象。确保不要在UI线程调用.get(),否则会造成UI线程的阻塞。
除了使用.into(),这里还有另外一个方法:回调!在Picasso概念中它们被称为Target。
使用Target实现回调机制
到目前为止,我们一直使用ImageView作为.into()的参数。这并不是.into()函数的全部用法。我们还可以实现一个Target接口。
和之前的加载方式一样,只不过不再将图像直接展示到ImageView上,而是通过Target回调,返回Bitmap对象(或者异常)。
来看一个示例。Picasso的创建方式和之前的例子一样:
Picasso
    .with(context)
    .load(UsageExampleListViewAdapter.eatFoodyImages[0])
    .into(target);
有趣的部分在Target实例中:
private Target target = new Target() {
    @Override
    public void onBitmapLoaded(Bitmap bitmap, Picasso.LoadedFrom from) {
        // loading of the bitmap was a success
        // TODO do some action with the bitmap
    }

    @Override
    public void onBitmapFailed(Drawable errorDrawable) {
        // loading of the bitmap failed
        // TODO do some action/warning/error message
    }

    @Override
    public void onPrepareLoad(Drawable placeHolderDrawable) {

    }
};
如果这个任务成功了,回调中将会接收到Bitmap对象和Picasso.LoadedFrom。后者用来判定,图像来源于内存还是网络。此时,你能做有关Bitmap的任何操作。
总之,无论何时,你都可以通过.get()来获得原始Bitmap或者通过实现Target来获得Drawable。
切记:总是将target实例作为字段属性存在,而不是匿名类!否则GC会销毁target对象,并且永远无法获得图像结果(译者注:这里的target会被作为WeakReference而存在)。
加载图像至自定义通知栏
一个新特性是加载图像至RemoteView上。RemoteView是一个非常有用的控件,用来自定义通知栏布局。
让我们看一个使用RemoteView,自定义通知栏的示例。如果你对自定义通知栏布局感兴趣,你可能已经知道了如果构建一个通知栏。希望下面这段代码能够对你有所帮助:
// create RemoteViews
final RemoteViews remoteViews = new RemoteViews(getPackageName(), R.layout.remoteview_notification);

remoteViews.setImageViewResource(R.id.remoteview_notification_icon, R.mipmap.future_studio_launcher);

remoteViews.setTextViewText(R.id.remoteview_notification_headline, "Headline");
remoteViews.setTextViewText(R.id.remoteview_notification_short_message, "Short Message");

remoteViews.setTextColor(R.id.remoteview_notification_headline, getResources().getColor(android.R.color.black));
remoteViews.setTextColor(R.id.remoteview_notification_short_message, getResources().getColor(android.R.color.black));

// build notification
NotificationCompat.Builder mBuilder = new NotificationCompat.Builder(UsageExampleTargetsAndRemoteViews.this)
    .setSmallIcon(R.mipmap.future_studio_launcher)
    .setContentTitle("Content Title")
    .setContentText("Content Text")
    .setContent(remoteViews)
    .setPriority(NotificationCompat.PRIORITY_MIN);

final Notification notification = mBuilder.build();

// set big content view for newer androids
if (android.os.Build.VERSION.SDK_INT >= 16) {
    notification.bigContentView = remoteViews;
}

NotificationManager mNotificationManager = (NotificationManager) this.getSystemService(Context.NOTIFICATION_SERVICE);
mNotificationManager.notify(NOTIFICATION_ID, notification);
这就是用自定义布局创建一个通知的全部代码。我们不再详细介绍,因为这并不属于本系列博客的范畴。我们感兴趣的是下一步:加载图像至ImageView。
Picasso的调用非常简单。与加载到ImageView上相似,我们也对RemoteView使用.into()函数。然而,传入的参数可能有些不同.into(android.widget.RemoteViews remoteViews, int viewId, int notificationId, android.app.Notification notification)
示例代码如下:
Picasso
    .with(UsageExampleTargetsAndRemoteViews.this)
    .load(UsageExampleListViewAdapter.eatFoodyImages[0])
    .into(remoteViews, R.id.remoteview_notification_icon, NOTIFICATION_ID, notification);
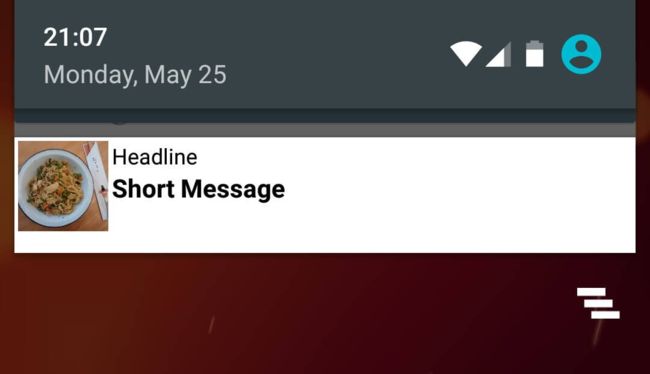
也许你不了解每个变量,请回到上面的长代码块中理解参数的含义。示例中的通知栏效果如下:
如果你对图片加载到Widget上感兴趣,可以使用.into()的另一个方法:into(android.widget.RemoteViews remoteViews, int viewId, int[] appWidgetIds)。