1、模版消息功能概述
基于微信的通知渠道,为开发者提供了可以高效触达用户的模板消息能力,以便实现服务的闭环并提供更佳的体验。
-
模板推送位置:服务通知
-
模板下发条件:用户本人在微信体系内与页面有交互行为后触发
1、 支付:当用户在小程序内完成过支付行为,可允许开发者向用户在7天内推送有限条数的模板消息(1次支付可下发1条,多次支付下发条数独立,互相不影响)
2、提交表单:当用户在小程序内发生过提交表单行为且该表单声明为要发模板消息的,开发者需要向用户提供服务时,可允许开发者向用户在7天内推送有限条数的模板消息(1次提交表单可下发1条,多次提交下发条数独立,相互不影响)
-
模版消息效果展现:
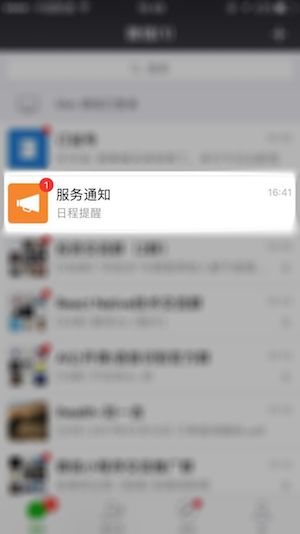
模版消息效果展现
-
进入服务通知:

进入服务通知
-
模板跳转能力:点击查看详情仅能跳转下发模板的该帐号的小程序各个页面
2、功能实现
-
获取模板 id
登录 https://mp.weixin.qq.com 获取模板,如果没有合适的模板,可以申请添加新模板,审核通过后可使用
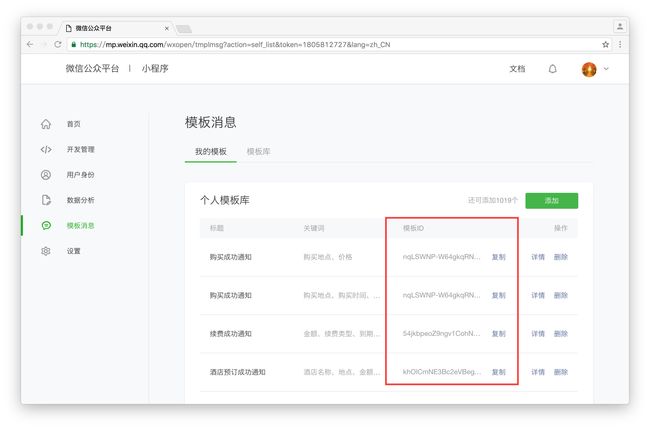
mp-notice.jpg
-
获取 access_token
- access_token 的有效期目前为2个小时,需定时刷新,重复获取将导致上次获取的 access_token 失效。
- 接口地址:https://api.weixin.qq.com/cgi-bin/token?grant_type=client_credential&appid=APPID&secret=APPSECRET
-
HTTP请求方式:GET
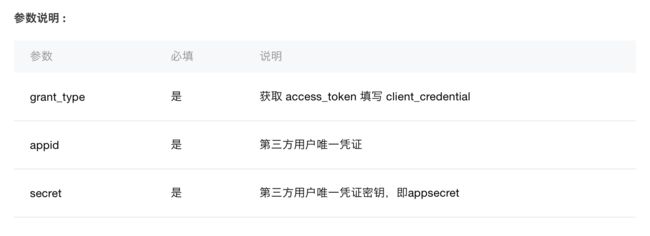 请求参数说明
 返回参数说明
 - node.js代码实现
const request = require('request');
var ih_request = {};
module.exports = ih_request;
ih_request.get = async function(option){
    var res = await req({
        url: option.url,
        method: 'get'
    });
    res.result?option.success(res.msg):option.error(res.msg);
}
const request = require('../script/ih_request');
await request.get({
        url: 'https://api.weixin.qq.com/cgi-bin/token?grant_type=client_credential&appid=APPID&secret=SECRET',
        success: function(res){
            console.log(res.access_token)
        },
        error: function(err){
            console.log(err)
        }
  });
-
获取用户的唯一标识(openid)
- 调用wx.login(OBJECT)获取登录凭证(code)进而换取用户登录态信息,包括用户的唯一标识(openid)
-
参数说明
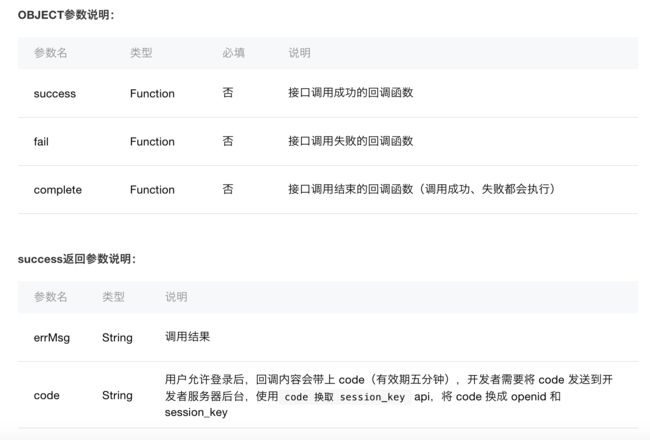 参数说明
参数说明 - 小程序代码实现获取code并请求传给服务器
//app.js
App({
  onLaunch: function() {
    wx.login({
      success: function(res) {
        if (res.code) {
          //发起网络请求 将code传给服务器
          wx.request({
            url: 'https://test.com/onLogin',
            data: {
              code: res.code
            }
          })
        } else {
          console.log('获取用户登录态失败!' + res.errMsg)
        }
      }
    });
  }
})
- code 换取 opened接口说明
接口地址:https://api.weixin.qq.com/sns/jscode2session?appid=APPID&secret=SECRET&js_code=JSCODE&grant_type=authorization_code
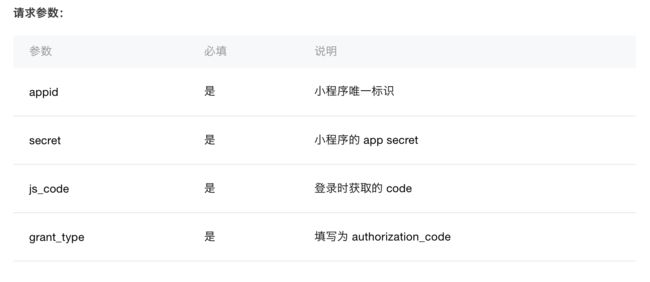 请求参数
请求参数
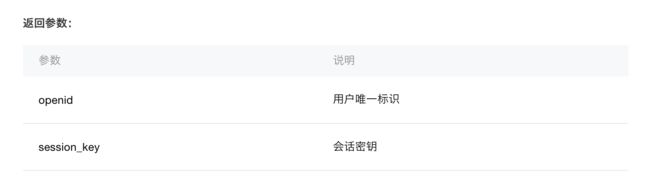 返回参数
返回参数
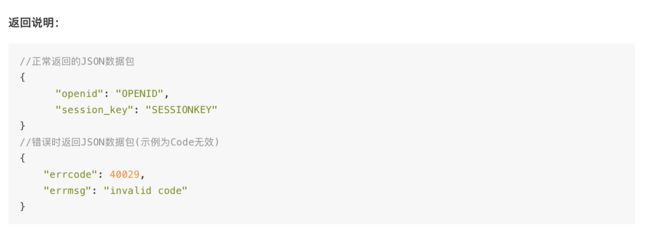 返回说明
返回说明 - node.js 代码实现code 换取 opened
const request = require('request');
var ih_request = {};
module.exports = ih_request;
ih_request.get = async function(option){
    var res = await req({
        url: option.url,
        method: 'get'
    });
    res.result?option.success(res.msg):option.error(res.msg);
}
const request = require('../script/ih_request');
request.get({
        url: 'https://api.weixin.qq.com/sns/jscode2session?appid=APPID&secret=SECRET&js_code=JSCODE&grant_type=authorization_code',
        success: function(res){
            console.log(res)
        },
        error: function(err){
            console.log(err)
        }
    });
-
小程序提交表单将formId传给服务器
{{userInfo.nickName}}
//实现绑定的formSubmit 将formId传给服务器
  formSubmit: function (e) {
    var that = this
    wx.request({
      url: 'https://ihealth-wx.s1.natapp.cc/template',
      data: {
        'input': e.detail.value.input,
        'formId': e.detail.formId,
        'code': that.data.login_res.code
      },
      method: 'POST', // OPTIONS, GET, HEAD, POST, PUT, DELETE, TRACE, CONNECT
      // header: {}, // 设置请求的 header
      success: function(res){
        // success
        console.log('成功' + res);
        // console.log(e.detail.formId);
      },
      fail: function(err) {
        // fail
        console.log('失败' + err);
      },
      complete: function() {
        // complete
      }
    })
  }

页面展示
-
发送模板消息
- 接口地址:https://api.weixin.qq.com/cgi-bin/message/wxopen/template/send?access_token=ACCESS_TOKEN
- HTTP请求方式:POST
-
POST参数说明
 POST参数说明
 -
返回码说明
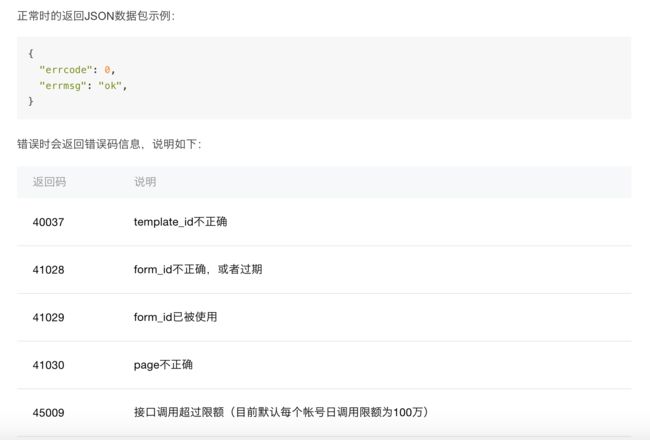 返回码说明
返回码说明 - node.js代码实现
const request = require('request');
var ih_request = {};
module.exports = ih_request;
ih_request.postJson = async function(option){
    var res = await req({
                            url: option.url,
                            method: 'post',
                            headers: {
                                'content-type': 'application/json'
                            },
                            body: JSON.stringify(option.body)
                        });
    res.result?option.success(res.msg):option.error(res.msg);
}
const request = require('../script/ih_request');
 await request.postJson({
        url: 'https://api.weixin.qq.com/cgi-bin/message/wxopen/template/send?access_token='+access_token,
        body: {
            touser: '触发帐号的opened',
            template_id: '模版id',
            page: '点击模版卡片的跳转页面',
            form_id: 'form_id或者prepay_id',
            data: {
                keyword1:{
                    value: '小程序测试模版',
                    color: '#173177'
                },
                keyword2:{
                    value: '2017年3月24日',
                    color: '#173177'
                },
                keyword3:{
                    value: 'iHleath',
                    color: '#173177'
                }
            },
            //需要放大的关键字
            emphasis_keyword: 'keyword1.DATA'
        },
        success: function(res){
            console.log(res);
        },
        error: function(err){
            console.log(err);
        }
    });
-
模版消息效果展现:
模版消息效果展现
-
进入服务通知:
进入服务通知
3、最后
如何大家看了文章还有不懂或者其他问题,欢迎私信我或者评论