The first is called dual stacking, which allows a device to have both the IPv4 and IPv6 protocol stack running so it’s capable of continuing on with its existing communications and simultaneously run newer IPv6 communications as they’re implemented. The next strategy is the 6to4 tunneling approach; this is your choice if you have an all IPv6 network that must communicate over an IPv4 network to reach another IPv6 network. I’ll surprise you with the third one just for fun!
Dual Stacking
This is the most common type of migration strategy because, well, it’s the easiest on us—it allows our devices to communicate using either IPv4 or IPv6. Dual stacking lets you upgrade your devices and applications on the network one at a time. As more and more hosts and devices on the network are upgraded, more of your communication will happen over IPv6, and after you’ve rrived—everything’s running on IPv6, and you get to remove all the old IPv4 protocol stacks you no longer need. Plus, configuring dual stacking on a Cisco router is amazingly easy—all you have to do is enable IPv6 forwarding and apply an address to the interfaces already configured with IPv4. It’ll look something like this:
Corp(config)#ipv6 unicast-routing
Corp(config)#interface fastethernet 0/0
Corp(config-if)#ipv6 address 2001:db8: 3c 4d:1::/64 eui-64
Corp(config-if)#ip address 192.168.255.1 255.255.255.0
But to be honest, it’s really a good idea to understand the various tunneling techniques because it’ll probably be awhile before we all start running IPv6 as a solo routed protocol.
6to4 Tunneling
6to4 tunneling is really useful for carrying IPv6 data over a network that’s still IPv4. It’s quite possible that you’ll have IPv6 subnets or other portions of your network that are all IPv6, and those networks will have to communicate with each other. Not so complicated, but when you consider that you might find this happening over a WAN or some other network that you don’t control, well, that could be a bit ugly. So what do we do about this if we don’t control the whole tamale? Create a tunnel that will carry the IPv6 traffic for us across the IPv4 network, that’s what.
The whole idea of tunneling isn’t a difficult concept, and creating tunnels really isn’t as hard as you might think. All it really comes down to is snatching the IPv6 packet that’s happily traveling across the network and sticking an IPv4 header onto the front of it. Kind of like catch and release fishing, except for the fish doesn’t get something plastered on its face before being thrown back into the stream.
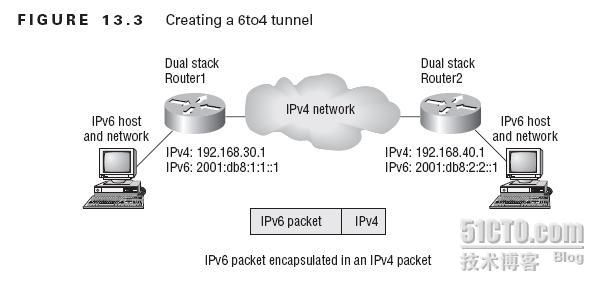
To get a picture of this, take a look at Figure 13.3.
Nice—but to make this happen we’re going to need a couple of dual-stacked routers, which I just demonstrated for you, so you should be good to go. Now we have to add a little configuration to place a tunnel between those routers. Tunnels are pretty simple—we just have to tell each router where the tunnel begins and where we want it to end up. Referring again to Figure 13.3, we’ll configure the tunnel on each router:
Router1(config)#int tunnel 0
Router1(config-if)#ipv6 address 2001:db8:1:1::1/64
Router1(config-if)#tunnel source 192.168.30.1
Router1(config-if)#tunnel destination 192.168.40.1
Router1(config-if)#tunnel mode ipv6ip
Router2(config)#int tunnel 0
Router2(config-if)#ipv6 address 2001:db8:2:2::1/64
Router2(config-if)#tunnel source 192.168.40.1
Router2(config-if)#tunnel destination 192.168.30.1
Router2(config-if)#tunnel mode ipv6ip
FIGURE 1 3 . 3 Creating a 6to4 tunnel
With this in place, our IPv6 networks can now communicate over the IPv4 network. Now,I’ve got to tell you that this is not meant to be a permanent configuration; your end goal shouldstill be to run a total, complete IPv6 network end to end.
One important note here—if the IPv4 network that you’re traversing in this situation has a NAT translation point, it would absolutely break the tunnel encapsulation we’ve just created! Over the years, NAT has been upgraded a lot so that it can handle specific protocols and dynamic connections, and without one of these upgrades, NAT likes to demolish most connections. And since this transition strategy isn’t present in most NAT implementations, that means trouble.
But there is a way around this little problem and it’s called Teredo, which allows all your tunnel traffic to be placed in UDP packets. NAT doesn’t blast away at UDP packets, so they won’t get broken as other protocols packets do. So with Teredo in place and your packets disguised under their UDP cloak, the packets will easily slip by NAT alive and well!
