参考文章写的很好,受益了感谢
一、了解
在 iOS 平台上,从AppStore 下载的App会被苹果使用fairPlay 技术加密,使得程序无法在其他未登陆相同AppleID的设备上运行,起到 DRM的作用.这样的文件同样也无法使用 IDA Pro 等工具进行分析.不管是出于安全研究还是再次分发的目的,都需要获取未加密的二进制文件,这一过程称为 砸壳
砸壳工具林林总总,核心原理其实一样.
iOS、MacOS 系统中,可执行文件、动态库等(mach-o文件)都是使用DYLD(也是一种Mach-o格式的文件) 加载执行。在iOS系统中使用 DYLD载入App 时,会先进行 DRM 检查,检查通过则从APP 的可执行文件中,选择适合当前架构的 Mach-o 文件镜像 镜像进行解密,然后再载入内存。 dumpdecrypted 等工具 ,就是利用这一原理,从内存中将已经解密的镜像文件 dump 出来, 再生成新的镜像文件,从而达到解密的效果。 其实FairPlay 算法依托硬件设备足够强大,迄今为止还没有能够脱离 iDevice 解密的工具。
dumpdecrypted.dylib 是由德国安全技术专家树人开发的一款砸壳工具,通过 DYLD_INSERT_LIBRARIES的方式简单地完成了砸壳的工作,不过我们这里分析的是AloneMonkey 的修改版他在原有代码的基础上把部分的printf改成了NSlog, 生成的 .decrypted.dylib文件放到了Docments目录,最主要的是,替换了_exit(1)为 return,这样就不会处理可执行程序的镜像文件,随后加载的framework、Dylib也会被一同Decrypt.
dumpdecryped源码十分简单,一共只有 230行,一共只有3个 c 函数, 下边来分析一下他的实现原理.
二、入口
眼见的同志一眼就看见了,源码里面没有main函数,因为编译出来的是 .dylib 文件(mach-o Dynamic Library 动态库),代码入口是:
__attribute__((constructor))
static void dumpexecutable() {
    printf("mach-o decryption dumper\n\n");
    printf("DISCLAIMER: This tool is only meant for security research purposes, not for application crackers.");
    _dyld_register_func_for_add_image(&image_added);
}
__attribute__ 这个关键字是由GCC引入的,用于为函数设置特殊属性,具体可以参看这里. __attribute__((constructor))修饰的dumpexecutable函数,会在目标App的 + load方法之后,main函数执行之前被自动调用.在函数里,除了输入两行提示消息以外,就是调用了一个_dyld_register_func_for_add_image()方法.
三、_dyld_register_func_for_add_image
_dyld_register_func_for_add_image() 这个函数声明在mach-o/dyld.h文件里面,如下描述:
 * The following functions allow you to install callbacks which will be called
 * by dyld whenever an image is loaded or unloaded.  During a call to _dyld_register_func_for_add_image()
 * the callback func is called for every existing image.  Later, it is called as each new image
 * is loaded and bound (but initializers not yet run).  The callback registered with
 * _dyld_register_func_for_remove_image() is called after any terminators in an image are run
 * and before the image is un-memory-mapped.
从注释中可以知道,通过_dyld_register_func_for_add_image注册的回调函数会在每次dyld(动态链接器一种mach-o格式文件专门用于动态加载动态库、可执行文件等) 加载镜像之后被调用,传递给回调函数的参数有2个:载入镜像的文件头:mach_header和内存数量:vmaddr_slide.在本例中, dumpexecutable函数中通过_dyld_register_func_for_add_image 函数向dyld注册一个回调函数image_added 每当dyld 载入一个镜像(可以是可执行程序、动态库、Plugin等),dyld会调用image_added 函数,并将相应的mach-o header 和 vmaddr_slide 传递给image_added, 那么image_added 又干了什么呢? 下面将:
四、image_added
image_added 方法依旧很短,只有3行,如下:
// const struct mach_header *mh 表示镜像文件的头
// intptr_t slide 表示的是内存数量
static void image_added(const struct mach_header *mh, intptr_t slide) {
    Dl_info image_info;
    int result = dladdr(mh, &image_info);
    dumptofile(image_info.dli_fname, mh);
}
Dl_info 结构体用于存储一些镜像信息,比如路劲,基地址,它的相关定义在dlfcn.h文件中,具体定义如下:
/*
 * Structure filled in by dladdr().
 */
typedef struct dl_info {
        const char      *dli_fname;     /* Pathname of shared object */
        void            *dli_fbase;     /* Base address of shared object */
        const char      *dli_sname;     /* Name of nearest symbol */
        void            *dli_saddr;     /* Address of nearest symbol */
} Dl_info;
之后通过dladdr函数,从mach-o Header 中填充Dl_info结构体,接着把镜像和路径和mach-o header 传给了 dumptofile方法,然后就没有了.
五、dumptofile
这是整个程序中最后也是最长的一个函数,在看这个函数的内容之前,我们先看看在它之前定义的一个宏:
#define swap32(value) \
                        (((value & 0xFF000000) >> 24) |\
                        ((value & 0x00FF0000) >> 8) | \
                        ((value & 0x0000FF00) << 8) | \
                        ((value & 0x000000FF) << 24) )
以 value=0x12345678 为例,简单说明下这个宏的作用:
0x12345678写成二进制位的形式如下:
0x12345678 & 0xFF000000 按位与的结果:
|31           24|23           16|15            8|7         bit 0|
+---------------+---------------+---------------+---------------+
|0 0 0 1 0 0 1 0|0 0 1 1 0 1 0 0|0 1 0 1 0 1 1 0|0 1 1 1 1 0 0 0|      //0x12345678
&
|1 1 1 1 1 1 1 1|0 0 0 0 0 0 0 0|0 0 0 0 0 0 0 0|0 0 0 0 0 0 0 0|      //0xff000000
=
|0 0 0 1 0 0 1 0|0 0 0 0 0 0 0 0|0 0 0 0 0 0 0 0|0 0 0 0 0 0 0 0|
>>24
=
|0 0 0 0 0 0 0 0|0 0 0 0 0 0 0 0|0 0 0 0 0 0 0 0|0 0 0 1 0 0 1 0|    //结果就是,0x12345678 的高8位被移动到了低8位。之后的类似:
+---------------+---------------+---------------+---------------+
结果就是,0x12345678 的高8位被移动到了低8位。之后的类似:
 0x12345678
& 0xFF000000
------------
  0x12000000 >> 24 = 0x00000012

  0x12345678
& 0x00FF0000
------------
  0x00340000 >> 8  = 0x00003400

  0x12345678
& 0x0000FF00
------------
  0x00005600 << 8  = 0x00560000

  0x12345678
& 0x000000FF
------------
  0x00340000 >> 24 = 0x78000000

                   | -----------
                   = 0x78563412
结论:
所以这个宏的功能就是:把数字从小端序转成大端序
回到正题:
首先是定义了一波要使用的变量:
struct load_command *lc;
struct encryption_info_command *eic;
struct fat_header *fh;
struct fat_arch *arch;
char buffer[1024];
char rpath[4096],npath[4096]; /* should be big enough for PATH_MAX */
unsigned int fileoffs = 0, off_cryptid = 0, restsize;
int i,fd,outfd,r,n,toread;
char *tmp;
然后是从传入的镜像路径中,获取镜像文件名,并输出。
if (realpath(path, rpath) == NULL) {
    strlcpy(rpath, path, sizeof(rpath));
}

/* extract basename */
tmp = strrchr(rpath, '/');
printf("\n\n");
if (tmp == NULL) {
    printf("[-] Unexpected error with filename.\n");
    _exit(1);
} else {
    printf("[+] Dumping %s\n", tmp+1);
}
做完了前边的定义和判断,下边就要开始真正地工作了,首先是通过文件头判断二进制文件架构:
/* detect if this is a arm64 binary */
if (mh->magic == MH_MAGIC_64) {
    lc = (struct load_command *)((unsigned char *)mh + sizeof(struct mach_header_64));
    NSLog(@"[+] detected 64bit ARM binary in memory.\n");
} else { /* we might want to check for other errors here, too */
    lc = (struct load_command *)((unsigned char *)mh + sizeof(struct mach_header));
    NSLog(@"[+] detected 32bit ARM binary in memory.\n");
}
mh 是一个 struct mach_header 结构体的指针,其定义如下:
/*
 * The 32-bit mach header appears at the very beginning of the object file for
 * 32-bit architectures.
 */
struct mach_header {
    uint32_t    magic;      /* mach magic number identifier */
    cpu_type_t  cputype;    /* cpu specifier */
    cpu_subtype_t   cpusubtype; /* machine specifier */
    uint32_t    filetype;   /* type of file */
    uint32_t    ncmds;      /* number of load commands */
    uint32_t    sizeofcmds; /* the size of all the load commands */
    uint32_t    flags;      /* flags */
};

/* Constant for the magic field of the mach_header (32-bit architectures) */
#define MH_MAGIC    0xfeedface  /* the mach magic number */
#define MH_CIGAM    0xcefaedfe  /* NXSwapInt(MH_MAGIC) */

/*
 * The 64-bit mach header appears at the very beginning of object files for
 * 64-bit architectures.
 */
struct mach_header_64 {
    uint32_t    magic;      /* mach magic number identifier */
    cpu_type_t  cputype;    /* cpu specifier */
    cpu_subtype_t   cpusubtype; /* machine specifier */
    uint32_t    filetype;   /* type of file */
    uint32_t    ncmds;      /* number of load commands */
    uint32_t    sizeofcmds; /* the size of all the load commands */
    uint32_t    flags;      /* flags */
    uint32_t    reserved;   /* reserved */
};

/* Constant for the magic field of the mach_header_64 (64-bit architectures) */
#define MH_MAGIC_64 0xfeedfacf /* the 64-bit mach magic number */
#define MH_CIGAM_64 0xcffaedfe /* NXSwapInt(MH_MAGIC_64) */
这里通过检查magic 字段来检查当前镜像架构(比如:arm64),之后是
   /* detect if this is a arm64 binary */
    if (mh->magic == MH_MAGIC_64) {
        lc = (struct load_command *)((unsigned char *)mh + sizeof(struct mach_header_64));
        NSLog(@"[+] detected 64bit ARM binary in memory.\n");
    } else { /* we might want to check for other errors here, too */
        lc = (struct load_command *)((unsigned char *)mh + sizeof(struct mach_header));
        NSLog(@"[+] detected 32bit ARM binary in memory.\n");
    }
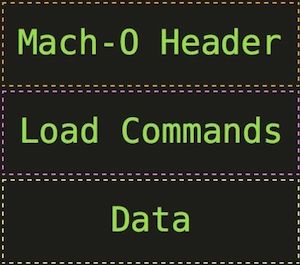
lc 是一个指向struct load_command结构体的指针,如下图所示,在Mach-O文件中,LoadCommands位于Header 之后,所以这里以Header 的大小作为偏移算出来 LoadCommand 的起始地址并赋值给 lc.
之后的这段有点儿长,我们从外向里看:循环遍历每一个 LoadComand,如果存在LC_ENCRYPTION_INFO 这个 Command,说明当前镜像是进行过加密的,执行解密操作。否则代表当前镜像未加密,无需解密,程序结束运行。
/* searching all load commands for an LC_ENCRYPTION_INFO load command */
for (i=0; incmds; i++) {
    /*printf("Load Command (%d): %08x\n", i, lc->cmd);*/

    if (lc->cmd == LC_ENCRYPTION_INFO || lc->cmd == LC_ENCRYPTION_INFO_64) {
       ...
       return;
    }
    lc = (struct load_command *)((unsigned char *)lc + lc->cmdsize);
}
NSLog(@"[-] This mach-o file is not encrypted. Nothing was decrypted.\n");
return;
循环体中,在找到LC_ENCRYPTION_INFO 之后,将 lc强转为 struct encryption_info_command * 并赋值给 eic, 之后判断 cryptid 是否 0, 0 则表示未加密,跳出循环,程序结束。
eic = (struct encryption_info_command *)lc;

/* If this load command is present, but data is not crypted then exit */
if (eic->cryptid == 0) {
    break;
}
如果 cryptid 为 1,说明镜像是加密的,接着执行:
首先计算 cryptid 距镜像开始的偏移:
off_cryptid = (off_t)((void*)&eic->cryptid - (void*)mh;

NSLog(@"[+] offset to cryptid found: @%p(from %p) = %x\n", &eic->cryptid, mh, off_cryptid);

NSLog(@"[+] Found encrypted data at address %08x of length %u bytes - type %u.\n", eic->cryptoff, eic->cryptsize, eic->cryptid);

NSLog(@"[+] Opening %s for reading.\n", rpath);
然后以只读模式打开镜像文件,读入镜像文件头信息:
fd = open(rpath, O_RDONLY);
if (fd == -1) {
    NSLog(@"[-] Failed opening.\n");
    return;
}

NSLog(@"[+] Reading header\n");
n = read(fd, (void *)buffer, sizeof(buffer));
if (n != sizeof(buffer)) {
    NSLog(@"[W] Warning read only %d bytes\n", n);
}

NSLog(@"[+] Detecting header type\n");
fh = (struct fat_header *)buffer;
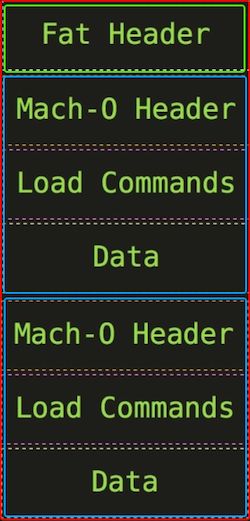
这里又出现了一个新的结构体: struct fat_header。FAT Bianry 是 iOS/macOS 系统上特有的一种文件格式,可以同时包含多种架构的二进制镜像,其文件结构如下:
可以看到,FAT Binary就是将多个 Mach-O镜像拼到一起之后,在最前边加了个 Fat Header。
可能你要问了,之前不是传进来一个 (struct mach_header *)mh 了嘛,这里为嘛还要自己读入一个呢?这里要注意了,传入的那个是 FAT Binary 中真正要读入到内存中执行的镜像的 Mach-O Header,而我们读入的,是整个 FAT Binary 的 FAT Header。FAT Header 定义如下:
#define FAT_MAGIC   0xcafebabe
#define FAT_CIGAM   0xbebafeca  /* NXSwapLong(FAT_MAGIC) */

struct fat_header {
    uint32_t    magic;      /* FAT_MAGIC or FAT_MAGIC_64 */
    uint32_t    nfat_arch;  /* number of structs that follow */
};

struct fat_arch {
    cpu_type_t  cputype;    /* cpu specifier (int) */
    cpu_subtype_t   cpusubtype; /* machine specifier (int) */
    uint32_t    offset;     /* file offset to this object file */
    uint32_t    size;       /* size of this object file */
    uint32_t    align;      /* alignment as a power of 2 */
};
其中 nfat_arch字段,表示在 fat_header 之后,包含多少个 fat_arch 结构体,也就是说该胖二进制包含多少个 瘦Mach-O 镜像。
接着判断读出来的 FAT Header 中的 magic 字段,如果是 FAT_CIGAM,则表明当前镜像是一个 FAT Binary。否则判断是否是一个纯 Mach-O 镜像。如果都不是,则文件格式错误,程序结束。
如果镜像是 FAT Binary,循环遍历每一个 fat_arch,如果找到一个 fat_arch 中 cputype 和 subcputype 与传入的 mach_header(mh) 一致,则表明找到了当前加载镜像在 FAT Binary 中的位置。此时设置 fileoffs = (arch->offset)。
注意:
此处的 cputype、subcputype 和 offset 需要使用之前定义的 swap32 宏转为大端序再进行判断
/* Is this a FAT file - we assume the right endianess */
if (fh->magic == FAT_CIGAM) {
    NSLog(@"[+] Executable is a FAT image - searching for right architecture\n");
    arch = (struct fat_arch *)&fh[1];
     for (i=0; i < swap32(fh->nfat_arch); i++) {
        if ((mh->cputype == swap32(arch->cputype)) && (mh->cpusubtype == swap32(arch->cpusubtype))) {
            fileoffs = swap32(arch->offset);
            NSLog(@"[+] Correct arch is at offset %u in the file\n", fileoffs);
            break;
        }
        arch++;
    }
    if (fileoffs == 0) {
        NSLog(@"[-] Could not find correct arch in FAT image\n");
        _exit(1);
    }
} else if (fh->magic == MH_MAGIC || fh->magic == MH_MAGIC_64) {
    NSLog(@"[+] Executable is a plain MACH-O image\n");
} else {
    NSLog(@"[-] Executable is of unknown type\n");
    return;
}
之后就是要生成解密之后的镜像了:
首先是要生成目标文件路径,如果在 Documents 目录下生成失败,则换个文件名重新生成,如果还失败,报错退出。
NSString *docPath = NSSearchPathForDirectoriesInDomains(NSDocumentDirectory, NSUserDomainMask, YES)[0];

strlcpy(npath, docPath.UTF8String, sizeof(npath));
strlcat(npath, tmp, sizeof(npath));
strlcat(npath, ".decrypted", sizeof(npath));
strlcpy(buffer, npath, sizeof(buffer));

NSLog(@"[+] Opening %s for writing.\n", npath);
outfd = open(npath, O_RDWR|O_CREAT|O_TRUNC, 0644);

if (outfd == -1) {
     if (strncmp("/private/var/mobile/Applications/", rpath, 33) == 0) {
         NSLog(@"[-] Failed opening. Most probably a sandbox issue. Trying something different.\n");

        /* create new name */
        strlcpy(npath, "/private/var/mobile/Applications/", sizeof(npath));
        tmp = strchr(rpath+33, '/');
        if (tmp == NULL) {
            NSLog(@"[-] Unexpected error with filename.\n");
            return;
        }
        tmp++;
        *tmp++ = 0;
        strlcat(npath, rpath+33, sizeof(npath));
        strlcat(npath, "tmp/", sizeof(npath));
        strlcat(npath, buffer, sizeof(npath));
        NSLog(@"[+] Opening %s for writing.\n", npath);
        outfd = open(npath, O_RDWR|O_CREAT|O_TRUNC, 0644);
     }
     if (outfd == -1) {
         NSLog(@"[-] Failed opening\n");
        return;
     }
}
开始写入文件,首先计算加密数据在新文件中的偏移:
/* calculate address of beginning of crypted data */
n = fileoffs + eic->cryptoff;

restsize = lseek(fd, 0, SEEK_END) - n - eic->cryptsize;
然后把文件指针设置到文件开头,写入 FAT Binary 的前 n 字节
lseek(fd, 0, SEEK_SET);
NSLog(@"[+] Copying the not encrypted start of the file\n");
/* first copy all the data before the encrypted data */
while (n > 0) {
    toread = (n > sizeof(buffer)) ? sizeof(buffer) : n;
    r = read(fd, buffer, toread);
    if (r != toread) {
        NSLog(@"[-] Error reading file\n");
        return;
    }
    n -= r;

    r = write(outfd, buffer, toread);
    if (r != toread) {
        NSLog(@"[-] Error writing file\n");
        return;
    }
}
接着把已解密的部分写入到文件中:
/* now write the previously encrypted data */
NSLog(@"[+] Dumping the decrypted data into the file\n");
r = write(outfd, (unsigned char *)mh + eic->cryptoff, eic->cryptsize);
if (r != eic->cryptsize) {
    NSLog(@"[-] Error writing file\n");
    return;
}
把剩下的部分(其他架构的镜像)写入到文件中:
/* and finish with the remainder of the file */
n = restsize;
lseek(fd, eic->cryptsize, SEEK_CUR);
NSLog(@"[+] Copying the not encrypted remainder of the file\n");
while (n > 0) {
    toread = (n > sizeof(buffer)) ? sizeof(buffer) : n;
    r = read(fd, buffer, toread);
    if (r != toread) {
        NSLog(@"[-] Error reading file\n");
        return;
    }
    n -= r;

    r = write(outfd, buffer, toread);
    if (r != toread) {
        NSLog(@"[-] Error writing file\n");
        return;
    }
}
最后,把已解密架构的 Mach-O header 中的 cryptid 字段置为 0, 表示未加密:
if (off_cryptid) {
    uint32_t zero=0;
    off_cryptid+=fileoffs;
    NSLog(@"[+] Setting the LC_ENCRYPTION_INFO->cryptid to 0 at offset %x\n", off_cryptid);
    if (lseek(outfd, off_cryptid, SEEK_SET) != off_cryptid || write(outfd, &zero, 4) != 4) {
        NSLog(@"[-] Error writing cryptid value\n");
    }
}
关闭文件,程序退出:
NSLog(@"[+] Closing original file\n");
close(fd);
NSLog(@"[+] Closing dump file\n");
close(outfd);

return;
六、mach-o 文件格式 宏定义说明
// 非arm64架构
#define MH_MAGIC    0xfeedface  // 大端
#define MH_CIGAM    0xcefaedfe  //小端

// arm64架构
#define MH_MAGIC_64 0xfeedfacf // 大端
#define MH_CIGAM_64 0xcffaedfe //小端

// 胖二进制文件
#define FAT_MAGIC 0xcafebabe  // 大端
#define FAT_CIGAM 0xbebafeca   //小端

