- ARKit点击屏幕增加文字
- ARKit点击屏幕增加3D模型
- ARKit检测到平面自动增加3D模型
- QuickLook的最简单使用
- ARKit人脸贴图
- ARKit微笑检测
- ARKit皱眉检测
- ARKit人脸参数BlendShapes详解
- demo
1. ARKit点击屏幕增加文字
1.点击屏幕增加文字.gif
-
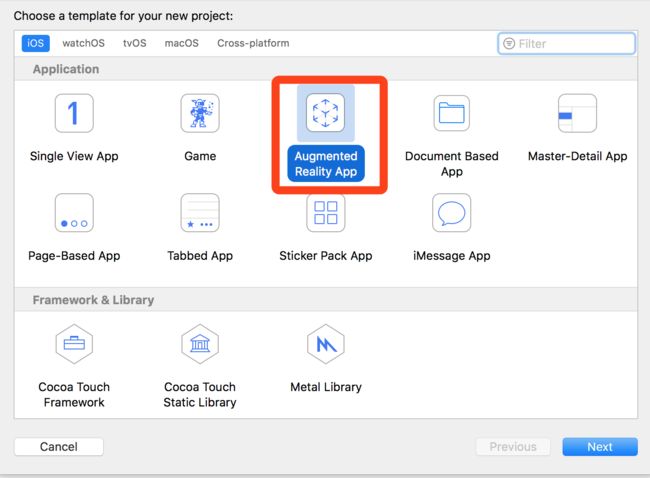
command+shift+n新建一个项目,然后选择
Augmented Reality App
-
在Content Technology中选择
SpriteKit即可
控制文字距离相机的距离(改变这个Z感受一下变化)
matrix_float4x4 translation = matrix_identity_float4x4;
translation.columns[3].z = -1;
2. ARKit点击屏幕增加3D模型
2.点击屏幕增加3D模型.gif
2.1 画面捕捉
主要就是三个类:
-
ARSCNView: 画面显示 -
ARConfiguration: 捕捉画面-
ARWorldTrackingConfiguration:后置摄像头 -
ARFaceTrackingConfiguration:前置摄像头,会实时监测面部表情特征
-
-
ARSession:数据中转
在viewDidLoad的时候初始化资源
self.arSCNView = [[ARSCNView alloc] initWithFrame:self.view.bounds options:nil];
    self.arSCNView.session = [[ARSession alloc] init];
    // 1. 创建世界追踪配置,需要支持A9芯片也就是iPhone6S以上
    self.arWordTrackingConfiguration = [[ARWorldTrackingConfiguration alloc] init];
    // 2. 设置追踪方向,追踪平面
    self.arWordTrackingConfiguration.planeDetection = ARPlaneDetectionHorizontal;
    self.arWordTrackingConfiguration.lightEstimationEnabled = YES;
在viewDidAppear时让session开始工作
[self.arSession runWithConfiguration:self.arWordTrackingConfiguration]
2.2 点击增加3D图像
当点击屏幕的时候加载一个scn文件并且作为childNode添加到self.arSCNView.scene.rootNode
- (void)touchesBegan:(NSSet *)touches withEvent:(UIEvent *)event {
    // 1. 使用场景加载scn文件
    SCNScene *scene = [SCNScene sceneNamed:@"art.scnassets/ship.scn"];

    SCNNode *shipNode = scene.rootNode.childNodes.firstObject;
    shipNode.position = SCNVector3Make(0, -1, -1);

    [self.arSCNView.scene.rootNode addChildNode:shipNode];
}
3. ARKit检测到平面自动增加3D模型
3.检测到平面增加3D模型.gif
前期准备工作和 2.1一样,只是增加了
self.arSCNView.delegate = self
然后在代理方法
renderer:didAddNode:forAnchor:中实现以下代码:
#pragma mark - ARSCNViewDelegate
// 添加节点的时候调用(当开启平地捕捉模式之后,如果捕捉到平地,ARKit会自动添加一个平地节点)
- (void)renderer:(id)renderer didAddNode:(SCNNode *)node forAnchor:(ARAnchor *)anchor {

    if (![anchor isMemberOfClass:[ARPlaneAnchor class]]) return;

    // 添加一个3D平面模型,ARKit只有捕捉能力,锚点只是一个空间位置,想更加清楚看到这个空间,我们需要给控件添加一个平地的3D模型来渲染它
    // 1. 获取捕捉到的平地锚点
    ARPlaneAnchor *planeAnchor = (ARPlaneAnchor *)anchor;
    // 2. 创建一个3D模型(系统捕捉到的平地是一个不规则的大小长方形,这里笔者q将其变成一个长方形,并且对平地做了一个缩放效果)
    // 参数分别是长、宽、高、圆角
    SCNBox *planeBox = [SCNBox boxWithWidth:planeAnchor.extent.x * 0.3 height:0 length:planeAnchor.extent.x * 0.3 chamferRadius:0];
    // 3. 使用Material渲染3D模型(默认模型是白色的)
    planeBox.firstMaterial.diffuse.contents = [UIColor clearColor];
    // 4. 创建一个基于3D物体模型的节点
    SCNNode *planeNode = [SCNNode nodeWithGeometry:planeBox];
    // 5. 设置节点的位置为捕捉到的平地的锚点的中心位置
    // SceneKit中节点的位置position是一个基于3D坐标系的矢量坐标SCNVector3Make
    planeNode.position = SCNVector3Make(planeAnchor.center.x, 0, planeAnchor.center.z);

    [node addChildNode:planeNode];

    // 6. 创建一个花瓶场景
    SCNScene *scene = [SCNScene sceneNamed:@"art.scnassets/vase/vase.scn"];
    // 7. 获取花瓶节点
    // 一个场景有多个节点,所有场景有且只有一个根节点,其它所有节点都是根节点的子节点
    SCNNode *vaseNode = scene.rootNode.childNodes.firstObject;
    // 8. 设置花瓶节点的位置为捕捉到的平地的位置,如果不设置,则默认为原点位置也就是相机位置
    vaseNode.position = SCNVector3Make(planeAnchor.center.x, 0, planeAnchor.center.z);
    // 9. 将花瓶节点添加到屏幕中
    // !!!!FBI WARNING: 花瓶节点是添加到代理捕捉到的节点中,而不是AR视图的根接节点。
    // 因为捕捉到的平地锚点是一个本地坐标系,而不是世界坐标系
    [node addChildNode:vaseNode];
}
4. QuickLook的最简单使用
4.QuickLook简单使用.gif
这个没什么好说的,直接上代码
#import "ViewController.h"
#import
#import "WYPreviewItem.h"

@interface ViewController ()

@end

@implementation ViewController

- (void)viewDidLoad {
    [super viewDidLoad];

}

- (void)touchesBegan:(NSSet *)touches withEvent:(UIEvent *)event {
    QLPreviewController *preVC = [[QLPreviewController alloc] init];
    preVC.dataSource = self;
    preVC.delegate = self;

    [self presentViewController:preVC animated:YES completion:nil];
}

#pragma mark - QLPreviewControllerDataSource && QLPreviewControllerDelegate
- (NSInteger)numberOfPreviewItemsInPreviewController:(QLPreviewController *)controller {
    return 1;
}

- (id)previewController:(QLPreviewController *)controller previewItemAtIndex:(NSInteger)index {

    return [[NSBundle mainBundle] URLForResource:@"plantpot.usdz" withExtension:nil];
}

- (UIImage *)previewController:(QLPreviewController *)controller transitionImageForPreviewItem:(id)item contentRect:(CGRect *)contentRect {

    CGRect rect = CGRectMake(100, 200, 300, 300);
    contentRect = ▭

    return [UIImage imageNamed:@"wy.jpeg"];
}
5. ARKit人脸贴图
5.人脸贴图.gif
设置session的configuration为ARFaceTrackingConfiguration,然后在ARSCNView的代理renderer:willUpdateNode:forAnchor中增加一个SCNNode核心代码如下:
- 创建
SCNNode- 试试看设置fillMesh为YES会怎么样
- 试试看设置masterial.diffuse.contents为一个颜色会怎么样
- (SCNNode *)textureMaskNode {
    if (!_textureMaskNode) {

        id device = self.arSCNView.device;
        ARSCNFaceGeometry *geometry = [ARSCNFaceGeometry faceGeometryWithDevice:device fillMesh:NO];
        SCNMaterial *material = geometry.firstMaterial;
        material.fillMode = SCNFillModeFill;
        material.diffuse.contents = [UIImage imageNamed:@"wy.jpg"];
        _textureMaskNode = [SCNNode nodeWithGeometry:geometry];
    }
    _textureMaskNode.name = @"textureMask";
    return _textureMaskNode;
}
- 添加
SCNNode并更新人脸特征
- (void)renderer:(id)renderer willUpdateNode:(SCNNode *)node forAnchor:(ARAnchor *)anchor {

    if (!anchor || ![anchor isKindOfClass:[ARFaceAnchor class]]) return;
    ARFaceAnchor *faceAnchor = (ARFaceAnchor *)anchor;

    if (!_textureMaskNode) {
        [node addChildNode:self.textureMaskNode];
    }

    ARSCNFaceGeometry *faceGeometry = (ARSCNFaceGeometry *)self.textureMaskNode.geometry;
    if (faceGeometry && [faceGeometry isKindOfClass:[ARSCNFaceGeometry class]]) {
        [faceGeometry updateFromFaceGeometry:faceAnchor.geometry];
    }
}
6. ARKit微笑检测
6.微笑检测.gif
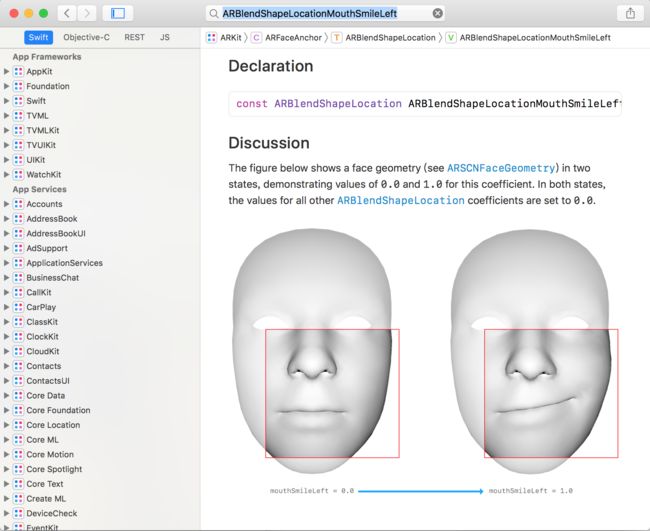
主要用到了ARBlendShapeLocationMouthSmileLeft和ARBlendShapeLocationMouthSmileRight表示微笑的键值
我提供的demo是用于调试微笑阀值的
核心代码:
- (void)renderer:(id)renderer didUpdateNode:(SCNNode *)node forAnchor:(ARAnchor *)anchor {

    if (!anchor || ![anchor isKindOfClass:[ARFaceAnchor class]]) return;

    ARFaceAnchor *faceAnchor = (ARFaceAnchor *)anchor;

    NSDictionary *blendShips = faceAnchor.blendShapes;
    CGFloat leftSmile = [blendShips[ARBlendShapeLocationMouthSmileLeft] floatValue];
    CGFloat rightSmile = [blendShips[ARBlendShapeLocationMouthSmileRight] floatValue];

    NSLog(@"leftSmile = %f, rightSmile = %f", leftSmile, rightSmile);
    if (leftSmile > self.smileValue && rightSmile > self.smileValue) {
        NSLog(@"检测到笑容");
        [self.arSession pause];
        dispatch_async(dispatch_get_main_queue(), ^{
            self.resultLabel.hidden = NO;
        });
    }
}
7. ARKit皱眉检测
7.皱眉检测.gif
我这里用的是眉毛向上的键值ARBlendShapeLocationBrowInnerUp
核心代码:
- (void)renderer:(id)renderer didUpdateNode:(SCNNode *)node forAnchor:(ARAnchor *)anchor {

    if (!anchor && ![anchor isKindOfClass:[ARFaceAnchor class]]) return;

    ARFaceAnchor *faceAnchor = (ARFaceAnchor *)anchor;
    NSDictionary *blendShapes = faceAnchor.blendShapes;
    NSNumber *browInnerUp = blendShapes[ARBlendShapeLocationBrowInnerUp];

    if ([browInnerUp floatValue] > self.browValue) {
        [self.arSession pause];
        dispatch_async(dispatch_get_main_queue(), ^{
            self.resultLabel.hidden = NO;
        });
    }

    NSLog(@"browInnerUp = %@", browInnerUp);
}
8. BlendShapes
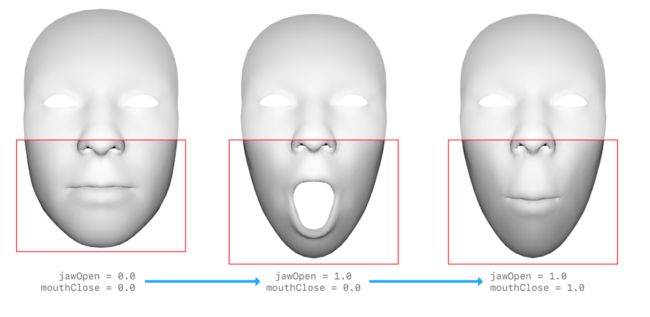
- 仅在iOS11及以上可用,每个参数的详细介绍和图片对比可以打开Xcode->Window->Developer Documentation,然后搜索对应的键值即可
- 每个建对应的值都是0~1的值
-
共51个表示人脸特征的参数
| 属性 | 说明 | 备注 |
|---|---|---|
| ARBlendShapeLocationBrowDownLeft | 左眉毛外部向下 | |
| ARBlendShapeLocationBrowDownRight | 右眉毛外部向下 | |
| ARBlendShapeLocationBrowInnerUp | 两眉毛内部向上 | |
| ARBlendShapeLocationBrowOuterUpLeft | 左眉毛外部向上 | |
| ARBlendShapeLocationBrowOuterUpRight | 右眉毛外部向上 | |
| ARBlendShapeLocationCheekPuff | 两个脸颊向外 | |
| ARBlendShapeLocationCheekSquintLeft | 左眼向下斜视 | |
| ARBlendShapeLocationCheekSquintRight | 右眼向下斜视 | |
| ARBlendShapeLocationEyeBlinkLeft | 眨左眼 | |
| ARBlendShapeLocationEyeBlinkRight | 眨右眼 | |
| ARBlendShapeLocationEyeLookDownLeft | 左眼睑运动的系数与向下凝视一致 | |
| ARBlendShapeLocationEyeLookDownRight | 右眼睑运动的系数与向下凝视一致 | |
| ARBlendShapeLocationEyeLookInLeft | 左眼睑运动的系数与向右凝视一致。 | |
| ARBlendShapeLocationEyeLookInRight | 右眼睑运动的系数与向左凝视一致。 | |
| ARBlendShapeLocationEyeLookOutLeft | 左眼睑运动的系数与向左凝视一致 | |
| ARBlendShapeLocationEyeLookOutRight | 右眼睑运动的系数与向右凝视一致 | |
| ARBlendShapeLocationEyeSquintLeft | 左眼脸部收缩 | |
| ARBlendShapeLocationEyeSquintRight | 右眼脸部收缩 | |
| ARBlendShapeLocationEyeWideLeft | 左眼周围眼睑变宽 | |
| ARBlendShapeLocationEyeWideRight | 右眼周围眼睑变宽 | |
| ARBlendShapeLocationJawForward | 下颌向前运动 | |
| ARBlendShapeLocationJawLeft | 下颌向左运动 | |
| ARBlendShapeLocationJawOpen | 下颌开口 | |
| ARBlendShapeLocationJawRight | 下颌向右运动 | |
| ARBlendShapeLocationMouthClose | 嘴唇闭合的系数与颌位置无关 | |
| ARBlendShapeLocationMouthDimpleLeft | 嘴左角后移 | |
| ARBlendShapeLocationMouthDimpleRight | 嘴右角后移 | |
| ARBlendShapeLocationMouthFrownLeft | 嘴左角向下运动 | |
| ARBlendShapeLocationMouthFrownRight | 嘴右角向下运动 | |
| ARBlendShapeLocationMouthFunnel | 两个嘴唇收缩成开放形状 | |
| ARBlendShapeLocationMouthLeft | 两个嘴唇向左移动 | |
| ARBlendShapeLocationMouthLowerDownLeft | 左侧下唇向下运动 | |
| ARBlendShapeLocationMouthLowerDownRight | 又侧下唇向下运动 | |
| ARBlendShapeLocationMouthPressLeft | 左侧下唇向上压缩 | |
| ARBlendShapeLocationMouthPressRight | 右侧下唇向上压缩 | |
| ARBlendShapeLocationMouthPucker | 两个闭合嘴唇的收缩和压缩 | |
| ARBlendShapeLocationMouthRight | 两个嘴唇向右运动 | |
| ARBlendShapeLocationMouthRollLower | 下唇向嘴内侧移动 | |
| ARBlendShapeLocationMouthRollUpper | 上唇向嘴内侧移动 | |
| ARBlendShapeLocationMouthShrugLower | 下唇向外运动 | |
| ARBlendShapeLocationMouthShrugUpper | 上唇向外运动 | |
| ARBlendShapeLocationMouthSmileLeft | 嘴左角向上运动 | |
| ARBlendShapeLocationMouthSmileRight | 嘴右角向上运动 | |
| ARBlendShapeLocationMouthStretchLeft | 嘴左角向左移动 | |
| ARBlendShapeLocationMouthStretchRight | 嘴左角向右移动 | |
| ARBlendShapeLocationMouthUpperUpLeft | 左侧上唇向上运动 | |
| ARBlendShapeLocationMouthUpperUpRight | 右侧上唇向上运动 | |
| ARBlendShapeLocationNoseSneerLeft | 左鼻孔抬高 | |
| ARBlendShapeLocationNoseSneerRight | 右鼻孔抬高 | |
| ARBlendShapeLocationTongueOut | 舌头延伸 |


