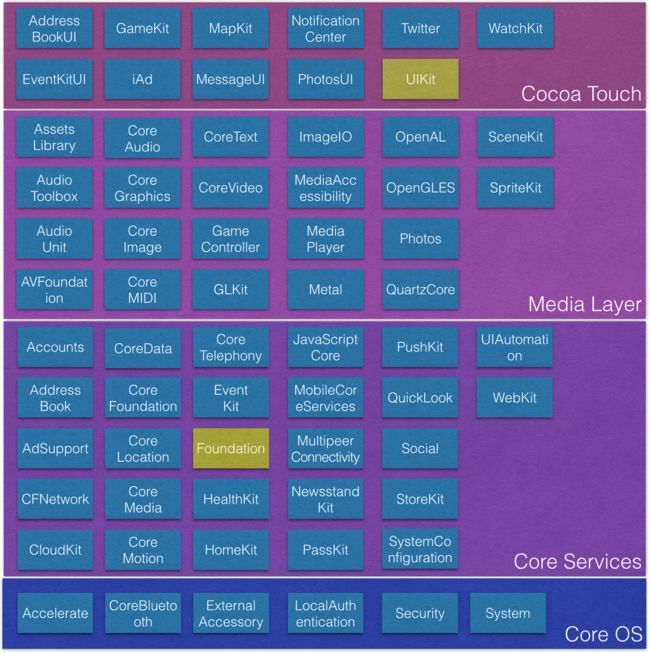
我们可以看到它位于Media Layer(Media Layer:媒体层提供应用中视听方面的技术,如图形图像相关的CoreGraphics,CoreImage,GLKit,OpenGL ES,CoreText,ImageIO等等。声音技术相关的CoreAudio,OpenAL,AVFoundation,视频相关的CoreMedia,Media Player框架,音视频传输的AirPlay框架等)。
一、系统的绘图框架都有哪些
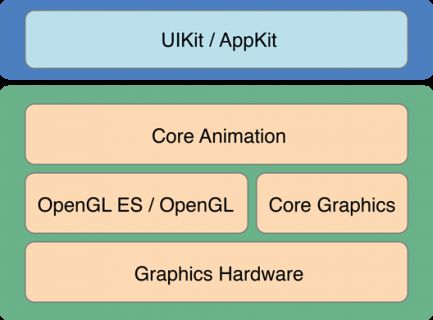
- UIKit
我们平常最常用的就是UIKit,其底层是依赖CoreGraphics实现的,而且绝大多数的图形界面也都是由UIKit完成,并且UIImage、NSString、UIBezierPath、UIColor等都知道如何绘制自己,也提供了一些方法来满足我们常用的绘图需求。 - CoreGraphics
主要的绘图系统,常用于绘制自定义视图,纯C的API,使用Quartz2D做引擎。Core Graphics数据结构和函数可以通过CG前缀来识别。 - Core Animation
提供了强大的2D和3D动画服务,它也与UIView高度集成。 - Core Image
提供了非常快的图片过滤方式,比如模糊,切图,锐化,扭曲和其他一些你能想象的变形效果。 - OpenGL-ES
主要用于游戏绘制,但它是一套编程规范,具体由设备制造商实现。
二、绘图方式
1. 绘图周期 (个人理解还不透彻,会继续学习更新)
首先我们需要了解绘图周期,因为都是在绘图周期中进行的。
- iOS会在运行循环中整合所有绘图请求,并在RunLoop将要结束时,一次将他们绘制出来。
所以,不能在子线程中绘制,也不能进行过于复杂的操作(否则会造成主线程卡顿)。
2. 绘图方式
- 视图绘制
调用UIView的drawRect方法进行绘制。如果调用一个view的setNeedsDisplay方法,那么该视图会被标记为需要重新绘制,会在下个绘制周期中重新绘制(此时会自动调用drawRect方法)。
drawRect被触发:
1.会在第一次被add到父视图上;2.还有调用setNeedsDisplay。
- 视图布局
调用UIView的layoutSubviews进行布局。如果调用一个view的setNeedsLayout方法,那么该view会被标记为需要重新布局,UIKit会自动调用layoutSubviews方法及其子视图的layoutSubviews方法。
在绘图时,我们应该多使用布局,少使用绘制,因为布局使用的是GPU,绘制使用的是CPU。GPU对于图形处理有优势,CPU要处理的事情较多,且不擅长图形处理。
三、准备工作
在介绍具体方法之前,我们需要知道,iOS的绘图必须在上下文中绘制,所以绘制前必须先获取上下文。如果是绘制图片,则先获取一个图片上下文,如果是其他视图,就需要获取一个非图片上下文。上下文可以理解为画布,在上面进行绘图。
1.上下文
- context(在drawRect方法中获取)
图形上下文(注意不是图片),可以通过UIGraphicsGetCurrentContext获取。 - imageContext (不必在drawRect方法中)
图片上下文,通过UIGraphicsBeginImageContextWithOptions:获取一个图片上下文,然后绘制完成后,调用UIGraphicsGetImageFromCurrentImageContext获取绘制的图片,最后要记得关闭图片上下文UIGraphicsEndImageContext。
四、具体绘图方法
由于iOS常见的绘图框架有两种,所以绘图的方法也有多种,我们介绍几种常见的方法。
1.通过图片类型的上下文
图片类型的上下文,不需要在drawRect方法中,在普通的oc方法中就可以进行绘制:
使用CoreGraphics实现:
// 获取图片上下文
UIGraphicsBeginImageContextWithOptions(CGSizeMake(100,100), NO, 0);
// 绘图
CGContextRef con = UIGraphicsGetCurrentContext();
CGContextAddEllipseInRect(con, CGRectMake(0,0,100,100));
CGContextSetFillColorWithColor(con, [UIColor blueColor].CGColor);
CGContextFillPath(con);
// 从图片上下文中获取绘制的图片
UIImage* im = UIGraphicsGetImageFromCurrentImageContext();
// 关闭图片上下文
UIGraphicsEndImageContext();
使用UIKit方式实现
// 获取图片上下文
UIGraphicsBeginImageContextWithOptions(CGSizeMake(100,100), NO, 0);
// 绘图
UIBezierPath* p = [UIBezierPath bezierPathWithOvalInRect:CGRectMake(0,0,100,100)];
[[UIColor blueColor] setFill];
[p fill];
// 从图片上下文中获取绘制的图片
UIImage* im = UIGraphicsGetImageFromCurrentImageContext();
// 关闭图片上下文
UIGraphicsEndImageContext();
2.通过drawRect:方法
在view的drawRect方法中,实现重新绘制:
使用CoreGraphics实现:
- (void) drawRect: (CGRect) rect {
    CGContextRef con = UIGraphicsGetCurrentContext();
    CGContextAddEllipseInRect(con, CGRectMake(0,0,100,100));
    CGContextSetFillColorWithColor(con, [UIColor blueColor].CGColor);
    CGContextFillPath(con);
}
使用UIKit方式实现
- (void) drawRect: (CGRect) rect {
    UIBezierPath* p = [UIBezierPathbezierPathWithOvalInRect:CGRectMake(0,0,100,100)];
    [[UIColor blueColor] setFill];
    [p fill];
}
3.通过drawLayer:inContext:
待续。。。
五、CoreGraphics具体如何使用
上边内容大多是告诉我们CoreGraphics的使用场景以及系统相关内容介绍,下边我们来看看具体CoreGraphics是如何使用的
1.具体步骤:
- 先在drawRect方法中获得上下文context(或通过imageContext);
- 绘制图形(线,图形,图片等);
- 设置一些修饰属性;
- 渲染到上下文,完成绘图。
show me code
#import "CustomView.h"

@implementation CustomView

- (void)drawRect:(CGRect)rect
{
    // 1.获取上下文
    CGContextRef ctx = UIGraphicsGetCurrentContext();

    // --------------------------实心圆

    // 2.画图
    CGContextAddEllipseInRect(ctx, CGRectMake(10, 10, 50, 50));
    [[UIColor greenColor] set];

    // 3.渲染
    CGContextFillPath(ctx);


    // --------------------------空心圆

    CGContextAddEllipseInRect(ctx, CGRectMake(70, 10, 50, 50));
    [[UIColor redColor] set];
    CGContextStrokePath(ctx);


    // --------------------------椭圆
    //画椭圆和画圆方法一样,椭圆只是设置不同的长宽
    CGContextAddEllipseInRect(ctx, CGRectMake(130, 10, 100, 50));
    [[UIColor purpleColor] set];
    CGContextFillPath(ctx);


    // --------------------------直线
    CGContextMoveToPoint(ctx, 20, 80); // 起点
    CGContextAddLineToPoint(ctx, self.frame.size.width-10, 80); //终点
//    CGContextSetRGBStrokeColor(ctx, 0, 1.0, 0, 1.0); // 颜色
    [[UIColor redColor] set]; // 两种设置颜色的方式都可以
    CGContextSetLineWidth(ctx, 2.0f); // 线的宽度
    CGContextSetLineCap(ctx, kCGLineCapRound); // 起点和重点圆角
    CGContextSetLineJoin(ctx, kCGLineJoinRound); // 转角圆角
    CGContextStrokePath(ctx); // 渲染(直线只能绘制空心的,不能调用CGContextFillPath(ctx);)


    // --------------------------三角形
    CGContextMoveToPoint(ctx, 10, 150); // 第一个点
    CGContextAddLineToPoint(ctx, 60, 100); // 第二个点
    CGContextAddLineToPoint(ctx, 100, 150); // 第三个点
    [[UIColor purpleColor] set];
    CGContextClosePath(ctx);
    CGContextStrokePath(ctx);


    // --------------------------矩形
    CGContextAddRect(ctx, CGRectMake(20, 170, 100, 50));
    [[UIColor orangeColor] set];
//    CGContextStrokePath(ctx); // 空心
    CGContextFillPath(ctx);


    // --------------------------圆弧
    CGContextAddArc(ctx, 200, 170, 50, M_PI, M_PI_4, 0);
    CGContextClosePath(ctx);
    CGContextFillPath(ctx);


    // --------------------------文字
    NSString *str = @"你在红楼,我在西游";
    NSMutableDictionary *dict = [NSMutableDictionary dictionary];
    dict[NSForegroundColorAttributeName] = [UIColor whiteColor]; // 文字颜色
    dict[NSFontAttributeName] = [UIFont systemFontOfSize:14]; // 字体

    [str drawInRect:CGRectMake(20, 250, 300, 30) withAttributes:dict];


    // --------------------------图片
    UIImage *img = [UIImage imageNamed:@"yingmu"];
//    [img drawAsPatternInRect:CGRectMake(20, 280, 300, 300)]; // 多个平铺
//    [img drawAtPoint:CGPointMake(20, 280)]; // 绘制到指定点,图片有多大就显示多大
    [img drawInRect:CGRectMake(20, 280, 80, 80)]; // 拉伸
}
六、UIBezierPath
而前者所属UIKit,其实是对Core Graphics框架关于path的进一步封装,所以使用起来比较简单。但是毕竟Core Graphics更接近底层,所以它更加强大。
UIBezierPath可以创建基于矢量的路径,例如椭圆或者矩形,或者有多个直线和曲线段组成的形状。
使用UIBezierPath,你只能在当前上下文中绘图。
1.所以如果你当前处于UIGraphicsBeginImageContextWithOptions函数或drawRect:方法中,你就可以直接使用UIKit提供的方法进行绘图。
2.如果你持有一个context:参数,那么使用UIKit提供的方法之前,必须将该上下文参数转化为当前上下文。幸运的是,调用UIGraphicsPushContext 函数可以方便的将context:参数转化为当前上下文,记住最后别忘了调用UIGraphicsPopContext函数恢复上下文环境。
它的绘图的步骤是这样的:
- 重写drawRect方法。但不需要我们自己获取当前上下文context;
- 创建相应图形的UIBezierPath对象,并设置一些修饰属性;
- 渲染,完成绘制。
1.绘制多边形
- (void)drawRect:(CGRect)rect
{
    UIColor *color = [UIColor colorWithRed:0 green:0.7 blue:0 alpha:1];
    //[[UIColor redColor] setFill];//设置填充色
    //[[UIColor redColor] setStroke];//设置线条
    [color set];//同时设置线条颜色和填充颜色

    UIBezierPath* aPath = [UIBezierPath bezierPath];
    aPath.lineWidth = 5.0;

    aPath.lineCapStyle = kCGLineCapRound;
    aPath.lineJoinStyle = kCGLineCapRound;

    // 起点
    [aPath moveToPoint:CGPointMake(100.0, 0.0)];

    // 绘制线条
    [aPath addLineToPoint:CGPointMake(200.0, 40.0)];
    [aPath addLineToPoint:CGPointMake(160, 140)];
    [aPath addLineToPoint:CGPointMake(40.0, 140)];
    [aPath addLineToPoint:CGPointMake(0.0, 40.0)];
    [aPath closePath];//第五条线通过调用closePath方法得到的

    //根据坐标点连线
    [aPath stroke];
    [aPath fill];
}

//椭圆
UIBezierPath* aPath = [UIBezierPath bezierPathWithOvalInRect:CGRectMake(20, 20, 100, 50)];
//矩形
UIBezierPath* aPath = [UIBezierPath bezierPathWithRect:CGRectMake(20, 20, 100, 50)];
2.圆弧
- (void)drawRect:(CGRect)rect
{
    UIColor *color = [UIColor redColor];
    [color set]; //设置线条颜色

    UIBezierPath* aPath = [UIBezierPath bezierPathWithArcCenter:CGPointMake(80, 80)
                                                         radius:75
                                                     startAngle:0
                                                       endAngle:DEGREES_TO_RADIANS(135)
                                                      clockwise:YES];

    aPath.lineWidth = 5.0;
    aPath.lineCapStyle = kCGLineCapRound; //线条拐角
    aPath.lineJoinStyle = kCGLineCapRound; //终点处理

    [aPath stroke];
}
3.曲线
两种曲线:
-
一个control point

- (void)drawRect:(CGRect)rect
{
    UIColor *color = [UIColor redColor];
    [color set]; //设置线条颜色

    UIBezierPath* aPath = [UIBezierPath bezierPath];

    aPath.lineWidth = 5.0;
    aPath.lineCapStyle = kCGLineCapRound; //线条拐角
    aPath.lineJoinStyle = kCGLineCapRound; //终点处理

    [aPath moveToPoint:CGPointMake(20, 100)];

    [aPath addQuadCurveToPoint:CGPointMake(120, 100) controlPoint:CGPointMake(70, 0)];

    [aPath stroke];
}
2.两个control point

- (void)drawRect:(CGRect)rect
{
    UIColor *color = [UIColor redColor];
    [color set]; //设置线条颜色

    UIBezierPath* aPath = [UIBezierPath bezierPath];

    aPath.lineWidth = 5.0;
    aPath.lineCapStyle = kCGLineCapRound; //线条拐角
    aPath.lineJoinStyle = kCGLineCapRound; //终点处理

    [aPath moveToPoint:CGPointMake(5, 80)];

    [aPath addCurveToPoint:CGPointMake(155, 80) controlPoint1:CGPointMake(80, 0) controlPoint2:CGPointMake(110, 100)];

    [aPath stroke];
}
参考:
iOS绘图框架CoreGraphics分析
iOS的不同绘图系统
绘图(具体使用)