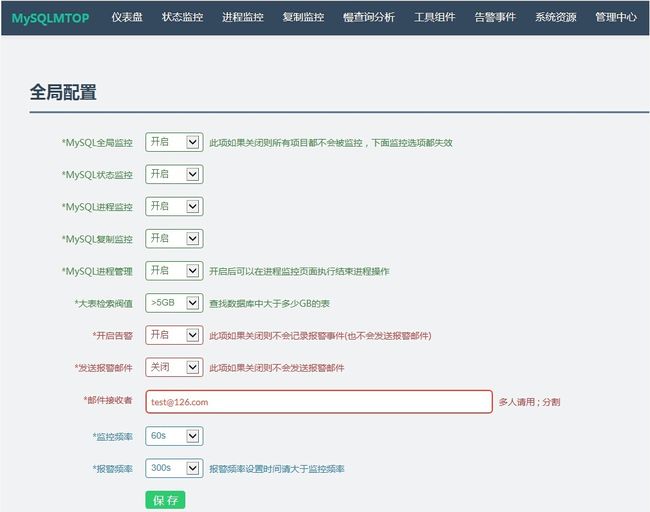
MySQLMTOP是一个由Python+PHP开发的MySQL企业级监控系统。系统由Python实现多进程数据采集和告警,PHP实现WEB展示和管理。最重要是MySQL服务器无需安装任何Agent,只需在监控WEB界面配置相关数据库信息,功能非常强大:
可对上百台MySQL数据库的状态、连接数、QTS、TPS、数据库流量、复制、性能等进行时时监控
能在数据库偏离设定的正常运行阀值(如连接异常,复制异常,复制延迟) 时发送告警邮件通知到DBA进行处理
对历史数据归档,通过图表展示出数据库近期状态,以便DBA和开发人员能对遇到的问题进行分析和诊断
系统主要由仪表盘、状态监控、进程监控、复制监控、慢查询分析、性能图表、工具组件、告警事件、系统资源等子系统组成,每个子系统负责完成特定信息的采集和展示
一、系统安装需求
MySQL MTOP由PHP和Python开发,所以监控机需要安装PHP运行环境和Python环境。需要的核心包如下:
1.MySQL 5.0及以上(用来存储监控系统采集的数据)
2.Apache 2.2及以上 (WEB服务器运行服务器)
3.PHP 5.3以上 (WEB界面)
4.Python2 (推荐2.7版本,其他版本未做测试,执行数据采集和报警任务)
5.MySQLdb for python (Python连接MySQl的接口)
二、 安装必备的开发包
yum -y install ntp gcc gcc-c++ flex bison autoconf automake bzip2-devel ncurses-devel zlib-devel libjpeg-devel libpng-devel libtiff-devel freetype-devel libXpm-devel gettext-devel pam-devel libtool libtool-ltdl openssl openssl-devel fontconfig-devel libxml2-devel curl-devel libicu libicu-devel libmcrypt libmcrypt-devel libmhash libmhash-devel
三、同步系统时间:
vim /etc/ntp.conf //添加下面三行内容
同步时间,重启ntp服务
[root data]$ service ntpd stop
[root data]$ ntpdate  cn.pool.ntp.org
[root data]$ chkconfig ntpd on
四、进制apache安装,版本要2.2及以上
[root src]$ wget http://archive.apache.org/dist/httpd/httpd-2.2.19.tar.gz
[root src]$ tar xvf httpd-2.2.19.tar.gz
[root src]$ cd httpd-2.2.19
[root src]$ ./configure --prefix=/usr/local/apache --enable-so --enable-rewrite --enable-mods-shared=most --sysconfdir=/etc/httpd
[root httpd-2.2.19]$ make && make install
[root httpd-2.2.19]$ cp /usr/local/apache/bin/apachectl /etc/init.d/httpd
[root httpd-2.2.19]$ service httpd start
[root httpd-2.2.19]$chkconfig --add httpd
[root httpd-2.2.19]$chkconfig httpd on
[root httpd-2.2.19]$  netstat -tnl |grep httpd
tcp        0      0 :::80              :::*                LISTEN      24810/httpd
五、进行MySQL安装
#!/bin/bash
#-------------------------------
#this install mysql for test ues


#定义变量
soft_path=/usr/local/src
mysql_pack=mysql-5.5.40-linux2.6-x86_64.tar.gz
mysql_version=`echo "mysql-5.5.40-linux2.6-x86_64.tar.gz"|cut -d - -f1,2`
mysql_user=mysql
mysql_port=3306
mysql_passwd=123456
install_path=/usr/local
mysql_path=/usr/local/${mysql_version}
mysql_data_path=/data/${mysql_version}/data


#创建用户、赋权、安装
groupadd ${mysql_user}
if [ $? -ne 0 ]
then
  echo "this user ${mysql_user} is exist!!"
  exit 1
fi
useradd -r -g ${mysql_user} ${mysql_user}

cd ${soft_path}
if [ ! -e ${mysql_pack} ]
then
  echo "install pack is not exist!!"
  exit 1
fi
tar zxvf ${mysql_pack} -C ${install_path}
cd ${install_path} && mv ${mysql_version}-* ${mysql_version}
chown -R root:${mysql_user} ${mysql_path}
cd ${mysql_path} && cp support-files/my-large.cnf ${mysql_path}/my.cnf
mkdir -p /data/${mysql_version}
chown -R ${mysql_user}:${mysql_user} /data/${mysql_version}

#修改my.cnf
  sed -i "/3306/{x;s/^/./;/^.\{2\}$/{x;s/3306/${mysql_port}/;b};x}" ${mysql_path}/my.cnf
  sed -i "/socket/{x;s/^/./;/^.\{2\}$/{x;s#/tmp/mysql.sock#/data/${mysql_version}/mysql.sock#;b};x}" ${mysql_path}/my.cnf
  sed -i "/\/data\/${mysql_version}\/mysql.sock/a\datadir         = ${mysql_data_path}" ${mysql_path}/my.cnf
  sed -i "/datadir/a\basedir         = ${mysql_path}" ${mysql_path}/my.cnf
  sed -i "/basedir/a\user            = ${mysql_user}" ${mysql_path}/my.cnf
  sed -i "/innodb_buffer_pool_size/s/^#//" ${mysql_path}/my.cnf


#初始化
cd ${mysql_path}
yum install libaio -y
scripts/mysql_install_db --user=${mysql_user} --defaults-file=${mysql_path}/my.cnf

if [ $? -ne 0 ]
then
  echo -e "\e[1;31m[MySQL install init failure...]\e[0m"
  exit 1
fi

#添加启动关闭脚本
cat >>shutdown_mysql.sh<>start_mysql.sh<> ${mysql_path}/start_stop.log 2>&1 &
EOF

#启动MySQL
chmod +x shutdown_mysql.sh start_mysql.sh && sh start_mysql.sh
sleep 50
ps -aux |grep -v grep |grep ${mysql_port} &> /dev/null
if [ $? -ne 0 ]
then
   echo -e "\e[1;31m[MySQL start failure...]\e[0m"
   exit 1
else
    echo -e "\e[1;32m[MySQL start secessful]\e[0m"
fi
#修改密码
${mysql_path}/bin/mysqladmin -uroot password "${mysql_passwd}"  -S /data/${mysql_version}/mysql.sock
六、进行PHP安装
[root src]$wget http://softlayer.dl.sourceforge.net/sourceforge/mcrypt/libmcrypt-2.5.8.tar.gz[root src]$ tar zxf libmcrypt-2.5.8.tar.gz
[root src]$ cd libmcrypt-2.5.8
[root libmcrypt-2.5.8]$ ./configure --prefix=/usr/local && make && make install
下载PHP并安装,版本要5.3以上,要注意的是,php安装涉及了你安装apache和mysql的路径,这个要特别注意的:
[root src]$ wget http://cn2.php.net/distributions/php-5.5.19.tar.gz
[root src]$ tar zxf php-5.5.19.tar.gz
[root src]$ cd php-5.5.19
[root php-5.5.19]$./configure --prefix=/usr/local/php \
--mandir=/usr/local/share/man \
--infodir=/usr/local/share/info \
--with-apxs2=/usr/local/apache/bin/apxs \
--enable-cgi --with-mysql=/usr/local/mysql-5.6.10/ \
--with-config-file-path=/usr/local/php/etc \
--with-pdo-mysql=/usr/local/mysql-5.6.10 \
--with-mysqli=/usr/local/mysql-5.6.10/bin/mysql_config \
--enable-zip --enable-sqlite-utf8 -enable-sockets \
--enable-soap --enable-pcntl --enable-mbstring \
--enable-intl --enable-calendar --enable-bcmath \
--enable-exif --with-mcrypt --with-mhash --with-gd \
--with-png-dir --with-jpeg-dir --with-freetype-dir \
--with-libxml-dir --with-curl --with-curlwrappers \
--with-zlib   --with-openssl --with-kerberos=shared \
--with-gettext=shared --with-xmlrpc=shared
[root php-5.5.19]$ make && make install
拷贝配置文件:
[root php-5.5.19]$ cp php.ini-production /usr/local/php/etc/php.ini
修改apache的配置文件:
[root php-5.5.19]$ vim /usr/local/apache/conf/httpd.conf
添加以下内容:
查找AddType application/x-gzip .gz .tgz,在该行下面添加
AddType application/x-httpd-php .php
AddType application/x-httpd-php-source .phps
查找DirectoryIndex index.html 把该行修改成
DirectoryIndex index.html index.htm index.php
重启apache服务,在/usr/local/apache/htdocs/下vim index.php,操作如下:
[root htdocs]$ service httpd restart
[root htdocs]$ pwd
/usr/local/apache/htdocs
[root htdocs]$ cat index.php
在防火墙里添加80端口,并重启,然后请问index.php:
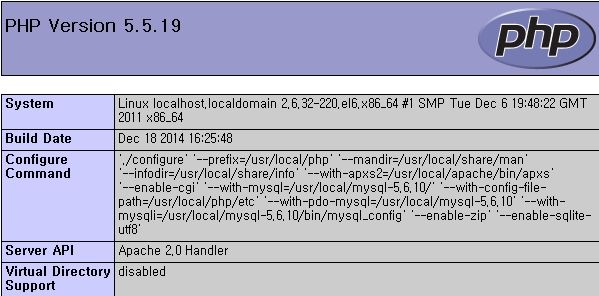
http://ip/index.php,如果得到下图,意味着apache整合php成功了
六、进行python安装,推荐2.7版本,其他版本未做测试,执行数据采集和报警任务
[root src]$ wget http://www.python.org/ftp/python/2.7.2/Python-2.7.2.tar.bz2
[root src]$ tar jxf Python-2.7.2.tar.bz2
[root src]$ cd Python-2.7.2
[root Python-2.7.2]$ ./configure --prefix=/usr/local/Python2.7 --enable-shared make && make install
[root Python-2.7.2]$ mv /usr/bin/python /usr/bin/pythonbak
[root Python-2.7.2]$ ln -sf /usr/local/Python2.7/bin/python /usr/bin/python
查看Python版本,如果报少了库文件,vim /etc/ld.so.conf添加/usr/local/Python2.7/lib,执行ldconfig刷新配置文件
[root Python-2.7.2]$ python -V
python: error while loading shared libraries: libpython2.7.so.1.0: cannot open shared object file: No such file or directory
[root Python-2.7.2]$ cat /etc/ld.so.conf
include ld.so.conf.d/*.conf
/usr/local/Python2.7/lib
[root Python-2.7.2]$ ldconfig
[root Python-2.7.2]$ python -V
Python 2.7.2
如果python升级到2.7以后出现yum无法使用的情况,错误为No module named yum,请按照如下步骤处理,将yum使用的python版本改为旧版本,第一行修改为如下即可:
[root htdocs]$ vim /usr/bin/yum
#!/usr/bin/python2.6
七、安装MySQLdb for python
[root src]$ wget [root src]$ unzip MySQLdb-python.zip
[root src]$ cd MySQLdb1-master
[root MySQLdb1-master]$ vim site.cfg
添加你安装的mysql路径下的mysql_config:
添加完再执行python setup.py build可能报以下错:
[root MySQLdb1-master]$ python setup.py build
error: command 'gcc' failed with exit status 1
解决方法:
[root MySQLdb1-master]$ yum install gcc python-devel
再执行安装:
[root MySQLdb1-master]$ python setup.py build
[root MySQLdb1-master]$ python setup.py install
基本环境已经安装OVER了,下面去官网下载开源的管理软件包:http://www.lepus.cc/soft/index,要注册账号的
八、安装MySQL MTOP系统
监控机创建监控数据库,并授予权限,导入SQL文件
mysql> create database mysqlmtop default character set utf8;
Query OK, 1 row affected (0.07 sec)

mysql> grant select,insert,update,delete,create,drop on mysqlmtop.* to 'mtop_user'@'localhost' identified by 'password';
Query OK, 0 rows affected (0.04 sec)

mysql>  flush privileges;
Query OK, 0 rows affected (0.02 sec)
[root src]$ unzip MySQLMTOP.zip
[root src]$ cd  mysqlmtop2.2
[root sql]$ pwd/usr/local/src/mysqlmtop2.2/sql
[root sql]$ lsmysqlmtop_data.sql  mysqlmtop.sql
监控机(即MySQL MTOP server)创建监控数据库,并授予权限,导入SQL文件夹里的SQL文件(表结构和数据文件):
[root sql]$ mysql -uroot -p123456 -S /data/mysql-5.6.10/mysql.sock  mysqlmtop < ./mysqlmtop.sql
[root sql]$ mysql -uroot -p123456 -S /data/mysql-5.6.10/mysql.sock  mysqlmtop < ./mysqlmtop_data.sql
[root sql]$ mv /usr/local/src/mysqlmtop2.2 /usr/local/mysqlmtop
对被监控的数据库进行授权
在python采集数据的过程中,需要连接到需要监控的数据库服务器采集数据,我们为了安全考虑,在WEB管理里面只要求录入主机和端口,没有录入账号和密码。所有需要监控的数据库请授予相同的用户密码记录在配置文件中。授权如下所示:
grant select,super,process on *.* to 'monitor'@'ip' identified by 'monitor';
九、安装数据采集和报警系统
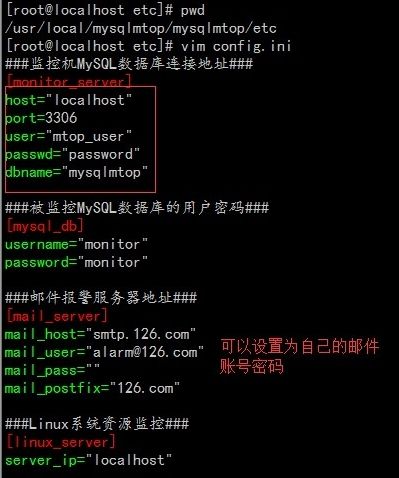
修改监控系统配置文件,进到/usr/local/mysqlmtop/mysqlmtop/etc,修改config.ini
授予可执行文件执行权限
[root mysqlmtop]$ pwd/usr/local/mysqlmtop/mysqlmtop
[root mysqlmtop]$ chmod +x *.py
[root mysqlmtop]$ chmod +x *.sh[root mysqlmtop]$ chmod +x mtopctl
[root mysqlmtop]$ ln -s /usr/local/mysqlmtop/mysqlmtop/mtopctl /usr/local/bin/
测试MySQL连接,报错了
[root mysqlmtop]$ ./test_mysql.py Traceback (most recent call last): File "./test_mysql.py", line 6, inimport MySQLdb File "/usr/lib64/python2.6/site-packages/MySQL_python-1.2.4-py2.6-linux-x86_64.egg/MySQLdb/__init__.py", line 19, in import _mysql ImportError: libmysqlclient.so.18: cannot open shared object file: No such file or directory
解决方法:
如果是64系统则:
[root mysqlmtop]$ ln -s /usr/local/mysql-5.6.10/lib/libmysqlclient.so.18  /usr/lib64/libmysqlclient.so.18
如果是32位系统:
[root mysqlmtop]$ ln -s /usr/local/mysql-5.6.10/lib/libmysqlclient.so.18  /usr/lib/libmysqlclient.so.18
如果是通过socket文件连接MySQL的话 可能会报以下错:
mysql_exceptions.OperationalError: (2002, "Can't connect to local MySQL server through socket '/tmp/mysql.sock' (111)")
添加一下链接:
[root mysqlmtop]$ ln -s /data/mysql-5.6.10/mysql.sock /tmp/mysql.sock
再执行测试脚本,看到OK就正常连接成功了:
[root mysqlmtop]$ ./test_mysql.py
MySQLDB OK!
修改下启动脚本mtopctl(注意路径),再启动监控系统(注意:只有监控进程运行时系统才会进行监控和报警)
启动:
[root mysqlmtop]$ mtopctl  start
nohup: 把输出追加到"nohup.out"
mysql mtop start success!
使用--help查看监控系统进程管理参数,分别有start、stop、status
[root mysqlmtop]$ mtopctl --help
mysql mtop help:
support-site:www.mtop.cc  www.ruzuojun.com
====================================================================
start        Start mysql mtop monitor server; Command: #mtopctl start
stop         Stop mysql mtop monitor server; Command: #mtopctl stop
status       Check mysql mtop monitor run status; Command: #mtopctl status
十、安装WEB管理界面
把/usr/local/mysqlmtop/frontweb下的所有文件传到apache的/usr/local/apache/htdocs/
[root frontweb]$ pwd
/usr/local/mysqlmtop/frontweb
[root frontweb]$ cp -a * /usr/local/apache/htdocs/
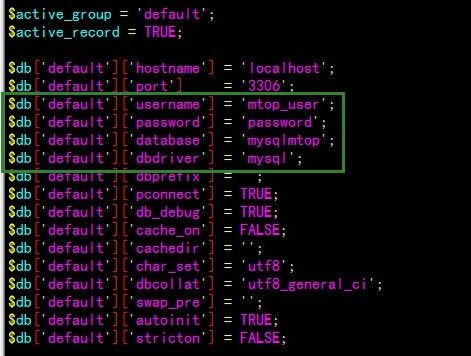
打开application/config/database.php文件,修改PHP连接监控服务器的数据库信息
[root@localhost config]# pwd
/usr/local/apache/htdocs/application/config
root@localhost config]# vim database.php
修改username填刚刚在MySQL授权用户,password也就是对应的密码,mysqlmtop是对应的库,修改这三个即可
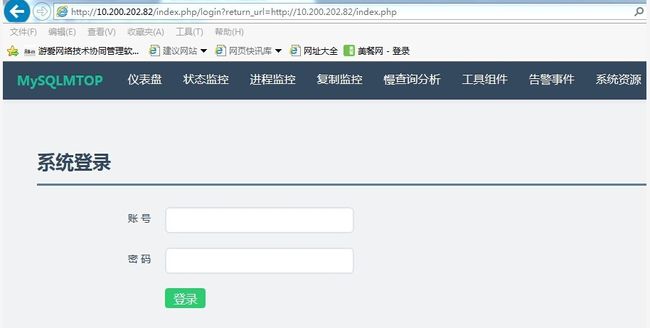
可以通过浏览器去访问了:http://ip
最好把默认的index.html删除了,这样才走index.php,默认管理员账号密码admin/admin 登录后请修改密码,增加普通账号
查看一下相关功能
总结:
一、该系统是开源的系统,如果搭建在公网,一定要做好各种访问控制,做好各方面的安全工作
二、该系统功能比较多,可以帮助MySQL DBA或运维DBA对管理MySQL及查看其性能
三、可能该系统存在一些小bug,例如发不出邮件啊,这些就要根据自己能力去完善了,如果会python,可以去掉没用的,加上自己想要的功能
详细参考资料 MySQLMTOP官网:http://www.mtop.cc/
http://www.cnblogs.com/xuanzhi201111/p/4172604.html
http://www.ruzuojun.com/topic/967.html
http://sofar.blog.51cto.com/353572/1384203
mysql经典语句
一、基础
1、说明:创建数据库
CREATE DATABASE database-name
2、说明:删除数据库
drop database dbname
3、说明:备份sql server
--- 创建 备份数据的 device
USE master
EXEC sp_addumpdevice 'disk', 'testBack', 'c:\mssql7backup\MyNwind_1.dat'
--- 开始 备份
BACKUP DATABASE pubs TO testBack
4、说明:创建新表
create table tabname(col1 type1 [not null] [primary key],col2 type2 [not null],..)
根据已有的表创建新表:
A:create table tab_new like tab_old (使用旧表创建新表)
B:create table tab_new as select col1,col2… from tab_old definition only
5、说明:删除新表
drop table tabname
6、说明:增加一个列
Alter table tabname add column col type
注:列增加后将不能删除。DB2中列加上后数据类型也不能改变,唯一能改变的是增加varchar类型的长度。
7、说明:添加主键: Alter table tabname add primary key(col)
说明:删除主键: Alter table tabname drop primary key(col)
8、说明:创建索引:create [unique] index idxname on tabname(col….)
删除索引:drop index idxname
注:索引是不可更改的,想更改必须删除重新建。
9、说明:创建视图:create view viewname as select statement
删除视图:drop view viewname
10、说明:几个简单的基本的sql语句
选择:select * from table1 where 范围
插入:insert into table1(field1,field2) values(value1,value2)
删除:delete from table1 where 范围
更新:update table1 set field1=value1 where 范围
查找:select * from table1 where field1 like ’%value1%’ ---like的语法很精妙,查资料!
排序:select * from table1 order by field1,field2 [desc]
总数:select count as totalcount from table1
求和:select sum(field1) as sumvalue from table1
平均:select avg(field1) as avgvalue from table1
最大:select max(field1) as maxvalue from table1
最小:select min(field1) as minvalue from table1
11、说明:几个高级查询运算词
A: UNION 运算符
UNION 运算符通过组合其他两个结果表(例如 TABLE1 和 TABLE2)并消去表中任何重复行而派生出一个结果表。当ALL 随 UNION 一起使用时(即 UNION ALL),不消除重复行。两种情况下,派生表的每一行不是来自 TABLE1 就是来自 TABLE2。
B: EXCEPT 运算符
EXCEPT 运算符通过包括所有在 TABLE1 中但不在 TABLE2 中的行并消除所有重复行而派生出一个结果表。当 ALL 随EXCEPT 一起使用时 (EXCEPT ALL),不消除重复行。
C: INTERSECT 运算符
INTERSECT 运算符通过只包括 TABLE1 和 TABLE2 中都有的行并消除所有重复行而派生出一个结果表。当 ALL 随INTERSECT 一起使用时 (INTERSECT ALL),不消除重复行。
注:使用运算词的几个查询结果行必须是一致的。
12、说明:使用外连接
A、left (outer) join:
左外连接(左连接):结果集几包括连接表的匹配行,也包括左连接表的所有行。
SQL: select a.a, a.b, a.c, b.c, b.d, b.f from a LEFT OUT JOIN b ON a.a = b.c
B:right (outer) join:
右外连接(右连接):结果集既包括连接表的匹配连接行,也包括右连接表的所有行。
C:full/cross (outer) join:
全外连接:不仅包括符号连接表的匹配行,还包括两个连接表中的所有记录。
12、分组:Group by:
一张表,一旦分组 完成后,查询后只能得到组相关的信息。
组相关的信息:(统计信息) count,sum,max,min,avg 分组的标准)
在SQLServer中分组时:不能以text,ntext,p_w_picpath类型的字段作为分组依据
在selecte统计函数中的字段,不能和普通的字段放在一起;
13、对数据库进行操作:
分离数据库: sp_detach_db; 附加数据库:sp_attach_db 后接表明,附加需要完整的路径名
14.如何修改数据库的名称:
sp_renamedb 'old_name', 'new_name'
二、提升
1、说明:复制表(只复制结构,源表名:a 新表名:b) (Access可用)
法一:select * into b from a where 1<>1(仅用于SQlServer)
法二:select top 0 * into b from a
2、说明:拷贝表(拷贝数据,源表名:a 目标表名:b) (Access可用)
insert into b(a, b, c) select d,e,f from b;
3、说明:跨数据库之间表的拷贝(具体数据使用绝对路径) (Access可用)
insert into b(a, b, c) select d,e,f from b in ‘具体数据库’ where 条件
例子:..from b in '"&Server.MapPath(".")&"\data.mdb" &"' where..
4、说明:子查询(表名1:a 表名2:b)
select a,b,c from a where a IN (select d from b ) 或者: select a,b,c from a where a IN (1,2,3)
5、说明:显示文章、提交人和最后回复时间
select a.title,a.username,b.adddate from table a,(select max(adddate) adddate from table where table.title=a.title) b
6、说明:外连接查询(表名1:a 表名2:b)
select a.a, a.b, a.c, b.c, b.d, b.f from a LEFT OUT JOIN b ON a.a = b.c
7、说明:在线视图查询(表名1:a )
select * from (SELECT a,b,c FROM a) T where t.a > 1;
8、说明:between的用法,between限制查询数据范围时包括了边界值,not between不包括
select * from table1 where time between time1 and time2
select a,b,c, from table1 where a not between 数值1 and 数值2
9、说明:in 的使用方法
select * from table1 where a [not] in (‘值1’,’值2’,’值4’,’值6’)
10、说明:两张关联表,删除主表中已经在副表中没有的信息
delete from table1 where not exists ( select * from table2 where table1.field1=table2.field1 )
11、说明:四表联查问题:
select * from a left inner join b on a.a=b.b right inner join c on a.a=c.c inner join d on a.a=d.d where .....
12、说明:日程安排提前五分钟提醒
SQL: select * from 日程安排 where datediff('minute',f开始时间,getdate())>5
13、说明:一条sql 语句搞定数据库分页
select top 10 b.* from (select top 20 主键字段,排序字段 from 表名 order by 排序字段 desc) a,表名 b where b.主键字段 = a.主键字段 order by a.排序字段
具体实现:
关于数据库分页:
declare @start int,@end int
@sql nvarchar(600)
set @sql=’select top’+str(@end-@start+1)+’+from T where rid not in(select top’+str(@str-1)+’Rid from T where Rid>-1)’
exec sp_executesql @sql
注意:在top后不能直接跟一个变量,所以在实际应用中只有这样的进行特殊的处理。Rid为一个标识列,如果top后还有具体的字段,这样做是非常有好处的。因为这样可以避免 top的字段如果是逻辑索引的,查询的结果后实际表中的不一致(逻辑索引中的数据有可能和数据表中的不一致,而查询时如果处在索引则首先查询索引)
14、说明:前10条记录
select top 10 * form table1 where 范围
15、说明:选择在每一组b值相同的数据中对应的a最大的记录的所有信息(类似这样的用法可以用于论坛每月排行榜,每月热销产品分析,按科目成绩排名,等等.)
select a,b,c from tablename ta where a=(select max(a) from tablename tb where tb.b=ta.b)
16、说明:包括所有在 TableA 中但不在 TableB和TableC 中的行并消除所有重复行而派生出一个结果表
(select a from tableA ) except (select a from tableB) except (select a from tableC)
17、说明:随机取出10条数据
select top 10 * from tablename order by newid()
18、说明:随机选择记录
select newid()
19、说明:删除重复记录
1),delete from tablename where id not in (select max(id) from tablename group by col1,col2,...)
2),select distinct * into temp from tablename
delete from tablename
insert into tablename select * from temp
评价: 这种操作牵连大量的数据的移动,这种做法不适合大容量但数据操作
3),例如:在一个外部表中导入数据,由于某些原因第一次只导入了一部分,但很难判断具体位置,这样只有在下一次全部导入,这样也就产生好多重复的字段,怎样删除重复字段
alter table tablename
--添加一个自增列
add column_b int identity(1,1)
delete from tablename where column_b not in(
select max(column_b) from tablename group by column1,column2,...)
alter table tablename drop column column_b
20、说明:列出数据库里所有的表名
select name from sysobjects where type='U' // U代表用户
21、说明:列出表里的所有的列名
select name from syscolumns where id=object_id('TableName')
22、说明:列示type、vender、pcs字段,以type字段排列,case可以方便地实现多重选择,类似select 中的case。
select type,sum(case vender when 'A' then pcs else 0 end),sum(case vender when 'C' then pcs else 0 end),sum(case vender when 'B' then pcs else 0 end) FROM tablename group by type
显示结果:
type vender pcs
电脑 A 1
电脑 A 1
光盘 B 2
光盘 A 2
手机 B 3
手机 C 3
23、说明:初始化表table1
TRUNCATE TABLE table1
24、说明:选择从10到15的记录
select top 5 * from (select top 15 * from table order by id asc) table_别名 order by id desc
三、技巧
1、1=1,1=2的使用,在SQL语句组合时用的较多
“where 1=1” 是表示选择全部 “where 1=2”全部不选,
如:
if @strWhere !=''
begin
set @strSQL = 'select count(*) as Total from [' + @tblName + '] where ' + @strWhere
end
else
begin
set @strSQL = 'select count(*) as Total from [' + @tblName + ']'
end
我们可以直接写成
错误!未找到目录项。
set @strSQL = 'select count(*) as Total from [' + @tblName + '] where 1=1 安定 '+ @strWhere 2、收缩数据库
--重建索引
DBCC REINDEX
DBCC INDEXDEFRAG
--收缩数据和日志
DBCC SHRINKDB
DBCC SHRINKFILE
3、压缩数据库
dbcc shrinkdatabase(dbname)
4、转移数据库给新用户以已存在用户权限
exec sp_change_users_login 'update_one','newname','oldname'
go
5、检查备份集
RESTORE VERIFYONLY from disk='E:\dvbbs.bak'
6、修复数据库
ALTER DATABASE [dvbbs] SET SINGLE_USER
GO
DBCC CHECKDB('dvbbs',repair_allow_data_loss) WITH TABLOCK
GO
ALTER DATABASE [dvbbs] SET MULTI_USER
GO
7、日志清除
SET NOCOUNT ON
DECLARE @LogicalFileName sysname,
@MaxMinutes INT,
@NewSize INT
USE tablename -- 要操作的数据库名
SELECT @LogicalFileName = 'tablename_log', -- 日志文件名
@MaxMinutes = 10, -- Limit on time allowed to wrap log.
@NewSize = 1 -- 你想设定的日志文件的大小(M)
Setup / initialize
DECLARE @OriginalSize int
SELECT @OriginalSize = size
FROM sysfiles
WHERE name = @LogicalFileName
SELECT 'Original Size of ' + db_name() + ' LOG is ' +
CONVERT(VARCHAR(30),@OriginalSize) + ' 8K pages or ' +
CONVERT(VARCHAR(30),(@OriginalSize*8/1024)) + 'MB'
FROM sysfiles
WHERE name = @LogicalFileName
CREATE TABLE DummyTrans
(DummyColumn char (8000) not null)
DECLARE @Counter INT,
@StartTime DATETIME,
@TruncLog VARCHAR(255)
SELECT @StartTime = GETDATE(),
@TruncLog = 'BACKUP LOG ' + db_name() + ' WITH TRUNCATE_ONLY'
DBCC SHRINKFILE (@LogicalFileName, @NewSize)
EXEC (@TruncLog)
-- Wrap the log if necessary.
WHILE @MaxMinutes > DATEDIFF (mi, @StartTime, GETDATE()) -- time has not expired
AND @OriginalSize = (SELECT size FROM sysfiles WHERE name = @LogicalFileName)
AND (@OriginalSize * 8 /1024) > @NewSize
BEGIN -- Outer loop.
SELECT @Counter = 0
WHILE ((@Counter < @OriginalSize / 16) AND (@Counter < 50000))
BEGIN -- update
INSERT DummyTrans VALUES ('Fill Log') DELETE DummyTrans
SELECT @Counter = @Counter + 1
END
EXEC (@TruncLog)
END
SELECT 'Final Size of ' + db_name() + ' LOG is ' +
CONVERT(VARCHAR(30),size) + ' 8K pages or ' +
CONVERT(VARCHAR(30),(size*8/1024)) + 'MB'
FROM sysfiles
WHERE name = @LogicalFileName
DROP TABLE DummyTrans
SET NOCOUNT OFF
8、说明:更改某个表
exec sp_changeobjectowner 'tablename','dbo'
9、存储更改全部表
CREATE PROCEDURE dbo.User_ChangeObjectOwnerBatch
@OldOwner as NVARCHAR(128),
@NewOwner as NVARCHAR(128)
AS
DECLARE @Name as NVARCHAR(128)
DECLARE @Owner as NVARCHAR(128)
DECLARE @OwnerName as NVARCHAR(128)
DECLARE curObject CURSOR FOR
select 'Name' = name,
'Owner' = user_name(uid)
from sysobjects
where user_name(uid)=@OldOwner
order by name
OPEN curObject
FETCH NEXT FROM curObject INTO @Name, @Owner
WHILE(@@FETCH_STATUS=0)
BEGIN
if @Owner=@OldOwner
begin
set @OwnerName = @OldOwner + '.' + rtrim(@Name)
exec sp_changeobjectowner @OwnerName, @NewOwner
end
-- select @name,@NewOwner,@OldOwner
FETCH NEXT FROM curObject INTO @Name, @Owner
END
close curObject
deallocate curObject
GO
10、SQL SERVER中直接循环写入数据
declare @i int
set @i=1
while @i<30
begin
insert into test (userid) values(@i)
set @i=@i+1
end
案例:
有如下表,要求就裱中所有沒有及格的成績,在每次增長0.1的基礎上,使他們剛好及格:
Name score
Zhangshan 80
Lishi 59
Wangwu 50
Songquan 69
while((select min(score) from tb_table)<60)
begin
update tb_table set score =score*1.01
where score<60
if (select min(score) from tb_table)>60
break
else
continue
end
数据开发-经典
1.按姓氏笔画排序:
Select * From TableName Order By CustomerName Collate Chinese_PRC_Stroke_ci_as //从少到多
2.数据库加密:
select encrypt('原始密码')
select pwdencrypt('原始密码')
select pwdcompare('原始密码','加密后密码') = 1--相同;否则不相同 encrypt('原始密码')
select pwdencrypt('原始密码')
select pwdcompare('原始密码','加密后密码') = 1--相同;否则不相同
3.取回表中字段:
declare @list varchar(1000),
@sql nvarchar(1000)
select @list=@list+','+b.name from sysobjects a,syscolumns b where a.id=b.id and a.name='表A'
set @sql='select '+right(@list,len(@list)-1)+' from 表A'
exec (@sql)
4.查看硬盘分区:
EXEC master..xp_fixeddrives
5.比较A,B表是否相等:
if (select checksum_agg(binary_checksum(*)) from A)
=
(select checksum_agg(binary_checksum(*)) from B)
print '相等'
else
print '不相等'
6.杀掉所有的事件探察器进程:
DECLARE hcforeach CURSOR GLOBAL FOR SELECT 'kill '+RTRIM(spid) FROM master.dbo.sysprocesses
WHERE program_name IN('SQL profiler',N'SQL 事件探查器')
EXEC sp_msforeach_worker '?'
7.记录搜索:
开头到N条记录
Select Top N * From 表
-------------------------------
N到M条记录(要有主索引ID)
Select Top M-N * From 表 Where ID in (Select Top M ID From 表) Order by ID Desc
----------------------------------
N到结尾记录
Select Top N * From 表 Order by ID Desc
案例
例如1:一张表有一万多条记录,表的第一个字段 RecID 是自增长字段, 写一个SQL语句, 找出表的第31到第40个记录。
select top 10 recid from A where recid not in(select top 30 recid from A)
分析:如果这样写会产生某些问题,如果recid在表中存在逻辑索引。
select top 10 recid from A where……是从索引中查找,而后面的select top 30 recid from A则在数据表中查找,这样由于索引中的顺序有可能和数据表中的不一致,这样就导致查询到的不是本来的欲得到的数据。
解决方案
1, 用order by select top 30 recid from A order by ricid 如果该字段不是自增长,就会出现问题
2, 在那个子查询中也加条件:select top 30 recid from A where recid>-1
例2:查询表中的最后以条记录,并不知道这个表共有多少数据,以及表结构。
set @s = 'select top 1 * from T where pid not in (select top ' + str(@count-1) + ' pid from T)'
print @s exec sp_executesql @s
9:获取当前数据库中的所有用户表
select Name from sysobjects where xtype='u' and status>=0
10:获取某一个表的所有字段
select name from syscolumns where id=object_id('表名')
select name from syscolumns where id in (select id from sysobjects where type = 'u' and name = '表名')
两种方式的效果相同
11:查看与某一个表相关的视图、存储过程、函数
select a.* from sysobjects a, syscomments b where a.id = b.id and b.text like '%表名%'
12:查看当前数据库中所有存储过程
select name as 存储过程名称 from sysobjects where xtype='P'
13:查询用户创建的所有数据库
select * from master..sysdatabases D where sid not in(select sid from master..syslogins where name='sa')
或者
select dbid, name AS DB_NAME from master..sysdatabases where sid <> 0x01
14:查询某一个表的字段和数据类型
select column_name,data_type from information_schema.columns
where table_name = '表名'
15:不同服务器数据库之间的数据操作
--创建链接服务器
exec sp_addlinkedserver 'ITSV ', ' ', 'SQLOLEDB ', '远程服务器名或ip地址 '
exec sp_addlinkedsrvlogin 'ITSV ', 'false ',null, '用户名 ', '密码 '
--查询示例
select * from ITSV.数据库名.dbo.表名
--导入示例
select * into 表 from ITSV.数据库名.dbo.表名
--以后不再使用时删除链接服务器
exec sp_dropserver 'ITSV ', 'droplogins '
--连接远程/局域网数据(openrowset/openquery/opendatasource)
--1、openrowset
--查询示例
select * from openrowset( 'SQLOLEDB ', 'sql服务器名 '; '用户名 '; '密码 ',数据库名.dbo.表名)
--生成本地表
select * into 表 from openrowset( 'SQLOLEDB ', 'sql服务器名 '; '用户名 '; '密码 ',数据库名.dbo.表名)
--把本地表导入远程表
insert openrowset( 'SQLOLEDB ', 'sql服务器名 '; '用户名 '; '密码 ',数据库名.dbo.表名)
select *from 本地表
--更新本地表
update b
set b.列A=a.列A
from openrowset( 'SQLOLEDB ', 'sql服务器名 '; '用户名 '; '密码 ',数据库名.dbo.表名)as a inner join本地表 b
on a.column1=b.column1
--openquery用法需要创建一个连接
--首先创建一个连接创建链接服务器
exec sp_addlinkedserver 'ITSV ', ' ', 'SQLOLEDB ', '远程服务器名或ip地址 '
--查询
select *
FROM openquery(ITSV, 'SELECT * FROM 数据库.dbo.表名 ')
--把本地表导入远程表
insert openquery(ITSV, 'SELECT * FROM 数据库.dbo.表名 ')
select * from 本地表
--更新本地表
update b
set b.列B=a.列B
FROM openquery(ITSV, 'SELECT * FROM 数据库.dbo.表名 ') as a
inner join 本地表 b on a.列A=b.列A
--3、opendatasource/openrowset
SELECT *
FROM opendatasource( 'SQLOLEDB ', 'Data Source=ip/ServerName;User ID=登陆名;Password=密码 ' ).test.dbo.roy_ta
--把本地表导入远程表
insert opendatasource( 'SQLOLEDB ', 'Data Source=ip/ServerName;User ID=登陆名;Password=密码 ').数据库.dbo.表名
select * from 本地表
http://linux521.blog.51cto.com/4099846/767662

