一、FMDB的简单说明
1.什么是FMDB
FMDB是iOS平台的SQLite数据库框架
FMDB以OC的方式封装了SQLite的C语言API
2.FMDB的优点
使用起来更加面向对象,省去了很多麻烦、冗余的C语言代码
对比苹果自带的Core Data框架,更加轻量级和灵活
提供了多线程安全的数据库操作方法,有效地防止数据混乱
3.FMDB的源代码地址
https://github.com/ccgus/fmdb
二、核心类
FMDB有三个主要的类
1.FMDatabase
一个FMDatabase对象就代表一个单独的SQLite数据库
用来执行SQL语句
2.FMResultSet
使用FMDatabase执行查询后的结果集
3.FMDatabaseQueue
用于在多线程中执行多个查询或更新,它是线程安全的
接下来我们就上Demo
首先我们把sqlite3依赖库导入:
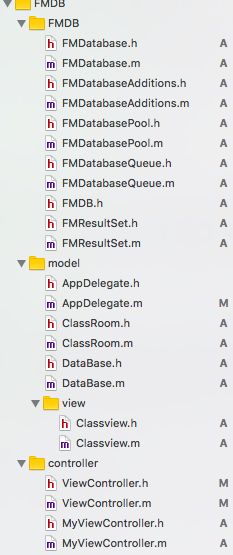
然后我们把把下载好的FMDB放进我们的项目中,把需要的MVC格式创建出来:
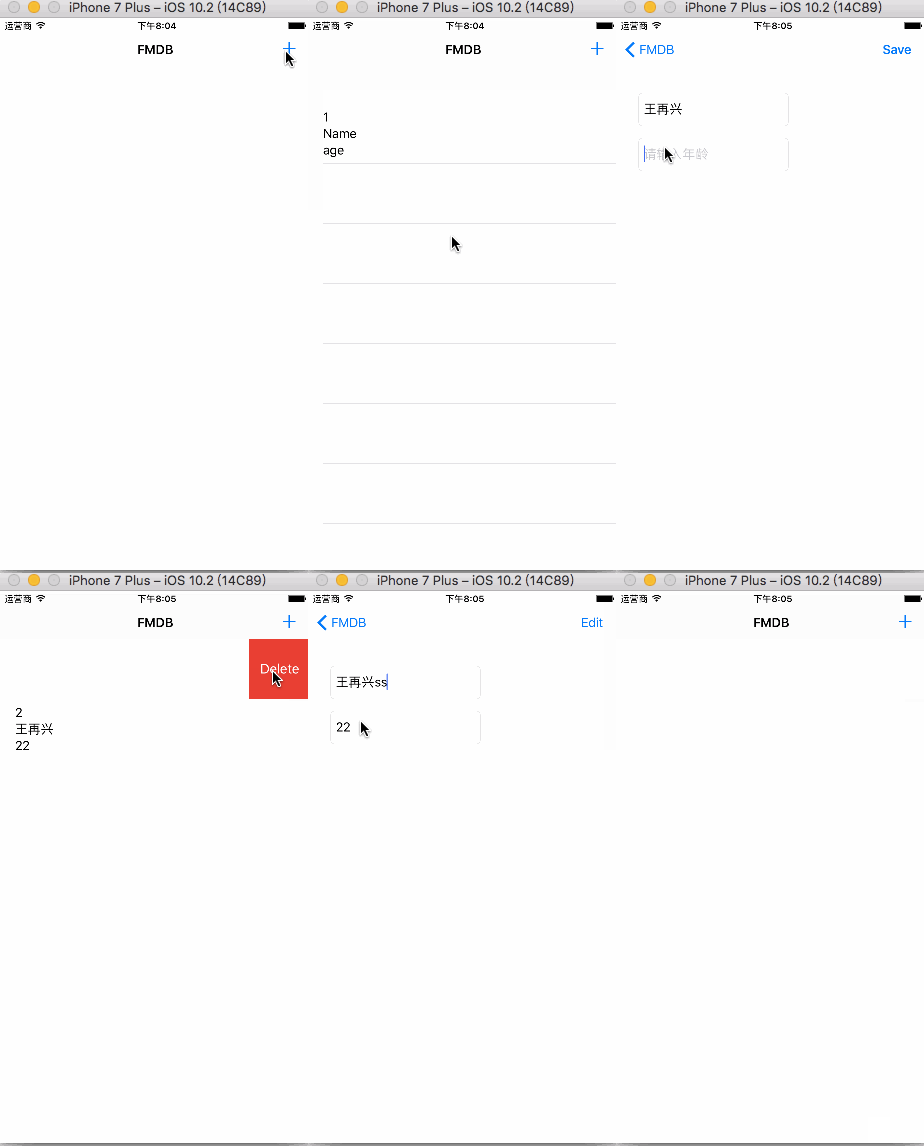
接下来是运行的效果:
同样跟SQL一样,我们需要创建的类文件都一样ClassRoom里面写属性用来存储数据,还是写姓名和年龄,继承于NSObject:
#import

@interface ClassRoom : NSObject

@property(nonatomic,assign)NSInteger integer;

@property(nonatomic,strong)NSString *name,*age;

@end
DataBase.h里写我们的单例方法和增删改查:
#import
#import "ClassRoom.h"
@interface DataBase : NSObject

// 单例
+(instancetype)initDataBase;
// 初始化数据库
-(void)initData;
// 创建数据库表格
-(void)createTable;

// 添加数据
-(void)addData:(ClassRoom *)thaData;
// 删除数据
-(void)deleteData:(NSInteger)theid;
// 修改数据
-(void)changeData:(ClassRoom *)theData;
// 查询数据
-(NSMutableArray *)Dataarray;
@end
接下来我们只需要记住SQL语句,其他的只要我们理解之后都可以根据自己的需求写出来:
#import "DataBase.h"
#import "FMDatabase.h"

static DataBase *thedata = nil;
static FMDatabase *db = nil;

@implementation DataBase

// 单例
+(instancetype)initDataBase
{
    static dispatch_once_t onceToken;
    dispatch_once(&onceToken, ^{
        thedata = [[DataBase alloc]init];
    });
    return thedata;
}

+(instancetype)allocWithZone:(struct _NSZone *)zone
{
    if (!thedata)
    {
        thedata = [super allocWithZone:zone];
    }
    return thedata;
}

-(id)copy
{
    return self;
}

-(id)mutableCopy
{
    return self;
}

// 初始化数据库
-(void)initData
{
    // 创建Document目录
    NSString *path = [NSSearchPathForDirectoriesInDomains(NSDocumentDirectory, NSUserDomainMask, YES) objectAtIndex:0];

    //拼接数据库的表名的路径
    NSString *strname = [path stringByAppendingString:@"/loaction.db"];

    db = [[FMDatabase alloc]initWithPath:strname];

    if ([db open])
    {
        NSLog(@"数据库创建成功");
        [self createTable];
    }
    else
    {
        NSLog(@"创建失败");
    }
}
// 创建数据库表格
-(void)createTable
{
    [db executeUpdate:@"create table classroom(integer integer primary key,name text,age text)"];

    [db close];
}

// 添加数据
-(void)addData:(ClassRoom *)thaData
{
    if ([db open])
    {
        [db executeUpdate:[NSString stringWithFormat:@"insert into classroom values(null,'%@','%@')",thaData.name,thaData.age]];
    }
    else
    {
        NSLog(@"添加失败");
    }

    [db close];
}
// 删除数据
-(void)deleteData:(NSInteger)theid
{
    if ([db open])
    {
        [db executeUpdate:[NSString stringWithFormat:@"delete from classroom where inTeger = '%ld'",theid]];
    }
    else
    {
        NSLog(@"删除失败");
    }

    [db close];
}
// 修改数据
-(void)changeData:(ClassRoom *)theData
{
    if ([db open])
    {
        [db executeUpdate:[NSString stringWithFormat:@"update classroom set name = '%@',age = '%@' where inTeger= '%ld'",theData.name,theData.age,theData.integer]];
    }
    else
    {
        NSLog(@"修改失败");
    }

    [db close];
}
// 查询数据
-(NSMutableArray *)Dataarray
{
    NSMutableArray *arr = [NSMutableArray array];

    [db open];

    FMResultSet *set = [[FMResultSet alloc]init];

    set = [db executeQuery:@"select *from classroom"];

    while ([set next])
    {
        ClassRoom *room = [[ClassRoom alloc]init];
        room.integer = [set intForColumn:@"integer"];

        room.name = [set stringForColumn:@"name"];

        room.age = [set stringForColumn:@"age"];

        [arr addObject:room];
    }


    [db close];

    return arr;
}

@end
ClassView.h里面我们就在视图上添加两个文本框用来添加数据:
#import "Classview.h"

@implementation Classview

- (instancetype)initWithFrame:(CGRect)frame
{
    if (self = [super initWithFrame:frame])
    {
        [self addSubview:self.nameTF];
        [self addSubview:self.ageTF];
    }
    return self;
}

- (UITextField *)nameTF
{
    if (!_nameTF)
    {
        _nameTF = [[UITextField alloc]initWithFrame:CGRectMake(30, 100, 200, 44)];

        _nameTF.placeholder = @"请输入用户名";
        _nameTF.borderStyle = UITextBorderStyleRoundedRect;


    }

    return _nameTF;
}

-(UITextField *)ageTF
{
    if (!_ageTF)
    {
        _ageTF = [[UITextField alloc]initWithFrame:CGRectMake(30, 160, 200, 44)];

        _ageTF.placeholder = @"请输入年龄";
        _ageTF.borderStyle = UITextBorderStyleRoundedRect;
        _ageTF.keyboardType = UIKeyboardTypePhonePad;


    }

    return _ageTF;
}


@end
view controller中我们继承于UITableViewController简单方便:
#import "ViewController.h"
#import "ClassRoom.h"
#import "Classview.h"
#import "DataBase.h"
#import "MyViewController.h"
#import "FMDatabase.h"


@interface ViewController ()
{
    NSMutableArray *array;
}
@end

@implementation ViewController

- (void)viewDidLoad {
    [super viewDidLoad];


    self.navigationItem.rightBarButtonItem = [[UIBarButtonItem alloc]initWithBarButtonSystemItem:UIBarButtonSystemItemAdd target:self action:@selector(click)];

    array = [NSMutableArray new];


}


-(CGFloat)tableView:(UITableView *)tableView heightForRowAtIndexPath:(NSIndexPath *)indexPath
{
    return 80;
}

-(NSInteger)tableView:(UITableView *)tableView numberOfRowsInSection:(NSInteger)section
{
    return array.count;
}

-(UITableViewCell *)tableView:(UITableView *)tableView cellForRowAtIndexPath:(NSIndexPath *)indexPath
{
    UITableViewCell *cell = [tableView dequeueReusableCellWithIdentifier:@""];

    if (!cell)
    {
        cell = [[UITableViewCell alloc]initWithStyle:UITableViewCellStyleDefault reuseIdentifier:@""];
    }

    ClassRoom *room =array[indexPath.row];
    cell.textLabel.text = [NSString stringWithFormat:@"%ld\n%@\n%@",room.integer,room.name,room.age];
    cell.textLabel.numberOfLines = 0;


    return cell;
}

-(void)tableView:(UITableView *)tableView didSelectRowAtIndexPath:(NSIndexPath *)indexPath
{
    MyViewController *my = [[MyViewController alloc]init];

    my.theroon = array[indexPath.row];

    [self.navigationController pushViewController:my animated:YES];
}

-(void)tableView:(UITableView *)tableView commitEditingStyle:(UITableViewCellEditingStyle)editingStyle forRowAtIndexPath:(NSIndexPath *)indexPath
{
    [[DataBase initDataBase]initData];

    [[DataBase initDataBase]deleteData:[array[indexPath.row]integer]];

    [array removeObject:array[indexPath.row]];

    [self.tableView reloadData];
}

-(void)viewWillAppear:(BOOL)animated
{
    [[DataBase initDataBase]initData];

    array = [[DataBase initDataBase]Dataarray];

    [self.tableView reloadData];
}

-(void)click
{
    MyViewController *my = [[MyViewController alloc]init];

    [self.navigationController pushViewController:my animated:YES];
}

@end
MyViewController.h里面我们用一个属性传值把两个控制器关联一下:
#import
#import "ClassRoom.h"
@interface MyViewController : UIViewController

@property(nonatomic,strong)ClassRoom *theroon;

@end
MyViewController.m里面我们就把需要传递的数据写上:
#import "MyViewController.h"
#import "ClassRoom.h"
#import "DataBase.h"
#import "Classview.h"
@interface MyViewController ()
{
    Classview *classview;
}
@end

@implementation MyViewController

- (void)viewDidLoad {
    [super viewDidLoad];

    classview = [[Classview alloc]initWithFrame:self.view.frame];

    classview.backgroundColor = [UIColor whiteColor];

    self.view = classview;

    classview.nameTF.text = self.theroon.name;
    classview.ageTF.text = self.theroon.age;

    if (classview.nameTF.text.length<=0)
    {
        self.navigationItem.rightBarButtonItem = [[UIBarButtonItem alloc]initWithBarButtonSystemItem:UIBarButtonSystemItemSave target:self action:@selector(save)];
    }else
    {
        self.navigationItem.rightBarButtonItem = [[UIBarButtonItem alloc]initWithBarButtonSystemItem:UIBarButtonSystemItemEdit target:self action:@selector(edit)];
    }

}

-(void)save
{
    ClassRoom *roomq = [[ClassRoom alloc]init];

    roomq.name = classview.nameTF.text;
    roomq.age = classview.ageTF.text;

    [[DataBase initDataBase]initData];

    [[DataBase initDataBase]addData:roomq];

    [self.navigationController popViewControllerAnimated:YES];
}

-(void)edit
{
    self.theroon.name = classview.nameTF.text;

    self.theroon.age =  classview.ageTF.text;

    [[DataBase initDataBase]initData];

    [[DataBase initDataBase]changeData:self.theroon];


    [self.navigationController popViewControllerAnimated:YES];
}

@end
最后总结一下,其实SQL和FMDB这两个都是差不多的,只不过需要重点注意的地方就是增删改查里增删改的方法都是executeUpdate,这三个方法是一样的,查询数据这块是executeQuery我们需要记住这两个方法.还有就是我们这个SQL语句添加我们的属性地方我们都需要加一个单引号,这个是重点需要注意的.写的有点匆忙,大家见谅..


