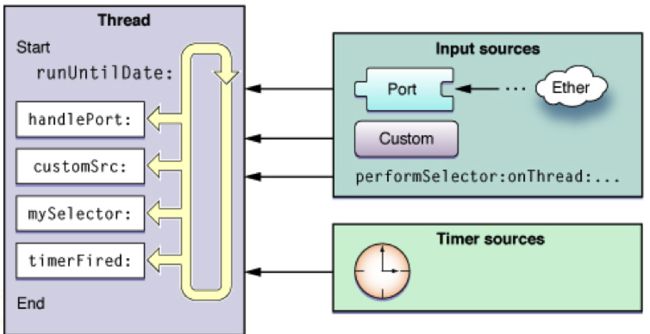
RunLoop资料
苹果官方文档
https://developer.apple.com/library/mac/documentation/Cocoa/Conceptual/Multithreading/RunLoopManagement/RunLoopManagement.htmlCFRunLoopRef是开源的
http://opensource.apple.com/source/CF/CF-1151.16/
问题: 什么是RunLoop?
- 从字面意思看
运行循环
跑圈
- 基本作用
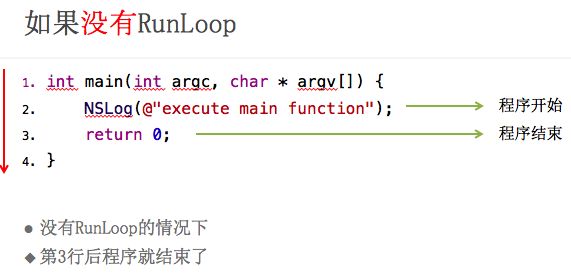
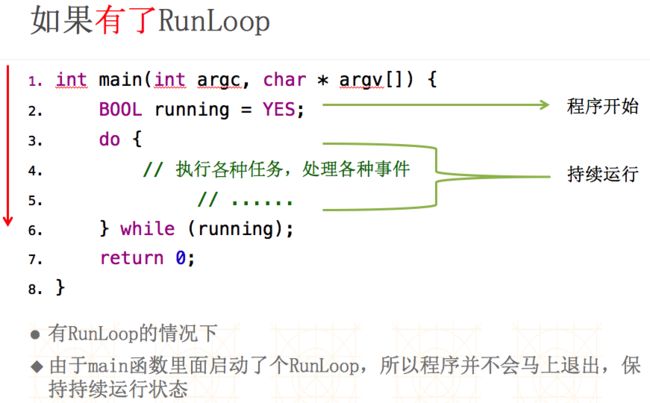
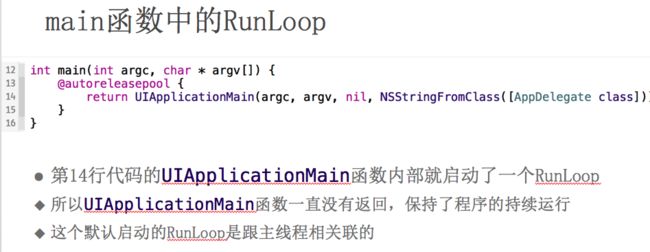
保持程序的持续运行
处理App中的各种事件(比如触摸事件、定时器事件、Selector事件)
节省CPU资源,提高程序性能:该做事时做事,该休息时休息
.....
]
RunLoop与线程
- 每条线程都有唯一的一个与之对应的RunLoop对象
- 主线程的RunLoop已经自动创建好了,子线程的RunLoop需要主动创建
- RunLoop在第一次获取时创建,在线程结束时销毁
获得RunLoop对象
- Foundation
[NSRunLoop currentRunLoop]; // 获得当前线程的RunLoop对象
[NSRunLoop mainRunLoop]; // 获得主线程的RunLoop对象
- CoreFoundation
CFRunLoopGetCurrent(); // 获得当前线程的RunLoop对象
CFRunLoopGetMain(); // 获得主线程的RunLoop对象
RunLoop相关类
-
CoreFoundation中关于RunLoop的5个类
- CFRunLoopRef
- CFRunLoopModeRef
- CFRunLoopSourceRef
- CFRunLoopTimerRef
- CFRunLoopObserverRef
-
**CFRunLoopModeRef **
- CFRunLoopModeRef代表RunLoop的运行模式
- 一个 RunLoop包含若干个 Mode,每个Mode又包含若干个Source/Timer/Observer
- 每次RunLoop启动时,只能指定其中一个 Mode,这个Mode被称作 CurrentMode
- 如果需要切换Mode,只能退出Loop,再重新指定一个Mode进入
- 这样做主要是为了分隔开不同组的Source/Timer/Observer,让其互不影响
-
系统默认注册了5个Mode:
- kCFRunLoopDefaultMode:App的默认Mode,通常主线程是在这个Mode下运行
- UITrackingRunLoopMode:界面跟踪 Mode,用于 ScrollView追踪触摸滑动,保证界面滑动时不受其他
Mode 影响 - UIInitializationRunLoopMode: 在刚启动 App 时第进入的第一个 Mode,启动完成后就不再使用
- GSEventReceiveRunLoopMode: 接受系统事件的内部 Mode,通常用不到
- kCFRunLoopCommonModes: 这是一个占位用的Mode,不是一种真正的Mode
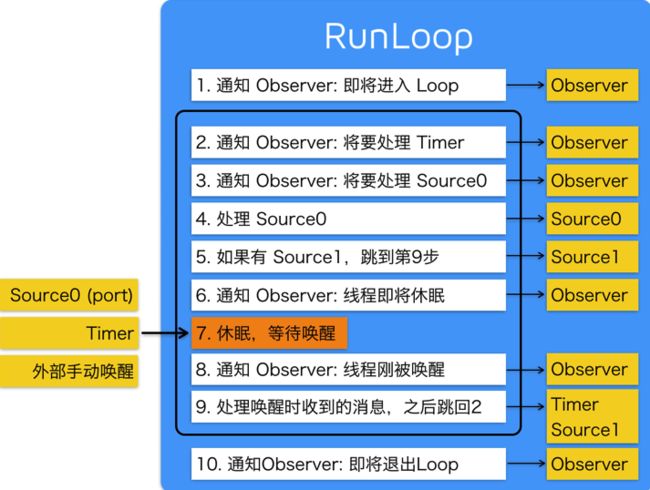
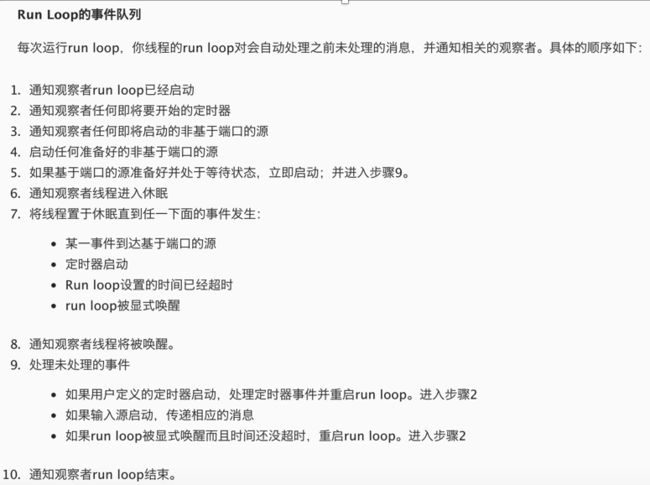
RunLoop处理逻辑
- RunLoop处理逻辑-网友整理版版
-
** RunLoop处理逻辑-官方版 **
代码展示区
01-掌握-NSRunLoop基本概念
#import "ViewController.h"

@interface ViewController ()

@end

@implementation ViewController

- (void)viewDidLoad {
    [super viewDidLoad];
    /*
    // Do any additional setup after loading the view, typically from a nib.
    NSRunLoop *currentRunloop =  [NSRunLoop currentRunLoop];
    NSLog(@"currentRunloop = %@", currentRunloop);
    NSRunLoop *mainRunloop = [NSRunLoop mainRunLoop];
    NSLog(@"mainRunloop = %@", mainRunloop);
     */
    /*
    CFRunLoopRef currentRunloop =  CFRunLoopGetCurrent();
    NSLog(@"currentRunloop = %@", currentRunloop);
    CFRunLoopRef mainRunloop = CFRunLoopGetMain();
    NSLog(@"mainRunloop = %@", mainRunloop);
     */

    /*
     1.一条线程对应一个RunLoop
     2.主线程的RunLoop默认已经创建好了, 而子线程的需要我们自己手动创建
     3.一个NSRunLoop/CFRunLoopRef, 就代表一个RunLoop对象
     4.如何获取当前线程对应的RunLoop对象,currentRunLoop/CFRunLoopGetCurrent
     5.如何获取主线程对应的RunLoop对象,mainRunLoop/CFRunLoopGetMain
     6.只要线程结束了, 那么与之对应的RunLoop对象也会被释放
     */

    NSThread *thread = [[NSThread alloc] initWithTarget:self selector:@selector(show) object:nil];
    [thread start];

}

- (void)show
{
//    [[NSRunLoop alloc] init]; // 注意, 如果想给子线程添加RunLoop, 不能直接alloc init

    [NSRunLoop currentRunLoop]; // 只要调用currentRunLoop方法, 系统就会自动创建一个RunLoop, 添加到当前线程中
}

@end
02-NSRunLoopMode中的类
#import "ViewController.h"

@interface ViewController ()

/** 时间 */
@property (nonatomic, strong) dispatch_source_t timer;
- (IBAction)btnClick:(id)sender;
@end

@implementation ViewController

- (void)viewDidLoad {
    [super viewDidLoad];
    // Do any additional setup after loading the view, typically from a nib.

}

- (void)touchesBegan:(NSSet *)touches withEvent:(UIEvent *)event
{
    NSLog(@"%s", __func__);
    [self gcdTimer];
}
- (IBAction)btnClick:(id)sender {
    NSLog(@"%s", __func__);
}


- (void)gcdTimer
{
    /*
     dispatch_after(dispatch_time(DISPATCH_TIME_NOW, (int64_t)(2.0 * NSEC_PER_SEC)), dispatch_get_main_queue(), ^{
     NSLog(@"-----------");
     });
     */

    NSLog(@"%s", __func__);
    // 0.获取一个全局并发队列
    dispatch_queue_t queue = dispatch_get_global_queue(0, 0);

    // 1.创建一个定时器
    // 第四个参数: 传递一个队列, 该队列对顶了将来的回调方法在哪个线程中执行
    dispatch_source_t timer = dispatch_source_create(DISPATCH_SOURCE_TYPE_TIMER, 0, 0, queue);
    self.timer = timer;
    //    NSLog(@"%@", timer);

    // 2.指定定时器开始的时间和间隔的时间, 以及精准度
    /*
     第1个参数: 需要给哪个定时器设置
     第2个参数: 定时器开始的时间 / DISPATCH_TIME_NOW立即执行
     第3个参数: 定时器开始之后的间隔时间
     第4个参数: 定时器间隔执行的精准度, 传入0代表最精准(尽量的让定时器精准), 传入一个大于0的值, 代表多少秒的范围是可以接受的
     第四个参数存在的意义: 主要是为了提高程序的性能
     注意点: Dispatch的定时器接收的时间是纳秒
     */

    // 开始时间
    //    dispatch_time_t startTime = DISPATCH_TIME_NOW;
    dispatch_time_t startTime = dispatch_time(DISPATCH_TIME_NOW, 3.0 * NSEC_PER_SEC);

    // 间隔时间
    uint64_t interval = 1.0 * NSEC_PER_SEC;
    dispatch_source_set_timer(timer, startTime, interval, 0 * NSEC_PER_SEC);

    // 3.指定定时器的回调方法
    /*
     第1个参数: 需要给哪个定时器设置
     第2个参数: 需要回调的block
     */
    dispatch_source_set_event_handler(timer, ^{
        NSLog(@"++++++++++++++ %@", [NSThread currentThread]);

    });

    // 4.开启定时器
    dispatch_resume(timer);
}
- (void)timer
{
    /*
     // 1.创建一个NSTimer
     NSTimer *timer = [NSTimer timerWithTimeInterval:1.0 target:self selector:@selector(show) userInfo:nil repeats:YES];
     // 2.将NSTimer添加到RunLoop中, 并且告诉系统, 当前Tiemr只有在RunLoop的默认模式下才有效
     //    [[NSRunLoop currentRunLoop] addTimer:timer forMode:NSDefaultRunLoopMode];

     // 2.将NSTimer添加到RunLoop中, 并且告诉系统, 当前Tiemr只有在Tracking的默认模式下才有效
     //    [[NSRunLoop currentRunLoop] addTimer:timer forMode:UITrackingRunLoopMode];

     // 2.将NSTimer添加到RunLoop中, 并且告诉系统, 在所有被"标记"common的模式都可以运行
     */
    /*
     common modes = {type = mutable set, count = 2,
     entries =>
     0 : {contents = "UITrackingRunLoopMode"}
     2 : {contents = "kCFRunLoopDefaultMode"}
     }
     UITrackingRunLoopMode和kCFRunLoopDefaultMode都被标记为了common模式, 所以只需要将timer的模式设置为forMode:NSRunLoopCommonModes, 就可以在默认模式和追踪模式都能够运行
     */
    //    [[NSRunLoop currentRunLoop] addTimer:timer forMode:NSRunLoopCommonModes];

    // 注意: 如果是通过scheduledTimerWithTimeInterval创建的NSTimer, 默认就会添加到RunLoop得DefaultMode中 , 所以它会自动运行
    NSTimer *timer = [NSTimer scheduledTimerWithTimeInterval:1.0 target:self selector:@selector(show) userInfo:nil repeats:YES];
    // 虽然默认已经添加到DefaultMode中, 但是我们也可以自己修改它的模式
    [[NSRunLoop currentRunLoop] addTimer:timer forMode:NSRunLoopCommonModes];
}


- (void)show
{
    NSLog(@"%s", __func__);
}

@end
03-CFRunLoopObserverRef
#import "ViewController.h"

@interface ViewController ()

@end

@implementation ViewController

- (void)viewDidLoad {
    [super viewDidLoad];

    // 创建Observer
    /*
     第1个参数: 指定如何给observer分配存储空间
     第2个参数: 需要监听的状态类型/ kCFRunLoopAllActivities监听所有状态
     第3个参数: 是否每次都需要监听
     第4个参数: 优先级
     第5个参数: 监听到状态改变之后的回调
     */
    CFRunLoopObserverRef  observer = CFRunLoopObserverCreateWithHandler(CFAllocatorGetDefault(), kCFRunLoopAllActivities, YES, 0, ^(CFRunLoopObserverRef observer, CFRunLoopActivity activity) {
        switch (activity) {
            case kCFRunLoopEntry:
                NSLog(@"即将进入runloop");
                break;
            case kCFRunLoopBeforeTimers:
                NSLog(@"即将处理timer");
                break;
            case kCFRunLoopBeforeSources:
                NSLog(@"即将处理source");
                break;
            case kCFRunLoopBeforeWaiting:
                NSLog(@"即将进入睡眠");
                break;
            case kCFRunLoopAfterWaiting:
                NSLog(@"刚从睡眠中唤醒");
                break;
            case kCFRunLoopExit:
                NSLog(@"即将退出");
                break;
            default:
                break;
        }
    });


    // 给主线程的RunLoop添加一个观察者
    /*
     第1个参数: 需要给哪个RunLoop添加观察者
     第2个参数: 需要添加的Observer对象
     第3个参数: 在哪种模式下可以可以监听
     */
    CFRunLoopAddObserver(CFRunLoopGetMain(), observer, kCFRunLoopDefaultMode);

    // 释放对象
    CFRelease(observer);

    [NSTimer scheduledTimerWithTimeInterval:5.0 target:self selector:@selector(show) userInfo:nil repeats:YES];
}

- (void)show{
     NSLog(@"show");
}
@end
04-掌握-RunLoop应用场景
#import "ViewController.h"

@interface ViewController ()
@property (weak, nonatomic) IBOutlet UIImageView *imageView;

/** 子线程 */
@property (nonatomic, strong) NSThread *thread;
@end

@implementation ViewController

- (void)viewDidLoad
{
    /*
     自动释放池什么时候创建和释放
     1.第一次创建, 是在runloop进入的时候创建  对应的状态 = kCFRunLoopEntry
     2.最后一次释放, 是在runloop退出的时候  对应的装 = kCFRunLoopExit
     3.其它创建和释放
        * 每次睡觉的时候都会释放前自动释放池, 然后再创建一个新的

     _wrapRunLoopWithAutoreleasePoolHandler activities = 0x1,
     1  = kCFRunLoopEntry  进入loop  创建自动释放池

     _wrapRunLoopWithAutoreleasePoolHandler activities = 0xa0,
     160 = kCFRunLoopBeforeWaiting  即将进入睡眠 ,先释放上一次创建的自动释放池, 然后再创建一个新的释放池
     +
     kCFRunLoopExit 即将退出loop  释放自动释放池

     */
    NSLog(@"%@", [NSRunLoop currentRunLoop]);
//    NSLog(@"%d %d", 0x1, 0xa0);


    NSThread *thread = [NSThread alloc] initWithTarget:self selector:@selector(show) object:nil];
    self.thread = thread;
    [thread start];
}

- (void)touchesBegan:(NSSet *)touches withEvent:(UIEvent *)event
{
    NSLog(@"%s", __func__);
    /*
    // 1.在指定模式下进行特定的操作
    [self.imageView performSelector:@selector(setImage:) withObject:[UIImage imageNamed:@"abc"] afterDelay:2.0 inModes:@[UITrackingRunLoopMode]];
     */

    // 默认清空下一个线程只能使用一次, 也就是说只能执行一个操作, 执行完毕之后就不能使用了
    [self performSelector:@selector(test) onThread:self.thread withObject:nil waitUntilDone:YES];
}
- (void)show{
    NSLog(@"%s", __func__);
//    while(1);

    // 1.子线程的NSRunLoop需要手动创建
    // 2.子线程的NSRunLoop需要手动开启
    // 3.如果子线程的NSRunLoop没有设置source or timer, 那么子线程的NSRunLoop会立刻关闭
//    [[NSRunLoop currentRunLoop] addPort:[NSMachPort port] forMode:NSDefaultRunLoopMode];


//    NSTimer *timer = [NSTimer timerWithTimeInterval:5.0 target:self selector:@selector(test) userInfo:nil repeats:YES];
//    [[NSRunLoop currentRunLoop] addTimer:timer forMode:NSRunLoopCommonModes];
//    [[NSRunLoop currentRunLoop] run];


    // 注意点: NSRunLoop只会检查有没有source和timer, 没有就关闭, 不会检查observer
    CFRunLoopObserverRef  observer = CFRunLoopObserverCreateWithHandler(CFAllocatorGetDefault(), kCFRunLoopAllActivities, YES, 0, ^(CFRunLoopObserverRef observer, CFRunLoopActivity activity) {
    });

    CFRunLoopAddObserver(CFRunLoopGetCurrent(), observer, kCFRunLoopDefaultMode);
    // 释放对象
    CFRelease(observer);

    [[NSRunLoop currentRunLoop] run];
    NSLog(@"end -----");
}

- (void)test
{
    NSLog(@"%s %@", __func__, [NSThread currentThread]);
}

@end
如何开启一个常驻线程
- Listing 3-1 shows the main routine for a thread that attaches a run loop observer to its run loop.
The purpose of the example is to show you how to create a run loop observer, so the code simply sets up a run loop observer to monitor all run loop activities.
The basic handler routine (not shown) simply logs the run loop activity as it processes the timer requests.- 翻译: 显示了主程序的线程高度运行循环观察其运行循环。
这个例子的目的是向您展示如何创建一个运行循环观察者,因此代码简单地设置一个运行循环观察员监督所有运行循环活动。
最基本的处理程序例程(图中未显示)简单的日志处理计时器请求运行循环活动。
- 翻译: 显示了主程序的线程高度运行循环观察其运行循环。
**Listing 3-1**  Creating a run loop observer
- (void)threadMain

{
    // The application uses garbage collection, so no autorelease pool is needed.
    NSRunLoop* myRunLoop = [NSRunLoop currentRunLoop];

    // Create a run loop observer and attach it to the run loop.
    CFRunLoopObserverContext context = {0, self, NULL, NULL, NULL};

    CFRunLoopObserverRef observer = CFRunLoopObserverCreate(kCFAllocatorDefault,kCFRunLoopAllActivities, YES, 0, &myRunLoopObserver, &context);

    if (observer) {
        CFRunLoopRef cfLoop = [myRunLoop getCFRunLoop];

        CFRunLoopAddObserver(cfLoop, observer, kCFRunLoopDefaultMode);
    }

    // Create and schedule the timer.
    [NSTimer scheduledTimerWithTimeInterval:0.1 target:self selector:@selector(doFireTimer:) userInfo:nil repeats:YES];
    NSInteger loopCount = 10;
    do {
        // Run the run loop 10 times to let the timer fire.
        [myRunLoop runUntilDate:[NSDate dateWithTimeIntervalSinceNow:1]];
        loopCount--;
   } while (loopCount);
}

// 官方文档介绍
When configuring the run loop for a long-lived thread, it is better to add at least one input source to receive messages.
Although you can enter the run loop with only a timer attached, once the timer fires, it is typically invalidated,
which would then cause the run loop to exit. Attaching a repeating timer could keep the run loop running over a longer period of time,
but would involve firing the timer periodically to wake your thread, which is effectively another form of polling.
By contrast, an input source waits for an event to happen, keeping your thread asleep until it does.

/*
    当你配置一个线程为常驻线程时,最好的方式是添加至少一个输入源去接收消息。
    尽管你可以只用一个定时器连接进入RunLoop,一旦定时器被销毁,RunLoop也通常是无效的,这会导致退出当前运行循环。
    附加一个相关的定时器可以让保持长时间的运行,但需要触发计时器定期唤醒你的线程,这实际上是另一种形式的循环。
    相比之下,一个输入源等待一个事件发生,保持你的线程运行,直到它睡着了。
*/
基于端口的常驻线程
- shows the primary thread code for launching a secondary worker thread. Because the Cocoa framework performs many of the intervening steps for configuring the port and run loop, the launchThread method is noticeably shorter than its Core Foundation equivalent; however, the behavior of the two is nearly identical. One difference is that instead of sending the name of the local port to the worker thread, this method sends the NSPort object directly.
- 显示了启动一个主要线程代码辅助工作线程。因为Cocoa框架执行许多干预措施的配置端口和运行循环,launchThread方法明显短于其核心基础等效;然而,两个的行为几乎是相同的。一个区别是,而不是发送本地端口的名称工作线程,该方法直接发送NSPort对象。
NSPort* myPort = [NSMachPort port];

if (myPort) {
    // This class handles incoming port messages.
    [myPort setDelegate:self];

    // Install the port as an input source on the current run loop.
    [[NSRunLoop currentRunLoop] addPort:myPort forMode:NSDefaultRunLoopMode];

    // Detach the thread. Let the worker release the port.
    [NSThread detachNewThreadSelector:@selector(LaunchThreadWithPort:) toTarget:[MyWorkerClass class] withObject:myPort];
}

// 官方文档介绍
In order to set up a two-way communications channel between your threads,
you might want to have the worker thread send its own local port to your main thread in a check-in message.
Receiving the check-in message lets your main thread know that all went well in launching the second thread and also gives you a way to send further messages to that thread.

/* 翻译:为了建立一个双向通信信道之间的线程,你可能想要工作线程发送自己的本地端口到主线程在登记信息。
主线程接收登记信息让你知道一切顺利发射第二个线程也给你进一步消息发送给该线程的方法。
*/
