1. 前言
Spring Boot可以帮助我们快速的构建Spring应用,因为Spring Boot构建了jar包的依赖集合,并设置了诸多默认配置。本文讲述使用Spring Boot构建一个简单的RESTful Web Service,是Spring Boot的入门。
2. 开发环境
- Eclipse
- JDK 1.8
- Maven 3.0+
3. 编码过程
3.1 创建工程
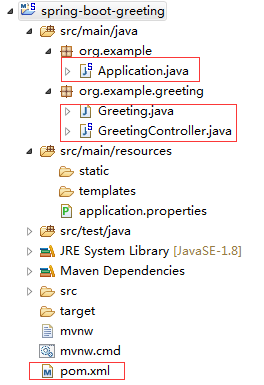
创建一个普通的maven工程,不必是web工程,目录结构如下图所示。
3.2 pom.xml配置文件
Spring Boot提供了诸多sping-boot-starter,每一个starter都是若干依赖的集合。本例是构建Web Service,因此使用了spring-boot-starter-web starter。
    org.springframework.boot
    spring-boot-starter-parent
    1.4.0.RELEASE


    UTF-8
    UTF-8
    1.8


        org.springframework.boot
        spring-boot-starter-web


            org.springframework.boot
            spring-boot-maven-plugin
3.3 Greeting.java
Greeting.java 有两个成员变量,分别是id和content。
  public class Greeting {

  private long id;

  private String content;

  public Greeting() {}

  public Greeting(long id, String content) {
    this.id = id;
    this.content = content;
  }

  public long getId() {
    return id;
  }

  public void setId(long id) {
    this.id = id;
  }

  public String getContent() {
    return content;
  }

  public void setContent(String content) {
    this.content = content;
  }

}
3.4 GreetingController.java
GreetingController是一个Spring MVC Controller,它使用了@RestController注解,等同于@Controller加@ResponseBody。
@RequestMapping这个注解的作用域是类和方法,本例是作用在greeting()方法上,代表它处理/greeting请求,并以json形式返回Greeting对象。
@RequestParam的作用域是方法的参数,代表greeting()方法接受一个名为name、默认值为World、类型为String的参数。
@RestController
public class GreetingController {

  private static final String TEMPLATE = "Hello, %s!";
  private final AtomicLong counter = new AtomicLong();

  @RequestMapping("/greeting")
  public Greeting greeting(@RequestParam(value = "name",
               defaultValue = "World") String name) {
    return new Greeting(counter.incrementAndGet(), String.format(TEMPLATE, name));
  }

}
3.5 Application.java
Application是本工程启动的入口。请注意,Spring Boot工程仅允许存在一个main方法,如果项目中还存在其它的main方法,本工程将不能正常启动。
@SpringBootApplication等于以下三个注解@Configuration 、@ComponentScan、@EnableAutoConfiguration 。
@SpringBootApplication
public class Application {

    public static void main(String[] args) {
        SpringApplication.run(Application.class, args);
    }
}
4. 启动验证
spring-boot-starter-web内嵌了tomcat了,因此我们可以直接run起来Application,之后即可使用浏览器访问 http://localhost:8080/greeting。我们将看到以下内容:
{
  id: 1,
  content: "Hello, World!"
}
还可以尝试加上name参数,例如访问http://localhost:8080/greeting?name=Kobe, 结果如下:
{
  id: 2,
  content: "Hello, Kobe!"
}
5. 总结
使用Spring Boot,可以快速的构建一个web应用,不用我们过多关心到底依赖哪些jar包,提高开发效率。Spring官网上有大量使用Spring Boot的例子,供我们学习。
Building a RESTful Web Service
Spring Boot Reference Guide
