socket.io是js实现的,websocket框架,为了解决浏览器不兼容问题而设计
socket.io.js下载地址:https://cdnjs.com/libraries/socket.io
常用的方式是,前端使用socket.io.js,后端使用node.js实现socket.io的接口,可是我们的架构后端使用的是java,所以我使用的是netty-socketio,基于spring-boot实现;
- 参考地址:http://www.my-lin.cn/2017/04/01/netty-socket.io_for_spring-boot/
一.pom.xml中添加依赖
            com.corundumstudio.socketio
            netty-socketio
            1.7.11
二.修改SpringBoot启动类
package domain;

import com.corundumstudio.socketio.SocketIOServer;
import com.corundumstudio.socketio.annotation.SpringAnnotationScanner;
import domain.util.YmlConfig;
import org.mybatis.spring.annotation.MapperScan;
import org.springframework.beans.factory.annotation.Autowired;
import org.springframework.boot.SpringApplication;
import org.springframework.boot.autoconfigure.SpringBootApplication;
import org.springframework.boot.builder.SpringApplicationBuilder;
import org.springframework.boot.web.support.SpringBootServletInitializer;
import org.springframework.context.annotation.Bean;
import org.springframework.transaction.annotation.EnableTransactionManagement;


/**
 * Spring Boot 应用启动类
 *
 * @author : liangxifeng
 * @date : 2018-1-19
 */
// Spring Boot 应用的标识
@SpringBootApplication
//如果mybatis中service实现类中加入事务注解,需要此处添加该注解
@EnableTransactionManagement
// mapper 接口类扫描包配置
@MapperScan("domain.dao")
public class AdverCenterApplication extends SpringBootServletInitializer {
    //读取配置文件
    @Autowired
    private YmlConfig ymlConfig;
    @Override
    protected SpringApplicationBuilder configure(SpringApplicationBuilder application) {
        return application.sources(AdverCenterApplication.class);
    }

    public static void main(String[] args) {
        SpringApplication.run(AdverCenterApplication.class, args);
    }

    /**
     * 注册netty-socketio服务端
     * @author liangxifeng 2018-07-07
     * @return
     */
    @Bean
    public SocketIOServer socketIOServer() {
        com.corundumstudio.socketio.Configuration config = new com.corundumstudio.socketio.Configuration();

        String os = System.getProperty("os.name");
        if(os.toLowerCase().startsWith("win")){   //在本地window环境测试时用localhost
            System.out.println("this is  windows");
            config.setHostname("localhost");
        } else {
            config.setHostname("192.168.9.209");
        }
        config.setPort("9092");

        /*config.setAuthorizationListener(new AuthorizationListener() {//类似过滤器
            @Override
            public boolean isAuthorized(HandshakeData data) {
                //http://localhost:8081?username=test&password=test
                //例如果使用上面的链接进行connect,可以使用如下代码获取用户密码信息,本文不做身份验证
                // String username = data.getSingleUrlParam("username");
                // String password = data.getSingleUrlParam("password");
                return true;
            }
        });*/

        final SocketIOServer server = new SocketIOServer(config);
        return server;
    }

    /**
     * tomcat启动时候,扫码socket服务器并注册
     * @param socketServer
     * @return
     */
    @Bean
    public SpringAnnotationScanner springAnnotationScanner(SocketIOServer socketServer) {
        return new SpringAnnotationScanner(socketServer);
    }
}
三.在项目服务启动的时候启动socket.io服务, 新增ServerRunner.java
package domain.websocketio;

import com.corundumstudio.socketio.SocketIOServer;
import lombok.extern.slf4j.Slf4j;
import org.springframework.beans.factory.annotation.Autowired;
import org.springframework.boot.CommandLineRunner;
import org.springframework.core.annotation.Order;
import org.springframework.stereotype.Component;

/**
 * 在项目服务启动的时候启动socket.io服务
 * @author liangxifeng 2018-07-07
 */
@Component
@Order(value=1)
@Slf4j
public class ServerRunner implements CommandLineRunner {

    private final SocketIOServer server;


    @Autowired
    public ServerRunner(SocketIOServer server) {
        this.server = server;
    }

    @Override
    public void run(String... args) throws Exception {
        server.start();
        log.info("socket.io启动成功!");
    }

}
四.接收前台用户信息类 MessageInfo.java
package domain.websocketio;

import lombok.ToString;
import org.springframework.stereotype.Component;

/**
 * 接收前台用户信息类
 * @author liangxifeng 2018-07-07
 */
@Component
@ToString
public class MessageInfo {

    String msgContent;

    public String getMsgContent() {
        return this.msgContent;
    }

    public void setMsgContent(String msgContent) {
        this.msgContent = msgContent;

    }
}
消息事件,作为后端与前台交互MessageEventHandler.java
package domain.websocketio;

import com.corundumstudio.socketio.AckRequest;
import com.corundumstudio.socketio.SocketIOClient;
import com.corundumstudio.socketio.SocketIOServer;
import com.corundumstudio.socketio.annotation.OnConnect;
import com.corundumstudio.socketio.annotation.OnDisconnect;
import com.corundumstudio.socketio.annotation.OnEvent;
import domain.websocket.MyWebSocket;
import org.springframework.beans.factory.annotation.Autowired;
import org.springframework.stereotype.Component;


import java.util.ArrayList;
import java.util.UUID;
import java.util.concurrent.ConcurrentHashMap;

/**
 * 消息事件,作为后端与前台交互
 * @authoer liangxifeng 2018-07-07
 */
@Component
public class MessageEventHandler {
    public static SocketIOServer socketIoServer;
    static ArrayList listClient = new ArrayList();
    static final int limitSeconds = 60;
    //线程安全的map
    public static ConcurrentHashMap webSocketMap = new ConcurrentHashMap();

    @Autowired
    public MessageEventHandler(SocketIOServer server) {
        this.socketIoServer = server;
    }

    /**
     * 客户端连接的时候触发,前端js触发:socket = io.connect("http://192.168.9.209:9092");
     * @param client
     */
    @OnConnect
    public void onConnect(SocketIOClient client) {
        String mac = client.getHandshakeData().getSingleUrlParam("mac");
        listClient.add(client.getSessionId());
        //以mac地址为key,SocketIOClient 为value存入map,后续可以指定mac地址向客户端发送消息
        webSocketMap.put(mac,client);
        //socketIoServer.getClient(client.getSessionId()).sendEvent("message", "back data");
        System.out.println("客户端:" + client.getSessionId() + "已连接,mac="+mac);
    }

    /**
     * 客户端关闭连接时触发:前端js触发:socket.disconnect();
     * @param client
     */
    @OnDisconnect
    public void onDisconnect(SocketIOClient client) {
        System.out.println("客户端:" + client.getSessionId() + "断开连接");
    }

    /**
     * 自定义消息事件,客户端js触发:socket.emit('messageevent', {msgContent: msg}); 时触发
     * 前端js的 socket.emit("事件名","参数数据")方法,是触发后端自定义消息事件的时候使用的,
     * 前端js的 socket.on("事件名",匿名函数(服务器向客户端发送的数据))为监听服务器端的事件
     * @param client 客户端信息
     * @param request 请求信息
     * @param data 客户端发送数据{msgContent: msg}
     */
    @OnEvent(value = "messageevent")
    public void onEvent(SocketIOClient client, AckRequest request, MessageInfo data) {
        System.out.println("发来消息:" + data);
        //服务器端向该客户端发送消息
        //socketIoServer.getClient(client.getSessionId()).sendEvent("messageevent", "你好 data");
        client.sendEvent("messageevent","我是服务器都安发送的信息");
    }

    public static void sendBuyLogEvent() {   //这里就是向客户端推消息了
        //String dateTime = new DateTime().toString("hh:mm:ss");

        for (UUID clientId : listClient) {
            if (socketIoServer.getClient(clientId) == null) continue;
            socketIoServer.getClient(clientId).sendEvent("enewbuy", "当前时间", 1);
        }

    }
}
五.目录结构
六.html内容
websocket-java-socketio
Socket.io Test
Waiting for input
hello world!
Connect
Send Message
七.测试
-
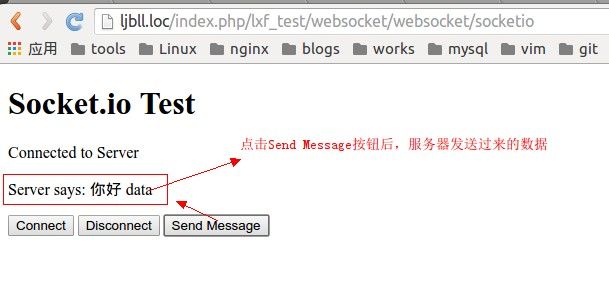
访问浏览器
-
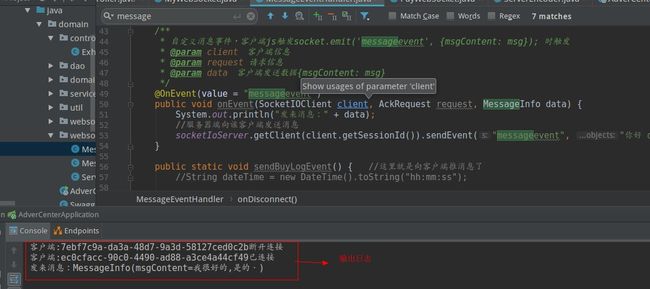
服务器端日志内容:
服务器指定mac地址用户向客户端发送消息
package domain.controller;

import com.corundumstudio.socketio.SocketIOClient;
import domain.domain.DomainResponse;
import domain.domain.Exhibition;
import domain.service.interfaces.exhibition.InsertExhibitionService;
import domain.websocket.PayWebSocket;
import domain.websocketio.MessageEventHandler;
import org.springframework.beans.factory.annotation.Autowired;
import org.springframework.web.bind.annotation.*;

@RestController
@RequestMapping(value = "/exhibiton")
public class ExhibitonController {
    @Autowired
    private InsertExhibitionService insertExhibitionService;
    @GetMapping(value = "/sendMsg/{mac}")
    /**
     * 指定某个websocket发送从服务器发送到浏览器,服务器主动推送
     */
    private DomainResponse testSendMsg(@PathVariable("mac") String mac ) throws  Exception{
        DomainResponse msg = new DomainResponse(Integer.parseInt(mac),mac,"指定给"+mac+"用户发消息");
        PayWebSocket payWebSocket = PayWebSocket.payWebSocketMap.get(mac);
        if(payWebSocket == null)
        {
            return new DomainResponse(0,"没有该用户",0);
        }
        payWebSocket.sendMessage(msg);
        return msg;
    }

    /**
     * web socketio方式指定用户发送消息
     * @param mac
     * @return
     */
    @GetMapping(value = "/socketIo/{mac}")
    private DomainResponse socketIoTest(@PathVariable("mac") String mac){
        SocketIOClient client = MessageEventHandler.webSocketMap.get(mac);
        DomainResponse msg = new DomainResponse(Integer.parseInt(mac),mac,"指定给"+mac+"用户发消息");
        client.sendEvent("messageevent","haha======++");
        return msg;
    }
}
测试
-
指定mac地址为2的用户发送消息
-
客户端会收到消息


