一、本地推送/本地通知 是什么?
(名称概念)本地推送,其实也就是本地通知,它们指的是同一种概念,只是叫法不同,下文统一称呼为本地通知(还有时候会叫做“推送本地通知”,真搞不懂为啥这么多叫法……)。本地通知是由系统触发的,它是基于将来时间行为的一种通知形式,本地通知并不依赖于网络连接,可简单将其视为一个定时装置即可。
(常用场景)常用于定期提醒行为,如一些 TODO 类的App定期提醒用户完成任务,健身锻炼类的App的每天锻炼提醒,又或者一个应用在一段时候后不使用通常会提示用户使用此应用等。
(形式区别)本地通知与远程推送
RemoteNotification通知形式相似,不同的是,本地通知并不依赖于网络连接,而远程推送则一定是通过苹果服务器将消息推送至已注册的设备上的,同时本地通知样式一般较为固定,通常是先设置好推送周期,而且推送内容往往也是固定的,可存放于plist文件中。-
本地通知类型有两个
- Date-based类型:即按给定的日期触发通知,通常需要考虑 Time Zone 的问题。
- Region-based类型:即按给定区域触发通知,当用户进入或离开指定 region 时触发通知
二、本地通知使用
1. 在 iOS 10之前

相比iOS 8之前的本地通知(简单设置通知的声音,app 的 badge 和 alerts 的内容等),iOS 8之后通知实例具备了category 和 action 的概念。iOS 8之后通知还涉及新增的三个类,分别为 UIUserNotificationSettings、UIUserNotificationCategory、UIUserNotificationAction 以及Category 和 Action 的可变版本UIMutableUserNotificationAction、UIMutableUserNotificationCategory。
- 本地推送使用的类是
UILocalNotification。
而在 iOS 8 之后,使用UILocalNotification前需要调用-[UIApplication registerUserNotificationSettings:]方法注册用户通知权限。(多个通知只需一次, 建议放在AppDelegate 的didFinishLaunchingWithOptions方法中)

申请获取权限图:

- 创建一个本地通知通常分为以下几个步骤:
- 创建UILocalNotification。
- 设置处理通知的时间fireDate。
- 配置通知的内容:通知主体、通知声音、图标数字等。
- 配置通知传递的自定义数据参数userInfo(可选)。
- 调用通知,可以使用
scheduleLocalNotification:按计划调度一个通知,也可以使用presentLocalNotificationNow立即调用通知。
整体测试 demo 代码,包括对应属性使用的描述和注意点:
//
//  AppDelegate.m
//  Notifications
//
//  Created by Jacob_Liang on 2017/9/19.
//  Copyright © 2017年 Jacob. All rights reserved.
//

#import "AppDelegate.h"


static NSString * const kIGNOREKEY = @"IGNOREKEY";
static NSString * const kOPENACTIONKEY = @"OPENACTIONKEY";
static NSString * const kCATEGORYKEY = @"ALERTCATEGORY";

@interface AppDelegate ()


@end

@implementation AppDelegate


- (BOOL)application:(UIApplication *)application didFinishLaunchingWithOptions:(NSDictionary *)launchOptions {

    //如果已经获得发送通知的授权则创建本地通知,否则请求授权(注意:如果不请求授权在设置中是没有对应的通知设置项的,也就是说如果从来没有发送过请求,即使通过设置也打不开消息允许设置)
    if ([[UIApplication sharedApplication] currentUserNotificationSettings].types != UIUserNotificationTypeNone) {
        [self addLocalNotification];
    } else {
        //iOS 8 请求用户通知权限
        if ([UIApplication instancesRespondToSelector:@selector(registerUserNotificationSettings:)]) {

            //添加通知的动作
            UIMutableUserNotificationCategory *category = [self addLocalNotificationActions];

            UIUserNotificationSettings *settings = [UIUserNotificationSettings settingsForTypes:UIUserNotificationTypeBadge | UIUserNotificationTypeAlert | UIUserNotificationTypeSound categories:[NSSet setWithObject:category]];
            [application registerUserNotificationSettings:settings];
            //在请求权限弹出的 Alert 选择中,用户选择 "好"时,会回调 application:didRegisterUserNotificationSettings:方法
        }
    }

    /*
     iOS 10 之前点击本地通知,从后台唤醒或启动 App 时在这个方法的 Options里获取 本地通知的 UserInfo;
     */
    UILocalNotification *notification = [launchOptions objectForKey:UIApplicationLaunchOptionsLocalNotificationKey];
    NSLog(@"%s  -- %@", __func__, notification);

//    dispatch_after(dispatch_time(DISPATCH_TIME_NOW, (int64_t)(2 * NSEC_PER_SEC)), dispatch_get_main_queue(), ^{
//        [self showInfo:[NSString stringWithFormat:@"%s  -- %@", __func__, notification]];
//    });

    //test app teminate 后,响应本地通知的 backgroundmode 的 acton后,再次启动,如果有打印即证明,backgroundmode 的 acton的触发真的没有启动 App,但是会回调 Action 的方法;
    NSString *clickIgnoreActionStr = [[NSUserDefaults standardUserDefaults] objectForKey:kIGNOREKEY];
    if (clickIgnoreActionStr.length) {
        NSLog(@"%@",clickIgnoreActionStr);
        [[NSUserDefaults standardUserDefaults] setObject:nil forKey:kIGNOREKEY];
    }


    return YES;
}

#pragma mark - 添加本地通知
- (void)addLocalNotification {

    //定义本地通知对象
    UILocalNotification *notification = [[UILocalNotification alloc] init];
    //设置时区
    notification.timeZone = [NSTimeZone defaultTimeZone];
    //设置调用时间
    notification.fireDate = [NSDate dateWithTimeIntervalSinceNow:10.0];//通知触发的时间,10s以后
    notification.repeatInterval = 0;//通知重复间隔,其是一个 option 值, 0表示不重复,即 fire 之后就 discard 该 notification,即不会被copy 进scheduledLocalNotifications数组里。
    //notification.repeatCalendar = [NSCalendar currentCalendar];//当前日历,使用前最好设置时区等信息以便能够自动同步时间

    //设置通知属性
    notification.alertBody = @"最近添加了诸多有趣的特性,是否立即体验?"; //通知主体
    notification.applicationIconBadgeNumber = 1;//应用程序图标右上角显示的消息数
    notification.alertAction = @"打开应用"; //待机界面的滑动动作提示
    notification.alertLaunchImage = @"Default";//通过点击通知打开应用时的启动图片,这里使用程序启动图片
    //notification.soundName = UILocalNotificationDefaultSoundName;//收到通知时播放的声音,默认消息声音
    notification.soundName = @"msg.caf";//通知声音(需要真机才能听到声音)

    //设置用户信息
    notification.userInfo = @{@"id":@1234, @"user":@"Jacob"};//绑定到通知上的其他附加信息
    //设定该通知的actions,actions确保已经添加到 category , 每一个 category 表示一种类型的 actions,也就说可以有很多类型的 category。但是 category 需要提前注册到 setting 中。
    notification.category = kCATEGORYKEY;

    //调用通知
    [[UIApplication sharedApplication] scheduleLocalNotification:notification]; //scheduleLocalNotification 方法会对 notification 对象进行 copy

    //    [[UIApplication sharedApplication] presentLocalNotificationNow:notification]; //立即发送本地通知,无视 notification 的 fireDate 属性值,会调用 application:didReceiveLocalNotification:处理通知

}

#pragma mark - 添加通知的动作
//添加通知的动作
- (UIMutableUserNotificationCategory *)addLocalNotificationActions {
    //UIMutableUserNotificationAction用来添加自定义按钮
    UIMutableUserNotificationAction * responseAction = [[UIMutableUserNotificationAction alloc] init];
    responseAction.identifier = kOPENACTIONKEY;
    responseAction.title = @"打开应用";
    responseAction.activationMode = UIUserNotificationActivationModeForeground; //点击的时候启动程序

    UIMutableUserNotificationAction *deleteAction = [[UIMutableUserNotificationAction alloc] init];
    deleteAction.identifier = kIGNOREKEY;
    deleteAction.title = @"忽略";
    deleteAction.activationMode = UIUserNotificationActivationModeBackground; //点击的时候不启动程序,后台处理
    deleteAction.authenticationRequired = YES;//需要解锁权限
    deleteAction.destructive = YES; //YES为红色,NO为蓝色

    UIMutableUserNotificationCategory *category = [[UIMutableUserNotificationCategory alloc] init];
    category.identifier = kCATEGORYKEY;//用于将该 category 标识的同时,那一个 notification 实例需要使用这个 category 的 actions 也是传入这个值给 notification 的。
    //UIUserNotificationActionContextDefault:默认添加可以添加两个自定义按钮
    //UIUserNotificationActionContextMinimal:四个自定义按钮
    [category setActions:@[responseAction, deleteAction] forContext:UIUserNotificationActionContextDefault];

    return category;
}

//iOS 8 ~ 9 ,当点击本地通知自定义的响应按钮(action btn)时,根据按钮的 activeMode 模式,回调以下方法
//1. ActivationModeForeground 的 action , 会启动 App 同时回调方法
//2. ActivationModeBackground 的 action 不启动 App 让 App 在 background 下回调方法
- (void)application:(UIApplication *)application handleActionWithIdentifier:(NSString *)identifier forLocalNotification:(UILocalNotification *)notification completionHandler:(void (^)())completionHandler {

    if ([identifier isEqualToString:kOPENACTIONKEY]) {
        //ActivationModeForeground 的 action , 启动 App 让 App 在 Foreground 下响应

        [self showInfo:[NSString stringWithFormat:@"thread -%@\n identifier -%@", [NSThread currentThread], identifier]];

    } else {

        //ActivationModeBackground 的 action 不启动 App 让 App 在 background 下响应
        NSLog(@"%s  -- %@  -- identifier %@ --- thread %@", __func__, notification, identifier, [NSThread currentThread]);

        //下面代码用于测试,退出 App 后接收到 本地通知时,点击后台action时是否执行了这个响应方法。实测执行了的
        [[NSUserDefaults standardUserDefaults] setObject:@"ActivationModeBackground 的 action 不启动 App 让 App 在 background 下响应" forKey:@"IGNOREKEY"];
        [[NSUserDefaults standardUserDefaults] synchronize];

    }


    completionHandler(); //根据Action btn 的 identifier 处理自定义事件后应该马上调用 completionHandler block,如果调用 completionHandler block 失败的话,App 会立即 terminated。
}


// APP在前台运行中收到 本地通知 时调用, 以及App 处于后台挂起(suspended)状态,但未 terminated 时,点击通知启动都是这个方法进行响应
- (void)application:(UIApplication *)application didReceiveLocalNotification:(UILocalNotification *)notification {
    // 可根据notification对象的userInfo等属性进行相应判断和处理
    NSLog(@"%s --- %@", __func__, notification);
}

//调用过用户注册通知方法之后执行(也就是调用完registerUserNotificationSettings:方法之后执行)
-(void)application:(UIApplication *)application didRegisterUserNotificationSettings:(UIUserNotificationSettings *)notificationSettings {

    if (notificationSettings.types != UIUserNotificationTypeNone) {
        [self addLocalNotification];
    }
}


- (void)applicationWillEnterForeground:(UIApplication *)application {

    [[UIApplication sharedApplication] setApplicationIconBadgeNumber:0];//进入前台取消应用消息图标

    //获取本地通知数组
    NSArray *notifications = [[UIApplication sharedApplication] scheduledLocalNotifications];
    for (int i = 0; i < notifications.count; i++) {
        UILocalNotification *notificaiton = notifications[i];
        NSLog(@"%@ \n", notificaiton);
    }
}


#pragma mark - 移除本地通知,在不需要此通知时记得移除
- (void)removeNotification {

    //获取本地通知数组 (该数组会持有需要重复 fired 的 已被 copy 的 notification 对象,用于到达下次间隔时再 fire, 如果不需要重复的 notification,即 notification.repeatInterval = 0 的话,该 notification fire 之后不会被 copy 保留到这个数组里)
    //本地通知最多只能有64个,超过会被系统忽略
    NSArray *notifications = [[UIApplication sharedApplication] scheduledLocalNotifications];
    NSLog(@"%@",notifications);

    //删除指定通知
    //    [[UIApplication sharedApplication] cancelLocalNotification:notifications[0]];
    //删除所有通知
    //    [[UIApplication sharedApplication] cancelAllLocalNotifications];

    /*
     执行取消本地通知的场景:
     1. 已经响应过的本地通知,需要取消。
     2. 已经递交到 application 的,但在 fire 之前 确定要取消的通知,需要取消。如提醒任务的取消,或更改提醒时间(此时应该是新的一个本地通知了)
     */
}

- (void)showInfo:(NSString *)infoStr {

    UIAlertController *alertController = [UIAlertController alertControllerWithTitle:@"" message:infoStr preferredStyle:UIAlertControllerStyleAlert];

    [alertController addAction:[UIAlertAction actionWithTitle:@"取消" style:UIAlertActionStyleCancel handler:NULL]];

    [[UIApplication sharedApplication].keyWindow.rootViewController presentViewController:alertController animated:YES completion:nil];
}


@end
需要注意的是:
1. iOS 8 后需要获取权限
//iOS 8 请求用户通知权限
if ([UIApplication instancesRespondToSelector:@selector(registerUserNotificationSettings:)]) {
    UIUserNotificationSettings *settings = [UIUserNotificationSettings settingsForTypes:UIUserNotificationTypeBadge | UIUserNotificationTypeAlert | UIUserNotificationTypeSound categories:nil];
    [application registerUserNotificationSettings:settings];
}
调用 registerUserNotificationSettings:方法后会弹出上述权限请求框,当用户选择 "好"时,会回调 application:didRegisterUserNotificationSettings:方法
2. 在 iOS 10之前有两个地方可以响应用户点击本地通知的地方(当 app 处在后台或终止状态时)
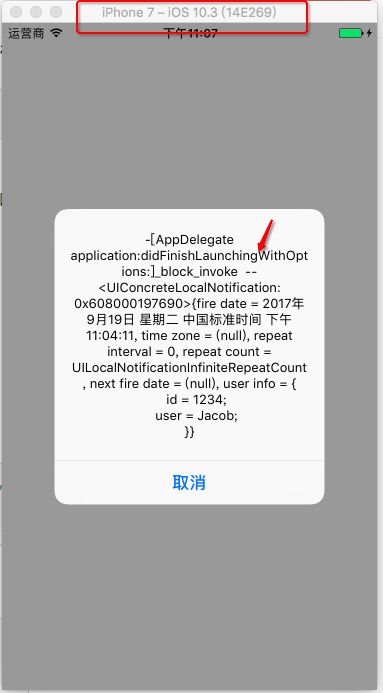
- 在方法
- (BOOL)application:(UIApplication *)application didFinishLaunchingWithOptions:(NSDictionary *)launchOptions内通过objectForKey:UIApplicationLaunchOptionsLocalNotificationKey获取UILocalNotification实例对象,如:
UILocalNotification *notification = [launchOptions objectForKey:UIApplicationLaunchOptionsLocalNotificationKey];
但是
UIApplicationLaunchOptionsLocalNotificationKey在 iOS 10 就被禁了。

- iOS 8 之后添加了方法
- (void)application:(UIApplication *)application handleActionWithIdentifier:(NSString *)identifier forLocalNotification:(UILocalNotification *)notification completionHandler:(void (^)())completionHandler用于响应本地通知的 notification action 动作。
3. App 在前台时,本地通知的响应方法
当App 在前台时,fire 的本地通知将被application的- (void)application:(UIApplication *)application didReceiveLocalNotification:(UILocalNotification *)notification;方法截获
4. App 处于后台挂起(suspended)状态,但未 terminated 时,点击通知启动App响应方法
被- (void)application:(UIApplication *)application didReceiveLocalNotification:(UILocalNotification *)notification;方法截获
5. 本地通知对象的存储机制
- 当调用
scheduleLocalNotification方法添加 notification 实例时,scheduleLocalNotification方法会对 notification 对象进行 copy ,所以需要手动 release 该 notification 对象。 - notification 实例中的
repeatInterval通知重复间隔属性,当其为0时表示不重复,即 fire 之后就 discard 该 notification, 即不会被 copy 进scheduledLocalNotifications数组里。 -
scheduledLocalNotifications数组最多只能有64个 notification 实例,超过会被系统忽略,该数组会持有需要重复 fired 的 notification 对象,用于下次在指定时间间隔到达时再 fire, 如果不需要重复的 notification,即notification.repeatInterval = 0的话,该 notification fire 之后不会被 copy 保留到这个数组里。
6. 要想看到本地通知的效果,需要的条件
- app 的通知权限已被打开(iOS 8)
- 本地通知是操作系统统一调度的,只有App状态为 suspended 或 not running 状态下(即程序处于后台或已经 terminated【又或者还没启动】)在才能收到通知通知提醒
7. 通知的声音
- 真机测试声音提示最保险,iOS 8.1和 iOS 9.3的模拟器测试没有声音,iOS 10.3的模拟器测试有声音(实测)
- 声音文件格式必须是Linear PCM,MA4(IMA/ADPCM),uLaw,alaw中的一种,而且时间必须在30秒内
- 声音文件必须放到main boundle 中
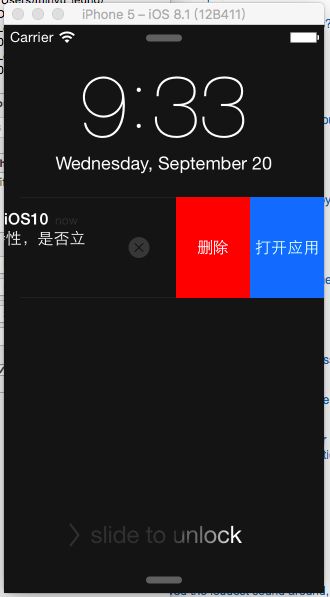
8. 向右滑动本地通知即解锁打开应用,锁屏状态下通知底部提示设置
下框中的 滑动打开 xxxx 显示值由notification.alertAction = @"打开应用";控制

9. 指定通知左划的按钮步骤
- 创建
UIMutableUserNotificationCategory对象 - 往 category 实例中放入
UIUserNotificationAction实例对象 - 在通知的 category 属性值传入对应的 UIMutableUserNotificationCategory 实例的 identifier 标识值
效果:
| 锁屏状态左划效果 | 下拉效果 |
|---|---|
锁屏状态左划效果
|
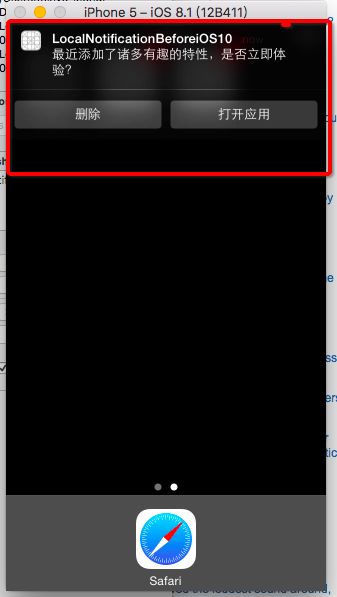
app在后台但未锁屏,顶部弹出通知,下拉效果
|
| 在通知面板,左划效果 | |
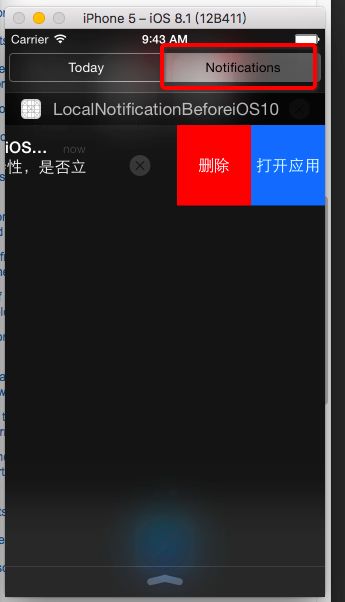
在通知面板,左划效果
|
- 这些动作的响应方法如下:
- 该方法会在启动程序后,在后台被调用
- 按照 id 处理完自定义响应按钮方法后立即调用 completionHandler block
- 如果调用 completionHandler block 失败的话,程序会立即 terminate
//iOS 8 ~ 9 ,当点击本地通知自定义的响应按钮(action btn)时,会启动 App 同时下述方法会在后台被执行
-(void)application:(UIApplication *)application
          handleActionWithIdentifier:(NSString *)identifier
                forLocalNotification:(UILocalNotification *)notification
                    withResponseInfo:(NSDictionary *)responseInfo
                   completionHandler:(void (^)())completionHandler;
10. 实测上述代码运行在 iOS 10+ 的模拟器是可以有提示声音发出的,前提是代码的 iOS Deployment Target 选择 8.0
11. iOS 8 和 iOS 9下,对应的 action 响应方法有如下,分别是 localNotification 和 remoteNotification,它们之间还有一个参数 response 的区别,调用的区别则为,iOS 8 会调用没有 response的方法,而 iOS 9 则会调用带有 response 的方法,如果在 iOS 9 上两个方法都写上的话,则只会调用iOS 9 推荐的带有 response 的方法,如果 iOS 9 如果没有写带有 response 的方法的话,默认还是会调用 iOS 8的方法
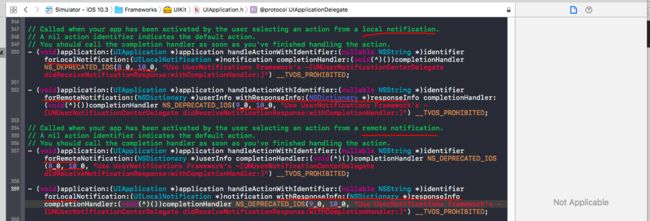
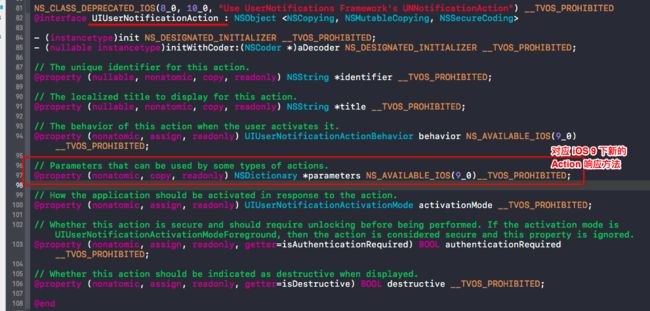
这里iOS 8 和 iOS 9 方法只有一个参数的区别,response 参数的描述是The data dictionary sent by the action.也就是用于接收 iOS 9 下 action 的parameters 属性值。
ps:在 iOS 10之前 (iOS 4 ~ 9)使用本地通知的学习就差不多了,下面我们说说 iOS 10 怎样使用 本地通知♪(∇*)啦啦。。。(待续~)
上述问题注意点 在 iOS 10之前 (iOS 4 ~ 9)使用本地通知 Test Demo
简单场景模拟
应用场景:一般的工具型APP会包含多个本地通知,分别设置不同的fireDate。如3天,7天,一个月分别推送一次,以唤醒用户。若一个月之内打开APP,则所有本地通知重置。
//模拟需求:这里以设置1Min和3Min的本地通知为例
Demo
2. 在 iOS 10 下使用本地通知
待续~~
三、应用通知设置界面
| iOS 8 | iOS 9 |
|---|---|

iOS8-NotificationSetting.gif
|

iOS9-NotificationSetting.gif
|
| Show in Notification Center是可设置显示个数 | Show in Notification Center只能设置是否显示 |
iOS 10之后就没有了 alert 样式。
| iOS 10 | iOS 11 |
|---|---|

iOS 10
|
待补充 |
Ref
UILocalNotification
Getting the User’s Attention While in the Background