前言
本文大部分参考 iOS利用voip push实现类似微信(QQ)电话连续响铃效果 有兴趣的可以多参考它下
自己代码:gitHubDemo
最近客户要求需要做出类似微信的 视频拉起的呼叫的功能,开始使用的是mqtt的方式来发起的消息拉起,
结果:发现 app退到后台、或者app杀死了,就不会收到了(也就拉起不了了)
试了:APNs的方式,结果APNs根本实现不了连续通知,而且它也不会实现像本地通知那样会有连续响铃的效果(微信一般大概30s左右)
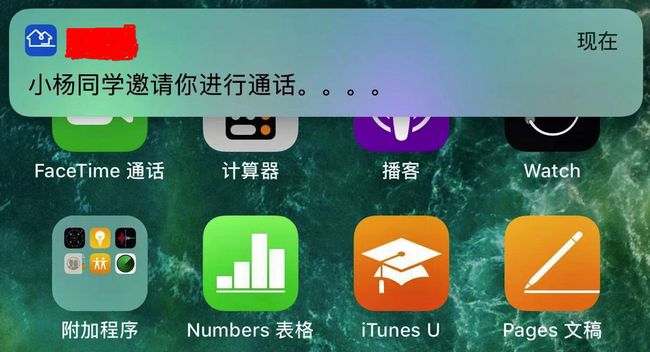
为了实现类似微信的方式,最终:我们通过 voip的方式来实现app的视频的拉起
-
说明
- VoIP 推送基于pushKit框架
- 好处:
- 只有当VoIP发生推送时,设备才会唤醒,从而节省能源。
- VoIP推送被认为是高优先级通知,并且毫无延迟地传送。
- VoIP推送可以包括比标准推送通知提供的数据更多的数据。
- 如果收到VoIP推送时,您的应用程序未运行,则会自动重新启动。
- 即使您的应用在后台运行,您的应用也会在运行时处理推送。
-
voip的集成
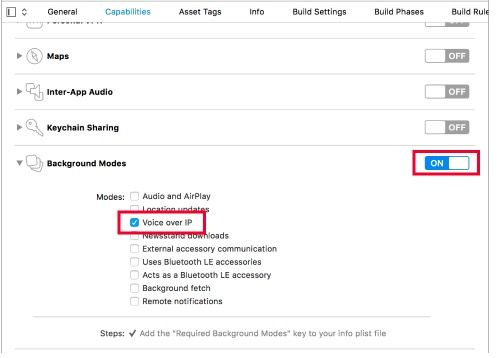
- 在Xcode中开启VoIP推送
-
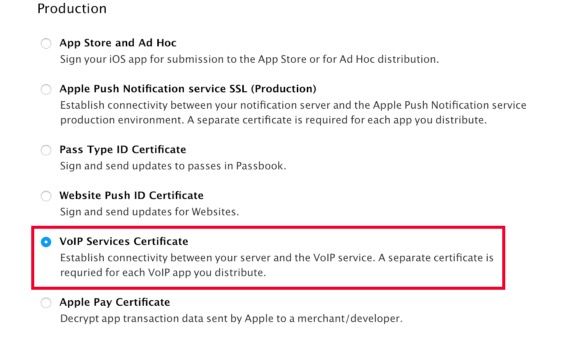
在Apple Developer创建VoIP证书
跟APNs证书不同,VoIP证书不区分开发和生产环境,VoIP证书只有一个,生产和开发都可用同一个证书。另外有自己做过推送的应该都知道服务器一般集成的.pem格式的证书,所以还需将证书转成.pem格式,后面会介绍怎么转换.pem证书。
导入framework:PushKit.framework-
Objective-C代码集成,导入头文件.
#import -
设置代理
PKPushRegistry *pushRegistry = [[PKPushRegistry alloc] initWithQueue:dispatch_get_main_queue()]; pushRegistry.delegate = self; pushRegistry.desiredPushTypes = [NSSet setWithObject:PKPushTypeVoIP]; -
代理方法
//应用启动此代理方法会返回设备Token 、一般在此将token上传服务器
- (void)pushRegistry:(PKPushRegistry *)registry didUpdatePushCredentials:(PKPushCredentials *)credentials forType:(NSString *)type{
}

//当VoIP推送过来会调用此方法,一般在这里调起本地通知实现连续响铃、接收视频呼叫请求等操作
- (void)pushRegistry:(PKPushRegistry *)registry didReceiveIncomingPushWithPayload:(PKPushPayload *)payload forType:(NSString *)type {
}
下面是我项目里面的代码:(本人亲用有效)
RingCall.h
#import
NS_ASSUME_NONNULL_BEGIN
@interface RingCall : NSObject
+ (instancetype)sharedMCCall;
- (void)regsionPush;
@end
NS_ASSUME_NONNULL_END

RingCall.m
#import "RingCall.h"
#import "TalkVideoManager.h"
#import
#import

@interface RingCall (){
    UILocalNotification *callNotification;
    UNNotificationRequest *request;//ios 10
    NSTimer *_vibrationTimer;
}
@end

@implementation RingCall
+ (instancetype)sharedMCCall {
    static  RingCall *callInstane;
    static dispatch_once_t onceToken;
    dispatch_once(&onceToken, ^{
        if (callInstane == nil) {
            callInstane = [[RingCall alloc] init];
            [[TalkVideoManager sharedClient] setDelegate:callInstane];
        }
    });
    return callInstane;
}

- (void)regsionPush {
    //iOS 10
    if(@available(iOS 10.0, *)){
        UNUserNotificationCenter *center = [UNUserNotificationCenter currentNotificationCenter];
        [center requestAuthorizationWithOptions:(UNAuthorizationOptionBadge | UNAuthorizationOptionSound | UNAuthorizationOptionAlert) completionHandler:^(BOOL granted, NSError * _Nullable error) {
            if (!error) {
                NSLog(@"request authorization succeeded!");
            }
        }];
        [center getNotificationSettingsWithCompletionHandler:^(UNNotificationSettings * _Nonnull settings) {
            NSLog(@"%@",settings);
        }];
    }
}

#pragma mark-VideoCallbackDelegate
- (void)onCallRing:(NSString *)CallerName withInfo:(NSDictionary *)info{
    if (@available(iOS 10.0, *)) {
        UNUserNotificationCenter* center = [UNUserNotificationCenter currentNotificationCenter];
        UNMutableNotificationContent* content = [[UNMutableNotificationContent alloc] init];
        content.body =[NSString localizedUserNotificationStringForKey:[NSString
                                                                       stringWithFormat:@"%@%@", CallerName,
                                                                       @"邀请你进行通话。。。。"] arguments:nil];
        content.userInfo = info;
        UNNotificationSound *customSound = [UNNotificationSound soundNamed:@"weixin.m4a"];
        content.sound = customSound;
        UNTimeIntervalNotificationTrigger* trigger = [UNTimeIntervalNotificationTrigger
                                                      triggerWithTimeInterval:1 repeats:NO];
        request = [UNNotificationRequest requestWithIdentifier:@"Voip_Push"
                                                       content:content trigger:trigger];
        [self playShake];
        [center addNotificationRequest:request withCompletionHandler:^(NSError * _Nullable error) {

        }];
    }else {
        callNotification = [[UILocalNotification alloc] init];
        callNotification.userInfo = info;
        callNotification.alertBody = [NSString
                                      stringWithFormat:@"%@%@", CallerName,
                                      @"邀请你进行通话。。。。"];
        callNotification.soundName = @"weixin.m4a";
        [self playShake];
        [[UIApplication sharedApplication] presentLocalNotificationNow:callNotification];
    }
}

- (void)onCancelRing {
    //取消通知栏
    if (@available(iOS 10.0, *)) {
        NSMutableArray *arraylist = [[NSMutableArray alloc]init];
        [arraylist addObject:@"Voip_Push"];
        [[UNUserNotificationCenter currentNotificationCenter] removeDeliveredNotificationsWithIdentifiers:arraylist];
    }else {
        [[UIApplication sharedApplication] cancelLocalNotification:callNotification];
    }
    [_vibrationTimer invalidate];
}

-(void)playShake{
    if(_vibrationTimer){
        [_vibrationTimer invalidate];
        _vibrationTimer = nil;
    }else{
        _vibrationTimer = [NSTimer scheduledTimerWithTimeInterval:1 target:self selector:@selector(playkSystemSound) userInfo:nil repeats:YES];
    }
}
//振动
- (void)playkSystemSound{
    AudioServicesPlaySystemSound(kSystemSoundID_Vibrate);
}
@end


TalkVideoManager.h
#import
#import
@protocol VideoCallbackDelegate
/**
 *  当APP收到呼叫、处于后台时调用、用来处理通知栏类型和铃声。
 *
 *  @param name 呼叫者的名字
 */
- (void)onCallRing:(NSString*)name withInfo:(NSDictionary*)info;
/**
 *  呼叫取消调用、取消通知栏
 */
- (void)onCancelRing;
@end

@interface TalkVideoManager : NSObject
+ (TalkVideoManager *)sharedClient;
- (void)initWithSever;
- (void)setDelegate:(id)delegate;
//用户挂断/接听  停止震动
-(void)cancleCall;
@end

TalkVideoManager.m
#import "TalkVideoManager.h"
#import
#import "RingCall.h"
@interface TalkVideoManager (){
    NSString *token;
}

@property (nonatomic,weak)idmydelegate;
@end

@implementation TalkVideoManager
static TalkVideoManager *instance = nil;
+ (TalkVideoManager *)sharedClient {
    if (instance == nil) {
        instance = [[super allocWithZone:NULL] init];
    }
    return instance;
}

-(void)initWithSever {
    //voip delegate
    PKPushRegistry *pushRegistry = [[PKPushRegistry alloc] initWithQueue:dispatch_get_main_queue()];
    pushRegistry.delegate = self;
    pushRegistry.desiredPushTypes = [NSSet setWithObject:PKPushTypeVoIP];
    //ios10注册本地通知
    if ([[UIDevice currentDevice].systemVersion floatValue] >= 10.0) {
        [[RingCall sharedMCCall] regsionPush];
    }
}

- (void)setDelegate:(id)delegate {
    self.mydelegate = delegate;
}

#pragma mark -pushkitDelegate
- (void)pushRegistry:(PKPushRegistry *)registry didUpdatePushCredentials:(PKPushCredentials *)credentials forType:(NSString *)type{
    if([credentials.token length] == 0) {
        NSLog(@"voip token NULL");
        return;
    }
    //应用启动获取token,并上传服务器
    token = [[[[credentials.token description] stringByReplacingOccurrencesOfString:@"<"withString:@""]
              stringByReplacingOccurrencesOfString:@">" withString:@""]
             stringByReplacingOccurrencesOfString:@" " withString:@""];
    NSLog(@"token:%@",token);
    //token上传服务器
    [[ACCacheTool shareACCacheTool] setObjectForKey:token key:@"deviceToken"];
}

- (void)pushRegistry:(PKPushRegistry *)registry didReceiveIncomingPushWithPayload:(PKPushPayload *)payload forType:(NSString *)type{
    BOOL isCalling = false;
    switch ([UIApplication sharedApplication].applicationState) {
        case UIApplicationStateActive: {
            isCalling = false;
        }
            break;
        case UIApplicationStateInactive: {
            isCalling = false;
        }
            break;
        case UIApplicationStateBackground: {
            isCalling = true;
        }
            break;
        default:
            isCalling = true;
            break;
    }
    NSLog(@"payload==%@",payload.dictionaryPayload);
    if (isCalling){
        //获取推送的内容
        NSString *callerStr = payload.dictionaryPayload[@"aps"][@"alert"];
        //本地通知,实现响铃效果
        [self.mydelegate onCallRing:callerStr withInfo:payload.dictionaryPayload];

    }
}

-(void)cancleCall{
    [self.mydelegate onCancelRing];
}
@end

--------------------------------------------------
使用:
在appdelegate.m里面
导入 #import "TalkVideoManager.h"

- (BOOL)application:(UIApplication *)application didFinishLaunchingWithOptions:(NSDictionary *)launchOptions {
  ......
    //配置voIP
    [[TalkVideoManager sharedClient] initWithSever];
    return YES;
}

- (void)application:(UIApplication *)application didReceiveLocalNotification:(UILocalNotification *)notification
{
   NSLog(@"点击了本地通知进来了---%@",notification.userInfo);
   [[TalkVideoManager sharedClient] cancleCall];

   .......//处理数据
}
说白了:就是通过voip发的消息回调,来进行发送本地通知,然后点击本地通知,再做相应的数据逻辑处理。
-
建立本地测试环境(自己搭建一个简单的测试环境先测试通,然后再与服务器对接)
-
制作.pem格式证书
1、将之前生成的voip.cer SSL证书双击导入钥匙串 2、打开钥匙串访问,在证书中找到对应voip.cer生成的证书,右键导出并选择.p12格式,这里我们命名为voippush.p12,这里导出需要输入密码(随意输入,别忘记了)。 3、目前我们有两个文件,voip.cer SSL证书和voippush.p12私钥,新建文件夹命名为VoIP、并保存两个文件到VoIP文件夹。 4、把.cer的SSL证书转换为.pem文件,打开终端命令行cd到VoIP文件夹、执行以下命令 openssl x509 -in voip.cer -inform der -out VoiPCert.pem 5、把.p12私钥转换成.pem文件,执行以下命令(这里需要输入之前导出设置的密码) openssl pkcs12 -nocerts -out VoIPKey.pem -in voippush.p12 6、再把生成的两个.pem整合到一个.pem文件中 cat VoiPCert.pem VoIPKey.pem > ck.pem 最终生成的ck.pem文件一般就是服务器用来推送的。 -
新建php文件(保存名字为push.php)
"1","address"=>"IANA"); //自己写的一个info字典(自己后台可以自定义) //////////////////////////////////////////////////////////////////////////////// $ctx = stream_context_create(); stream_context_set_option($ctx, 'ssl', 'local_cert', 'ck.pem'); //这里的ck.pem需要和导出的证书名字要一致 stream_context_set_option($ctx, 'ssl', 'passphrase', $passphrase); stream_context_set_option($ctx, 'ssl', 'verify_peer', false); // Open a connection to the APNS server //ssl://gateway.sandbox.push.apple.com:2195(测试环境) //ssl://gateway.push.apple.com:2195(生产环境) $fp = stream_socket_client('ssl://gateway.sandbox.push.apple.com:2195', $err,$errstr, 60, STREAM_CLIENT_CONNECT|STREAM_CLIENT_PERSISTENT, $ctx); if (!$fp) exit("Failed to connect: $err $errstr" . PHP_EOL); echo 'Connected to APNS' . PHP_EOL; // Create the payload body $body['aps'] = array( 'content-available' => '1', 'alert' => $message, 'sound' => 'weixin.m4a', 'badge' => 0, 'info'=> $info, ); // Encode the payload as JSON $payload = json_encode($body); // Build the binary notification $msg = chr(0) . pack('n', 32) . pack('H*', $deviceToken) . pack('n', strlen($payload)) . $payload; // Send it to the server $result = fwrite($fp, $msg, strlen($msg)); if (!$result) echo 'Message not delivered' . PHP_EOL; else echo 'Message successfully delivered' . PHP_EOL; // Close the connection to the server fclose($fp); ?> -
推送测试
将ck.pem 文件和push.php 放在同一个文件夹下(必须)
一般测试VoIP推送的稳定性最好是通过Hoc证书打包在生产环境中测试
打开terminal ,cd到 push.php 文件目录下
-
输入:php push.php (不出意外就可以收到推送啦)
-
-
补充点(摘录 iOS利用voip push实现类似微信(QQ)电话连续响铃效果)
- 当app要上传App Store时,请在iTunes connect上传页面右下角备注中填写你用到VoIP推送的原因,附加上音视频呼叫用到VoIP推送功能的demo演示链接,演示demo必须提供呼出和呼入功能,demo我一般上传到优酷。
- 经过大量测试,VoIP当应用被杀死(双击划掉)并且黑屏大部分情况都能收到推送,很小的情况会收不到推送消息,经测试可能跟手机电量消耗还有信号强弱有关。 再强调一遍,测试稳定性请在生产环境测试。


