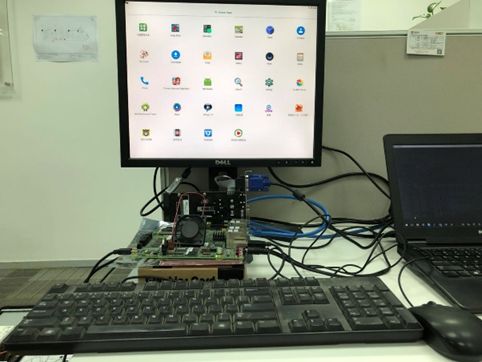
The is the quick start-up guide for booting Android on the QorIQ LS1043xARDB board.
The requirement for this demo is listed as below, both including hardware and software.
Hardware:
A LS1043ARDB or LS1046ARDB board
A Nvidia G210 PCIe x1 video card
An Atheros ATH10K WIFI module
An 8GB SD card
A USB mouse
A USB keypad
A monitor
All these devices are shown as below:
Software:
Android-7.1.2-LS104xARDB.iso
In this demo, only a single software image is used. What it requires is to clone this image to the ready 8GB SD card.
Here two methods are provided to write the Android-7.1.2-LS104xARDB.iso to the SD card:
Using an Ubuntu PC:
$ dd if=Android-7.1.2-LS104xARDB.iso of=/dev/sdb bs=4M;sync
Using the LS104xARDB board, boot it up with SDK kernel and ramdisk, mount the directory where the Android-7.1.2-LS104xARDB.iso is from the Ubuntu PC to a directory named rootfs in this board:
root@ls1043ardb:~/rootfs# dd if=Android-7.1.2-LS104xARDB.iso of=/dev/mmcblk0 bs=4M;sync
When U-Boot boots up, copy-paste the following command list to the prompt of U-Boot, then Android system will boot up, and boot log is attached in file Android-boot-log.txt.
For LS1043ARDB:
setenv kerneladdr 0x82000000;setenv ramdiskaddr 0x84000000;setenv dtbaddr 0x83000000;setenv bootargs root=/dev/ram console=ttyS0,115200 nouveau.atomic=1 androidboot.console=ttyS0 androidboot.hardware=layerscape androidboot.dm_verity=disabled androidboot.selinux=permissive video=nouveaufb:800x600@60;ext2load mmc 0:4 $kerneladdr /uImage.android;ext2load mmc 0:4 $ramdiskaddr /ramdisk.img.u-boot;ext2load mmc 0:4 $dtbaddr /fsl-ls1043a-rdb-sdk.dtb;bootm $kerneladdr $ramdiskaddr $dtbaddr
For LS1046ARDB:
setenv kerneladdr 0x82000000;setenv ramdiskaddr 0x84000000;setenv dtbaddr 0x83000000;setenv bootargs root=/dev/ram console=ttyS0,115200 nouveau.atomic=1 androidboot.console=ttyS0 androidboot.hardware=layerscape androidboot.dm_verity=disabled androidboot.selinux=permissive video=nouveaufb:800x600@60;ext2load mmc 0:4 $kerneladdr /uImage.android;ext2load mmc 0:4 $ramdiskaddr /ramdisk.img.u-boot;ext2load mmc 0:4 $dtbaddr /fsl-ls1046a-rdb-sdk.dtb;bootm $kerneladdr $ramdiskaddr $dtbaddr
when Android login interface shows up on the monitor, use USB mouse to login Android.
Then go to setting to enable WIFI, and connect to WIFI router with password.
And from the console, change to root:
layerscape:/ $ su
Check if the Ethernet and WIFI are up?
layerscape:/ # ifconfig
eth6 Link encap:Ethernet HWaddr 00:04:9f:04:4d:52
UP BROADCAST MULTICAST MTU:1500 Metric:1
RX packets:0 errors:0 dropped:0 overruns:0 frame:0
TX packets:0 errors:0 dropped:0 overruns:0 carrier:0
collisions:0 txqueuelen:1000
RX bytes:0 TX bytes:0
Memory:1af0000-1af0fff
wlan0 Link encap:Ethernet HWaddr 00:0e:8e:5a:8d:7a
inet addr:192.168.0.212 Bcast:192.168.1.255 Mask:255.255.254.0
inet6 addr: fe80::20e:8eff:fe5a:8d7a/64 Scope: Link
UP BROADCAST RUNNING MULTICAST MTU:1500 Metric:1
RX packets:362 errors:0 dropped:0 overruns:0 frame:0
TX packets:268 errors:0 dropped:0 overruns:0 carrier:0
collisions:0 txqueuelen:1000
RX bytes:365110 TX bytes:37777
Bring down Ethernet port:
layerscape:/ # ifconfig eth6 down
Set up default route table entry:
layerscape:/ # ip rule add from all lookup main pref 0
And set up default gateway IP for wlan0:
layerscape:/ # busybox route add default gw 192.168.0.1 dev wlan0
layerscape:/ # ping www.baidu.com
PING www.a.shifen.com (61.135.169.125) 56(84) bytes of data.
64 bytes from 61.135.169.125: icmp_seq=2 ttl=54 time=2.41 ms
64 bytes from 61.135.169.125: icmp_seq=3 ttl=54 time=1.77 ms
Now Android system can surf internet.

