tips
- 解特殊json
- okhttp2 -> 3, 将set模式改成了builder模式
Retrofit使用From
1. 添加依赖和网络权限
build.gradle
dependencies {
    compile 'com.squareup.retrofit2:retrofit:2.0.2'
    // Retrofit库
  }
Manifest
2. 创建接受服务器返回的数据的类
public class Translation {
        private int status;

    private content content;
    private static class content {
        private String from;
        private String to;
        private String vendor;
        private String out;
        private int errNo;
    }

    //定义 输出返回数据 的方法
    public void show() {
        System.out.println(status);

        System.out.println(content.from);
        System.out.println(content.to);
        System.out.println(content.vendor);
        System.out.println(content.out);
        System.out.println(content.errNo);
    }
}
3. 创建用于描述网络请求的接口
public interface GetRequest_Interface {

 @GET("ajax.php?a=fy&f=auto&t=auto&w=hello%20world")
    Call getCall();
    // 注解里传入 网络请求 的部分URL地址
    // Retrofit把网络请求的URL分成了两部分:一部分放在Retrofit对象里,另一部分放在网络请求接口里
    // 如果接口里的url是一个完整的网址,那么放在Retrofit对象里的URL可以忽略
    // getCall()是接受网络请求数据的方法
}
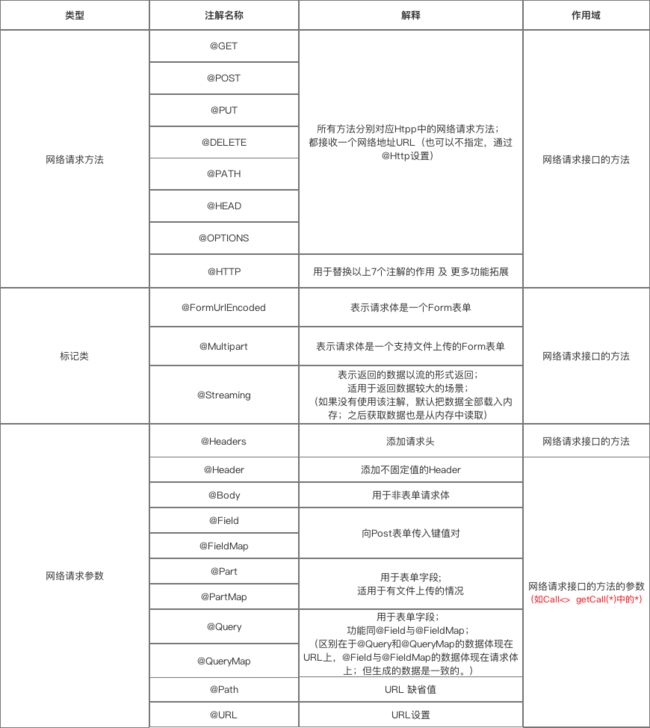
3.1 接口拆分
4. 创建 Retrofit 对象
4.1 数据解析器(Converter)
Retrofit retrofit = new Retrofit.Builder()
        .baseUrl("http://fy.iciba.com/") // 设置 网络请求 Url
        .addConverterFactory(GsonConverterFactory.create()) //设置使用Gson解析(记得加入依赖)
        .build();
| 数据解析器 | Gradle依赖 |
|---|---|
| Gson | com.squareup.retrofit2:converter-gson:2.0.2 |
| Jackson | com.squareup.retrofit2:converter-jackson:2.0.2 |
| Simple XML | com.squareup.retrofit2:converter-simplexml:2.0.2 |
| Protobuf | com.squareup.retrofit2:converter-protobuf:2.0.2 |
| Moshi | com.squareup.retrofit2:converter-moshi:2.0.2 |
| Wire | com.squareup.retrofit2:converter-wire:2.0.2 |
| Scalars | com.squareup.retrofit2:converter-scalars:2.0.2 |
4.2 网络请求适配器(CallAdapter)
| 网络请求适配器 | Gradle依赖 |
|---|---|
| guava | com.squareup.retrofit2:adapter-guava:2.0.2 |
| Java8 | com.squareup.retrofit2:adapter-java8:2.0.2 |
| rxjava | com.squareup.retrofit2:adapter-rxjava:2.0.2 |
5. 创建 网络请求接口实例
6. 发送网络请求(异步 / 同步)
7. 处理返回的数据
public class GetRequest extends AppCompatActivity {

    @Override
    protected void onCreate(Bundle savedInstanceState) {
        super.onCreate(savedInstanceState);
        setContentView(R.layout.activity_main);

        request();
        // 使用Retrofit封装的方法
    }
    public void request() {

        //步骤4:创建Retrofit对象
        Retrofit retrofit = new Retrofit.Builder()
                .baseUrl("http://fy.iciba.com/") // 设置 网络请求 Url
                .addConverterFactory(GsonConverterFactory.create()) //设置使用Gson解析(记得加入依赖)
                .build();

        // 步骤5:创建 网络请求接口 的实例
        GetRequest_Interface request = retrofit.create(GetRequest_Interface.class);

        //对 发送请求 进行封装
        Call call = request.getCall();

        //步骤6:发送网络请求(异步)
        call.enqueue(new Callback() {
            //请求成功时回调
            @Override
            public void onResponse(Call call, Response response) {
                // 步骤7:处理返回的数据结果
                response.body().show();
            }

            //请求失败时回调
            @Override
            public void onFailure(Call call, Throwable throwable) {
                System.out.println("连接失败");
            }
        });
    }
}
6.2 同步请求(记得不在主线程请求)
Response response = call.execute();
        response.body().show();
加上gson解析需要的依赖
compile 'com.squareup.retrofit2:converter-gson:2.0.2'
Retrofit进阶
okhttp3
HttpLoggingInterceptor拦截日志
原本retrofit 的 set log level已经删除, 通过okhttp拦截
retryOnConnectionFailure(true) 设置出现错误进行重新连接
connectTimeout(15, TimeUnit.SECONDS) 设置超时时间
addNetworkInterceptor, 让所有的网络请求都加上拦截器,
参考
drakeet | Retrofit 2.0 + OkHttp 3.0 配置