概念
DLLPlugin 和 DLLReferencePlugin 用某种方法实现了拆分 bundles,同时还大大提升了构建的速度,将包含大量复用模块且不会频繁更新的库进行编译,只需要编译一次,编译完成后存在指定的文件中。在之后的构建过程中不会再对这些模块进行编译,而是直接使用 DllReferencePlugin 来引用动态链接库的代码。一般会对常用的第三方模块使用这种方式,例如 react、react-dom、lodash 等。只要这些模块不升级更新,这些动态链接库就不需要重新编译。
摘要
本文介绍了 Webpack 中 DllPlugin 插件的使用,以及配合使用 AddAssetHtmlPlugin 或者 HtmlWebpackIncludeAssetsPlugin 将构建好的 JS 文件插入到 html页面中
代码地址
github: 源码
欢迎交流,Star!
项目目录
常规webpack项目,搭建过程本文章不在描述
myreact
|- /build
  |- webpack.config.js
  |- webpack.dll.conf.js
|- /dist
  |- dll
  |- js
|- /src
  |- index.js
|- package.json
|- index.html
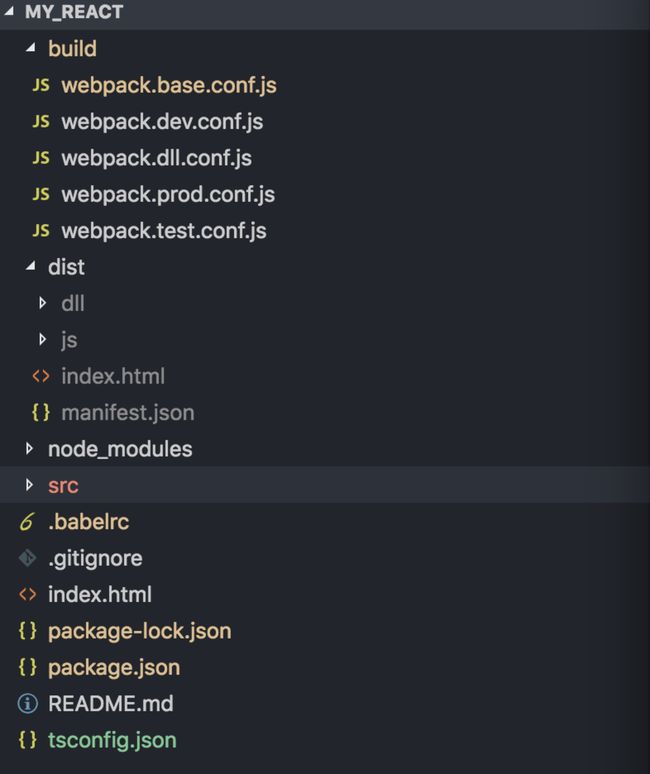
具体项目结构,请看下图
下面开始DLL之旅
一.build目录下创建webpack.dll.conf.js(DLLPlugin)
const webpack = require("webpack")
const path = require('path')
const CleanWebpaclPlugin = require('clean-webpack-plugin');
const resolve = (dir) => path.join(__dirname, '..', dir);

module.exports = {
  entry: {
    # 将 react、lodash等模块作为入口编译成动态链接库
    vendor: ['react', 'react-dom', 'react-router-dom', 'lodash']
  },
  output: {
    # 指定生成文件所在目录文件夹,
    # 将它们存放在了 src 文件夹下
    path: resolve('public'),
    # 指定文件名
    library: '_dll_[name]',
    # 存放动态链接库的全局变量名称,例如对应 lodash 来说就是 lodash_dll_lib
    # 这个名称需要与 DllPlugin 插件中的 name 属性值对应起来
    filename: 'dll/_dll_[name].[hash].js'
  },
  plugins: [
    new CleanWebpaclPlugin(['dll'], {
        root: resolve('public')
    }),
    new webpack.DllPlugin({
      name: '_dll_[name]',
    # 和output.library中一致,值就是输出的manifest.json中的 name值
      path: path.join(__dirname, '../public/dll', '[name].manifest.json')
    })
  ]
}
二. 创建webpack.base.conf.js 使用 DllReferencePlugin
const path = require('path');
const webpack = require('webpack');
const HTMLWebpackPlugin = require('html-webpack-plugin');
const CleanWebpaclPlugin = require('clean-webpack-plugin');
const resolve = (dir) => path.join(__dirname, '..', dir);

module.exports = {
    entry: './src/index.js',
    output: {
        path: resolve('dist'),
        filename: 'js/[name].[hash].js',
        library: '_dll_[name]'
    },
    plugins: [
        # 需添加root 否则无法删除,exclude未生效
        new CleanWebpackPlugin(['dist'], {
          root: path.join(__dirname, '..')
        }),
        new HTMLWebpackPlugin({
            title: 'Webpak DllPlugin 的使用',
            template: resolve('index.html'),
            filename: 'index.html'
        }),
        new webpack.DefinePlugin({
            'process.env.NODE_ENV': JSON.stringify('production')
        }),
        # 告诉 Webpack 使用动态链接库
        new webpack.DllReferencePlugin({
            // 描述 lodash 动态链接库的文件内容
            manifest: require(../public/dll/vendor.manifest')
        })
    ]
}
三、在 index.html 文件中引入动态链接库
由于动态链接库我们一般只编译一次,除非依赖的三方库更新,之后就不用编译,因此入口的 index.js 文件中不包含这些模块,所以要在 index.html 中单独引入。
两种方案
- 手动添加script,手动copy打包好的dll文件夹到dist,麻烦反复,很不爽
- 使用add-asset-html-webpack-plugin或者html-webpack-include-assets-plugin插入到html中,简单自动化,美滋滋
所以我们肯定会采用第二种方式,下面着重讲下add-asset-html-webpack-plugin与html-webpack-include-assets-plugin插件的使用,项目中使用add-asset-html-webpack-plugin
安装大同小异
npm install add-asset-html-webpack-plugin -D
npm install html-webpack-include-assets-plugin -D
使用也有相似的地方
webpack.base.conf.js 文件中进行使用
# add-asset-html-webpack-plugin
...;
const AddAssetHtmlPlugin = require('add-asset-html-webpack-plugin');

module.exports = {
    ...,
    plugins: [
        ...,
        # 给定的 JS 或 CSS 文件添加到 webpack 配置的文件中,并将其放入资源列表 html webpack插件注入到生成的 html 中。
        new AddAssetHtmlPlugin([
            {
                # 要添加到编译中的文件的绝对路径
                filepath: path.resolve(__dirname,'../public/dll/_dll_vendor.js'),
                outputPath: 'dll',
                publicPath: 'dll',
                includeSourcemap: false
            }
        ])
    ]
}
# html-webpack-include-assets-plugin
...;
const HtmlWebpackIncludeAssetsPlugin = require('html-webpack-include-assets-plugin');

module.exports = {
    ...,
    plugins: [
        ...,
        # 给定的 JS 或 CSS 文件添加到 webpack 配置的文件中,并将其放入资源列表 html webpack插件注入到生成的 html 中。
        new HtmlWebpackIncludeAssetsPlugin([
            {
                assets: ['dll/_dll_vendor.js'],
                append: false
            }
        ])
    ]
}
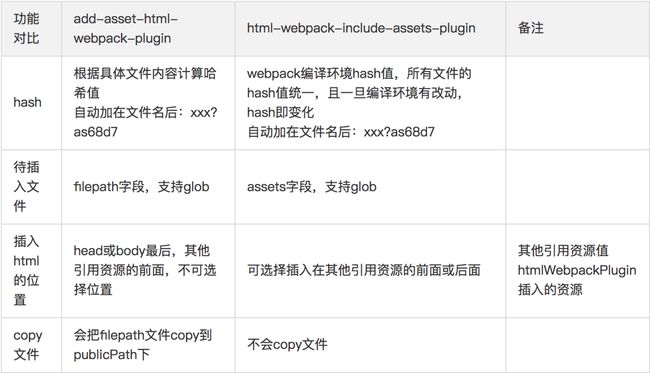
两者区别
index.html
爱你的一只猫哈哈哈1111
运行项目
npm run build
查看dist文件下的文件
相关文档
webpack 中文

