背景:由于产品需要原先的三级联动的picker,字数过长时显示不全,所以要改用类似京东地址选择的控件/(ㄒoㄒ)/~~,oh my god ,废话不多说,来看看京东的地址选择器的效果
思路分析
1.有一个动态的标题显示的View,标题可点击,动态显示长度,需要根据所选择的栏目进行显示
2.下方是省市区选择区域,可以用一个滑动视图来添加表视图来实现,当选择当前级别的时候,设置标题,自动滑动到下一级页面,下一级页面的标题为请选择,当点击最后一级页面的时候,回调地址
3.当重新选择的时候,把之前的下一级页面干掉,如果点击则添加下一级页面滑动,显示对应标题,对应的下划线跟着移动
实现
先看需求效果图
拿到这个我们肯定是先把界面需要的元素先写出来啦 ,但是这个标题是动态变化追加的,还是要注意下,我刚开始也是固定宽度调试的,下面看下这个标题视图代码实现
标题栏实现
 override func layoutSubviews() {
        super.layoutSubviews()
        let mArrar = NSMutableArray.init(array: [])
        for subview in self.subviews {
            if(subview.isKind(of: UIButton.self) ) {
                mArrar.add(subview)
            }
        }
        for i in 0.. 0) {
                let preView : UIView = mArrar[i - 1] as! UIView
                view.frame.origin.x = HYBarItemMargin + preView.frame.origin.x + preView.frame.size.width
                // view.frame = CGRect(x: HYBarItemMargin + (HYBarItemWidth + 5) * CGFloat( i) , y: 0, width: HYBarItemWidth, height: kHYTopTabbarHeight-1)
            }
        }
    }
选择视图逻辑
选择视图是一个滑动视图去添加一个或者多个表视图,我们可以把这些表视图放在一个数组里,添加删除通过数组去管理,标题栏的添加删除也可以这样实现
我们可以在代理方法willSelectRowAtIndexPath实现以下方法
func tableView(_ tableView: UITableView, willSelectRowAt indexPath: IndexPath) -> IndexPath? {
   // 判断是否是第一次选择,不是,则重新选择省,切换省.
  let  indexPath0 = tableView.indexPathForSelectedRow
    //已当前显示第一个tableView将要点击为例
  if(self.tableViews.index(of: tableView) == 1) {
            let itemValue = secondConponent?[indexPath.row]
            thirdConponent  = (itemValue?.items)!
            let  indexPath0 = tableView.indexPathForSelectedRow
            if (indexPath0 != nil) && indexPath0!.compare(indexPath).rawValue != ComparisonResult.orderedSame.rawValue {//不同cell
                    for _ in 0..<(self.tableViews.count - 1) {
                        if self.tableViews.count > 2 {
                           //移除最后一级标题按钮,还有tabView
                            self.removeLastItem()
                        }
                }
                self.addTopBarItem()
                self.addTableView()
                self.scrollToNextItem(preTitle: (itemValue?.name)!)
                return indexPath
            }else if (indexPath0 != nil) && indexPath0!.compare(indexPath).rawValue == ComparisonResult.orderedSame.rawValue {//点击相同cell
                self.scrollToNextItem(preTitle: (itemValue?.name)!)
                return indexPath
            }
           //从来没有选中过,添加标题按钮,添加下一级tabView
            self.addTopBarItem()
            self.addTableView()
            let itemValu = secondConponent?[indexPath.row]
            self.scrollToNextItem(preTitle: (itemValu?.name)!)
        }
}
在didSelectRow进行选中的标记,这里最好用model的Bool值来标记,然后再刷新,当前页面是第三级的时候,由于我们可以移除视图进行其他操作了 ,所以我这里第三级视图也没有再进行标记刷新
    func tableView(_ tableView: UITableView, didSelectRowAt indexPath: IndexPath) {
        if(self.tableViews.index(of: tableView) == 0 ) {
            firstSelectIndex = indexPath
            let  commonImage =  (firstDataSource[indexPath.row])
            commonImage.selectItem = true
            secondSelectIndex = indexPath
            tableView.reloadRows(at: [indexPath], with: .automatic)
            tableView.selectRow(at: indexPath, animated: false, scrollPosition: .none)
            tableView.selectRow(at: indexPath, animated: false, scrollPosition: .none)
        } else if (self.tableViews.index(of: tableView) == 1 ) {
            let  commonImage =  (secondConponent?[indexPath.row])!
            commonImage.selectItem = true
            secondSelectIndex = indexPath
            tableView.reloadRows(at: [indexPath], with: .automatic)
            tableView.selectRow(at: indexPath, animated: false, scrollPosition: .none)

        } else if (self.tableViews.index(of: tableView) == 2) {
            UIView.animate(withDuration: 0.15, animations: {
                self.backBtn?.backgroundColor = UIColor.clear
                self.frame = CGRect(x: 0, y: screenH, width: screenW, height: self.frame.height)
            }, completion: { isComplete in
                self.removeFromSuperview()
                self.backBtn?.removeFromSuperview()
            })
            let firstSelect = firstDataSource[(firstSelectIndex?.row)!]
            var codeStr = ""
            let  model = secondConponent?[(secondSelectIndex?.row)!]
            codeStr = model?.code ?? ""
            if  thirdConponent.count > 0 {
                let mo  = thirdConponent[indexPath.row]
                codeStr = mo.code ?? ""
            }
            let value = ( firstSelect.name  == XYJPhotoUploadPickerType.camera.rawValue) ? 1 : 0
            //选择完成,进行回调
            self.callBack!(value, codeStr)
        }
    }
在同一个tabView选择另一个cell的时候我们需要取消之前的选中,然后再刷新
func tableView(_ tableView: UITableView, didDeselectRowAt indexPath: IndexPath) {
        if(self.tableViews.index(of: tableView) == 0 ) {
            let  commonImage =  (firstDataSource[indexPath.row])
            commonImage.selectItem = false
            tableView.reloadRows(at: [indexPath], with: .automatic)
        } else if (self.tableViews.index(of: tableView) == 1 ) {
            let  commonImage =  (secondConponent?[indexPath.row])!
            commonImage.selectItem = false
            tableView.reloadRows(at: [indexPath], with: .automatic)
        } else if (self.tableViews.index(of: tableView) == 2) {
        }
    }
移除最后一个标题按钮和最后一级视图
func removeLastItem() {
        let tab : UITableView =  self.tableViews.lastObject as! UITableView
        let   btn : UIButton =  self.topTabbarItems.lastObject as! UIButton
        tab.removeFromSuperview()
        btn.removeFromSuperview()
        self.tableViews.removeLastObject()
        self.topTabbarItems.removeLastObject()
    }
滑动到下一级页面显示对应的标题
 func scrollToNextItem(preTitle : String ) {
        let index = (self.contentView?.contentOffset.x)! / screenW
        let btn : UIButton  = self.topTabbarItems[Int(index)] as! UIButton
        btn.setTitle(preTitle, for: .normal)
        btn.sizeToFit()
        topTabbar?.layoutIfNeeded()
        UIView.animate(withDuration: 0.25) {
            self.contentView?.contentSize = CGSize(width:  CGFloat(self.tableViews.count) * screenW, height: 0)
            let offset : CGPoint = (self.contentView?.contentOffset)!
            self.contentView?.contentOffset = CGPoint(x: offset.x + screenW, y: offset.y)
            //修改选中下划线的位置
            self.changeUnderLineFrame(btn: self.topTabbar?.subviews.last as! UIButton)
        }
}
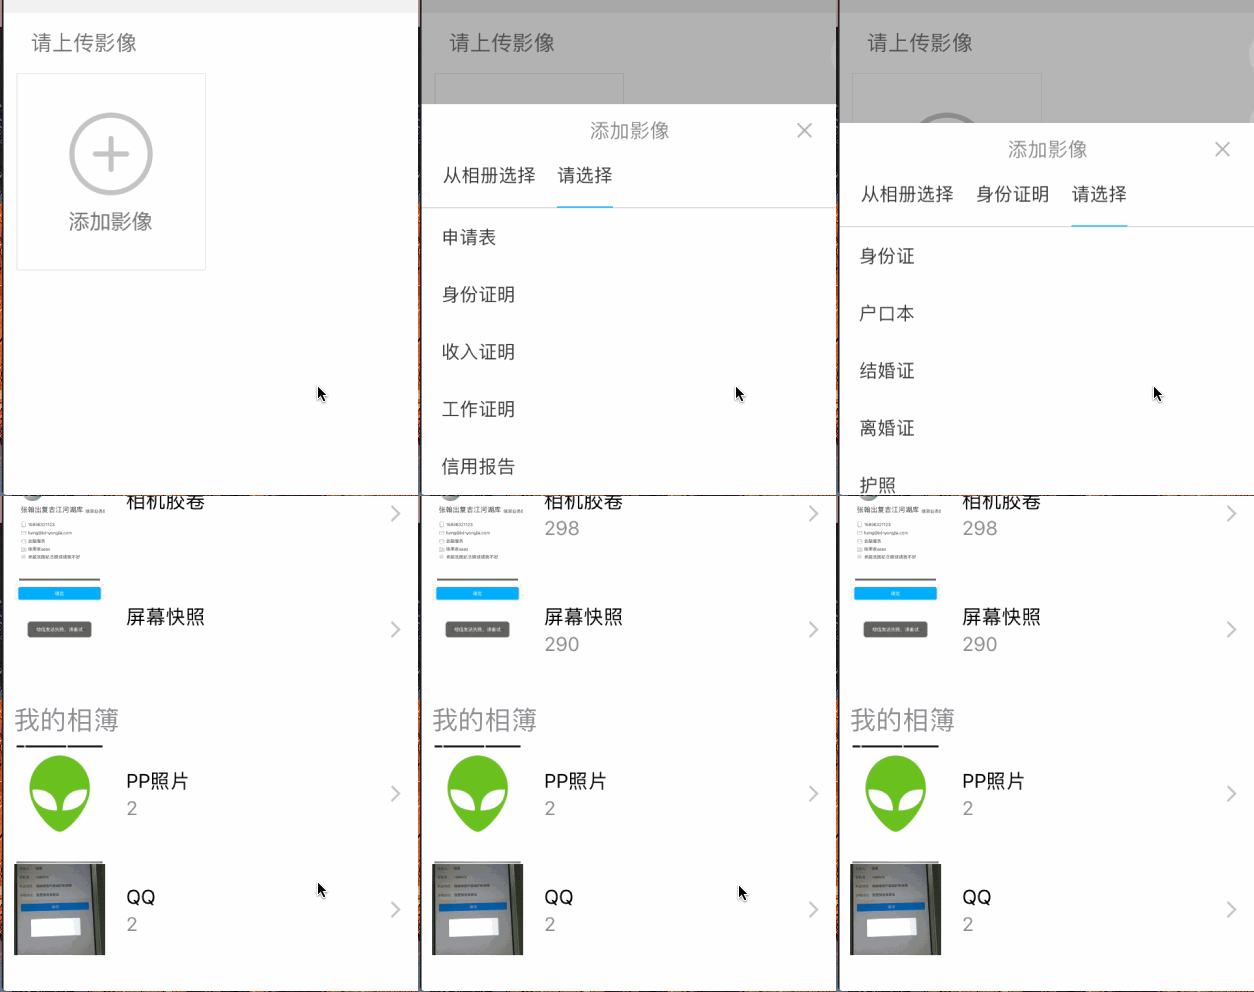
我的最终选择器效果如下图
总体的思路及主要主代码实现就这些了,如果有需要并且有疑惑,可以点击这里下载
我的数据都是从本地缓存中获取的,所以有几个获取数据的方法会报错,只要进行相关的替换就好了.


