目标
使用DeclareLayoutSwift来实现界面,代码非常简短,完全手写代码,不使用Storyboard和xib,也不使用约束。
要实现的效果:
1.导航栏
1.1 导航栏结构分析
    func createTitleView(title:String){
        self.navigationController?.navigationBar.barTintColor = .white
        let titleView = HostView {
            Grid(.columns <- [.star(1),.auto]){ // ①
                [Label(.text <- title, .fontSize <- 20),//②
                 StackPanel(.gridColumnIndex <- 1,.orientation <- .Horizontal) {//③
                    [Button(.image <- #imageLiteral(resourceName: "Msg_nav1")),//④
                     Button(.image <- #imageLiteral(resourceName: "Msg_nav2"), .margin <- Insets(vertical: 0, horizontal: 20)),
                     Button(.image <- #imageLiteral(resourceName: "Msg_nav3"))]
                    }]
            }
        }
        self.navigationItem.titleView = titleView
    }
①
- 使用Grid,将导航栏分成2列
- 第2列为自动(.auto,根据内容设置宽度),用来放置右侧图标。因为这一列是根据内容自动适应宽度的,增加图标或减少图标时不需要修改
- 第1列占据剩下宽度。
.star(1)的表示这一列是按比例分配。如:[.star(1),.star(2)]表示按1:2分配空间。这里没有多个列用.star表示,所以第1列会占用所有剩下空间。
②
- 声明一个Label,并设置文本和字体大小
- Label是Grid的子元素
- 由于位于Grid中,可以设置其所在的行或列,不设置默认不第1行第1列
③
- StackPanel表示一个水平或竖直方向的布局,这里设置为水平方向
.orientation <- .Horizontal,表示把子元素从左到右水平排列。 - 将StackPanel放到
Grid的第2列(.gridColumnIndex <- 1)
④
- 创建Button,并设置Button的图片
- 也可以写为
Button(.image <- "Msg_nav1")
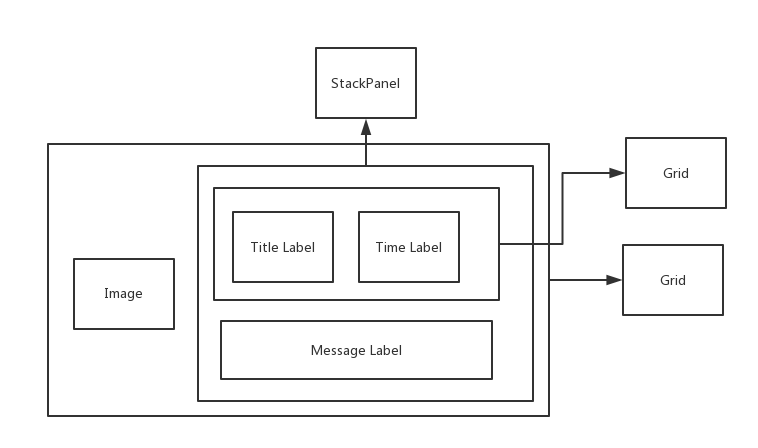
2. 创建UITableView Cell
2.1 Cell结构分析
    func tableView(_ tableView: UITableView, cellForRowAt indexPath: IndexPath) -> UITableViewCell {
        let element = Grid(.columns <- [.auto, .star(1)], .padding <- Insets(vertical: 8, horizontal: 20)) {
            [Image(.width <- 50, .image <- #imageLiteral(resourceName: "Msg_List"), .margin <- Insets(right: 10)),
             StackPanel(.gridColumnIndex <- 1) {
                 [Grid(.columns <- [.star(1), .auto]) {
                     [Label(.text <- "钉钉运动", .fontSize <- 17),
                      Label(.gridColumnIndex <- 1, .text <- "下午 8:36", .fontSize <- 13, .textColor <- UIColor(white: 0.8, alpha: 1))]
                 },
                  Label(.text <- "IT技术中心 获得3月24日 XXX有限公司全员步数第一", .fontSize <- 15, .textColor <- .gray, .margin <- Insets(top: 8))]
            }]
        }
        return tableView.makeCell(element: element)
    }
padding和margin分别定义内边距和外边距类型为Insets(UIEdgeInsets)
完整代码
import DeclareLayoutSwift
import UIKit

class MessageVC: UIViewController, UITableViewDelegate, UITableViewDataSource {

    override func viewDidLoad() {
        super.viewDidLoad()

        self.createTitleView(title: "钉钉")

        self.view.hostElement {
            Table(.delegate <- self, .dataSource <- self)
        }
    }

    func createTitleView(title: String) {
        self.navigationController?.navigationBar.barTintColor = .white
        let titleView = HostView {
            Grid(.columns <- [.star(1), .auto]) {
                [Label(.text <- title, .fontSize <- 20),
                 StackPanel(.gridColumnIndex <- 1, .orientation <- .Horizontal) {
                     [Button(.image <- #imageLiteral(resourceName: "Msg_nav1")),
                      Button(.image <- #imageLiteral(resourceName: "Msg_nav2"), .margin <- Insets(vertical: 0, horizontal: 20)),
                      Button(.image <- #imageLiteral(resourceName: "Msg_nav3"))]
                }]
            }
        }
        self.navigationItem.titleView = titleView
    }

    func tableView(_ tableView: UITableView, numberOfRowsInSection section: Int) -> Int {
        return 100
    }

    func tableView(_ tableView: UITableView, cellForRowAt indexPath: IndexPath) -> UITableViewCell {
        let element = Grid(.columns <- [.auto, .star(1)], .padding <- Insets(vertical: 8, horizontal: 20)) {
            [Image(.width <- 50, .image <- #imageLiteral(resourceName: "Msg_List"), .margin <- Insets(right: 10)),
             StackPanel(.gridColumnIndex <- 1) {
                 [Grid(.columns <- [.star(1), .auto]) {
                     [Label(.text <- "钉钉运动", .fontSize <- 17),
                      Label(.gridColumnIndex <- 1, .text <- "下午 8:36", .fontSize <- 13, .textColor <- UIColor(white: 0.8, alpha: 1))]
                 },
                  Label(.text <- "IT技术中心 获得3月24日 XXX有限公司全员步数第一", .fontSize <- 15, .textColor <- .gray, .margin <- Insets(top: 8))]
            }]
        }
        return tableView.makeCell(element: element)
    }
}
Demo已经放在https://github.com/huangzhouhong/DeclareLayoutSwift


