Android Material Design 组件
定义阴影
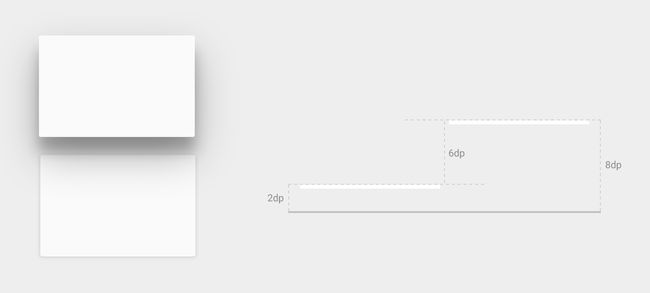
Material Design为UI元素引入了高度的概念。由 Z 属性所表示的视图高度将决定其阴影的视觉外观:拥有较高 Z 值的视图将投射更大且更柔和的阴影。 拥有较高 Z 值的视图将挡住拥有较低 Z 值的视图;不过视图的 Z 值并不影响视图的大小。
指定视图的高度
视图的Z值包含两个部分:
- 高度(elevation),静态组件。
- 转换(translationZ),用于动画的动态组件。
Z = elevation + translationZ
Z值以dp为单位度量
设置静态组件(elevation)
设置elevation有两种方式:
- 布局属性,android:layout_elevation
- 代码,View.setElevation()
注意这里的设置的elevation指的是surfaces之间的高度间距,它是相对的,并不都是以屏幕的底部为起点来设定elevation
效果图:
设置动态组件(translationZ)
通过View.setTranslationZ()方法来设置。
当View有了Z和translationZ的属性,可以通过PropertyAnimator改变这两个属性轻松地为视图高度添加动画。
自定义视图阴影与轮廓
视图的背景可绘制对象的边界将决定其阴影的默认形状。轮廓(Outline)代表图形对象的外形并定义触摸反馈的波纹区域
定制一个阴影需要做到两点:
- 设置View的elevation值
- 给View 设置一个背景或者Outline
背景阴影
View
Background Drawable myrect.xml
视图将投射一个带有圆角的阴影,因为背景可绘制对象将定义视图的轮廓。 如果提供一个自定义轮廓,则此轮廓将替换视图阴影的默认形状。
Outline自定义轮廓
如果要为您的代码中的视图定义自定义轮廓:
- 扩展 ViewOutlineProvider 类别。
- 替代 getOutline() 方法。
- 利用 View.setOutlineProvider() 方法向您的视图指定新的轮廓提供程序。
可使用 Outline 类中的方法创建带有圆角的椭圆形和矩形轮廓。视图的默认轮廓提供程序将从视图背景取得轮廓。 如果要防止视图投射阴影,请将其轮廓提供程序设置为 null。
ViewOutlineProvider viewOutlineProvider = new ViewOutlineProvider() {
    @Override
    public void getOutline(View view, Outline outline) {
        int size = getResources().getDimensionPixelSize(R.dimen.fab_size);
        outline.setOval(0, 0, size, size);
    }
};
fab.setOutlineProvider(viewOutlineProvider);
常用控件elevation
| 控件名称 | 值 |
|---|---|
| Toolbar | 4dp |
| SnackBar | 6dp |
| FloatingButton | resting 6dp,pressed 12dp |
更多控件Elevation值可以参考Component reference shadows
参考
定义阴影与裁剪视图
ANDROID L——Material Design详解(视图和阴影)
Component reference shadows
FloatingActionButton
介绍
浮动操作按钮 (简称 FAB) 是: “一个特殊的promoted操作案例。因为一个浮动在UI之上的圆形图标而显得格外突出,同时它还具有特殊的手势行为”
浮动操作按钮代表一个屏幕之内最基本的额操作。关于FAB按钮的更多信息和使用案例请参考MaterialDesign文档
常用属性
FloatingActionButton继承自ImageView,所以拥有所有ImageView的属性。同时还有一些特制的属性:
| 属性名称 | 描述 |
|---|---|
| app:backgroundTint | 设置FAB的背景颜色。 |
| app:rippleColor | 设置FAB点击时的背景颜色。 |
| app:borderWidth | 该属性尤为重要,如果不设置0dp,那么在4.1的sdk上FAB会显示为正方形,而且在5.0以后的sdk没有阴影效果。所以设置为borderWidth="0dp"。 |
| app:elevation | 设置FAB z轴的静态高度 |
| app:pressedTranslationZ | 设置FAB 点击时的Z轴的动态值 |
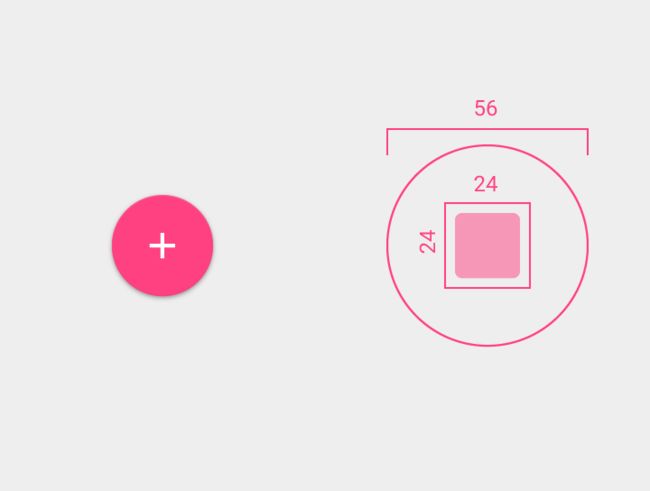
| app:fabSize | 设置FAB的大小,该属性有两个值,分别为normal和mini,对应的FAB大小分别为56dp和40dp。 |
| android:src | 设置FAB的图标,Google建议符合Design设计的该图标大小为24dp。 |
| app:layout_anchor | 设置FAB的锚点,即以哪个控件为参照点设置位置。 |
| app:layout_anchorGravity | 设置FAB相对锚点的位置,值有 bottom、center、right、left、top等。 |
在上述表格中可以看到最后两个属性是布局属性。一般FAB配合CoordinatorLayout使用,通过这两个属性构建出特定位置与效果的FloatingActionButton。
根据MaterialDesign文档应该为FAB设置手机上下方的margin设置为16dp而平板上设置为24dp(layout_margin)。
注意,当设置layout_behavior时,不能引用CoordinatorLayout,会提示CoordinatorLayout不能作为View parent。
...
效果:
默认Behavior
浮动操作按钮默认的behavior是为Snackbar让出空间。效果如下:
布局代码和上面类似,Activity中代码:
@Override
    protected void onCreate(@Nullable Bundle savedInstanceState) {
        super.onCreate(savedInstanceState);
        setContentView(R.layout.activity_floating_btn);
        initView();
        initEvent();
    }

    private void initEvent() {
        mFab.setOnClickListener(new View.OnClickListener() {
            @Override
            public void onClick(View v) {
                Snackbar.make(mCoordinatorLayout, "SnackBar", Snackbar.LENGTH_SHORT).show();
            }
        });
    }

    private void initView() {
        mCoordinatorLayout = (CoordinatorLayout) findViewById(R.id.id_coordinatorlayout);
        mFab = (FloatingActionButton) findViewById(R.id.id_fab);
    }
自定义Behavior
有一下几个准备工作:
- 首先需要一个起源控件,可以是RecyclerView,也可以是AppBarLayout。
- 需要为浮动操作按钮实现CoordinatorLayout.Behavior。这个类用于定义按钮该如何响应包含在同一CoordinatorLayout之内的其它view。
布局文件
这里采用了RecyclerView作为起源控件。
注意,起源控件可以是CoordinatorLayout包含的ViewTree中任一子View(直接活着间接)。但是与Behavior关联的必须是CoordinatorLayout的直接子View。
Activity代码
@Override
    protected void onCreate(@Nullable Bundle savedInstanceState) {
        super.onCreate(savedInstanceState);
        setContentView(R.layout.activity_fab_behavior);
        initDate();
        initView();
    }

    private void initDate() {
        mDates = new ArrayList<>();
        for(int i = 0; i < 20; i++) {
            mDates.add("This is item " + i);
        }
    }

    private void initView() {
        mRecyclerView = (RecyclerView) findViewById(R.id.id_recycler_behavior);
        mRecyclerView.setLayoutManager(new LinearLayoutManager(this));
        mAdapter = new HomeAdapter();
        mRecyclerView.setAdapter(mAdapter);
    }

    class HomeAdapter extends RecyclerView.Adapter {
        @Override
        public int getItemCount() {
            return mDates.size();
        }

        @Override
        public HomeAdapter.MyViewHolder onCreateViewHolder(ViewGroup parent, int viewType) {
            MyViewHolder holder = new MyViewHolder(LayoutInflater.from(FABBehaviorActivity.this)
                    .inflate(R.layout.layout_item, parent, false));
            return holder;
        }

        @Override
        public void onBindViewHolder(HomeAdapter.MyViewHolder holder, int position) {
            holder.tv.setText(mDates.get(position));
        }

        class MyViewHolder extends RecyclerView.ViewHolder {

            TextView tv;
            public MyViewHolder(View itemView) {
                super(itemView);
                tv = (TextView) itemView.findViewById(R.id.id_tv_num);
            }
        }
    }
主要是对RecyclerView的初始化,以及设置Adapter。RecyclerView应该默认开启了NestedScrolling允许条件ViewCompat.setNestedScrollingEnabled(RecyclerView,true);
Custom Behavior
整个代码如下:
public class ScrollAwareFABBehavior extends FloatingActionButton.Behavior{

    private static final Interpolator INTERPOLATOR = new FastOutSlowInInterpolator();
    private static final String TAG = "Behavior";
    /**
     * 用于判断当前FloatingActionButton是否在执行退出动画
     */
    private boolean mIsAnimatingOut = false;

    public ScrollAwareFABBehavior(Context context, AttributeSet attrs) {
        super();
    }

    @Override
    public boolean onStartNestedScroll(
            CoordinatorLayout coordinatorLayout,
            FloatingActionButton child,
            View directTargetChild,
            View target,
            int nestedScrollAxes) {
        return nestedScrollAxes == ViewCompat.SCROLL_AXIS_VERTICAL;
    }

    @Override
    public void onNestedScroll(
            CoordinatorLayout coordinatorLayout,
            FloatingActionButton child,
            View target,
            int dxConsumed,
            int dyConsumed,
            int dxUnconsumed,
            int dyUnconsumed) {
        super.onNestedScroll(
                coordinatorLayout,
                child, target, dxConsumed, dyConsumed, dxUnconsumed, dyUnconsumed);
        Log.d(TAG, target.toString());
        //上拉,DOWN坐标减去MOVE坐标,值为正
        if(dyConsumed > 0 && !mIsAnimatingOut && child.getVisibility() == View.VISIBLE) {
            animateOut(child);
        } else if(dyConsumed < 0 && child.getVisibility() != View.VISIBLE) {
            //下拉,DOWN坐标减去MOVE坐标,值为负
            animateIn(child);
        }
    }

    private void animateOut(final FloatingActionButton child) {
        if(Build.VERSION.SDK_INT >= Build.VERSION_CODES.ICE_CREAM_SANDWICH) {
            ViewCompat.animate(child).scaleX(0.0f).scaleY(0.0f).alpha(0.0f)
                    .setInterpolator(INTERPOLATOR)
                    .withLayer()
                    .setListener(new ViewPropertyAnimatorListenerAdapter() {
                        @Override
                        public void onAnimationCancel(View view) {
                            mIsAnimatingOut = false;
                        }

                        @Override
                        public void onAnimationEnd(View view) {
                            mIsAnimatingOut = false;
                            view.setVisibility(View.GONE);
                        }

                        @Override
                        public void onAnimationStart(View view) {
                            mIsAnimatingOut = true;
                        }
                    })
                    .start();
        }else {
            Animation anim = AnimationUtils.loadAnimation(child.getContext(), R.anim.fab_out);
            anim.setInterpolator(INTERPOLATOR);
            anim.setAnimationListener(new Animation.AnimationListener() {
                @Override
                public void onAnimationStart(Animation animation) {
                    mIsAnimatingOut = true;
                }

                @Override
                public void onAnimationEnd(Animation animation) {
                    mIsAnimatingOut = false;
                    child.setVisibility(View.GONE);
                }

                @Override
                public void onAnimationRepeat(Animation animation) {
                }
            });
            child.startAnimation(anim);
        }
    }

    private void animateIn(FloatingActionButton child) {
        child.setVisibility(View.VISIBLE);
        if(Build.VERSION.SDK_INT >= Build.VERSION_CODES.ICE_CREAM_SANDWICH) {
            ViewCompat.animate(child).scaleX(1.0f).scaleY(1.0f).alpha(1.0f)
                    .setInterpolator(INTERPOLATOR)
                    .withLayer()
                    .setListener(null)
                    .start();
        }else {
            Animation animation = AnimationUtils.loadAnimation(child.getContext(), R.anim.fab_in);
            animation.setInterpolator(INTERPOLATOR);
            child.startAnimation(animation);
        }
    }
}
代码分析:
自定义的Behavior继承自FloatingActionButton.Behavior。这样的好处就是使用该Behavior可以保留默认的Behavior的操作(为Snackbar腾出空间),又可以实现自定义的Behavior。
其实CoordinatorLayout.Behavior有两种模式,一种是实现
layoutDependsOn()和onDependentViewChanged()方法,Snackbar就是;而另一种就是采用NestedScrolling事件传递。
可以发现上面覆写的方法还是和NestedScrollParent接口方法有一点区别的。上面覆写的方法来自CoordinatorLayout.Behavior,而CoordinatorLayout实现了NestedScrollParent接口。CoordinatorLayout.java中实现了该接口的方法,并且在这些方法中去调用Behavior的相应方法。
CoordinatorLayout.onStartNestedScroll()方法通过遍历所有直接子View的布局参数(LayoutParams)来找到有设置layout_behavior属性的View,并且获取到相应的Behavior类。然后调用该Behavior的相应方法。这也就解释了为什么关联Behavior控件必须是CoordinatorLayout直接子View
public boolean onStartNestedScroll(View child, View target, int nestedScrollAxes) {
        boolean handled = false;
        final int childCount = getChildCount();
        for (int i = 0; i < childCount; i++) {
            final View view = getChildAt(i);
            final LayoutParams lp = (LayoutParams) view.getLayoutParams();
            final Behavior viewBehavior = lp.getBehavior();
            if (viewBehavior != null) {
                final boolean accepted = viewBehavior.onStartNestedScroll(this, view, child, target,
                        nestedScrollAxes);
                handled |= accepted;
                lp.acceptNestedScroll(accepted);
            } else {
                lp.acceptNestedScroll(false);
            }
        }
        return handled;
    }
这样一来,具备了事件起源控件(RecyclerView),NestedScrollParent(CoordinatorLayout),Behavior,以及与Behavior关联的FloatingActionButton。
当CoordinatorLayout同时有AppBarLayout和RecyclerView时,AppBarLayout作为事件起源控件,同时给RecyclerView和FloatingActionButton设置各自的layout_behavior属性。
有一点要注意,自定义Behavior一定要实现上述代码中的构造函数。
效果
参考
codepath教程:浮动操作按钮详解
Material Design之FloatingActionButton的使用