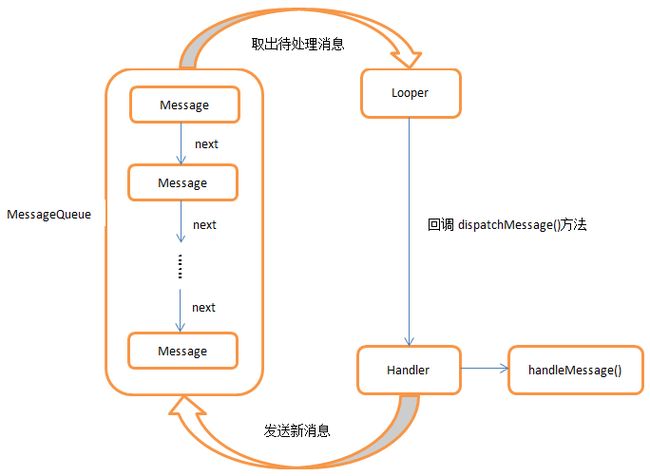
本文主要讲解Android线程间通信的一种方式,即Handler机制。
子线程使用Handler
相信很多童鞋有过子线程中new Handler时系统报错的经历
java.lang.RuntimeException: Can't create handler inside thread that has not called Looper.prepare()
at android.os.Handler.(Handler.java:203)
at android.os.Handler.(Handler.java:117)
报错的原因是,在没有调用过Looper.prepare()的子线程中不能new Handler。
正确的使用方式是
new Thread() {
    @Override
    public void run() {
        Looper.prepare();
        Looper looper = Looper.myLooper();
        Looper.loop();
        Handler handler = new Hander();
    }
}.start();
这到底是什么原因,Handler的构造函数做了什么操作,Looper.prepare()做了什么处理,我们接着往下看。
Handler
public Handler(Callback callback, boolean async) {
    if (FIND_POTENTIAL_LEAKS) {
        final Class klass = getClass();
        if ((klass.isAnonymousClass() || klass.isMemberClass() || klass.isLocalClass()) &&
                (klass.getModifiers() & Modifier.STATIC) == 0) {
            Log.w(TAG, "The following Handler class should be static or leaks might occur: " +
                klass.getCanonicalName());
        }
    }

    mLooper = Looper.myLooper();
    if (mLooper == null) {
        throw new RuntimeException(
            "Can't create handler inside thread that has not called Looper.prepare()");
    }
    mQueue = mLooper.mQueue;
    mCallback = callback;
    mAsynchronous = async;
}
这里可以很清晰的看到抛出的异常
mLooper = Looper.myLooper();
if (mLooper == null) {
    throw new RuntimeException(
        "Can't create handler inside thread that has not called Looper.prepare()");
}
接着看Looper中的实现。
Looper
public final class Looper {

    ...

    // sThreadLocal.get() will return null unless you've called prepare().
    static final ThreadLocal sThreadLocal = new ThreadLocal();

    /** Initialize the current thread as a looper.
    * This gives you a chance to create handlers that then reference
    * this looper, before actually starting the loop. Be sure to call
    * {@link #loop()} after calling this method, and end it by calling
    * {@link #quit()}.
    */
    public static void prepare() {
        prepare(true);
    }

    private static void prepare(boolean quitAllowed) {
        if (sThreadLocal.get() != null) {
            throw new RuntimeException("Only one Looper may be created per thread");
        }
        sThreadLocal.set(new Looper(quitAllowed));
    }

    ...

    /**
     * Return the Looper object associated with the current thread.  Returns
     * null if the calling thread is not associated with a Looper.
     */
    public static @Nullable Looper myLooper() {
        return sThreadLocal.get();
    }

    ...

    /**
     * Run the message queue in this thread. Be sure to call
     * {@link #quit()} to end the loop.
     */
    public static void loop() {
        final Looper me = myLooper();
        if (me == null) {
            throw new RuntimeException("No Looper; Looper.prepare() wasn't called on this thread.");
        }
        final MessageQueue queue = me.mQueue;

        for (;;) {
            Message msg = queue.next(); // might block
            if (msg == null) {
                // No message indicates that the message queue is quitting.
                return;
            }

              ...

            try {
                msg.target.dispatchMessage(msg);
            } finally {
                if (traceTag != 0) {
                    Trace.traceEnd(traceTag);
                }
            }

              ...

            msg.recycleUnchecked();
        }
    }
}
上面贴了Looper的一些主要代码,主要工作流程如下:
prepare() 中就做了一件事,用ThreadLoacl在当前Thread中保存了一份Looper实例对象,并保证了每个线程只拥有一个Looper实例对象,保证循环中的消息队列的唯一性。有兴趣的童鞋可以看看这个ThreadLocal类详解。
myLooper() 就是将当前线程中保存的Looper对象返回。
loop() 开启MessageQueue中消息列表的循环处理,若当前无消息则阻塞,有消息则发送。
Looper和Handler的联系
public class Handler {

    ...

    public final boolean post(Runnable r){
       return  sendMessageDelayed(getPostMessage(r), 0);
    }

    public final boolean postAtTime(Runnable r, long uptimeMillis){
        return sendMessageAtTime(getPostMessage(r), uptimeMillis);
    }

    public final boolean postAtTime(Runnable r, Object token, long uptimeMillis){
        return sendMessageAtTime(getPostMessage(r, token), uptimeMillis);
    }

    public final boolean postDelayed(Runnable r, long delayMillis){
        return sendMessageDelayed(getPostMessage(r), delayMillis);
    }

    public final boolean postAtFrontOfQueue(Runnable r){
        return sendMessageAtFrontOfQueue(getPostMessage(r));
    }

    public final boolean sendMessage(Message msg){
        return sendMessageDelayed(msg, 0);
    }

    public final boolean sendEmptyMessage(int what){
        return sendEmptyMessageDelayed(what, 0);
    }

    public final boolean sendEmptyMessageDelayed(int what, long delayMillis) {
        Message msg = Message.obtain();
        msg.what = what;
        return sendMessageDelayed(msg, delayMillis);
    }

    public final boolean sendEmptyMessageAtTime(int what, long uptimeMillis){
        Message msg = Message.obtain();
        msg.what = what;
        return sendMessageAtTime(msg, uptimeMillis);
    }

    public final boolean sendMessageDelayed(Message msg, long delayMillis){
        if (delayMillis < 0) {
            delayMillis = 0;
        }
        return sendMessageAtTime(msg, SystemClock.uptimeMillis() + delayMillis);
    }

    public boolean sendMessageAtTime(Message msg, long uptimeMillis) {
        MessageQueue queue = mQueue;
        if (queue == null) {
            RuntimeException e = new RuntimeException(
                    this + " sendMessageAtTime() called with no mQueue");
            Log.w("Looper", e.getMessage(), e);
            return false;
        }
        return enqueueMessage(queue, msg, uptimeMillis);
    }

    public final boolean sendMessageAtFrontOfQueue(Message msg) {
        MessageQueue queue = mQueue;
        if (queue == null) {
            RuntimeException e = new RuntimeException(
                this + " sendMessageAtTime() called with no mQueue");
            Log.w("Looper", e.getMessage(), e);
            return false;
        }
        return enqueueMessage(queue, msg, 0);
    }


    //消息入队
    private boolean enqueueMessage(MessageQueue queue, Message msg, long uptimeMillis) {
        msg.target = this;
        if (mAsynchronous) {
            msg.setAsynchronous(true);
        }
        return queue.enqueueMessage(msg, uptimeMillis);
    }

    ...
}
上面这些方法,到最后调用就是个方法
    //消息入队
    private boolean enqueueMessage(MessageQueue queue, Message msg, long uptimeMillis) {
        msg.target = this;
        if (mAsynchronous) {
            msg.setAsynchronous(true);
        }
        return queue.enqueueMessage(msg, uptimeMillis);
    }
在开头的Hanlder构造函数里我们可以知道,这里所用的queue就是Looper中的queue,也就是Handler中发送的消息其实入到了Looper中,两者在这里关联起来。
这也就解释了为什么Handler实例化之前需要Looper先行prepare。
这里先说明一点,post(Runnable r)等一系列方法中,最后Runnable回调都会被设置到msg中的callback中,看下面这个2方法
private static Message getPostMessage(Runnable r) {
    Message m = Message.obtain();
    m.callback = r;
    return m;
}

private static Message getPostMessage(Runnable r, Object token) {
    Message m = Message.obtain();
    m.obj = token;
    m.callback = r;
    return m;
}
这里特做说明,下文会用到这点。
Hanlder和Message的联系
上面看到handler消息入队列的时候会给msg.target赋值为this,也就是当前handler实例对象。
在Looper的loop()中message从MessageQueue取出,并调用 msg.target.dispatchMessage(msg),并传递给他的target进行处理,也就是哪个h
andler发送的消息,最后又经由谁来处理。
来看一下Handler的dispatchMessage()
/**
 * Handle system messages here.
 */
public void dispatchMessage(Message msg) {
    if (msg.callback != null) {
        handleCallback(msg);
    } else {
        if (mCallback != null) {
            if (mCallback.handleMessage(msg)) {
                return;
            }
        }
        handleMessage(msg);
    }
}

private static void handleCallback(Message message) {
    message.callback.run();
}

/**
 * Subclasses must implement this to receive messages.
 */
public void handleMessage(Message msg) {
    //用户自行实现的消息处理
}
上面可以清晰的看到
- 如果msg有回调,则msg的回掉先行处理msg;
- 如果Handler实例化时有传入Callback,则这个Callback处理msg;
- 最后由用户自行实现的消息处理方式处理msg。
从上面可以看出,如果msg没有回调,则都会回到Handler所在线程进行处理。这也就是可以利用Handler更新UI的原理。
好了,Hanlder机制的整体流程如下图所示(图片来源网络,侵删):
文章看完了,肯定有童鞋有疑问,为什么在UI线程new Handler时不需要先进行Looper.perpare(),原因是系统自动帮你完成了UI线程Looper.perpare()操作。
