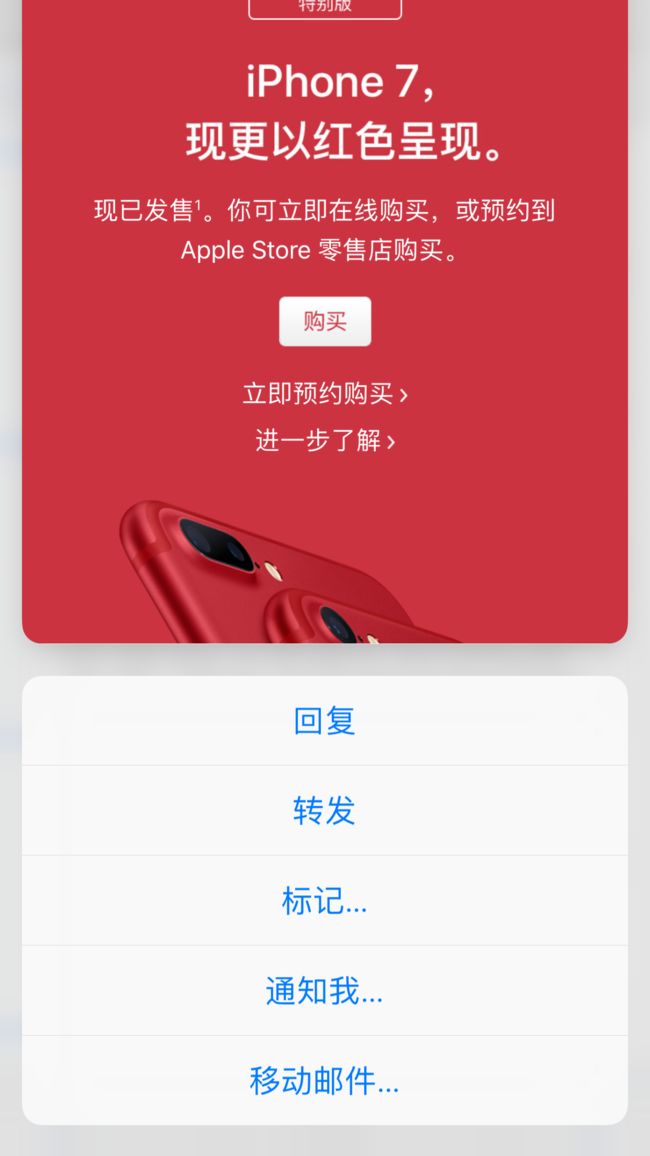
这就是 iOS SpringBoard 上用力点按 App Icon 弹出的快捷操作菜单了。此类菜单分为两类,静态和动态。
静态 action 被定义在 app 的 info.plist 文件中。定义之后,用户在安装了你的 app 后就可以生效使用。例如:
-UIApplicationShortcutItems
--Item 0
---UIApplicationShortcutItemType String com.company.app.XXX
---UIApplicationShortcutItemTitle String New Chat
---UIApplicationShortcutItemIconType String UIApplicationShortcutIconTypeMessage(system type)
最后的 ShortcutIconType 可以使用系统提供的一些类型。而关于 Item 总数的问题,除去 iOS 10 开始系统增加的 “分享” 项外,最多只能设置 4 个(包括动静态项全部)。顺带一提,貌似大多数 app 的做法都是一个静态项外加三个动态生成项。
与上面静态项所对应的就是 dynamic item,动态项是你的 App 在运行时创建的,所以只有在你的 app 第一次启动后才可以生成并可用。并且顺序上 dynamic item 是展示在 static item(看 action 列表展开的方向嘛,动态项会比静态项离手指更远)。但是动态项除了可以使用上面提到的系统提供的 icon 外,还可以使用自定义的 icon,以及通讯录中联系人的头像。举个例子:
let contactName = "RocZhang"
var contactIcon: UIApplicationShortcutIcon? = nil
// Make sure to request access to the user's contacts first
if CNContactStore.authorizationStatue(for: .contacts) == .authorized {
let predicate = CNContact.predicateForContacts(matchingName: contactName)
let contacts = try? CNContactStore().unifiedContacts(matching: predicate, keysToFecth: [])
if let contact = contacts?.first {
contactIcon = UIApplicationShortcutIcon(contact: contact)
}
}
// Fallback
let icon = contactIcon ?? UIApplicationShortcutIcon(type: .message)
// Create a Dynamic quick action using the icon
let type = "com.company.app.sendMessageTo"
let subtitle = "Send a message"
let shortcutItem1 = UIApplicationShortcutItem(type: type, localizedTitle: contactName, localizedSubTitle: subtitle, icon: icon)
// Repeat ...
let shortcutItems = [shortcutItem1, shortcutItem2, shortcutItem3]
// Register the Dynamic quick actions to display on the home Screen
UIApplication.shared.shortcutItems = shortcutItems
设置好这些快捷操作项后我们当然要处理相应点击后的操作,两种情况:
func application(application: UIApplication, performActionForShortcutItem shortcutItem: UIApplicationShortcutItem, completionHandler: Bool -> Void) {
let didHandle: Bool = handle the quick action using shortcutItem
completionHandler(didHandle)
}
func application(application: UIApplication, didFinishLaunchingWithOptions launchOptions: [NSObject: AnyObject]?) -> Bool {
var performAdditionalHandling = true
if let shortcutItem = launchOptions?[UIApplicationLaunchOptionsShortcutItemKey] as? UIApplicationShortcutItem {
handle the quick action using shortcutItem
performAdditionalHandling = false
}
return performAdditionalHandling
}
关于上述的 Quick Actions,Apple 提供了一些建议:
每个 app 都应该提供 quick actions(我想这可能就是 iOS 10 系统全部加上 “分享” 的原因之一)
好钢用在刀刃上(因为总数只有 4 个,所以 Apple 建议应该给具有高价值的任务创建快捷进入项)
确保你设置的项目是可被用户预知的
做好版本升级后依然能处理前一个版本生成的动态快捷项的准备
如果你还不太了解 peek pop 是什么,建议去看一下超炫酷的 iPhone 6s 发布时介绍 3D Touch 的视频。
简单说来,Peek & Pop 提供了一种可供用户快速预览和在内容之间导航的方式。
适配 Peek & Pop 非常简单,但首先需要了解一下,CocoaTouch 中把这两个动作先后称之为 Preview 和 Commit。
适配的过程可分为以下几步:
一,让 ViewController 遵循 UIViewControllerPreviewingDelegate:
// MARK: - UIViewControllerPreviewingDelegate Methods
extension ViewController: UIViewControllerPreviewingDelegate {
}
二,是把 ViewController 注册 Previewing:
override func viewDidLoad() {
super.viewDidLoad()
registerForPreviewing(with: self, sourceView: tableView)
}
三,实现 UIViewControllerPreviewingDelegate 中的 preview 和 commit 方法:
// MARK: - UIViewControllerPreviewingDelegate Methods
extension ViewController: UIViewControllerPreviewingDelegate {
func previewingContext(_ previewingContext: UIViewControllerPreviewing, viewControllerForLocation locatin: CGPoint) -> UIViewContrller? {
guard let indexPath = tableView.indexPathForRow(at: location) else { return nil }
let chatDetailViewController = ...
chatDetailViewController.chatItem = chatItem(at: indexPath)
let cellRect = tableView.rectForRow(at: indexPath)
let sourceRect = previewingContext.sourceView.convert(cellRect, from: tableView)
previewingContext.sourceRect = sourceRect
return chatDetailViewController
}
func previewingContext(_ previewingContext: UIViewControllerPreviewing, commit viewControllerToCommit: UIViewContrller) {
show(viewControllerToCommit, sender: self)
}}
这里你可以自己决定是否要提供一些预览时的快捷操作。并不是最开始说的主屏幕上的快捷操作,而是这里的:
这里需要 override 一个 previewActionItems 的函数:
override func previewActionItems() -> [UIPreviewActionItem] {
let heart = UIPreviewAction(title: "", style: .default) { (action, viewController) in
}
return [heart]
}
其中的 style 除了 .default 还有 .selected 代表被选中,以及 .destructive 代表具有破坏性的操作。
同样,关于 Peek & Pop ,Apple 提供了一些建议:
可以被点击的内容应该要考虑支持 Peek & Pop (和上面那条 每个 app 都应该提供 quick actions 差不多,毕竟 3D Touch 用力点按之前用户并不知道会发生什么,有些可以响应 3D Touch 有些又不能就可能会让用户很不爽,久而久之就不愿意去使用 3D Touch 了)
不要在 previewing delegate 中花费太长的时间,因为是需要 peek 一下就显示出来,不能做太过费时的操作。
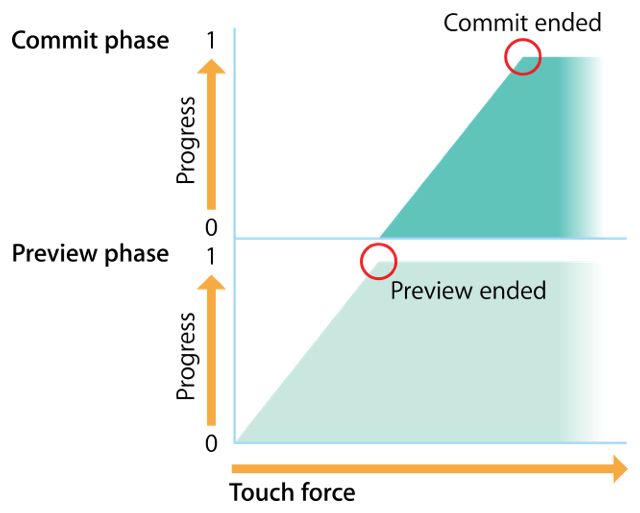
UIPreviewInteraction 似乎是用的比较少的,这是一个可以让我们的视图提供响应 3D Touch 交互动作的类。刚才提到 preview 和 commit,实际上这是使用 3D Touch preview 中包括的两个过程。由于从开始点按屏幕到响应 peek(preview 阶段结束) 再到响应 pop (commit 阶段结束),力度是有变化的。通过 UIPreviewInteraction 我们就可以获取当前用户点按力度分别在这两个阶段中的进度(0-1),这两个阶段的关系使用 API 官网中的一张图就可以表示清楚:
适配过程同样很简单,大致如下:
一,遵循 UIPreviewInteractionDelegate
extension xxViewController: UIPreviewInteractionDelegate
二,创建 UIPreviewInteraction 并设置 delegate
private var previewInteraction: UIPreviewInteraction?
override func viewDidLoad {
super.viewDidLoad()
previewInteraction = UIPreviewInteraction(view: view)
previewInteraction?.delegate = self
}
三,就可以通过代理方法获取到当前的进度,然后做你需要的事情了。比如:
func previewInteraction(_ previewInteraction: UIPreviewInteraction, didUpdatePreviewTransition transitionProgress: CGFloat, ended: Bool) {
// Do something
}
因为通过 progress 获取到进度,所以我们可以通过这个值来驱动一些动画之类的,仔细想想这个应该会是蛮好玩的。
此外,session 228 的最后也提及了一下低层级力度 API ,在支持 3D Touch 或 Apple Pencil 的设备上,你可以获取到规范化的力度数据。关于这方面的内容,可以参见另一个 session: Leveraging Touch input on iOS.
下面是一些 session 中并没有提及的内容。
除去上面通过 UIViewControllerPreviewingDelegate 适配常见的 UITableView, UICollectionView 等的 peek 与 pop 操作,还有一种比较常见的场景是,我们希望在 3D Touch 发生在 cell 的每个部分上时,作出不同的响应(比如,3D Touch 了某个 feed 我们希望预览这个 feed 的详情,而点的时 feed 里的头像时,我们希望弹出的预览是 profile)。我们可以在上面的基础上进一步,比如:
public func viewContainsFormSuperview(with view: UIView, location: CGPoint) -> Bool {
let location = view.convert(location, from: self)
return view.bounds.contains(location)
}
public func previewingContext(_ previewingContext: UIViewControllerPreviewing, viewControllerForLocation location: CGPoint) -> UIViewController? {
guard let indexPath = tableView.indexPathForRow(at: location) else { return nil }
guard let cell = tableView.cellForRow(at: indexPath) as? xxCell else { return nil }
let avatarView = cell.avatarView
let location = avatarView.convert(location, from: tableView)
if avatarView.bounds.contains(location) {
let viewRect = tableView.convert(avatarView.frame, from: avatarView.superview)
previewingContext.sourceRect = viewRect
return ProfileViewController()
} else {
return nil
}
}
总结,session 中方提到的适配 3D Touch 主要三个方面 – 主屏幕快捷操作可以使用户直接跳转进对应的动作,Peek & Pop 允许用户快速预览并导航到内容,最后的 UIPreviewInteraction 也为 app 的交互提供了新的可能。

