本文将基于Android N Framework层中的Volley库,对Volley请求库中的网络缓存框架源码进行分析
- 源码学习|Volley网络库源码分析
- 源码学习|Volley图片加载源码分析
在上面两篇文章中,我们已经对Volley的简单使用和图片加载的源码进行了简单分析,在这篇文章中,我们将具体对Volley的网络缓存源码进行分析。
1. 使用HTTP缓存的作用
使用缓存其实主要有两个原因。首先降低延迟,缓存离客户端更近,因此,从缓存请求内容比从源服务器所用时间更少,呈现速度更快,网站就显得更灵敏。其次降低网络传输, 副本被重复使用,大大降低了用户的带宽使用,其实也是一种变相的省钱(如果流量要付费的话),同时保证了带宽请求在一个低水平上,更容易维护了。
2. Volley中的缓存实现
在前面文章中,我们已经知道,Volley中RequestQueue是通过下面方法进行构建的
RequestQueue queue = new RequestQueue(new DiskBasedCache(cacheDir), network);
在初始化RequestQueue时会启动两个循环线程CacheDispatcher和NetworkDispatcher,它们会不断的遍历其耦合的队列,执行响应操作。
/**
 * Starts the dispatchers in this queue.
 */
public void start() {
    stop();  // Make sure any currently running dispatchers are stopped.
    // Create the cache dispatcher and start it.
    mCacheDispatcher = new CacheDispatcher(mCacheQueue, mNetworkQueue, mCache, mDelivery);
    mCacheDispatcher.start();

    // Create network dispatchers (and corresponding threads) up to the pool size.
    for (int i = 0; i < mDispatchers.length; i++) {
        NetworkDispatcher networkDispatcher = new NetworkDispatcher(mNetworkQueue, mNetwork,
                mCache, mDelivery);
        mDispatchers[i] = networkDispatcher;
        networkDispatcher.start();
    }
}
而对于每一个add()到RequestQueue中的Request对象,需要设置SequenceNumber(用来决定执行顺序),其中对于addMarker(Adds an event to this request's event log; for debugging.),注释上说明是用来做调试用的,我们不用重点关注。
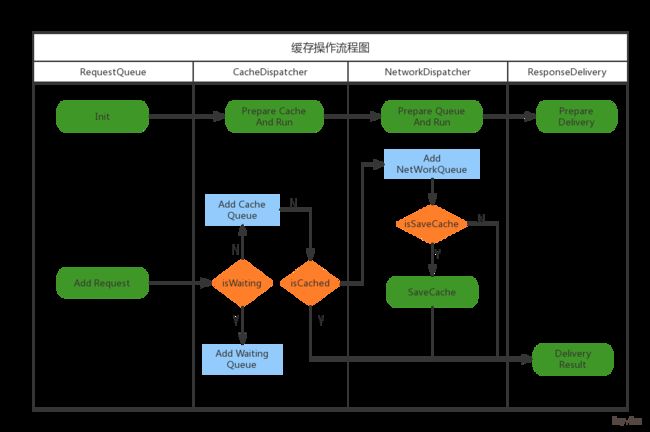
对于不需要进行缓存的请求,会直接加入到NetWorkQueue中,由NetWorkDispatcher进行处理。而对于需要缓存的请求,则先判断waitingRequest队列中是否存在,如果存在,说明已经有相同任务通过CacheDispatcher进行处理,则会加入到WaitingReqeust的Map中进行排队,否则,则会加入到CacheDispatcher中进行处理。
    // Process requests in the order they are added.
    request.setSequence(getSequenceNumber());
    request.addMarker("add-to-queue");

    // If the request is uncacheable, skip the cache queue and go straight to the network.
    if (!request.shouldCache()) {
        mNetworkQueue.add(request);
        return request;
    }

    // Insert request into stage if there's already a request with the same cache key in flight.
    synchronized (mWaitingRequests) {
        String cacheKey = request.getCacheKey();
        if (mWaitingRequests.containsKey(cacheKey)) {
            // There is already a request in flight. Queue up.
            Queue> stagedRequests = mWaitingRequests.get(cacheKey);
            if (stagedRequests == null) {
                stagedRequests = new LinkedList>();
            }
            stagedRequests.add(request);
            mWaitingRequests.put(cacheKey, stagedRequests);
            if (VolleyLog.DEBUG) {
                VolleyLog.v("Request for cacheKey=%s is in flight, putting on hold.", cacheKey);
            }
        } else {
            // Insert 'null' queue for this cacheKey, indicating there is now a request in
            // flight.
            mWaitingRequests.put(cacheKey, null);
            mCacheQueue.add(request);
        }
        return request;
    }
此处的缓存是WaitingRequests,其作用主要是对于短时间内重复请求的Request进行缓存,其结构为HashMap。
我们在此处还要留意,就是对于WaitingRequests的处理,我们可以看到加入后等待队列后,并无处理,事实上,在已有请求Request Cancel时或者处于缓存,无需变化时,都会由Request调用finish(),进而将所有等待队列中的请求加入到缓存队列中进行遍历执行,最终返回缓存结果。具体代码参考如下所示:
/**
 * Called from {@link Request#finish(String)}, indicating that processing of the given request
 * has finished.
 *
 * Releases waiting requests for request.getCacheKey() if
 *      request.shouldCache().
 */
 void finish(Request request) {
    // Remove from the set of requests currently being processed.
    synchronized (mCurrentRequests) {
        mCurrentRequests.remove(request);
    }
    synchronized (mFinishedListeners) {
      for (RequestFinishedListener listener : mFinishedListeners) {
        listener.onRequestFinished(request);
      }
    }

    if (request.shouldCache()) {
        synchronized (mWaitingRequests) {
            String cacheKey = request.getCacheKey();
            Queue> waitingRequests = mWaitingRequests.remove(cacheKey);
            if (waitingRequests != null) {
                if (VolleyLog.DEBUG) {
                    VolleyLog.v("Releasing %d waiting requests for cacheKey=%s.",
                            waitingRequests.size(), cacheKey);
                }
                // Process all queued up requests. They won't be considered as in flight, but
                // that's not a problem as the cache has been primed by 'request'.
                mCacheQueue.addAll(waitingRequests);
            }
        }
    }
}
当时看到这段的时候当时挺疑惑,为什么不直接返回一个缓存结果,将等待队列的请求都抛弃掉,后来想想也对,对于重复请求返回一个请求结果,这也不符合实际使用场景。
3. CacheDispatcher的缓存策略:
通过上文中,我们可以看到,Volley会默认为我们构建一个DiskBasedCache用来缓存Request请求。下面我们重点分析CacheDispatcher。
对于CacheQueue中的Request,如果Request已经取消,则直接调用Request.finish()进行处理,如果未命中缓存,则添加到NetworkQueue中,交由NetworkDispatcher进行处理,如果entry过期,则重新设置entry并交由NetworkDispatcher进行处理,如果缓存命中,则直接返回缓存内容,由ResponseDelivery进行转发,最后将结果回调回调用者。但是此处缓存命中也分了两种情况,一种需要刷新缓存,一种不需要,如果需要刷新缓存,则需要将缓存结果先返回,然后在调用NetworkDispatcher进行缓存刷新。关键代码如下所示:
    if (!entry.refreshNeeded()) {
        // Completely unexpired cache hit. Just deliver the response.
        mDelivery.postResponse(request, response);
    } else {
        // Soft-expired cache hit. We can deliver the cached response,
        // but we need to also send the request to the network for
        // refreshing.
        request.addMarker("cache-hit-refresh-needed");
        request.setCacheEntry(entry);

        // Mark the response as intermediate.
        response.intermediate = true;

        // Post the intermediate response back to the user and have
        // the delivery then forward the request along to the network.
        mDelivery.postResponse(request, response, new Runnable() {
            @Override
            public void run() {
                try {
                    mNetworkQueue.put(request);
                } catch (InterruptedException e) {
                    // Not much we can do about this.
                }
            }
        });
    }
此处使用的mDelivery是ResponseDelivery接口的实现类ExecutorDelivery的对象,其主要作用是用来转发请求结果与错误信息。其在RequestQueue中传入如下所示:
    public RequestQueue(Cache cache, Network network, int threadPoolSize) {
    this(cache, network, threadPoolSize,
            new ExecutorDelivery(new Handler(Looper.getMainLooper())));
    }
我们可以看到它会传入一个主线程的Handler,传入的Handler其实最终是通过ExecutorDelivery中的Executor来将所有消息以postRunnable()的方式返回到主线程中。但是这里还是会有一个疑问,使用postResponse时,其传入的Runnable依然会在主线程中运行。为了保证主线程的优先工作,为什么不把这个提到子线程去做呢?具体关键代码如下:
  public ExecutorDelivery(final Handler handler) {
    // Make an Executor that just wraps the handler.
    mResponsePoster = new Executor() {
        @Override
        public void execute(Runnable command) {
            handler.post(command);
        }
    };
}


//ResponseDeliveryRunnable run方法中的传入Runnable处理
// If we have been provided a post-delivery runnable, run it.
 if (mRunnable != null) {
   mRunnable.run();
 }
4. NetworkDispatcher的缓存策略:
NetworkDispatcher中只是简单的执行Request请求,将请求结果解析后,将Response置入缓存中,此时的过期时间也是在此时进行设置的。具体关键代码如下:
 if (request.shouldCache() && response.cacheEntry != null) {
      mCache.put(request.getCacheKey(), response.cacheEntry);
      request.addMarker("network-cache-written");
 }

 // Post the response back.
request.markDelivered();
 mDelivery.postResponse(request, response);
最后补上一张自己丧心病狂画的流程图:
至此,对于Volley的分析也就暂时告一段落了,如果分析中有什么错漏还请各位积极留言指导,谢谢(∩_∩)哈哈~
