这篇文章中,我将介绍在Xmartlabs项目中,使用Xcode Server进行持续集成,并自动部署到iTunes Connect的一些经验,以及我所遇到问题。本文将描述我是如何解决其中的一些问题的,以期它可以帮助一些遇到相似情况的人。
已经有很多博客讲述如何设置Xcode Server,创建一个集成 bot(译者注:机器人,为便于理解与实践,本文中不翻),以及在
Xcode上浏览其结果(问题跟踪,测试代码覆盖率等)。然而,当你尝试一些更复杂的东西,你可能会遇到一些错误时,而这些错误一般很难找到描述解决办法的资源。
为什么我们需要有自己的CI(continuous integration)服务器?
几乎每个人都知道拥有CI服务器的好处:它可以自动分析代码,运行单元和UI测试,在其他有价值的任务中构建项目。如果代码出现问题,它会将结果通知可能引入该问题的人。 Xcode bot跟踪每个集成的所有新问题以及已解决的问题。对于新的问题,bot将显示一系列可能产生问题的提交。此外,我们不再需要处理所部署环境的配置文件和证书,从而允许团队中的任何人轻松发布新版本的应用程序。
总之,这允许程序员花更多的时间在应用程序开发上,而在应用程序集成和部署上花更少的时间。同时,确保代码有质量问题的可能性保持在最低。
设立Xcode Server
苹果公司的Xcode Server和持续集成指南,将为您提供有关如何设立和使用Xcode Server的良好入门。我们建议您首先阅读该指南,因为我们将不会具体介绍关于设立Xcode Server的基础知识。
Cocoapods&Fastlane
当我们安装了Xcode Server应用程序,并启用了Xcode Server服务,下一步便是安装Cocoapods和Fastlane。Fastlane将帮助我们完成许多常规任务,这些任务是构建项目和将应用程序上传到iTunes Connect所必需的。为了防止它们运行过程中出现权限问题,我们将仅仅为对应的构建者(译者注:builder user,构建用户,本文中简称构建者),安装所有gem,使用gem install --user-install some_gem命令来完成安装。另外,我们需要创建符号链接,来访问Cocoapods和Fastlane二进制文件,以便在我们的bot运行时访问它们。
在开始之前,通过将下面的这一行加入到~/.bashrc和~/.bash_login文件内,将ruby bin文件夹包含到构建者的路径中:
# It may change depending on the ruby's version on your system
# 请根据你系统中ruby的版本来修改此处的版本号
export PATH="$PATH:/var/_xcsbuildd/.gem/ruby/2.0.0/bin"
现在开始安装gems:
$ sudo su - _xcsbuildd

$ gem install --user-install cocoapods
$ pod setup
$ ln -s `which pod` /Applications/Xcode.app/Contents/Developer/usr/bin/pod

$ gem install --user-install fastlane
$ ln -s `which fastlane` /Applications/Xcode.app/Contents/Developer/usr/bin/fastlane
邮件 & 通知
Xcode Server有一个很好的功能,能够根据集成结果向选定的人发送电子邮件。例如,如果因为项目没有编译通过,或者一些测试没有通过,而导致的集成失败,bot将发送电子邮件到最后提交者,通知其构建已经失败了。
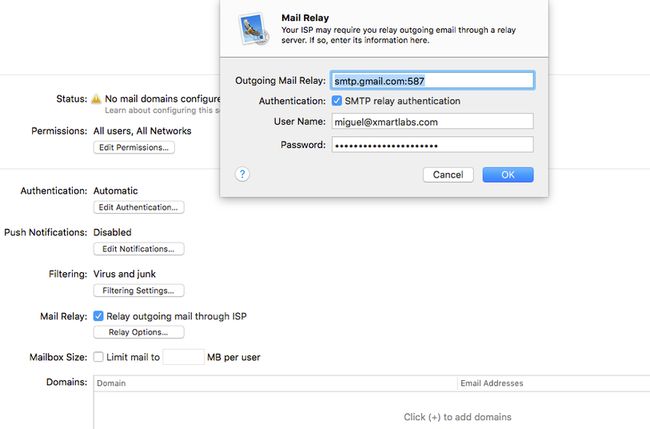
由于我们使用Gmail帐户发送电子邮件,因此需要更改Xcode Server上的邮件服务的设置。首先在服务器上启用邮件服务,然后检查选项“Relay outgoing mail through ISP”。在选项对话框中,添加smtp.gmail.com:587,启用身份验证并输入有效的凭据。这就是让 Xcode Server使用您的Gmail帐户发送电子邮件需要的所有设置。
创建bot
现在我们已经将Xcode Server启动并运行了,现在是创建我们的Xcode bots的时候了。在Xmartlabs,我们为每个Xcode项目设立了两个不同的bot。
持续集成 bot
为了确保项目正确构建,以及代码分析,单元和UI测试相应地都通过。每当一个拉取请求合并到开发分支中时,这个bot都将被自动触发。如果出现问题,它将通知提交者。
我们可以通过以下简单的步骤创建bot:
- 在Xcode项目中,选择菜单选项“Product”>”Create Bot”。
- 依照创建向导,比较简单就可以完成。在设置git凭据时,你可能会遇到一些困难。我们选择创建一个ssh密钥,并将其用于我们的bot。于是我们最终选择现有的SSH密钥,并对所有的bot使用相同的密钥。
- 集成它,看看一切是否运行良好。
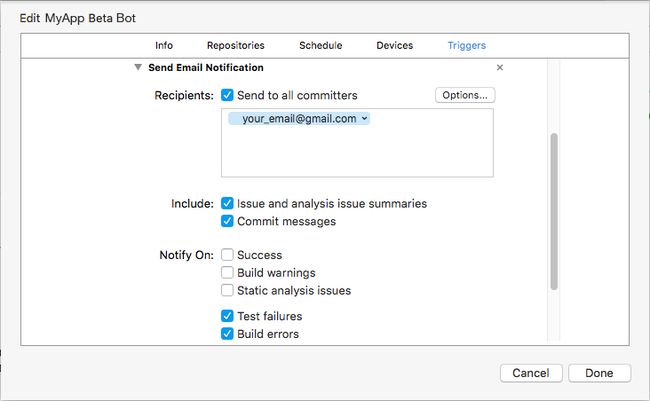
比较好用的一点是,电子邮件将被发送到所有可能导致该问题的提交者,你也可以指定其他接收者。
部署型bot
第二个bot负责构建和上传应用程序IPA到iTunes Connect。它还将负责使用最新的代码仓库创建和推送新的git标签,而这我们将使用Fastlane来实现。
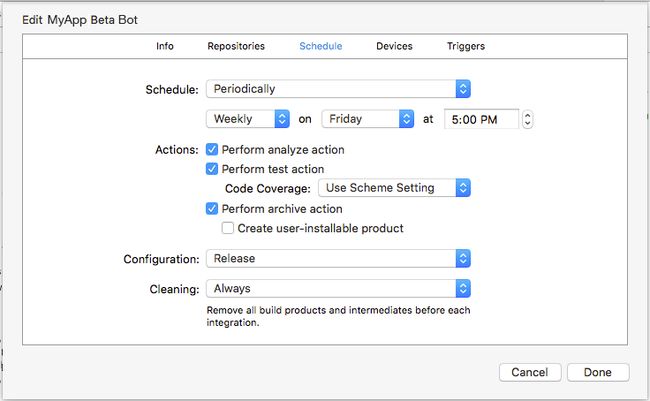
因为我们通常需要每周发布一次测试版本,因此通常我们将其配置为按需运行或每周运行。
证书和私钥
我们必须确保在系统钥匙串上已经安装了分发/开发证书及其对应的私钥。
要构建IPA,我们必须在以下文件夹中放入必需的配置文件,因为bot在其自己的用户_xcsbuildd上运行,并在此文件夹中搜索配置文件:
/Library/Developer/XcodeServer/ProvisioningProfiles
集成前的脚本
Xcode集成时,允许我们提供,集成前和集成后的脚本。
在我们的部署型Bot开始集成之前,我们必须执行一些触发型的命令:
- 递增编译版本号
- 下载所需的配置文件
- 安装项目使用的库的正确版本
Fastlane工具将在Appfile文件中查找有用信息,以修改诸如Apple ID和application Bundle Identifier。下面的代码片段,介绍了Appfile:
app_identifier "" # The bundle identifier of your app

apple_dev_portal_id ""  # Your Apple email address
itunes_connect_id ""

# You can uncomment the lines below and add your own
# team selection in case you are on multiple teams
# team_name ""
# team_id ""

# To select a team for iTunes Connect use
# itc_team_name ""
# itc_team_id ""
下载和配置“配置文件”由Fastlane sigh工具完成。它的用法很简单,只要正确设置了Appfile,剩下的就交给它了。
before_integration lane是在Fastfile文件中定义的,如下所示:
lane :before_integration do
  # fetch the number of commits in the current branch
  build_number = number_of_commits

  # Set number of commits as the build number in the project's plist file before the bot actually start building the project.
  # This way, the generated archive will have an auto-incremented build number.
  set_info_plist_value(
    path: './MyApp-Info.plist',
    key: 'CFBundleVersion',
    value: "#{build_number}"
  )

  # Run `pod install`
  cocoapods

  # Download provisioning profiles for the app and copy them to the correct folder.
  sigh(output_path: '/Library/Developer/XcodeServer/ProvisioningProfiles', skip_install: true)
end
number_of_commits和cocoapods是Fastlane的动作。Appfile和Fastfile文件都必须位于项目根目录中的fastlane文件夹中。
如果我们运行fastlane before_integration,它将连接到iOS Member Center,并使用在Appfile中的bundle id,下载该应用程序的配置信息文件。此外,我们必须将密码发送到fastlane。从而使这些操作配合Xcode bots工作,我们通过环境变量FASTLANE_PASSWORD上传密码:
$ export FASTLANE_PASSWORD=""
$ fastlane before_integration
最初,我们尝试使用Keychain将密码传递给Fastlane
sigh,但并没有成功,更多有关这方面的信息,请参阅这里。
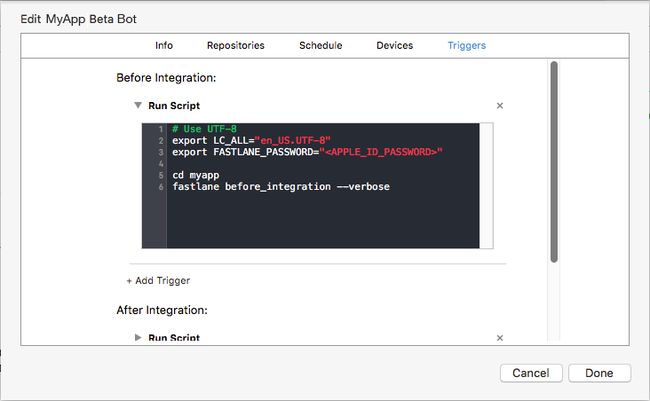
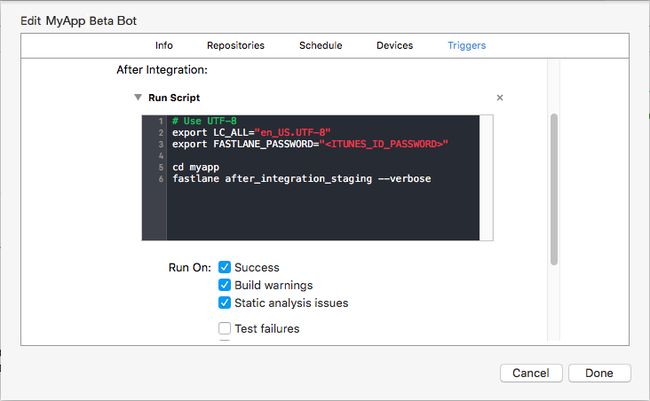
我们将通过在Triggers选项卡上添加一个before trigger命令来修改部署型bot,使得其执行before_integration lane。
注意,在调用
fastlane之前,我们切换到了myapp文件夹,这是git远程仓库名称。触发器在父项目文件夹中运行。
集成后脚本
在bot完成项目集成后,我们将能够访问创建的归档文件,将其导出为IPA文件并将其上传到iTunes Connect。我们将创建一个额外的lane,负责将IPA上传到iTunes Connect,并创建一个git标签。
让我们从简单的开始,现在先不考虑上传到iTunes Connect:
lane :after_integration do
  plistFile = './MyApp-Info.plist'

  # Get the build and version numbers from the project's plist file
  build_number = get_info_plist_value(
    path: plist_file,
    key: 'CFBundleVersion',
  )
  version_number = get_info_plist_value(
    path: plist_file,
    key: 'CFBundleShortVersionString',
  )

  # Commit changes done in the plist file
  git_commit(
    path: ["#{plistFile}"],
    message: "Version bump to #{version_number} (#{build_number}) by CI Builder"
  )

  # TODO: upload to iTunes Connect

  add_git_tag(
    tag: "beta/v#{version_number}_#{build_number}"
  )

  push_to_git_remote

  push_git_tags
end
现在,我们将从集成期间由bot创建的归档文件中导出IPA。我们通过在after_integration lane中运行命令xcrun xcodebuild来实现。此外,我们将使用Fastlane交付工具将IPA上传到iTunes Connect。详情如下:
lane :after_integration do
  plistFile = './MyApp-Info.plist'

  # ...

  ipa_folder = "#{ENV['XCS_DERIVED_DATA_DIR']}/deploy/#{version_number}.#{build_number}/"
  ipa_path = "#{ipa_folder}/#{target}.ipa"
  sh "mkdir -p #{ipa_folder}"

  # Export the IPA from the archive file created by the bot
  sh "xcrun xcodebuild -exportArchive -archivePath \"#{ENV['XCS_ARCHIVE']}\" -exportPath \"#{ipa_path}\" -IDEPostProgressNotifications=YES -DVTAllowServerCertificates=YES -DVTSigningCertificateSourceLogLevel=3 -DVTSigningCertificateManagerLogLevel=3 -DTDKProvisioningProfileExtraSearchPaths=/Library/Developer/XcodeServer/ProvisioningProfiles -exportOptionsPlist './ExportOptions.plist'"

  # Upload the build to iTunes Connect, it won't submit this IPA for review.
  deliver(
    force: true,
    ipa: ipa_path
  )

  # Keep committing and tagging actions after export & upload to prevent confirm the changes to the repo if something went wrong
  add_git_tag(
    tag: "beta/v#{version_number}_#{build_number}"
  )

  # ...

end
我们没有使用bot来创建IPA文件,因为它在触发器执行期间不可用。我们也不是使用gym,因为钥匙串限制问题。
支持多个Target
通常我们的项目有应用的产品以及多个阶段的target(staging application targets)。对于我们想要上传到iTunes Connect的每个target,Fastfile文件将需要不同的lane。我们需要修改Appfile文件,以根据每个lane设置正确的应用标识符:
for_platform :ios do
  for_lane :before_integration_staging do
      app_identifier "com.xmartlabs.myapp.staging"
  end

  for_lane :after_integration_staging do
    app_identifier "com.xmartlabs.myapp.staging"
  end

  for_lane :before_integration_production do
      app_identifier "com.xmartlabs.myapp"
  end

  for_lane :after_integration_production do
    app_identifier "com.xmartlabs.myapp"
  end
end

apple_dev_portal_id ""
itunes_connect_id ""

# team_name ""
# team_id ""
设置 apple_dev_portal_id 和 itunes_connect_id 允许我们使用不同的帐户来抓取配置文件,以及分别上传到iTunes Connect。
最后,在一些重构后,Fastfile文件可能如下所示:
require './libs/utils.rb'

fastlane_version '1.63.1'

default_platform :ios

platform :ios do
  before_all do
    ENV["SLACK_URL"] ||= "https://hooks.slack.com/services/#####/#####/#########"
  end

  after_all do |lane|
  end

  error do |lane, exception|
    reset_git_repo(force: true)
    slack(
      message: "Failed to build #{ENV['XL_TARGET']}: #{exception.message}",
      success: false
    )
  end

  # Custom lanes

  desc 'Do basic setup, as installing cocoapods dependencies and fetching profiles, before start integration.'
  lane :before_integration do
    ensure_git_status_clean

    plist_file = ENV['XL_TARGET_PLIST_FILE']

    # This is a custom action that could be find in the libs/utils.rb
    increase_build_number(plist_file)

    cocoapods
    sigh(output_path: '/Library/Developer/XcodeServer/ProvisioningProfiles', skip_install: true)
  end

  desc 'Required tasks before integrate the staging app.'
  lane :before_integration_staging do
    ENV['XL_TARGET_PLIST_FILE'] = './MyAppStaging-Info.plist'
    before_integration
  end

  desc 'Required tasks before build the production app.'
  lane :before_integration_production do
    ENV['XL_TARGET_PLIST_FILE'] = './MyApp-Info.plist'
    before_integration
  end

  desc 'Submit a new Beta Build to Apple iTunes Connect'
  lane :after_integration do
    branch = ENV['XL_BRANCH']
    deliver_flag = ENV['XL_DELIVER_FLAG'].to_i
    plist_file = ENV['XL_TARGET_PLIST_FILE']
    tag_base_path = ENV['XL_TAG_BASE_PATH']
    tag_base_path = "#{tag_base_path}/" unless tag_base_path.nil? || tag_base_path == ''
    tag_link = ENV['XL_TAG_LINK']
    target = ENV['XL_TARGET']

    build_number = get_info_plist_value(
      path: plist_file,
      key: 'CFBundleVersion',
    )
    version_number = get_info_plist_value(
      path: plist_file,
      key: 'CFBundleShortVersionString',
    )

    ENV['XL_VERSION_NUMBER'] = "#{version_number}"
    ENV['XL_BUILD_NUMBER'] = "#{build_number}"

    tag_path = "#{tag_base_path}release_#{version_number}_#{build_number}"
    tag_link = "#{tag_link}#{tag_path}"
    update_changelog({
      name: tag_path,
      version: version_number,
      build: build_number,
      link: tag_link
    })

    ENV['XL_TAG_LINK'] = "#{tag_link}"
    ENV['XL_TAG_PATH'] = "#{tag_path}"

    sh "git config user.name 'CI Builder'"
    sh "git config user.email '[email protected]'"

    git_commit(
      path: ["./CHANGELOG.md", plist_file],
      message: "Version bump to #{version_number} (#{build_number}) by CI Builder"
    )

    if deliver_flag != 0
      ipa_folder = "#{ENV['XCS_DERIVED_DATA_DIR']}/deploy/#{version_number}.#{build_number}/"
      ipa_path = "#{ipa_folder}/#{target}.ipa"
      sh "mkdir -p #{ipa_folder}"
      sh "xcrun xcodebuild -exportArchive -archivePath \"#{ENV['XCS_ARCHIVE']}\" -exportPath \"#{ipa_path}\" -IDEPostProgressNotifications=YES -DVTAllowServerCertificates=YES -DVTSigningCertificateSourceLogLevel=3 -DVTSigningCertificateManagerLogLevel=3 -DTDKProvisioningProfileExtraSearchPaths=/Library/Developer/XcodeServer/ProvisioningProfiles -exportOptionsPlist './ExportOptions.plist'"

      deliver(
        force: true,
        ipa: ipa_path
      )
    end

    add_git_tag(tag: tag_path)

    push_to_git_remote(local_branch: branch)

    push_git_tags

    slack(
      message: "#{ENV['XL_TARGET']} #{ENV['XL_VERSION_NUMBER']}.#{ENV['XL_BUILD_NUMBER']} successfully released and tagged to #{ENV['XL_TAG_LINK']}",
    )
  end

  desc "Deploy a new version of MyApp Staging to the App Store"
  lane :after_integration_staging do
    ENV['XL_BRANCH'] = current_branch
    ENV['XL_DELIVER_FLAG'] ||= '1'
    ENV['XL_TAG_BASE_PATH'] = 'beta'
    ENV['XL_TARGET_PLIST_FILE'] = './MyApp Staging-Info.plist'
    ENV['XL_TARGET'] = 'MyApp Staging'
    ENV['XL_TAG_LINK'] = 'https://github.com/xmartlabs/MyApp/releases/tag/'

    after_integration
  end

  desc "Deploy a new version of MyApp to the App Store"
  lane :after_integration_production do
    ENV['XL_BRANCH'] = current_branch
    ENV['XL_DELIVER_FLAG'] ||= '1'
    ENV['XL_TARGET_PLIST_FILE'] = './MyApp-Info.plist'
    ENV['XL_TARGET'] = 'MyApp'
    ENV['XL_TAG_LINK'] = 'https://github.com/company/MyApp/releases/tag/'

    after_integration
  end
end
关于前一个Fastfile文件的注意事项:
为生产环境和多阶段环境定义两个
before_integrationlane,以便使用Appfile设置正确的应用程序标识符。编译,版本控制操作和部署操作封装在
after_integrationlane中。这使得我们可以产品和分阶段的after_integrationlane,设置了不同的参数和内部调用。ensure_git_status_clean将检查bot的工作文件夹是否有更改,若更改,则运行失败。这将确保bot的工作副本与远程存储库文件完全相同。由于我们正在更新我们的after_integrationlane上的本地文件,如果出现问题,我们将需要重置所有文件。因此,我们在error块中添加了reset_git_repo操作。-
命令
xcrun xcodebuild -exportArchive需要使用选项-exportOptionsPlist指定的配置文件。我们在fastlane文件夹中创建了ExportOptions.plist文件,其内容类似于:teamID method app-store uploadSymbols uploadBitcode
最后一步,添加一个新的在集成后触发器(After Integration Trigger),执行我们的after_integration_staging lane:
您可以在 Fastlane CI files这个github仓库中,找到上面列出Fastlane文件的模板。
故障排除(Troubleshooting)
在我们设置Xcode Server的过程中,我们面临许多不容易解决的错误和问题,主要是因为我们在网络上找不到任何相关信息。我们决定制定一份全面的名单,以便能够帮助处于同样情况的任何人。
尝试传递开发者密码给Fastlane tools
sigh将尝试将密码存储在钥匙串中,当没有提供密码时,它将尝试访问它,但是当从bot的触发器运行sigh时,这不起作用,因为触发器命令无法访问bot用户的钥匙串。
我们试图解锁它,然后运行sigh时,结果如下所示:
# Try to unlock the keychain to be accessed by fastlane actions
$ security -v unlock-keychain -p `cat /Library/Developer/XcodeServer/SharedSecrets/PortalKeychainSharedSecret` /Library/Developer/XcodeServer/Keychains/Portal.keychain

# Will download profiles using sigh
$ fastlane before_integration_staging
在输出日志中显示下一条消息:
security: SecKeychainAddInternetPassword : User interaction is not allowed.
Could not store password in keychain
我们根本无法在运行Fastlane时访问钥匙串。我们选择仅将密码保存为系统环境变量。
CocoaPods无法更新依赖关系
[!] Unable to satisfy the following requirements:

- `SwiftDate` required by `Podfile`
- `SwiftDate (= 3.0.2)` required by `Podfile.lock`
注意:Podfile中的依赖关系似乎是好的,可能是当pods尝试在用户的文件下更新它的仓库文件夹时,发送了权限问题。
我们是这样解决的:卸载重装CocoaPods。如下所示:
$ sudo rm -fr /var/_xcsbuildd/.cocoapods

$ sudo su - _xcsbuildd
$ gem install --user-install cocoapods
$ pod setup
$ ln -s `which pod` /Applications/Xcode.app/Contents/Developer/usr/bin/pod
Fastlane - Sigh & Gym 无法访问钥匙串
结果就是这样,他们不能访问钥匙串。看到这条消息(或类似的),当运行gym或sigh产生的结果如下:
security:SecKeychainAddInternetPassword :User interaction is not allowed.
他们无法访问存储的登录密码,必须使用
FASTLANE_PASSWORD通过env变量传递密码至sigh。gym无法访问安装在钥匙串中的分发证书,所以使IPA使用xcrun xcodebuild而不是gym中。
证书和私钥
确保这些:
- 它们必须安装在系统钥匙串中,以便Xcode Bot可以访问它们。
- 在钥匙串应用程序上,更改证书和私钥访问控制,允许
codesign和security二级制文件访问它们。
无法在Xcode Server程序中 选择 Xcode
将Xcode更新到版本7.2.1后,我们能够在Xcode Server上选择它,之后Xcode service被禁用了。当我们尝试选择正确的Xcode 时,会显示一个对话框,说明“您必须同意xcode软件许可协议的条款”。我们找到了解决方案,在苹果论坛问题中 “Can not choose Xcode in Server App - “You must agree to the terms…”,运行如下命令将允许您在Xcode Server中选择Xcode:
$ sudo /Applications/Xcode.app/Contents/Developer/usr/bin/xcscontrol --initialize
IPA not available
在编译完成之后,bot构建的IPA被拷贝到了下面的路径:
/Library/Developer/XcodeServer/IntegrationAssets/$XCS_BOT_ID-$XCS_BOT_NAME/$XCS_INTEGRATION_NUMBER/$TARGET_NAME.ipa
但是,直到集成后的触发器运行完毕后,它才是可用的。
XCS_ARCHIVE not defined
只有当bot被设置为执行归档操作时,环境变量XCS_ARCHIVE才被定义。
使用自定义ssh key
修改日志的更改和内部版本号,这些内容的提交,我们需要从_xcsbuildd的shell对仓库有访问权限。如果您更喜欢使用SSH访问git服务器,则需要在构建者(builder user).ssh文件夹中添加有效的签名。请注意,此签名不应设置密码。否则,触发器将停止其处理过程,您输入了shh key 密码。
使用
_xcsbuildd登录: $ sudo su - _xcsbuildd拷贝一个有效的ssh key到: ~/.ssh.
-
修改
~/.bash_login以便自动添加你自定义的key到 ssh agent:$ echo 'eval "$(ssh-agent -s)"' >> ~/.bash_login $ echo 'ssh-add ~/.ssh/id_rsa_github' >> ~/.bash_login 修改
~/.ssh/config文件,以决定哪个key将被用户访问git仓库,比如下面的几行:
    Host github.com
       HostName github.com
    IdentityFile ~/.ssh/id_rsa_github
这也将有助于获取git子模块。
Invalid Signature. A sealed resource is missing or invalid.
如果上传到iTunes Connect失败,并出现类似于“Invalid Signature. A sealed resource is missing or invalid.“,可能会发生,因为export archive命令(xcodebuild命令)未配置参数选项-exportOptionsPlist。需要加上它,并保证文件的路径是正确的。完整的错误信息是:
parameter ErrorMessage = ERROR ITMS-90035: "Invalid Signature. A sealed resource is missing or invalid. Make sure you have signed your application with a distribution certificate, not an ad hoc certificate or a development certificate. Verify that the code signing settings in Xcode are correct at the target level (which override any values at the project level). Additionally, make sure the bundle you are uploading was built using a Release target in Xcode, not a Simulator target. If you are certain your code signing settings are correct, choose "Clean All" in Xcode, delete the "build" directory in the Finder, and rebuild your release target. For more information, please consult https://developer.apple.com/library/ios/documentation/Security/Conceptual/CodeSigningGuide/Introduction/Introduction.html
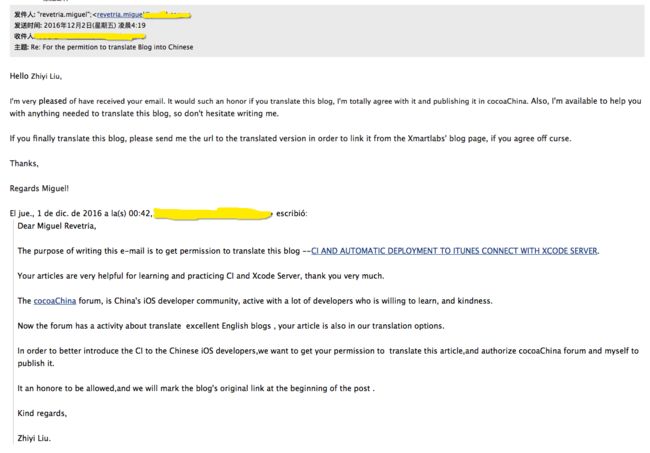
在翻译时已经获得了授权。
原文:CI AND AUTOMATIC DEPLOYMENT TO ITUNES CONNECT WITH XCODE SERVER
作者:Miguel Revetria
译者:本人原创翻译,首发在cocoaChina
