https://blogs.technet.microsoft.com/kevinholman/2013/01/16/scvmm-2012-sp1-quickstart-deployment-guide/
The following document will cover a basic install of System Center Virtual Machine Manager 2012 SP1 at a generic customer. This is to be used as a template only, for a customer to implement as their own pilot or POC deployment guide. It is intended to be general in nature and will require the customer to modify it to suit their specific data and processes.
SVCMM can be scaled to match the customer requirements. This document will cover a two server model, where all SCVMM roles are installed on a single VM/Server, and leverage a remote SQL database server.
This is not an architecture guide or intended to be a design guide in any way.
Windows Server 2012 will be installed as the base OS for all platforms. All servers will be a member of the AD domain.
SQL 2012 will be the base standard for all SQL database services.
Server Names\Roles:
DB1 SQL 2012 Database Services
SCVMM VMM Management Server and Console
High Level Deployment Process:
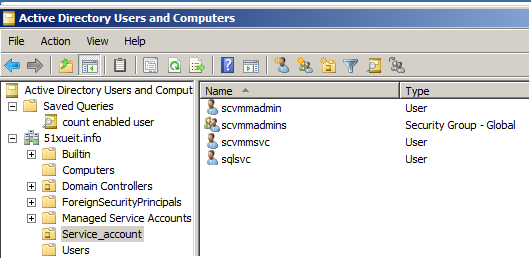
1. In AD, create the following accounts and groups, according to your naming convention:
DOMAIN\scvmmsvc SCVMM Service Account account
DOMAIN\scvmmadmin SCVMM RunAs account for managing hosts
DOMAIN\sqlsvc SQL service account
DOMAIN\SCVMMAdmins SCVMM Administrators security group
2. Add the “scvmmsvc” and “scvmmadmin” account to the “SCVMMAdmins” global group.
3. Add the domain user accounts for yourself and your team to the SCVMMAdmins group.
4. Install Windows Server 2012 to all server role servers.
5. Install Prerequisites and SQL 2012.
6. Install the SCVMM Server and Console.
7. Deploy SCVMM Agent to Hyper-V hosts.
Prerequisites:
1. Install Windows Server 2012 to all servers.
2. Ensure server has a minimum of 4GB of RAM.
3. Join all servers to domain.
4. Install all available Windows Updates.
5. Add the “DOMAIN\SCVMMAdmins” domain global group and the “DOMAIN\scvmmsvc” domain account explicitly to the Local Administrators group on each SCVMM role server.
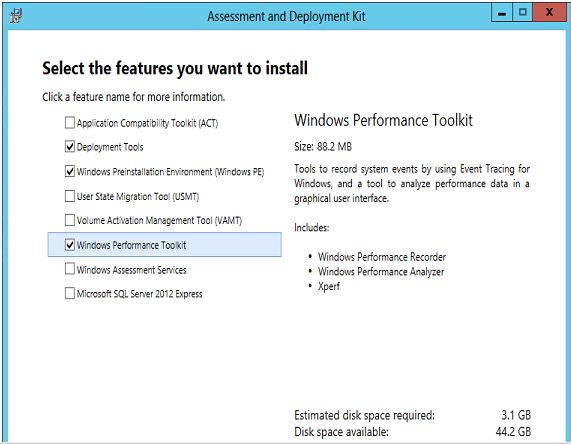
8. On the SCVMM server, install the Windows Assessment and Deployment Kit (ADK) for Windows 8. http://www.microsoft.com/en-us/download/details.aspx?id=30652 When you install this – install only the “Deployment Tools” and “Windows Preinstallation Environment” options. This can take a significant amount of time depending on download speed.
9. On the SCVMM server – install the SQL 2012 Native Client and the SQL 2012 Command Line Utilities from http://go.microsoft.com/fwlink/?LinkId=253555
10. On the SQL database server, install SQL 2012.
Setup is fairly straightforward. This document will not go into details and best practices for SQL configuration. Consult your DBA team to ensure your SQL deployment is configured for best practices according to your corporate standards.
Run setup, choose Installation > New SQL server stand-alone installation…..
When prompted for feature selection, install ALL of the following:
Database Engine Services
Additionally, the product documentation for SCVMM states to install the management tools – complete:
Management Tools – Basic and Complete (for running queries and configuring SQL services)
On the Instance configuration, choose a default instance, or a named instance. Default instances are fine for testing and labs. Production clustered instances of SQL will generally be a named instance. For the purposes of the POC, choose default instance to keep things simple.
On the Server configuration screen, set SQL Server Agent to Automatic. I prefer to use a service account for SQL, so I will set the Agent and DB Engine to run under my DOMAIN\sqlsvc account and provide the password. This is optional.
On the Collation Tab – you can use the default of SQL_Latin1_General_CP1_CI_AS or choose another supported collation.
On the Account provisioning tab – add your personal domain user account or a group you already have set up for SQL admins. Alternatively, you can use the SCVMMAdmins global group here. This will grant more rights than is required to all SCVMM Admin accounts, but is fine for testing purposes of the POC.
On the Data Directories tab – set your drive letters correctly for your SQL databases, logs, TempDB, and backup.
Setup will complete.
Step by step deployment guide:
1. Install SCVMM 2012 SP1:
Log on using your domain user account that is a member of the SCVMMAdmins group.
Run Setup.exe
Click Install
Accept the license agreement and click Next.
Select:
VMM Management Server
VMM Console
On the Product Registration – input a product key for a licensed version, otherwise Eval will be installed with a timeout. Click Next.
Accept or change the default install path and click Next.
If you get any Prerequisite errors – resolve them. If you get any warnings, understand them and click Next to proceed.
On the Database Configuration screen, enter in the name of your SQL database server and leave port blank. You can leave “use the following credentials” blank if you are installing to the local SQL server. You can enter credentials here to connect to a remote SQL server if your user account you are running setup as does not have enough rights over the instance to create a database. One the Instance Name – click the pull-down to select the instance you wish to install to. Ensure “New Database” is checked and use the default name or change it to suit your naming standards. Click Next when this screen is complete.
On the Account Configuration screen, enter the domain account for the SCVMM service account that we created earlier (DOMAIN\scvmmsvc). Leave the default to store encryption keys locally for this simple deployment. Click Next.
On the Port configuration screen, accept defaults and click Next.
On the Library configuration screen, change the library path or accept the default location, and click Next.
Click Install.
Setup will install all roles and complete.
2. Deploy an agent to an existing Hyper-V Host.
Open the System Center Virtual Machine Manager 2012 console.
Connect to the SCVMM server.
In the lower left hand pane of the console – select “Fabric”.
In the folder list – Right click “All Hosts” and choose “Create Host Group”.
Name your custom host group something like “Demo”
Right click the Demo host group and choose “Add Hyper-V hosts and Clusters”
On the Resource Location screen – choose the first bullet for a trusted AD domain computer.
On the Credentials screen, click Browse.
Select “Create Run As Account”
On the General screen, enter a Name of “Hyper-V Host Administration Account”
Input a DOMAIN\username of an AD account that has admin access to your Hyper-V servers. This account will be used to administer the Host and VM guests. For the purposes of the POC, we will use the DOMAIN\scvmmadmin account.
After inputting the password, and accepting the new account, we will return to the Credentials screen with our existing RunAs account shown. Click Next.
Type in the computer names of your Hyper-V servers that you wish to Manage. Ensure that the DOMAIN\SCVMMAdmins global group is a member of the local admins group on all Hyper-V servers so that we can manage them. Click Next.
Select all the discovered Hyper-V servers, and click Next.
Assign the discovered hosts to the “Demo” host group.
Click Next, Finish.
A job will be created to deploy the SCVMM agent to the Hyper-V hosts.
3. Create host groups and clouds
4. Configure WSUS for updates to Hosts
5. Configure Logical Networks
6. Connect with OpsMgr 2012 SP1:
http://technet.microsoft.com/en-us/library/hh427287.aspx

