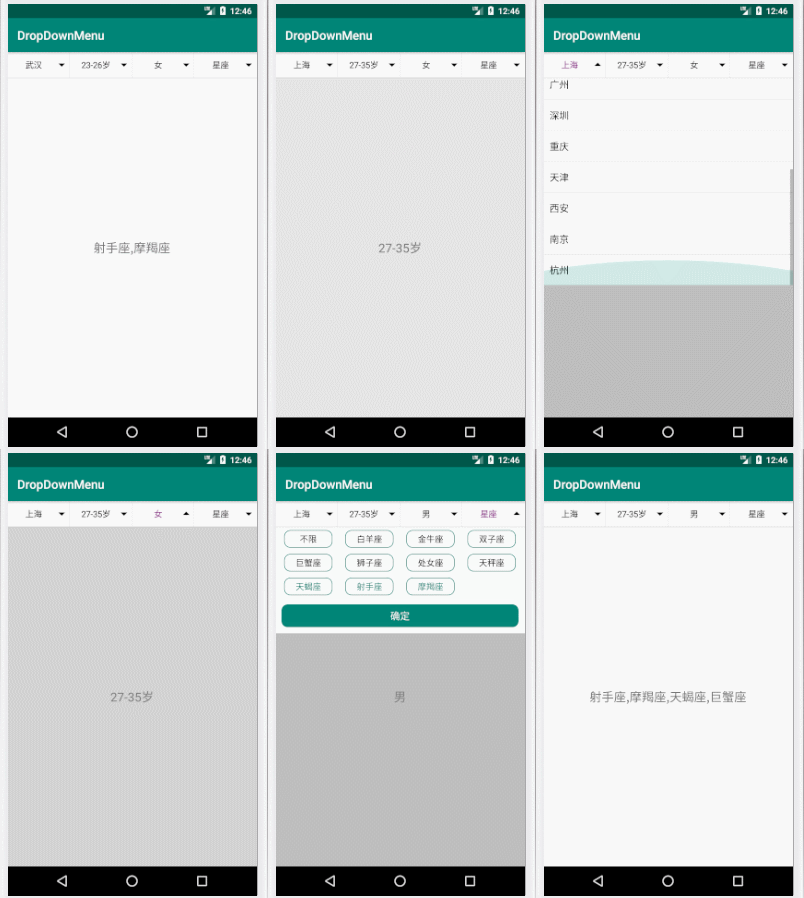
这是一个自定义布局容器实现的下拉菜单效果,看看实现该效果涉及到哪些东西,实现的一个大致流程和思路是啥样的;
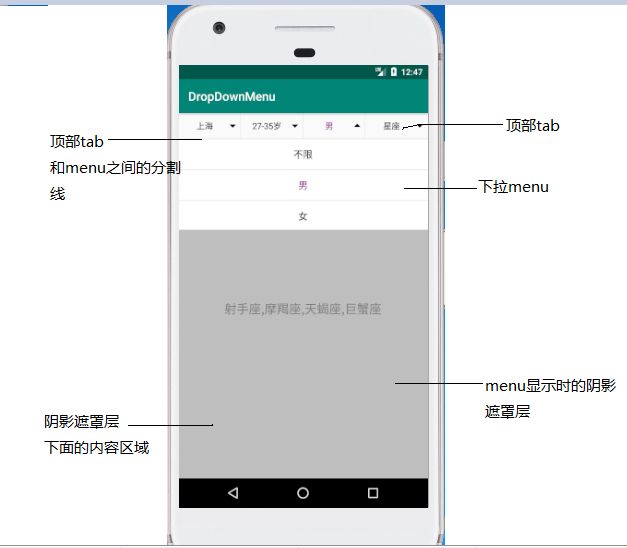
通过上面的示意图大致分为:
1、顶部的tab
2、顶部tab和menu之间的分割线
3、下拉menu
4、menu显示时的阴影遮罩
5、阴影遮罩下面的内容区域
对于下拉menu、menu显示的阴影遮罩、阴影遮罩下面的内容区域可以放到一个FrameLayout容器中,这样就可以把它看成是顶部tab、分割线、FrameLayout依次的上下摆放,在自定义布局容器时可以继承在LinearLayout设置垂直方向显示就ok了;
public class DropDownMenu extends LinearLayout {
    public DropDownMenu(Context context) {
        this(context, null);
    }

    public DropDownMenu(Context context, AttributeSet attrs) {
        this(context, attrs, 0);
    }

    public DropDownMenu(Context context, AttributeSet attrs, int defStyleAttr) {
        super(context, attrs, defStyleAttr);
        setOrientation(VERTICAL);
    }
}
提供了下面这些自定义属性,在xml布局中可以通过其来设置显示效果;
//下滑分割线的颜色
  /**
     * 初始化自定义属性
     *
     * @param context
     * @param attrs
     */
    private void initAttrs(Context context, AttributeSet attrs) {
        TypedArray array = context.obtainStyledAttributes(attrs, R.styleable.DropDownMenu);
        mUnderlineColor = array.getColor(R.styleable.DropDownMenu_underlineColor, mUnderlineColor);
        mDividerColor = array.getColor(R.styleable.DropDownMenu_dividerColor, mDividerColor);
        mTextSelectColor = array.getColor(R.styleable.DropDownMenu_textSelectColor, mTextSelectColor);
        mTextUnSelectColor = array.getColor(R.styleable.DropDownMenu_textUnSelectColor, mTextUnSelectColor);
        mMenuBackgroundColor = array.getColor(R.styleable.DropDownMenu_menuBackgroundColor, mMenuBackgroundColor);
        mMaskColor = array.getColor(R.styleable.DropDownMenu_maskColor, mMaskColor);
        mMenuTextSize = array.getDimensionPixelSize(R.styleable.DropDownMenu_menuTextSize, mMenuTextSize);
        mMenuSelectIcon = array.getResourceId(R.styleable.DropDownMenu_menuSelectIcon, mMenuSelectIcon);
        mMenuUnSelectIcon = array.getResourceId(R.styleable.DropDownMenu_menuUnSelectIcon, mMenuUnSelectIcon);
        mUnderlineHeight = array.getDimension(R.styleable.DropDownMenu_underlineHeight, dip2px(mUnderlineHeight));
        mDividerShow = array.getBoolean(R.styleable.DropDownMenu_dividerShow, mDividerShow);
        array.recycle();
    }
根据上面的分析,自定义好布局容器后,在构造方法中先将tab容器、下滑分割线、FrameLayout容器创建好并添加到自定布局容器中;
private void initViews(Context context) {
        //创建顶部tab
        tabMenuView = new LinearLayout(context);
        FrameLayout.LayoutParams tabLp = new FrameLayout.LayoutParams(LayoutParams.MATCH_PARENT, LayoutParams.WRAP_CONTENT);
        tabMenuView.setOrientation(HORIZONTAL);
        tabMenuView.setLayoutParams(tabLp);
        addView(tabMenuView, 0);
        //创建水平下滑线
        View underlineView = new View(context);
        FrameLayout.LayoutParams lineLp = new FrameLayout.LayoutParams(LayoutParams.MATCH_PARENT, (int) mUnderlineHeight);
        underlineView.setBackgroundColor(mUnderlineColor);
        underlineView.setLayoutParams(lineLp);
        addView(underlineView, 1);

        //初始化containerView
        containerView = new FrameLayout(context);
        FrameLayout.LayoutParams contentLp = new FrameLayout.LayoutParams(LayoutParams.MATCH_PARENT, LayoutParams.MATCH_PARENT);
        containerView.setLayoutParams(contentLp);
        addView(containerView, 2);
    }
创建并添加好后,就只剩下tab容器中显示的文字、分割线、menu、阴影遮罩、内容区域,而这些需要根据tab显示的数量来进行创建,通过setDropDownMenu方法来进行创建和设置,该方法需要出入一个tab显示的集合、menu对应的view集合、内容区域显示的view,根据传入的参数先来创建顶部tab;
/**
     * 添加顶部tab
     *
     * @param tabTextList
     * @param index
     */
    private void addTab(List tabTextList, int index) {
        final TextView tabTextView = new TextView(getContext());
        tabTextView.setSingleLine();
        tabTextView.setEllipsize(TextUtils.TruncateAt.END);
        tabTextView.setGravity(Gravity.CENTER);
        tabTextView.setTextSize(TypedValue.COMPLEX_UNIT_SP, mMenuTextSize);
        tabTextView.setLayoutParams(new LinearLayout.LayoutParams(0, LayoutParams.WRAP_CONTENT, 1));
        tabTextView.setTextColor(mTextUnSelectColor);
        tabTextView.setCompoundDrawablesWithIntrinsicBounds(null, null, getResources().getDrawable(mMenuUnSelectIcon), null);
        tabTextView.setText(tabTextList.get(index));
        tabTextView.setPadding(dip2px(5f), dip2px(12f), dip2px(5f), dip2px(12f));
        //设置点击事件
        tabTextView.setOnClickListener(new OnClickListener() {
            @Override
            public void onClick(View v) {
                if(mDividerShow){
                    switchTabContainLineMenu(tabTextView);
                }else{
                    switchTabMenu(tabTextView);
                }
            }
        });
        tabMenuView.addView(tabTextView);
        if(mDividerShow){
            //添加分割线
            if (index < tabTextList.size() - 1) {
                View underlineView = new View(getContext());
                LinearLayout.LayoutParams lineLp = new LinearLayout.LayoutParams(dip2px(0.5f), LayoutParams.MATCH_PARENT);
                underlineView.setBackgroundColor(mDividerColor);
                underlineView.setLayoutParams(lineLp);
                tabMenuView.addView(underlineView);
            }
        }
    }
tab中间分割线的创建需要根据mDividerShow的值来进行创建,内容区域比较简单,将传入的内容区域的view添加到初始化创建好的FrameLayout中就可以了;
containerView.addView(contentView, 0);
接着添加遮罩层;
       //添加遮罩层
        maskView = new View(getContext());
        maskView.setLayoutParams(new FrameLayout.LayoutParams(FrameLayout.LayoutParams.MATCH_PARENT, FrameLayout.LayoutParams.MATCH_PARENT));
        maskView.setBackgroundColor(mMaskColor);
        maskView.setOnClickListener(new OnClickListener() {
            @Override
            public void onClick(View v) {
                closeMenu();
            }
        });
        maskView.setVisibility(View.GONE);
        containerView.addView(maskView, 1);
一进入页面遮罩层以及后面的menu肯定是隐藏不可见的,
        //添加内容view
        popupMenuViews = new FrameLayout(getContext());
        popupMenuViews.setVisibility(View.GONE);
        for (int i = 0; i < popuViews.size(); i++) {
            final View view = popuViews.get(i);
            view.setBackgroundColor(Color.WHITE);
            if (recyclerViewHeight != 0) {
                view.setLayoutParams(new FrameLayout.LayoutParams(LayoutParams.MATCH_PARENT, recyclerViewHeight));
            } else {
                int totalHeight = getTotalHeight(view);
                if (totalHeight != 0) {
                    view.setLayoutParams(new FrameLayout.LayoutParams(LayoutParams.MATCH_PARENT, totalHeight));
                } else {
                    view.setLayoutParams(new FrameLayout.LayoutParams(LayoutParams.MATCH_PARENT, LayoutParams.WRAP_CONTENT));
                }
            }
            popupMenuViews.addView(popuViews.get(i), i);
        }
        containerView.addView(popupMenuViews, 2);
在创建menu设置其显示的高度时,根据对应的view来设置其显示的高度,如果是ListView或者GridView就会调用getTotalHeight()方法去计算所有item的高度如果大于当前屏幕的1/2就显示屏幕的1/2滑动滚动显示;
/**
     * 如果是listview或者gridview 获取它们所有子条目的总高度
     *
     *
     * @param view
     * @return
     */
    private int getTotalHeight(View view) {
        int result = 0;
        if (view instanceof AbsListView) {
            //如果是listview或者gridview 获取它们所有子条目的总高度
            AbsListView listView = (AbsListView) view;
            ListAdapter adapter = listView.getAdapter();
            if (adapter == null) {
                return result;
            }
            int count = adapter.getCount();
            for (int j = 0; j < count; j++) {
                View listItem = adapter.getView(j, null, listView);
                listItem.measure(0, 0);
                int measuredHeight = listItem.getMeasuredHeight();
                result += measuredHeight;
            }
        }
        if (result > getScreenHeight() / 2) {
            //高度超过屏幕高度一半,设置高度为屏幕高度的一半
            result = getScreenHeight() / 2;
        }
        Log.e("TAG", "result--->" + result);
        return result;
    }
如果是RecyclerView的话就调用setRecyclerViewHeight()方法,不过要在setDropDownMenu()方法之前调用,将获取到的所有item高度传入,
/**
     * 如果列表用的recyclerView 通过该方法设置它显示的高度
     * 具体的测量在recyclerView设置setLayoutManager是重写onMeasure方法
     * 如果超过屏幕高度的1/2,显示屏幕高度的1/2 如果没有就正常显示
     * 该方法的调用要在setDropDownMenu()方法前调用
     *
     * @param height
     */
    public void setRecyclerViewHeight(int height) {
        if (height > getScreenHeight() / 2) {
            this.recyclerViewHeight = getScreenHeight() / 2;
        } else {
            this.recyclerViewHeight = height;
        }
    }
这时顶部tab、下滑分割线、menu、遮罩层、内容区域等就都创建并添加完毕了,剩下的就是点击顶部tab item时menu的显示、切换、点击menu时menu的隐藏等;在创建tab item时就已经给每个item添加了对应的点击事件了;
//设置点击事件
        tabTextView.setOnClickListener(new OnClickListener() {
            @Override
            public void onClick(View v) {
                if(mDividerShow){
                    switchTabContainLineMenu(tabTextView);
                }else{
                    switchTabMenu(tabTextView);
                }
            }
        });
这里是根据mDividerShow的值也就是顶部tab 分割线是否显示来处理的,先看下有分割线的处理;
/**
     * 切换菜单
     * 顶部tab栏中间有分割线
     * @param tragetView
     */
    private void switchTabContainLineMenu(TextView tragetView) {
        int childCount = tabMenuView.getChildCount();
        for (int i = 0; i < childCount; i = i + 2) {
            //i = i + 2 原因是顶部tab 中间加了分割线 如果没有分割线还是正常的i++
            if (tragetView == tabMenuView.getChildAt(i)) {
                if (currentTabPosition == i) {
                    //关闭菜单
                    closeMenu();
                } else {
                    //弹出菜单
                    if (currentTabPosition == -1) {
                        //初始状况
                        popupMenuViews.setVisibility(View.VISIBLE);
                        popupMenuViews.setAnimation(AnimationUtils.loadAnimation(getContext(), R.anim.dd_menu_in));
                        maskView.setVisibility(View.VISIBLE);
                        maskView.setAnimation(AnimationUtils.loadAnimation(getContext(), R.anim.dd_mask_in));
                        //i / 2的原因是顶部tab中加了分割线 如果没有分割线就直接是i
                        popupMenuViews.getChildAt(i / 2).setVisibility(View.VISIBLE);
                    } else {
                        popupMenuViews.getChildAt(i / 2).setVisibility(View.VISIBLE);
                    }
                    currentTabPosition = i;
                    TextView childAt = (TextView) tabMenuView.getChildAt(i);
                    childAt.setTextColor(mTextSelectColor);
                    childAt.setCompoundDrawablesWithIntrinsicBounds(null, null, getResources().getDrawable(mMenuSelectIcon), null);
                }
            } else {
                TextView childAt = (TextView) tabMenuView.getChildAt(i);
                childAt.setTextColor(mTextUnSelectColor);
                childAt.setCompoundDrawablesWithIntrinsicBounds(null, null, getResources().getDrawable(mMenuUnSelectIcon), null);
                popupMenuViews.getChildAt(i / 2).setVisibility(View.GONE);
            }
        }
    }
如果有中间分割线的话,在进行循环遍历是i的自增为2,menu通过getChildAt获取子view时就是i/2,如果没有显示中间分割线,遍历循环时就不用做这些处理,直接通过当前i就可以了;
/**
     * 切换菜单
     * 顶部tab栏中间没有分割线
     * @param tragetView
     */
    private void switchTabMenu(TextView tragetView){
        int childCount = tabMenuView.getChildCount();
        for (int i = 0; i < childCount; i++) {
            //i = i + 2 原因是顶部tab 中间加了分割线 如果没有分割线还是正常的i++
            if (tragetView == tabMenuView.getChildAt(i)) {
                if (currentTabPosition == i) {
                    //关闭菜单
                    closeMenu();
                } else {
                    //弹出菜单
                    if (currentTabPosition == -1) {
                        //初始状况
                        popupMenuViews.setVisibility(View.VISIBLE);
                        popupMenuViews.setAnimation(AnimationUtils.loadAnimation(getContext(), R.anim.dd_menu_in));
                        maskView.setVisibility(View.VISIBLE);
                        maskView.setAnimation(AnimationUtils.loadAnimation(getContext(), R.anim.dd_mask_in));
                        //i / 2的原因是顶部tab中加了分割线 如果没有分割线就直接是i
                        popupMenuViews.getChildAt(i).setVisibility(View.VISIBLE);
                    } else {
                        popupMenuViews.getChildAt(i).setVisibility(View.VISIBLE);
                    }
                    currentTabPosition = i;
                    TextView childAt = (TextView) tabMenuView.getChildAt(i);
                    childAt.setTextColor(mTextSelectColor);
                    childAt.setCompoundDrawablesWithIntrinsicBounds(null, null, getResources().getDrawable(mMenuSelectIcon), null);
                }
            } else {
                TextView childAt = (TextView) tabMenuView.getChildAt(i);
                childAt.setTextColor(mTextUnSelectColor);
                childAt.setCompoundDrawablesWithIntrinsicBounds(null, null, getResources().getDrawable(mMenuUnSelectIcon), null);
                popupMenuViews.getChildAt(i).setVisibility(View.GONE);
            }
        }
    }
通过currentTabPosition成员变量来判断打开、关闭、切换的逻辑,如果currentTabPosition为-1的,也就是回到了初始状态就是重新打开,将选中的menu、遮罩层显示出并添加一些动画效果,其他的则隐藏;如果currentTabPosition不为-1,并且和当前选中的i不相等代表的就是切换菜单操作,遮罩层继续显示不用处理,将选中的menu显示,其他则隐藏;
如果currentTabPosition不为-1,且currentTabPosition和当前选中的i一致,就要将选中的menu进行关闭并隐藏遮罩层;
/**
     * 关闭菜单
     */
    public void closeMenu() {
        if (currentTabPosition != -1) {
            TextView childAt = (TextView) tabMenuView.getChildAt(currentTabPosition);
            childAt.setTextColor(mTextUnSelectColor);
            childAt.setCompoundDrawablesWithIntrinsicBounds(null, null, getResources().getDrawable(mMenuUnSelectIcon), null);
            popupMenuViews.setVisibility(View.GONE);
            popupMenuViews.setAnimation(AnimationUtils.loadAnimation(getContext(), R.anim.dd_menu_out));
            maskView.setVisibility(View.GONE);
            maskView.setAnimation(AnimationUtils.loadAnimation(getContext(), R.anim.dd_mask_out));
            currentTabPosition = -1;
        }
    }
显示、切换、关闭menu就实现了,在布局文件中使用看下;
public class MainActivity extends AppCompatActivity {
    private List tabTextList = Arrays.asList("城市", "年龄", "性别", "星座");
    private DropDownMenu dropDownMenu;
    private List popupsView = new ArrayList<>();
    private String[] citys = {"不限", "武汉", "北京", "上海", "成都", "广州", "深圳", "重庆", "天津", "西安", "南京", "杭州"};
    private String[] ages = {"不限", "18岁以下", "18-22岁", "23-26岁", "27-35岁", "35岁以上"};
    private String[] sexs = {"不限", "男", "女"};
    private String[] constellations = {"不限", "白羊座", "金牛座", "双子座", "巨蟹座", "狮子座", "处女座", "天秤座", "天蝎座", "射手座", "摩羯座"};
    private CityAdapter cityAdapter;
    private SexAdapter sexAdapter, ageAdapter;
    private GridDropDownAdapter dropDownAdapter;
    private TextView tvContent;
    private List constellationSelect;

    @Override
    protected void onCreate(Bundle savedInstanceState) {
        super.onCreate(savedInstanceState);
        setContentView(R.layout.activity_main);
        dropDownMenu = findViewById(R.id.drop_down_view);
        constellationSelect = new ArrayList<>();
        initViews();
        View contentView = getLayoutInflater().inflate(R.layout.content_layout, null);
        //设置dropDownMenu
        dropDownMenu.setDropDownMenu(tabTextList, popupsView, contentView);
        tvContent = contentView.findViewById(R.id.tv_content);
        tvContent.setText("内容布局");
    }

    private void initViews() {
        ListView lvCity = new ListView(this);
        cityAdapter = new CityAdapter(this, Arrays.asList(citys));
        lvCity.setAdapter(cityAdapter);
        lvCity.setOnItemClickListener(new AdapterView.OnItemClickListener() {
            @Override
            public void onItemClick(AdapterView parent, View view, int position, long id) {
                cityAdapter.setSelectPostion(position);
                String select = position == 0 ? "城市" : citys[position];
                tvContent.setText(select);
                //根据选中设置tab文字
                dropDownMenu.setTabText(select);
                //关闭menu
                dropDownMenu.closeMenu();
            }
        });

        ListView ageListView = new ListView(this);
        ageAdapter = new SexAdapter(Arrays.asList(ages), this);
        ageListView.setAdapter(ageAdapter);
        ageListView.setOnItemClickListener(new AdapterView.OnItemClickListener() {
            @Override
            public void onItemClick(AdapterView parent, View view, int position, long id) {
                ageAdapter.setSelectPostion(position);
                String select = position == 0 ? "年龄" : ages[position];
                tvContent.setText(select);
                dropDownMenu.setTabText(select);
                dropDownMenu.closeMenu();
            }
        });

        ListView sexListView = new ListView(this);
        sexAdapter = new SexAdapter(Arrays.asList(sexs), this);
        sexListView.setAdapter(sexAdapter);
        sexListView.setOnItemClickListener(new AdapterView.OnItemClickListener() {
            @Override
            public void onItemClick(AdapterView parent, View view, int position, long id) {
                sexAdapter.setSelectPostion(position);
                String select = position == 0 ? "性别" : sexs[position];
                tvContent.setText(select);
                dropDownMenu.setTabText(select);
                dropDownMenu.closeMenu();
            }
        });

        View constellationView = getLayoutInflater().inflate(R.layout.layout_constellation, null);
        GridView gridView = constellationView.findViewById(R.id.constellation);
        dropDownAdapter = new GridDropDownAdapter(this, Arrays.asList(constellations));
        gridView.setAdapter(dropDownAdapter);
        TextView tvOk = constellationView.findViewById(R.id.tv_ok);
        tvOk.setOnClickListener(new View.OnClickListener() {
            @Override
            public void onClick(View v) {
                if (constellationSelect.size() == 0) {
                    dropDownMenu.closeMenu();
                    return;
                }
                StringBuilder sb = new StringBuilder();
                for (int i = 0; i < constellationSelect.size(); i++) {
                    String s = constellationSelect.get(i);
                    if (!s.equals("不限")) {
                        if (i == constellationSelect.size() - 1) {
                            sb.append(s);
                        } else {
                            sb.append(s).append(",");
                        }
                    }
                }
                tvContent.setText(sb.toString());
                dropDownMenu.closeMenu();
            }
        });
        gridView.setOnItemClickListener(new AdapterView.OnItemClickListener() {
            @Override
            public void onItemClick(AdapterView parent, View view, int position, long id) {
                String result = constellations[position];
                if (result.equals("不限")) {
                    constellationSelect.clear();
                } else {
                    if (constellationSelect.contains(result)) {
                        constellationSelect.remove(result);
                    } else {
                        constellationSelect.add(result);
                    }
                }
                dropDownAdapter.setSelectList(constellationSelect);
            }
        });
        popupsView.add(lvCity);
        popupsView.add(ageListView);
        popupsView.add(sexListView);
        popupsView.add(constellationView);
    }

    @Override
    public void onBackPressed() {
        if (dropDownMenu != null && dropDownMenu.isShowing()) {
            //显示就关闭
            dropDownMenu.closeMenu();
        } else {
            super.onBackPressed();
        }
    }
}
这样大致效果就实现了。
源码

