关注 同名 公众号【程序职场】,专注于 Spring Boot+微服务,小程序,flutter,Android,定期文章和视频教程分享,关注后回复 Java资料 ,领取为你精心准备的 学习 干货!
大家好,我是“追梦蜗牛”,大家可以在公众号后台回复 “Java资料”获得技能提升的资料,绝对是干货。
另有:每月有送书活动,关注公众号 后台回复 送书 就有机会获得好书。
前言
(一).Spring Boot的端口配置
(二). 使用XML配置
(三). 命令行参数配置
(四). 常规属性配置
(五). 类型安全的配置(基于properties)
(六). 日志配置
(七). Profile配置
(一). Spring Boot 的端口配置
Spring boot使用一个全局的配置文件,application.properties或者application.yml放置在src/main/resources目录或者类路径的/config下。
SpringBoot不仅支持常规的properties配置文件,还支持yaml语言的配置文件,yaml是以数据为中心的语言,在配置数据的时候具有面向对象的特征。
application.properties是比较常见的配置文件,SpringBoot的全局配置文件的作用是对一些默认配置的配置值进行修改。
下面我们以 默认端口和默认访问路径为例:我们将Tomcat的默认端口8080修改成8081,并将默认的访问路径 “/hello”修改为“/springboot/hello”
1. 在配置文件application.properties中添加配置信息
server.port=8081server.servlet.context-path=/springboot
2,或者在配置文件application.yml中添加
server: port:8081contextPath:/springboot
上面说明了两种配置信息的添加,我们以第一种application.properties配置来讲解 调整后的运行结果如下:
(二). 使用XML配置
SpringBoot提倡零配置,就是说不要xml配置,但是在项目开发中,我们会遇到一些特殊要求下必须通过配置xml方式来实现,这样你不得不添加xml配置,我们可以通过Spring提供的@ImportResource来加载xml配置
实例如下:
@ImportResource({"classpath:some-context.xml","classpath:another-context.xml"})
(三). 命令行参数配置
SpringBoot可以是基于jar包和war包运行的,打成jar包的程序可以直接通过命令行运行:
java-jarxxx.jar
当然更方便的是可以通过命令行修改Tomcat的端口:
java-jar xxx.jar --server.port=8081
至此你的运行端口可以任由你来改动。
(四). 常规属性配置
在常规的Spring环境下,注入properties文件里的值的方式,通过@PropertySource指明properties文件的位置,然后通过@Value注入值,但是在SpringBoot中就简单多了,只需要我们在application.properties文件中定义属性,直接使用@Value注入就可以了。
1.application.properties中添加属性
game.enterprise=腾讯game.name=斗地主game.taste=true
2. 在接口类中通过@Value直接注入
@Value("${game.enterprise}")privateString gameEnterprise;@Value("${game.name}")privateString gameName;@Value("${game.taste}")privateString taste;
3. 修改接口调用函数 Test
@GetMapping(value ="/hello",produces ="text/plain;charset=UTF-8")//RequestMapping ,GetMapping是一个用来处理请求地址映射的注解,可用于类或方法上publicString Test(){return"SpringBoot 第一个项目,单独一个控制类中添加--游戏公司:"+gameEnterprise+"---游戏名称:"+gameName+"---是否感兴趣:"+taste; }
完整代码如下:
packageorg.cxzc.myyoung.springboot_2;importorg.springframework.beans.factory.annotation.Value;importorg.springframework.web.bind.annotation.GetMapping;importorg.springframework.web.bind.annotation.RestController;// @RestController等于@Controller,@ResponseBody两个注解,注解为止在controller类上,相当于整个类中所有方法的返回值都为json字符串//如果只是使用@RestController注解Controller,则Controller中的方法无法返回jsp页面,或者html,配置的视图解析器// InternalResourceViewResolver不起作用,返回的内容就是Return 里的内容。@RestControllerpublicclassHelloController{@Value("${game.enterprise}")privateString gameEnterprise;@Value("${game.name}")privateString gameName;@Value("${game.taste}")privateString taste;@GetMapping(value ="/hello",produces ="text/plain;charset=UTF-8")//RequestMapping ,GetMapping是一个用来处理请求地址映射的注解,可用于类或方法上publicString Test(){return"SpringBoot 第一个项目,单独一个控制类中添加--游戏公司:"+gameEnterprise+"---游戏名称:"+gameName+"---是否感兴趣:"+taste; }}
4. 浏览器访问,获取注入信息
有些小伙伴在配置文件中添加的是中文,或者输出信息也是中文,这样就牵涉到两个地方的乱码问题
1, 输出信息乱码,我们在页面显示的时候需要中文说明,这样就会出现乱码问题,如下:
publicStringTest(){return"SpringBoot 第一个项目,单独一个控制类中添加--游戏公司:"+gameEnterprise+"---游戏名称:"+gameName+"---是否感兴趣:"+taste; }
解决办法:
请求接口注解中添加字符格式
@GetMapping(value="/hello",produces ="text/plain;charset=UTF-8")
2,application.properties配置文件中设置中文,浏览器访问出现乱码,如下
game.enterprise=腾讯game.name=斗地主game.taste=true
解决办法:在配置文件application.properties中添加属性
server.tomcat.uri-encoding=UTF-8spring.http.encoding.charset=UTF-8spring.http.encoding.enabled=truespring.http.encoding.force=truespring.messages.encoding=UTF-8
然后 在IntelliJ IDEA中依次点击File -> Settings -> Editor -> File Encodings
将Properties Files (*.properties)下的Default encoding for properties files设置为UTF-8,将Transparent native-to-ascii conversion前的勾选上。
如下图 :
到此常规属性配置 小伙伴们应该都会了,是不是很有成就感......
(五). 类型安全的配置(基于properties)
上面使用@Value注入每个配置在实际项目开发中肯定是非常麻烦的,毕竟我们的配置一般都是多个的,若使用上面的方式就需要我们使用@Value注入很多次。
当然这种情况SpringBoot也考虑到了,同时提供了基于类型安全的配置方式,通过@ConfigurationProperties 将preporties属性和一个Bean及其属性关联,来实现类型安全的配置。
实例如下:
1.在src/main/resources文件夹下创建文件eat.properties文件 ,添加属性值
2. 创建类型 安全的Bean,并注入properties文件中的值,代码如下:
packageorg.cxzc.myyoung.springboot_2;importorg.springframework.boot.context.properties.ConfigurationProperties;importorg.springframework.context.annotation.PropertySource;importorg.springframework.stereotype.Component;/***@Auther追梦蜗牛*@ABOUT公众号 程序职场*@CONTENT描述信息 */@Component@ConfigurationProperties(prefix ="eat")@PropertySource("classpath:eat.properties")publicclassEatFood{privateString eatName;privateinteatprice;publicStringgetEatName(){returneatName; }publicvoidsetEatName(String eatName){this.eatName = eatName; }publicintgetEatprice(){returneatprice; }publicvoidsetEatprice(inteatprice){this.eatprice = eatprice; }}
代码解释:
1. 通过@ConfigurationProperties(prefix = "eat") 加载properties文件内的配置,通过 prefix属性指定properties的配置的前缀,通过@PropertySource 指定文件的位置(1.4之前是通过 location指定properties的文件位置)
3. 在接口控制类中通过@Autowired注入该配置中的Bean
@Autowired private EatFood eatFood;
4. 添加路径映射
@GetMapping(value ="/prope",produces ="text/plain;charset=UTF-8")publicString Test2(){return"喜欢吃什么:"+eatFood.getEatName()+"---价格是多少:"+eatFood.getEatprice(); }
代码如下:
packageorg.cxzc.myyoung.springboot_2;importorg.springframework.beans.factory.annotation.Autowired;importorg.springframework.beans.factory.annotation.Value;importorg.springframework.web.bind.annotation.GetMapping;importorg.springframework.web.bind.annotation.RestController;// @RestController等于@Controller,@ResponseBody两个注解,注解为止在controller类上,相当于整个类中所有方法的返回值都为json字符串//如果只是使用@RestController注解Controller,则Controller中的方法无法返回jsp页面,或者html,配置的视图解析器// InternalResourceViewResolver不起作用,返回的内容就是Return 里的内容。@RestControllerpublicclassHelloController{@AutowiredprivateEatFood eatFood;@GetMapping(value ="/prope",produces ="text/plain;charset=UTF-8")publicString Test2(){return"喜欢吃什么:"+eatFood.getEatName()+"---价格是多少:"+eatFood.getEatprice(); }}
5.运行结果
(六). 日志配置
SpringBoot 支持JavaUtil Logging,Log4j,Log4j2,和Logback作为日志框架,无论使用哪种日志框架,SpringBoot都为使用日志框架的控制台输出及其文件输出做好了配置。
默认情况下,SpringBoot使用LogBack作为日志框架。
1. 配置日志文件
logging.file=d:/log/log.log
2. 配置日志级别(格式:logging.level.包名=级别)
logging.level.org.springframework.web=debug
完整配置:
logging.file=d:/log/log.loglogging.level.org.springframework.web=debug
配置完日志配置后,启动项目,会在配置路径看到对应的日志文件。
(七). Profile配置
Profile是 SpringBoot 用来针对不同的环境对应不同的配置提供支持的,全局Profile配置使用application-{profile}.properties,例如:application-dev.properties
通过在application.properties中设置 spring.profiles.active=prod来指定使用哪个配置。
我们以开发环境和正式环境的配置为例:
1,
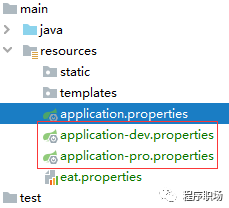
在src/main/resources文件夹下定义不同环境下的Profile配置文件,文件名分别为application-pro.properties和application-dev.properties,这两个前者表示生产环境下的配置,后者表示开发环境下的配置,如下:
我们分别再两个不同的文件中添加,启动的端口,
1,application-pro.properties下配置端口 为8082server.port=80822,application-dev.properties下配置端口为8081server.port=8081
在application.properties 文件中进行配置 。
spring.profiles.active=dev
运行结果:
默认我们使用 dev的配置运行项目:
如果想换为生产环境,只需要把spring.profiles.active=dev改为spring.profiles.active=pro即可,这时候访问端口这是也变为8082了,如下:
本案例下载地址:
https://github.com/ProceduralZC/itcxzc/tree/master/springboot_2
关注 同名 公众号【程序职场】,专注于 Spring Boot+微服务,小程序,flutter,Android,定期文章和视频教程分享,关注后回复 Java资料 ,领取为你精心准备的 学习 干货!
重要的事情说三遍:
每月有送书活动,关注公众号 后台回复 送书 就有机会获得好书。
每月有送书活动,关注公众号 后台回复 送书 就有机会获得好书。
每月有送书活动,关注公众号 后台回复 送书 就有机会获得好书。


